New Table Interface
When you
create a new table (see
Create a Table), a New Table document is opened in the
tabbed MDI (see
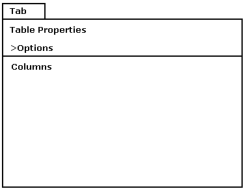
Multiple Document Interface). It consists of the following elements and areas:
• A standard tab for an MDI document
• Table Properties area to define table-level properties
• An expandable Options area where you specify table options
• A Columns grid where you create and define columns
The title of the document is initially [new table]. When you specify a name for the table, it is displayed in the tab title. After you modify any field in the document, an asterisk is displayed after the name, indicating that the document has
unsaved changes (see
Save an Unsaved Document). After saving the table, the asterisk disappears.
Table Properties
You can assign the following table-level properties:
Name
Specifies the name for the table. There is no default for a table name. You must enter a valid Ingres table name. For more information, see
Object Naming Rules.
Director performs basic validation on the table name, checking that you have supplied a valid object name. The DBMS performs complete validation checks—such as checking for duplicate table names—when you save the table.
Structure
Specifies the structure to use for the table. The default is the default structure type for an Ingres installation. Ingres allows the following structure types:
Heap
Non-keyed storage structure with sequential data entry and access
Hash
Keyed storage structure with algorithmically chosen addresses based on key data values
ISAM
Keyed storage structure in which data is sorted by values in key columns for fast access. The index is static and needs remodification as the table grows.
B-Tree
Keyed storage structure in which data is sorted by values in key columns, but the index is dynamic and grows as the table grows
X100
Stores data in columns. Puts as few columns as possible in one disk block (in most cases only one).
X100_ROW
Stores data in rows. Puts as many columns as possible in one disk block.
In one block, values are still kept in compressed vectors. Potentially, all columns in a row can be stored in a disk block. This type is useful for small tables, especially those with a large number of columns; it saves disk space and disk cache memory.
Options
Lets you specify the following options for the new table:
Journaling?
Specifies whether the table is created with journaling turned on. If selected, journaling begins at the next checkpoint.
Duplicates?
Specifies whether duplicate rows can be added to the table. If a table allows duplicates, duplicate rows can always be inserted. If a table does not allow duplicates:
• Duplicate rows can be added if the table uses a heap storage structure.
• Single row inserts (insert . . . values) are silently discarded if a duplicate row occurs on a keyed structure.
• Multiple row inserts (insert . . . select) generate an error if a duplicate row occurs on a keyed structure. The entire statement is rolled back.
• When a table is modified from a heap structure to a keyed structure, duplicates are eliminated.
Page Size
Specifies the size of the default storage block for the table. For more information about page size, see Page Size Specification in the Ingres Database Administrator Guide.
Specify locations
Specifies whether additional locations can be specified for the table
Partition the table
Select Locations Dialog
The Select Locations dialog lets you select from a list of existing DATA locations where an entire table or individual columns will be stored. This dialog contains the following fields:
Locations
Lists each DATA location as a checkbox. Select each location you want to specify.
OK
Saves your selected locations and closes the dialog.
Cancel
Closes the dialog without saving any changes.
For more information, see Specify Locations.
Partition Specification Dialog
The Partition Specifications dialog lets you configure individual partitions. This dialog contains the following fields:
Number of partitions
Lets you specify the number of partitions for the table.
Default: 1
Override default names?
Lets you specify whether you want to override the default partition names (part1, part2, and so on). If selected, the Names grid appears. Edit each field in the Name column to assign a new name for the partition.
Specify location
Lets you specify whether you want to select a location for each of the partitions. If selected, a locations drop-down appears; select a DATA location for the partition.
OK
Saves your specified partitions and closes the dialog.
Cancel
Closes the dialog without saving any changes.
For more information, see
Specify Locations.
Column Operations
You can configure the following column properties in the grid:
• Column name
• Data type
• Nullability
• Default value
• Uniqueness
• Partitioning
For more information, see
Configuring Columns.
When you first create a new table, the columns grid contains an empty row. To specify a column, you add a row by right-clicking on or below this row and selecting Insert Column from the context menu.
You activate an existing row in the columns grid by clicking anywhere on the row, including the margin. The currently active row in the grid is indicated by a triangle glyph at the beginning of the row.
When you click in a row, the following rules apply:
• If you click the margin for a row, it selects the row.
• If you click a cell, that cell is selected and becomes editable.
• If you click on the Allow Nulls checkbox, the cell is selected and the check state is toggled.
Selecting multiple rows is possible according to operating system conventions. Selecting multiple rows lets you perform the same operation on multiple columns, for example, deleting them using the Delete Column command on the context menu. Options available are listed in Context Menus for New Table Rows.
Configuring Columns
You can configure the following properties for columns in the columns grid of a new table document:
Column Name
Specifies the name of the column
Data Type
Specifies a data type for the column. You can select a value from the drop-down list or enter the value manually. When manually entering a data type, auto-complete functionality attempts to fill in the name of the data type based on the predefined items in the drop-down list.
The drop-down list contains all available data types for the table, listed in alphabetical order. Available data types depend on the selected structure of the table; for example, Actian Vector does not allow BLOB data types, so they are not available for that table structure.
All data types that require a length have a default length when displayed in the drop-down list and furnished with auto-complete. You may change the default length value manually.
Default: varchar(10)
Allow Nulls?
Specifies whether the column is nullable
Default: do not allow nulls
Default? and Default Value
Specifies whether the column has a default value, and what that value is. The Default Value field becomes editable only when the Default option is checked.
Unique?
When checked, ensures that no two rows have the same value in a particular column or set of columns
Default: unchecked
Partition
If partitioning is enabled for the table, this checkbox is available. Select it if you wish to partition on the column. For more information, see
Partition the Table.
Cells in the grid are validated when the cell loses focus, ensuring that you have entered correct details for the cell, for example, that the name is of the correct format and the data type exists. For more information about naming conventions, see
Object Naming Rules.
Database validation occurs when you
save the table (see
Save a Table). Any errors are displayed in an error message.
Insert a Column
You can insert new column rows in the columns grid above the currently selected row.
You may insert multiple columns and edit their fields later. However, all column names and data types must be specified before a table can be saved.
To insert a column (a row in the Columns grid)
1. Select a row in the column grid above which you want to insert a new column.
2. Right-click the row and select Insert Column from the context menu, or click the Insert Column button.
A new row is inserted above the selected row.
Delete a Column
You can delete column rows from a table definition using the context menu. You are not prompted for confirmation when you delete columns from an unsaved table.
To delete a column (a row in the Columns grid)
1. Select the row in the columns grid that you want to delete.
2. Right-click the row and select Delete Column from the context menu, or click the Delete Column button.
The row is deleted from the columns grid.