Configure Vnode Attributes
In addition to defining login and connection data, you can use netutil to configure vnode attributes. Attributes define additional connection, encryption, and authentication information for the vnode.
To configure one or more attributes for a vnode
1. From the netutil startup screen, select the Attributes menu option.
Attribute information for the first vnode in the Virtual Node Name table is displayed.
2. Use the arrow keys to select the vnode for which you want to configure an attribute. Tab to the Other attribute data for vnode table and select the Create menu option.
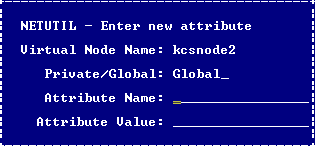
The Enter new attribute pop-up window appears.
4. Select the Save menu option.
Netutil returns to the startup screen. The attribute you configured is now displayed in the Other attribute data for vnode table.
Vnode Attribute Names and Values
Valid vnode attribute names and values are as follows:
connection_type
Indicates the connection type. The only valid value is direct, which indicates that a direct connection with the remote instance must be established without using Net. This attribute improves performance because data goes directly from the application process on the client machine to the Ingres DBMS process on the server machine, thus bypassing Communications Server processing, except for initial connection setup.
For direct access to occur, the following conditions must be met:
• The client and server machines must be the same platform type (for example, both Windows, or both Solaris, or Windows to Linux on Intel-based machines) and the environment variable II_CHARSET must be identical on both the client and server machines.
• The same network protocol must be used for the local IPC on the client and server machines.
• On Windows, the client and server machines must be logged into the same Windows network domain if using (default) named pipes for local IPC.
• Ingres II 2.5 or higher must be installed on both the client and server machines.
• On any platform which uses the IPC protocol for local and network connections, the environment variable, II_GC_REMOTE must be set (for the DBMS Server instance) to ON or ENABLED to allow direct connections. For important information on network security and II_GC_REMOTE, see the System Administrator Guide.
• Between Windows and UNIX or Linux, II_GC_PROT is set to tcp_ip on Windows, and the UNIX or Linux system is running TCP/IP for its local protocol.
Note: II_GC_PROT should be changed only when Ingres (including tools such as IVM) is completely shut down; otherwise, failures will occur for Ingres shutdown, startup, and connection requests.
• An Ingres client installation should not be at a higher major release level than the Ingres server. While this is not a requirement across all releases of Ingres, Ingres 10 clients specifically are not supported for direct access to pre-Ingres 10 servers; connection attempts will likely hang. The reverse configuration works: An older release Ingres client can directly access a newer release Ingres server.
encryption_mode
Specifies the encryption mode for the connection. If set, this value overrides the Communications Server’s ob_encrypt_mode parameter value configured using Configuration Manager or the Configuration-By-Forms utility. The local and remote Communications Servers must be able to negotiate a common mechanism to perform the encryption. Valid values are:
• off – No encryption. The connection fails if the remote Communications Server has an encryption mode of required.
• optional – Encryption occurs if the remote Communications Server has an encryption mode of on or required.
• on – Encryption occurs if the remote Communications Server has an encryption mode other than off.
• required – Encryption occurs if the remote Communications Server has an encryption mode other than off. If off, the connection fails.
encryption_mechanism
Specifies the mechanism to be used to encrypt the remote connection. If set, this value overrides the Communications Server’s ob_encrypt_mech parameter value configured using Configuration Manager or the Configuration-By-Forms utility. Valid values are:
• none – Disables encryption
• * – Allows all encryption mechanisms to be considered during Communications Server negotiations
• mechanism_name – Indicates a specific mechanism to be considered during Communications Server negotiations
authentication_mechanism
Specifies the mechanism to be used for remote authentication in a distributed security environment. This setting replaces the need for a user ID and password. If set, this value overrides the Communications Server’s remote_mechanism parameter value configured using Configuration Manager or the Configuration-By-Forms utility. The only valid value is kerberos.
Multiple Connection Data Entries
If a remote instance has more than one Communications Server or can be accessed by more than one network protocol, that information can be included in the vnode definition by adding another connection data entry. This allows you to distribute the load of communications processing and increase fault tolerance.
Note: When more than one Communications Server listen address is defined for a given vnode, Ingres Net automatically tries each server in random order until it finds one that is available. Similarly, when a connection fails over one network protocol, Ingres Net automatically attempts the connection over any other protocol that has been defined.
End users can create private connection data for an existing vnode by adding an entry to the Connection Data table. For the user who creates it, a private connection data entry overrides a global connection data entry defined to the same vnode. In other words, Ingres Net uses the private connection data entry whenever the user who created the entry uses the vnode.
You need the following information before adding a connection data entry:
• The network address of the node on which the remote instance resides
• The listen address of the remote instance’s Communications Server. (For the correct listen address format for your network protocol, see the appropriate appendix or check the Configure Net Server Protocols screen in the Configuration-By-Forms utility on the remote instance.)
To define an additional connection data entry in netutil
1. Select the desired vnode in the Virtual Node Name table.
The connection data for the highlighted vnode appears in the Connection Data table.
2. Move the cursor to the Connection Data table, and then choose Create from the menu.
The Enter new connection pop-up window appears displaying prompts for the connection type (private or global), the network address, the network protocol to be used, and the Listen address of the remote instance. For your convenience, netutil supplies default values for the first three fields; to enter a new value, simply type over the default value.
3. Enter the connection data; then choose Save from the menu.
Netutil returns to the startup screen. The data you entered is now displayed in the Connection Data table.
Additional Remote User Authorization
End users can create a private remote user authorization for an existing vnode.
For the user who creates it, a private authorization overrides a global authorization defined to the same vnode. Ingres Net uses the private authorization whenever that user uses the vnode.
To define and test a new remote user authorization in netutil
1. Select the desired vnode in the Virtual Node Name table.
The remote user authorization for the highlighted vnode appears in the “Login/password data” table.
2. Move the cursor to the “Login/password data” table, and then choose Create from the menu.
The Enter New Login/Password pop-up window appears.
3. Enter the login and the password, as described in Step 5 of Establish and Test a Remote Connection Using Netutil, and then choose Save from the menu.
Netutil returns to the startup screen. The data you entered is displayed in the Login/password data table.