Manipulating Btrieve Data Files with Maintenance
Handling Btrieve Files with the Maintenance Tool
The following topics are covered here:
Maintenance Utilities Overview
PSQL provides both an interactive Maintenance GUI and a command line Maintenance tool. Both versions perform the following file and data manipulations:
•Create new data files based on file and key specifications you define.
•Provide file and key specifications for existing data files.
•Set and clear owner names for data files.
•Create and drop indexes on data files.
•Import and export ASCII sequential data.
•Copy data between PSQL data files.
•Recover changes made to a file between the time of the last backup and a system failure.
While both utilities provide the same core functionality, minor differences exist. For example, the interactive Maintenance tool allows you to create description files based on file and key specifications you define. The command line Maintenance tool allows you to start and stop continuous operation on a file or set of files locally on the server.
Before you use either Maintenance tool, you should be familiar with Btrieve fundamentals, such as files, records, keys, and segments. For information about these topics, see PSQL Programmer's Guide.
Note The PSQL product provides two categories of maintenance tools: Btrieve and SQL. The SQL Maintenance tool supports data source names (DSNs), which are used for relational access through ODBC.
Btrieve Interactive Maintenance Tool
The interactive Maintenance tool is a Windows application that runs on Windows 32-bit and 64-bit platforms. Use it if you prefer a graphical user interface or if you want to create a description file. This section contains the following major topics:
Each major topic contains tasks specific to that topic.
Extended File Support
The size of a MicroKernel data file can be larger than the operating system file size limit. When you export data from an extended MicroKernel file to an unformatted file, the size of the unformatted file can exceed the database engine file size limit because of the differences in the physical format.
When you are exporting large files, the interactive Maintenance tool detects when the unformatted file exceeds a 2 GB file size limit and starts creating extension files. This process is transparent. Extension files and the original unformatted file must reside on the same volume. Note that file size limit varies depending on the operating system and file system. The 2 GB size is the limit supported by the database engine.
The extension file uses a naming scheme in which the file names are similar to the base file name. In contrast to native MicroKernel Engine extension files which use a caret “^” to indicate extension file status, the unformatted extension files use a tilde “~” to avoid overwriting any existing extended engine files with the same base file name. The first export extension file is the same base file name with “.~01” extension. The second extension file is “.~02” and so on. These extensions are appended in hexadecimal format.
The naming convention supports up to 255 extension files, thus supporting files as large as 256 GB.
Additionally, when you import data from an unformatted file, the tool detects whether the file has extensions and loads the data from the extension file.
Long File Names and Embedded Spaces Support
Long file name support, including support for embedded spaces is available in all supported operating system environments. All references to files can contain embedded spaces and be longer than 8 bytes.
Older versions of Btrieve allowed spaces to be added at the end of a file name in path-based operations such as Open and Create. This is still the default behavior. Existing applications will not break. However, if you want to take advantage of file and directory names with embedded spaces, set the Embedded Spaces configuration setting for the client requester to On. Note that On is the default setting.
Even when you turn off the option, an application that accesses a file having a name with embedded spaces can enclose that name in double quotation marks while making the BTRV/BTRVID/BTRCALL/BTRCALLID call to open or create the file.
Record and Page Compression
PSQL provides two types of data compression: record and page. These two types may be used separately or together. The primary purpose for both compression types is to reduce the size of the data files and to provide faster performance depending on the type of data and on the type of data manipulation.
Record Compression
Record compression requires a file format of 6.0 or later. Record compression can result in a significant reduction of the space needed to store records that contain many repeating characters. The database engine compresses five or more of the same contiguous characters into 3 bytes.
When creating a file, the database engine automatically uses a page size larger than what is specified to allow room for the specified record length. If the uncompressed record length is too large to fit on the largest available page, the database engine automatically turns on record compression.
Because the final length of a compressed record cannot be determined until the record is written to the file, the database engine creates a file with record compression as a variable-length record file. Compressed images of the records are stored as variable-length records. Individual records may become fragmented across several file pages if your application performs frequent insertions, updates, and deletions. The fragmentation can result in slower access times because the database engine may need to read multiple file pages to retrieve a single record.
Page Compression
Page compression requires a file format of 9.5 or later. Internally, a PSQL data file is a series of different types of pages. Page compression controls the compression and decompression of data pages within a file.
As a file is read from physical storage, data pages are decompressed and held in a memory cache. Record reads and updates are performed against the uncompressed data in the memory cache. When a write action occurs, the data page is compressed then written to physical storage. Depending on cache management, the compressed page is also retained in memory until accessed again.
If the type of data cannot be significantly compressed, the database engine writes the data to physical storage uncompressed.
Deciding When To Use Compression
The benefits obtained by using record compression, page compression, or both depends entirely on the type of data being compressed. Given that, the following table discusses some general factors to consider when deciding to use data compression or not.
Table 67 Factors To Consider Pertaining to Data Compression
Compression | Factors to Consider |
Record | Page |
| | Record compression is most effective for the following conditions: •Each record has the potential for containing a large number of repeating characters. For example, a record may contain several fields, all of which may be initialized to blanks by your task when it inserts the record into the file. Record compression is more efficient if these fields are grouped together in the record, rather than being separated by fields containing other values. •The computer running the database engine can supply the extra memory required for compression buffers. •The records are read much more frequently than they are changed. If the fixed length portion of a record is longer than the page size minus overhead, compression is used automatically. Note that you cannot use record compression for key-only files or for files that use blank truncation. |
| | Page compression is most effective for the following conditions: •Data is highly compressible using a ZIP-type compression algorithm. When the file size can be significantly decreased because of page compression, such as 4 to 1 compression, file performance can be increased significantly. •The pages are read much more frequently than they are inserted, updated, or deleted. Note that the database engine writes data pages to physical storage uncompressed if the data cannot be significantly compressed. |
| | The use of record compression and page compression is most effective when records contain a large proportion of blank space and the pages are read much more frequently than they are inserted, updated, or deleted. |
The Btrieve Maintenance Tool Interface
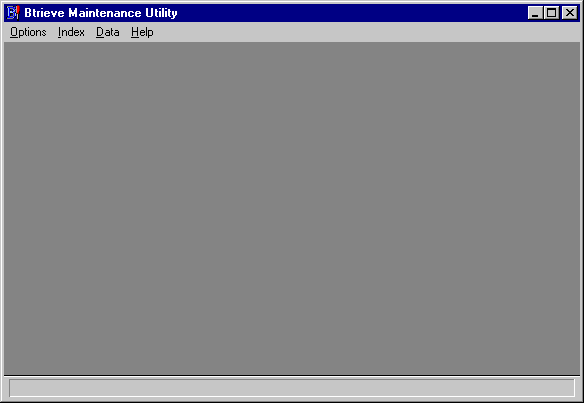
Access Maintenance from the operating system Start menu or Apps screen or from the Tools menu in PSQL Control Center. The Maintenance main window looks like the following.
Figure 18 Btrieve Maintenance Main Window
Menu Options
The interactive Maintenance tool provides the following menus:
Options | Allows you to display the File Information Editor, set and clear an owner name, generate statistics reports, and exit the tool. |
Index | Allows you to create and drop indexes. |
Data | Allows you to load data from ASCII files, save data to ASCII files, copy records between data files, and perform a roll forward operation to recover changes made to a data file between the time of the last backup and a system failure. |
Help | Provides access to the Maintenance tool help system. |
Getting Help
To access the Maintenance tool help system, click Help in the dialog box for which you want help, or choose a command from the Help menu, as follows:
Contents | Provides a list of Maintenance tool help topics. |
About | Displays copyright information and the product version number. |
File Information Editor
This section provides general information about the File Information Editor with which you can create new files based on file and key specifications you construct. Because this Editor allows you to load information based on an existing file, it is also useful for viewing file and key specifications on existing data files. You can also create a new file based on the file and key specifications of an existing file (similar to the clone command for butil, the command line Maintenance tool).
Caution No two files can share the same file name and differ only in their file name extension if both files are in the same directory. For example, do not name a data file Invoice.btr and another one Invoice.mkd in the same directory. This restriction applies because the database engine uses the file name for various areas of functionality while ignoring the file name extension. Since only the file name is used to differentiate files, files that differ only in their file name extension look identical to the database engine.
Open the File Information Editor by clicking Options > Show Information Editor.
Figure 19 File Information Editor

File Information Editor Dialog Elements
At the top of the Editor, the following buttons appear:
Load Information | Loads information for an existing file. When you load file information, you are not editing the file. Instead, you are loading a copy of the information about that file. |
Create File | Creates a new file based on current information in the dialog box. |
Set To Defaults | Sets the controls to default values. |
Description Comments | If you are creating a description file, allows you to enter notes about the file. |
Help | Displays help for the File Information Editor dialog box. |
Data File Info
The Data File Info area, also at the top of the File Information Editor, contains the following controls:
Owner Name | Displays the file owner name, if one exists, as a string of asterisks. |
Version | Earliest version of the database engine that can read all of the attributes of the file. For example, if you created a file using the 9.5 database engine but did not use any attributes specific to 9.5, the Maintenance tool displays 9.0 as the version number. See
File Version Notes for additional information about file format versions. |
Total Records | Total number of records in the file. |
File Specification
The
File Specification area is in the middle of the File Information Editor. Table
68 describes the controls in this box.
Table 68 File Specification Controls
Control | Description | Range | Default |
Record Length | Specifies the logical data record length (in bytes) of the fixed-length records in a file. For information about record length and overhead, see “Record Length” in PSQL Programmer's Guide. | Minimum is 4 bytes. Maximum is variable. If the record length specified exceeds the page size minus overhead, the database engine automatically tries the next available page size for the file format. If the record length exceeds the maximum page size minus overhead, the engine turns on record compression. | 100 |
Page Size | Specifies the physical page size (in bytes) for the file. | 512 – 4096 for file versions prior to 9.0 (a multiple of 512 bytes up to 4096) 512, 1024, 1536, 2048, 2560, 3072, 3584, 4096, or 8192 for file version 9.0. 1024, 2048, 4096, 8192, or 16384 for file version 9.5. 4096, 8192, or 16384 for file version 13.0. | 4096 |
# Keys | Indicates the number of distinct keys (as opposed to key segments) currently defined in the Editor. Reflects the number of keys in the Key list. | 0 – 119 | 0 |
# Segments | Indicates the number of key segments currently defined in the Editor. Reflects the number of segments in the Segment list. | 0 – 119 for file versions before 9.5 0 – 420 for file version 9.5 0 – 378 for file version 13.0 | 0 |
Available Linked Keys | Specifies how many 8-byte place holders you want to reserve for future linked-duplicatable keys. If you are loading information based on an existing data file, this value reflects the number of place holders currently available in that file. (The number of originally reserved place holders is not stored in the file.) | 0 – 119 | 3 |
Key-Only | Indicates whether the file is key-only. Not applicable if you turn Record Compression on, if you turn Variable Records on, or if you define more than one key for the file. | On or Off | Off |
Balanced Indexing | Specifies that the file uses the balanced indexing method of managing key pages. | On or Off | Off |
Pre-allocation | Specifies that the file uses preallocated pages. | On or Off | Off |
# Pages | Specifies the number of pages you want preallocated when you create the file. Applicable only if Pre-allocation is turned on. If you are loading information based on an existing data file, this value reflects the number of unused, preallocated pages left in that file. (The number of originally preallocated pages is not stored in the file.) | 1 – 65535 | 0 |
Record Compression | Specifies that the file uses record compression. Not applicable for key-only files or files that use blank truncation. See also
Record and Page Compression. | On or Off | Off |
Page Compression | Specifies that the file uses page compression. See also
Record and Page Compression. | On or Off | Off |
Variable Records | Specifies that the file can contain variable-length records. | On or Off | Off |
Blank Truncation | Specifies whether the file uses blank truncation on variable records to conserve disk space. Applicable only if Variable Records is turned on. | On or Off | Off |
Include VATs | Specifies whether the file supports Variable-tail Allocation Tables for faster access to data in very long records. Applicable only if Variable Records is turned on. | On or Off | Off |
% Free Space | Specifies the amount of unused space a file’s variable pages must have available before the database engine creates a new variable page. Applicable only if Record Compression or Variable Records are turned on. | 5, 10, 20, or 30 | 5 |
Key
At the bottom left in the dialog box is the
Key group box. Table
69 describes the controls in this area. These controls are specific to the key highlighted in the
Key list, not just to the current key segment. When you change the setting for one of these controls, the change affects
all segments of the specified key.
Table 69 Key Controls
Control | Description | Default |
Duplicates | Specifies that the key can have duplicate values (linked duplicates). | On |
Modifiable | Specifies that the key value can be modified after creation. Allowing modification of key values does not affect performance. Key pages are only updated if the actual key value changes, not if non-key fields in a particular record are changed. | On |
Repeating Duplicates | Specifies that the database engine uses the repeating duplicates method of storing duplicate key values. | Off |
Sparse Key (Null Key) | A sparse key contains fewer key values than the number of record in the file. To specify which key values are excluded from the index, see the next two controls. Applicable only to keys that contain nullable segments. | Off |
All Segments (Null) | Specifies that if all key segments in the record contain a null value, the database engine does not include that record in the index. Applicable only if Sparse Key (Null Key) is turned on. Equivalent to key flag 0x0008. Whether a segment is evaluated as null is determined solely by the null indicator segment for that field; the contents of the field are not evaluated. | Off |
Any Segment (Manual) | Specifies that if one or more key segments contains a null value, the database engine does not include that record in the index. Applicable only if Sparse Key (Null Key) is turned on. Equivalent to key flag 0x0200. Whether a segment is evaluated as null is determined solely by the null indicator segment for that field; the contents of the field are not evaluated. | Off |
ACS Information | Allows you to specify an alternate collating sequence (ACS) for the key. Applicable only if the Use ACS check box is selected for a segment of the key. | Off |
Unique Values | Indicates the number of unique key values in the file. Applicable only if you are loading information based on an existing data file. | N/A |
Key List and Segment List
At the bottom middle of the dialog box, the Key list shows the key numbers defined in a file. (For 6.x and later files, these key numbers do not have to be consecutive; they can have gaps between them.) The Maintenance tool displays the highlighted key’s specifications in the Key box at the bottom left of the dialog box.
Also at the bottom middle of the dialog box, the Segment list shows the key segment numbers defined for the key highlighted in the Key list. The Maintenance tool displays the highlighted segment’s specifications in the Segment box at the bottom right of the dialog box.
In addition, the following buttons appear under the Key and Segment lists:
Insert | Defines a new key or segment. |
Delete | Removes the highlighted key or segment specification. |
Compress | Renumbers the keys consecutively. You can use this button to remove gaps that result from deleting a key specification. |
Because these buttons control key specifications for a file you want to create, you cannot use them to operate on keys in an existing file. If you want to create or drop an index on an existing file, refer to
Index Tasks.
Key Segment
At the bottom right in the dialog box is the
Key Segment group box. Table
70 describes the controls in this area. These controls are specific to the segment highlighted in the
Segment list),
Table 70 Key Segment Specification Controls
Control | Description | Default |
Data Type | Specifies a data type for the key segment. The NULL data type indicates that the index is one byte Null indicator segment. It must be in a multisegment key and it must precede another key segment that is not a NULL type. The number used in the Btrieve API for this key type is 255. | String |
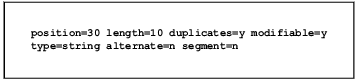
Position | Specifies by number the relative starting position of the beginning of this key segment in the record. The value cannot exceed the record length. | 1 |
Length | Specifies the length (in bytes) of the key segment. This value cannot exceed the limit dictated by the data type for the segment. The total of key position and key length cannot exceed the record length. | 10 |
Null Value (Hex) | Specifies the null character value (in hexadecimal) for the key segment. Applicable only if the Null Key check box is selected for the key. | Binary zero |
Case Insensitive | Specifies whether the segment is sensitive to case. Applicable only for STRING, LSTRING, and ZSTRING data types or for keys that do not use an ACS. | On |
Descending | Specifies that the database engine sort the key segment values in descending order (that is, from highest to lowest). | Off |
Use ACS | Specifies that the segment uses the alternate collating sequence defined for the key. Applicable only for string, lstring and zstring data types that are case sensitive. | Off |
NULL Value Discrete Ordering | NULL Value Discrete Ordering is used for the null indicator segment (NIS) to determine whether the MicroKernel Engine should treat the NIS as a boolean value, where any non-zero value is considered NULL, or as a one byte integer, where zero is considered non-null and all other values are considered different types of null. In this case they are sorted as discrete values. The Btrieve API uses the NO_CASE flag, 0x0400, to indicate discrete ordering should be performed, because that flag was previously unused for integer values. | Off |
Methods for Handling Duplicate Keys
Multiple records may carry the same duplicated value for index keys. The two methods to keep track of the records with duplicate key values are called linked duplicates and repeating duplicates.
Linked Duplicates
The linked duplicates method uses a chain technique in which each record in the group connects to its neighbors by means of pointers. Each entry on an index page contains a pair of record pointers that indicate the first and last links in the chain of records that duplicate that key's value. This makes each key page entry 4 bytes longer than a repeating duplicates index. In addition, each record on the data page requires an extra 8 bytes of overhead for each linked duplicates index. These 8 bytes consist of two record pointers that point to the next and previous records in the chain.
The first record pointer holds the address of the first, or oldest, record stored. The second pointer holds the address of the most recent, or newest record. After the first record is written but before any others are added, both pointers on the key page entry hold the first record’s address. Subsequent records cause the second pointer to be changed to point to each record as it is added. This permits the record pointer for the last record to be used as the previous-record link of the chain built in the data page when the record is added, and also to be used to locate that previous record.
Repeating Duplicates
With the repeating duplicates method, each duplicate key value is stored on both the index page and within the record on the data page. Each key value has only one record pointer instead of two. This method requires no chaining within the data records and saves the 8 bytes of overhead per index within each record. Since the key value is repeated for each duplicate record, the indexes affected increase in size.
Method Comparisons
The linked duplicates and repeating duplicates methods can be compared based on the following criteria:
•Ordering
•Storage
•Performance
•Concurrency
Ordering
A linked duplicates index retrieves duplicates in the order in which they were inserted. A repeating duplicates index retrieves duplicates in the order in which they are located within the file. Since location with a file cannot be controlled, the ordering must be considered as random.
Storage
A linked duplicates index requires 12 more bytes for the first occurrence of each duplicate key value. That includes 8 extra bytes on each record and 4 extra bytes for the key page entry. But each duplicate record requires no additional space in the key page, and adds only 8 bytes per record. Therefore, as the number of duplicates per key value increases, and as the size of the key value increases, linked duplicate indexes can save significant storage space used by key pages. However, storage space can increase if your file contains very few records with duplicate keys, the key length is very short, or both.
The following figure exemplifies the amount of storage space saved using linked duplicate indexes. Note that linked duplicate indexes take more space if duplicate records per key value are few. As the number of duplicate records per key value increases, however, linked duplicate indexes require less pages, providing significant space savings.
Figure 20 Comparison of Page Counts for Duplicate Key Methods
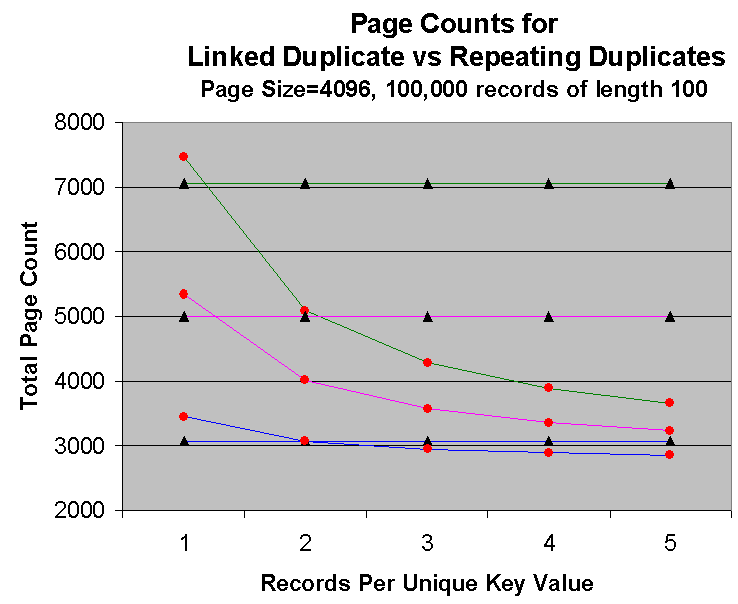
Legend: |  = linked duplicates |  = repeating duplicates |
| Top two lines represent a key length of 100
Middle two lines represent a key length of 50
Bottom two lines represent a key length of 4 |
Performance
Faster performance results when fewer pages are involved in an index search because fewer pages must be read from disk. The linked duplicates method generally uses less physical storage space and therefore provides faster performance. The repeating duplicates method provides a performance advantage if only a small number of keys have duplicates.
Concurrency
The database engine provides page-level concurrency when several concurrent transactions are active on the same file at the same time. This applies to most changes to key pages and for all changes to data pages. The concurrency means that the same page can contain pending changes from separate transactions at the same time, and the transactions can be committed in any order. Repeating duplicate indexes take the most advantage of this concurrency.
Linked duplicate indexes add another limitation on concurrency that does not exist with repeating duplicates. When a new duplicate is created, the new record is linked to another record at the end of the list. This record linking causes two records to be locked instead of one. Since all duplicates are added to the end of the chain of linked records, only one duplicate can be inserted at a time.
Such a record lock conflict usually causes other clients to wait until the first transaction is committed. In a concurrent environment, if all new records use the same duplicate value, then concurrency can effectively be reduced to one transaction at a time. And if transactions are large or long lasting, this serialization can affect performance tremendously.
Performance is typically better if you use repeating duplicate indexes for databases that are updated in a concurrent environment. Therefore, unless you have a compelling reason to use the linked duplicates method, you should use repeating duplicate indexes for databases that are updated in a concurrent environment.
Information Editor Tasks
You perform the following tasks with the File Information Editor:
Loading Information from an Existing Data File
When you load information from an existing file, you are not editing the existing file. Instead, you are loading a copy of the information about that file. Generally, you want to load a data file before performing other tasks with the File Information Editor, but this is not mandatory.
►To load information from an existing data file into the File Information Editor
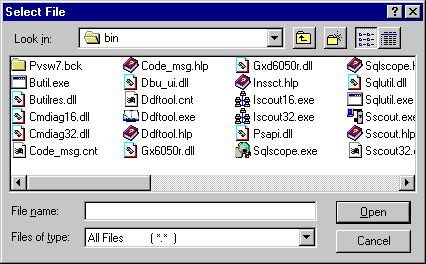
1 Click Load Information at the top of the File Information Editor. The Select File dialog box appears.
Figure 21 Select File Dialog Box
2 Specify the name and path of the file for which you want to load information. By default, data files have the file extension .mkd, but others are possible, or none.
The Maintenance tool first attempts to open the specified file as a data file. If the file requires an owner name, the tool prompts for one. If the specified file is not a data file, the tool then attempts to open the file as a description file.
Creating a New File
You can create a new file based on the current information in the File Information Editor or on new information you provide.
►To create a new file based on the current information in the File Information Editor
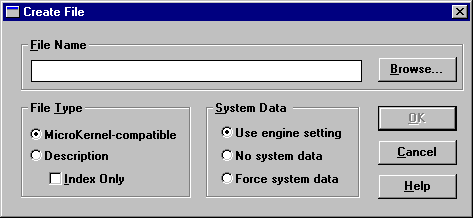
1 Click Create File at the top of the File Information Editor dialog box. The Create File dialog box appears.
Figure 22 Create File Dialog Box
2 Specify the controls in the
Create File dialog box, which are described in Table
71.
Table 71 Create File Dialog Controls
Control | Description | Default |
File Name | Specifies a name and path for the file. By default, data files have the.mkd extension. | N/A |
File Type | Specifies the type of file to create. If you are creating a description file, you can use the Index Only option, which creates a description file you can use with the butil tool to add an index to an existing data file. (For more information, refer to
Creating Indexes.) | MicroKernel-compatible |
System Data | Determines whether the tool includes system data in the file. If you choose Use Engine Setting, the tool uses the setting for the
System Data configuration option described. If you choose No System Data, the tool does not create system data, regardless of the engine configuration. If you choose Force System Data, the tool creates system data, regardless of the engine configuration. This is applicable only if the file type is MicroKernel-compatible. | Use Engine Setting |
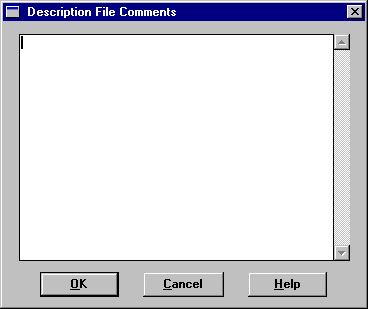
Adding Comments to a Description File
The comments are written to the top of the description file when you create the description file. For example, the comment, “This is my file,” appears at the top of the description files as /* This is my file */. If you add additional comments after creating the description file, you need to create the file again to include the additional comments.
►To add comments to a description file
1 Click Description Comments. The Description File Comments dialog box appears.
Figure 23 Description File Comments Dialog Box
2 Enter a block of comments up to 5120 characters long.
3 Click OK when you are finished entering comments.
Compacting Btrieve Data Files
You can compact a Btrieve data file to remove unused space in it, which typically decreases the file size. You can also perform this procedure using the command line Maintenance tool (see
To compact a Btrieve data file).
►To compact a Btrieve file
1 Click Load Information in the File Information Editor and select the file you want to compact.
2 Click Create File, give the file a new name (which creates a clone) in the Create File dialog box, and click OK.
3 From the Data menu on the main window, select Save. In the Save Data dialog box, enter the name of the original file in the From MicroKernel File box and then specify a name for the output file (for example, <original file>.out) in the To Sequential File box.
4 Click Execute. The Save Data dialog box displays the results of the save. Click Close.
5 From the
Data menu, select
Load. In the
Load Data dialog box, enter the name of the sequential data file you just saved in the
From Sequential File box. Then enter the name of the clone file you created in Step
2 in the
To MicroKernel File box.
6 Click Execute. The Loading Data dialog box displays the results of the load. Click Close.
You can now compare the size of the original file to the clone file to verify the reduction in size.
Specifying a Alternate Collating Sequence for a Key
You can use an alternate collating sequence (ACS) to sort string keys (types STRING, LSTRING, and ZSTRING) differently from the standard ASCII collating sequence. By using one or more collating sequences, you can sort keys as follows:
•By your own user-defined sorting order, which may require a sorting sequence that mixes alphanumeric characters (A-Z, a-z, and 0-9) with non-alphanumeric characters (such as #).
•By an international sorting rule (ISR) that accommodates language-specific collations, including multibyte collating elements, diacritics, and character expansions and contractions.
Files can have a different ACS for each key in the file, but only one ACS per key. Therefore, if the key is segmented, each segment must use either the key’s specified ACS or no ACS at all. For a file in which a key has an ACS designated for some segments but not for others, Btrieve sorts only the segments that specify the ACS.
The ISR tables are provided with PSQL and are based on ISO-standard locale tables. ISR tables are stored in the collate.cfg file, which is installed with the PSQL database engine. Multiple data files can share a single ISR.
►To specify a key’s alternate collating sequence
1 Click ACS Information.
The Maintenance tool displays the Specify ACS Information dialog box.
Figure 24 Specify ACS Information Dialog Box
2 You can specify either an ACS File name or an International Sorting Rule (ISR) as follows:
Table 72 ACS Information Controls
Control | Description | Default |
ACS Country/Code | No longer used. | N/A |
ACS File | Specifies the fully qualified file name of the alternate collating sequence file. | N/A |
International Sorting Rule | Allows you to select an ISR table for sorting international data. PSQL provides a set of already generated ISR tables, which are listed in the programmer’s guide. | |
3 When you specify an ACS file name for a data file, the database engine copies the contents of the ACS file into the data file. (That is, the data file does not contain the file name of the ACS file.) The ACS identifies itself using an eight-digit name (such as UPPER). Subsequently, when you view the ACS information for a data file, the Maintenance tool displays this eight-digit name, not the file name of the original ACS.
4 When you specify an ACS File for a description file, the Maintenance tool copies the actual path and file name of the ACS file into the description file. Subsequently, when you view the ACS information for a description file, the Maintenance tool attempts to locate the specified ACS file.
To specify an ACS that sorts string values using an ISO-defined, language-specific collating sequence, you must specify an ISR table name. The Table Name field is limited to 16 characters. For more information on ISRs, see the PSQL Programmer's Guide in the Developer Reference.
Managing Owner Names
The MicroKernel gives you the option of restricting access to an individual data file by setting an owner name in the file. Only users who provide the owner name are able to read from or write to the file. This topic covers use of the Maintenance tool to manage owner names. For more information, see
Owner Names.
An ODBC error results if you attempt relational access of a table that is restricted by an owner name without providing that string value, such as trying to delete the table in PCC. You can specify owner names for one or more tables in a session with the GRANT or SET OWNER statement. Use the GRANT statement to authorize access for a particular user or group, and then manipulate the table relationally through ODBC. The Master user must supply the GRANT statement with the correct owner name. For more information, see
GRANT in
SQL Engine Reference.
Use SET OWNER to provide one or more owner names to enable file access during the current database session. For more information, see
SET OWNER in
SQL Engine Reference.
Setting or Clearing an Owner Name
Setting an owner name restricts access to a data file. Clearing the owner name removes the restriction.
►To set or clear an owner name
1 In the Maintenance tool window, select Options > Set - Clear Owner to open the Set - Clear Owner Name dialog.
Figure 25 Set/Clear Owner Name Dialog
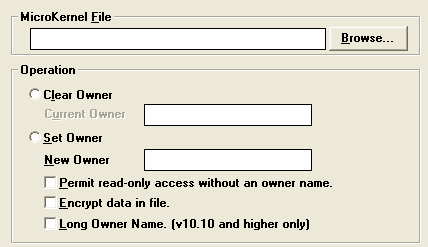
2 In the MicroKernel File box, enter the file for which you want to set or clear an owner name. Then, to clear the owner name, click Clear Owner and enter the owner name in the Current Owner field to authorize its removal.
3 To set the owner name, click Set Owner, enter the new owner name in the New Owner field, then select any desired options.
•Select Permit read-only access without an owner name to allow all users read-only access to the data file.
•Select Encrypt data in file to ensure that unauthorized users do not examine your data using a debugger or file dump tool. Select this option only if data security is important to your environment, since encryption and decryption add to processing time.
•Select
Long Owner Name to create an owner name up to 24 bytes long, or if hexadecimal, 34–50 bytes long. Without this setting, a short owner name can be up to 8 bytes long. Long owner names have certain restrictions. For more information, see
Owner Names.
4 Click Execute to apply the options.
Statistics Report
Generating a statistics report is a good way to determine whether a file can be logged by the database engine’s transaction durability feature. The report shows whether the file has system data and if a key is unique. (A unique key lacks the D flag, which indicates that duplicates are allowed.) The statistics report provides metadata about the file. This information can be used when you troubleshoot problems or to help you create similar files.
Statistics Report Tasks
The following task lists the steps to create a statistics report.
►To create a statistics report for an existing data file
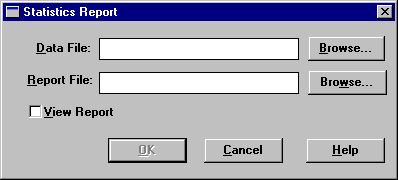
1 Click Options > Create Stat Report from the menu on the main window. The Maintenance tool displays the Statistics Report dialog box.
Figure 26 Statistics Report Dialog Box
2 Specify a data file to use and a report file name. If you want to view the report when it is created, select the View Report check box.
If you choose to view the report, the Maintenance tool displays the View File window shown next.
Figure 27 Statistics Report Example
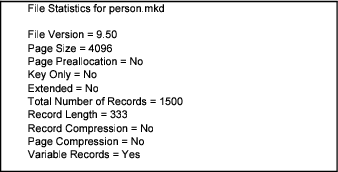
The informational headings in a status report correspond to the controls in the File Information Editor, which is described in
File Information Editor.
The legend at the bottom of the statistics report explains the symbols used in the key/segment portion of the report. This information includes items such as the number of keys and key segments, the position of the key in the file, and the length of the key:
Legend:
< = Descending Order
D = Duplicates Allowed
I = Case Insensitive
M = Modifiable
R = Repeat Duplicate
A = Any Segment (Manual)
L = All Segments (Null)
* = The values in this column are hexadecimal.
?? = Unknown
-- = Not Specified
Indexes
An index is a structure that sorts all the key values for a specific key. Btrieve access permits overlapping indexes (an index that includes a partial column). Relational access through ODBC does not permit overlapping indexes. (You can create an overlapping index with the File Information Editor, which you can display by clicking the Goto Editor button.)
Index Tasks
You perform the following tasks pertaining to indexes:
Creating Indexes
You cannot create an index for a file unless the file has at least one key defined. You can create a key with the File Information Editor (see
File Information Editor).
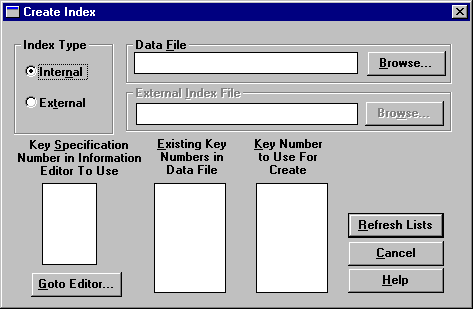
►To create an index
1 Click Index > Create from the main menu, which opens the Create Index dialog box.
Figure 28 Create Index Dialog Box
2 Complete the following options in the Create Index dialog box.
Index Type | Specify whether to create an internal or external index. Internal indexes are dynamically maintained as part of the data file. External indexes are separate files you generate as needed.
An external index file is a standard data file that contains records sorted by the key you specify. Each record consists of the following: •A 4-byte address identifying the physical position of the record in the original data file •A key value |
Data File | Specify the name of the data file for which you want to create the index. |
External Index File | Specify the name of the file to generate for an external index. Not applicable for internal indexes. |
Key Specification Number in Information Editor to Use | Lists the key numbers defined in the File Information Editor. |
Existing Key Numbers in Data File | Click Refresh Lists to display the key number defined for the file. If the file contains a system-defined log key, this list includes SYSKEY. |
Key Number to Use For Create | Click Refresh Lists to display the key numbers available (that is, not defined for the file). Highlight the key number you want to use when creating the index. If the file contains a system-defined log key (also called system data) but the key has been dropped, this list includes SYSKEY, which you can select to add the system-defined log key to the file again. |
3 You can click Go To Editor to display the File Information Editor dialog box, which shows more complete information about the key. You can click Refresh Lists to read key information from the data file and refresh the Existing Key Numbers in Data File and Key Number to Use For Create lists. You must click Refresh Lists before you can create an index.
4 When you have completed the Create Index dialog box, click Execute to create the index. The amount of time required to create the index depends on how much data the file contains.
Dropping Indexes
Ensure that you understand the access performed by an application program before dropping an index. Certain functions fail (such as GET NEXT) if a required index is missing. This can result in an application program not functioning correctly.
►To drop an index
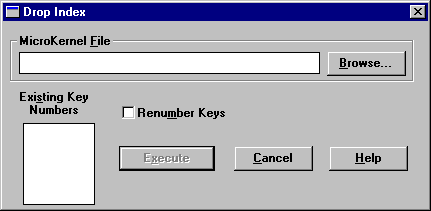
1 Click Index > Drop from the main menu. The Drop Index dialog box appears.
Figure 29 Drop Index Dialog Box
2 Complete the following options in the Drop Index dialog box.
MicroKernel File | Specify the name of the data file from which you want to drop the index. |
Existing Key Numbers | Click Refresh List to display the key number defined for the file. Highlight the number of the key whose index you want to drop. If the file contains a system-defined log key, this list includes SYSKEY, which you can select to drop the system-defined log key from the file. |
Renumber Keys | Renumbers the keys consecutively. Select this check box to remove gaps that result from deleting an index. |
3 Click Refresh List to get the key information from the file you have specified.
Data
The commands in the Data menu allow you to import, export, and copy records in data files. You can also recover data after a system failure with the Roll Forward feature. See
Roll Forward Command for a discussion of Roll Forward.
Importing and Exporting ASCII File Format
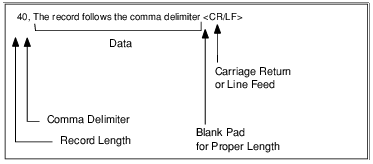
When you save data, records in the ASCII file have the following format. You can use an ASCII text editor to create files that you can load, as long as they adhere to these specifications. Note that most text editors do not support editing binary data.
•The first field is a left-adjusted integer (in ASCII) that specifies the length of the record. (When calculating this value, ignore the carriage return/line feed that terminates each line.) The value in this first field matches the record length specified in the data file.
•For files with fixed-length records, the length you specify should equal the record length of the data file.
•For files with variable-length records, the length you specify must be at least as long as the fixed-record length of the data file.
•A separator (a comma or a blank) follows the length field.
•The record data follows the separator. The length of the data is the exact number of bytes specified by the length field. If you are creating an import ASCII file using a text editor, pad each record with blank spaces as necessary to fill the record to the appropriate length.
•A carriage return/line feed (0D0A hexadecimal) terminates each line. The Maintenance tool does not insert the carriage return/line feed into the data file.
•The last line in the file must be the end-of-file character (CTRL+Z or 1A hexadecimal). Most text editors automatically insert this character at the end of a file.
Figure
30 shows the correct format for records in the input ASCII file. For this example, the data file has a defined record length of 40 bytes.
Figure 30 Format for Records in Input Sequential Files
Data Tasks
You can perform the following data tasks with the Maintenance tool:
•To recover (Roll Forward) changes made to a data file between the time of the last backup and a system failure, see the
Logging, Backup, and Restore chapter.
Importing Records From an ASCII File
You can use the Maintenance tool to import records from an ASCII file to a standard data file. This operation does not perform any conversions on the data. You can create an import file using a text editor or the Maintenance tool (see
Exporting Records to an ASCII File).
►To import ASCII data
1 Click Data > Load from the main menu. The Load dialog box appears.
Figure 31 Load Dialog Box
The ASCII file you specify must adhere to the specifications explained in
Importing and Exporting ASCII File Format. The record length of the standard data file you specify must be compatible with the records in the ASCII file.
2 Click Execute to import the records.
While importing data, the Maintenance tool shows the number of records being imported, the percentage of records imported, and a status message. You can continue working in the Maintenance tool (for example, you can open another Load dialog box).
Exporting Records to an ASCII File
You can use the Maintenance tool to export records from a data file to an ASCII file.
►To export ASCII records
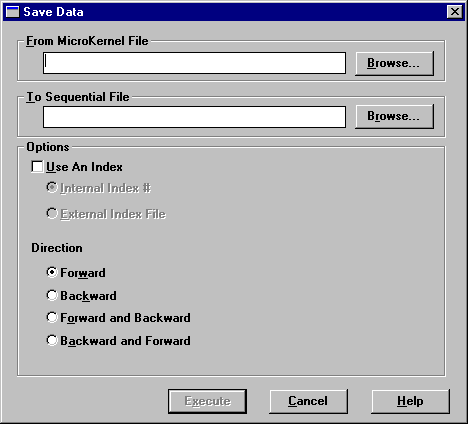
1 Click Data > Save from the main menu. The Save Data dialog box appears.
Figure 32 Save Data Dialog Box
2 In the Save Data dialog box, specify the following options.
From MicroKernel File | Specifies the name of the existing MicroKernel-compatible file you want to save. |
To Sequential File | Specifies the name of the sequential file to create. |
Use An Index | Uses a specified index when sorting the records for export. By default, the Maintenance tool does not use an index, meaning that records are exported according to their physical position in the data file. |
| Internal Index #:
Uses the specified key number. Click Refresh Index List to update the available indexes if you change file in the From MicroKernel File box. |
| External Index File: Uses the specified external index. (To create an external index, refer to
Creating Indexes.) |
Direction | Forward: This is the default setting and indicates the tool recovers the file from the beginning.
Backward: This option recovers data from the end of the file.
Forward and Backward: This option reads the file forward until it fails. Then it starts at the end of the file and reads the file backward until it reaches the record that failed previously or encounters another failure.
Backward and Forward: Indicates the tool reads the file backward until it fails. Then it starts at the beginning of the file and reads the file forward until it reaches the record that failed previously or encounters another failure. |
3 Click
Execute to export the data. The Maintenance tool creates the specified ASCII file using the format described in
Importing and Exporting ASCII File Format. You can then edit the ASCII file and use the
Load command to import the edited text to another standard data file
Copying Records Between Data Files
You can use the Maintenance tool to copy data from one MicroKernel data file to another. The record lengths for both data files you specify must be the same.
►To copy records between MicroKernel data files
1 Click Data > Copy from the main menu. The Copy Data dialog box appears.
Figure 33 Copy Data Dialog Box
2 Enter the name of the file you want to copy in the From MicroKernel File box and then specify the path where you want to copy the file in the To MicroKernel File box.
The record lengths for both data files you specify must be the same.
Recovering (Roll Forward) Changes to a Data File
Btrieve Command Line Maintenance Tool (Butil)
Use butil if you prefer a command line interface or if you want to start or stop continuous operation. You can manually execute Maintenance commands at a command prompt or as an executable batch script. Before you run butil commands, we recommend you understand the concepts and syntax covered here.
The Btrieve command line Maintenance tool performs the following file and data manipulations:
Return Codes
When butil finishes executing, it returns an exit code or DOS error-level return code to the operating system. The return codes are shown in the following table.
Code | Meaning |
SUCCESS_E = 0 | Requested operation succeeded. |
PARTIAL_E = 1 | Requested operation completed, but with errors. |
INCOMPLETE_E = 2 | Requested operation did not complete. |
USAGE_E = 3 | Syntax error in input, display usage screen and exit. |
Commands
The next table lists the commands used with butil. Links in the table lead to more detailed information.
Command | Description |
| Preloads pages for a file into cache, returning when either the file is fully cached or the cache is full. Counterpart to the Purge command. |
| Creates a new, empty data file using specifications for an existing file. |
| Clears the owner name of a data file. |
| Copies the contents of one data file to another. |
| Creates a data file. |
| Drops an index. |
| Ends continuous operation on data files defined for backup. |
| Creates an external index file. |
| Loads the contents of an unformatted file into a data file. |
| Flushes all unneeded cached pages for a file. Returns immediately if the file has open handles. Counterpart to the cache command. |
| Reads data sequentially from a data file and writes the results to an unformatted file. (The DOS version does not support rollfwd.) Use this command if you have a damaged file. |
Rollfwd | Recovers changes made to a data file between the time of the last backup and a system failure. See
Performing Archival Logging. |
| Reads data along a key path and writes the results to a sequential file. |
| Assigns an owner name to a data file. |
| Creates an index. |
Startbu | Starts continuous operation on files defined for backup. See
Logging, Backup, and Restore. |
| Reports statistics about file attributes and current sizes of data files. |
| Unloads the MicroKernel Engine and Requester. |
| Displays the version of the database engine and requester that is loaded at the server. |
Viewing Command Usage Syntax
To view a summary of each command usage, enter the butil command at a prompt on the file server.
Command Format
The format for butil is as follows:
BUTIL [-command [parameter ...]] | @commandFile
–command | A Maintenance tool command, such as copy. You must precede the command with a dash (–), and you must enter a space before the dash. |
parameter | Information that the command may require. Discussions of the individual commands provide details when applicable. |
@commandFile | Fully qualified file name of a command file. |
Command Files
You can use a command file to do the following:
•Execute a command that is too long to fit on the command line.
•Execute a command that you use often (by entering the command once in the command file and then executing the command file as often as you want).
•Execute a command and write the output to a file, using the following command format:
butil @commandFile [commandOutputFile]
For each command executed, the resulting output file shows the command followed by its results. All messages appear on the server console screen, as well.
•Execute multiple commands sequentially.
Command files contain the same information as that required on the command line.
Rules for Command Files
Observe the following rules when creating a Maintenance tool command file:
•You cannot split a single parameter across two lines.
•You must end each command with <end> or [end]. You must also end each command with <end> when trying to execute multiple commands. The <end> or [end] must be lowercase.
Command File Example
The following is an example command file, copycrs.cmd. the file calls the butil - clone command to create the newcrs.mkd file by cloning the course.mkd file, and the -create command to create the newfile.dta file by using the description provided in the newfiles.des description file.
-clone newcrs.mkd course.mkd <end>
-create newfile.dta newfiles.des <end>
The following command uses the copypats.cmd file and writes the output to the copypats.out file:
butil @copypats.cmd copypats.out
Description Files
Description files are ASCII files that contain descriptions of file and key specifications that the Maintenance tool can use to create data files and indexes. Some users employ description files as a vehicle for archiving information about the data files they have created. For more information about the description file format, see
Description Files.
Extended File Support
The size of the database engine data file can be larger than the operating system file size limit. When you export data from an extended MicroKernel file to an unformatted file, the size of the unformatted file can exceed the database engine file size limit because of the differences in the physical format.
When large files are exported, the Interactive Maintenance tool detects when an unformatted file has exceeded the operating system file size limit (2 GB) and starts creating extension files. This process is transparent. Extension files and the original unformatted file must reside on the same volume. The extension file uses a naming scheme in which the file names are similar to the base file name. In contrast to native MicroKernel Engine extension files which use a caret “^” to indicate extension file status, the unformatted extension files use a tilde “~” to avoid overwriting any existing extended MicroKernel Engine files with the same base file name. The first export extension file is the same base file name with “.~01” extension. The second extension file is “.~02,” and so on. These extensions are appended in hexadecimal format.
While the naming convention supports up to 255 extension files, the current maximum number of extension files is 64, thus supporting files as large as 128 GB.
To
Save or
Recover huge files to unformatted files, see the respective command. Also, when you import data from an unformatted file, the tool detects if the file has extensions and loads the data from the extension file.
Owner Names
The MicroKernel allows you to restrict access to individual files by specifying an owner name for the file. For information, see
Owner Names.
Redirecting Error Messages
Be sure that you specify a fully qualified file name (including a drive letter or UNC path) when redirecting error messages.
►To redirect error messages to a file
•Use the following command format.
BUTIL -command commandParameters > filePath
ASCII File Format
See
Importing and Exporting ASCII File Format in the Interactive Maintenance tool section.
Rules for Specifying File Names on Different Platforms
When you run butil on Windows, Linux, or macOS, you do not need to specify the name of the path if the data file resides in the same directory as your current directory.
Importing and Exporting Data
This topic provides detailed information on importing and exporting data using the following
BUTIL commands:
Copy,
Load,
Recover, and
Save.
Table 73 Commands to Import and Export Data
Command | Description |
| Copies the contents of one data file to another. |
| Loads the contents of a sequential file into a data file. |
| Reads data sequentially from a data file and writes the results to a sequential file. |
| Reads data along a key path and writes the results to a sequential file. |
Copy
The copy command copies the contents of one MicroKernel file to another. Copy retrieves each record in the input data file and inserts it into the output data file. The record size must be the same in both files. After copying the records, copy displays the total number of records inserted into the new data file.
Note Copy performs in a single step the same function as a
Recover command followed by a
Load command.
Using the copy command, you can create a data file that contains data from an old file, but has new key characteristics.
►To copy a MicroKernel data file
1 Use the
Create command to create an empty data file with the desired key characteristics (key position, key length, or duplicate key values).
or
Use
Clone to create an empty data file using the characteristics of an existing file.
2 Use the copy command to copy the contents of the existing data file into the newly created data file.
Format
butil -copy sourceFile outputFile [/O< owner1 | *>
[/O<owner2 | *>]] [/UIDuname /PWDpword [/DBdbname]]
sourceFile | The fully qualified name of the data file from which to transfer records. When you run butil for Windows platforms, you do not need to specify the name of the path if the data file resides in the same directory as your current directory. |
outputFile | The fully qualified name of the data file into which to insert records. The output data file can contain data or be empty. When you run butil for Windows platforms, you do not need to specify the name of the path if the data file resides in the same directory as your current directory. |
/Oowner1 | The owner name of the source data file, if required. If only the output data file requires an owner name, specify /O followed by a blank for owner1 (as shown in the example). |
/Oowner2 | The owner name of the output data file, if required. |
/UID<name> /UIDuname | Specifies the name of the user authorized to access a database with security enabled. |
/PWD<word> /PWDpword | Specifies the password for the user who is identified by uname. Pword must be supplied if uname is specified. |
/DB<name> /DBdbname | Specifies the name of the database on which security is enabled. If omitted, the default database is assumed. |
Example
The following command copies the records in course.mkd to newcrs.mkd. the course.mkd input file does not require an owner name, but the newcrs.mkd output file uses the owner name Pam.
butil -copy course.mkd newcrs.mkd /O /OPam
If you omit the first /O from this example, the tool assumes that the owner name Pam belongs to the input data file, not the output data file.
Load
The load command inserts records from an input ASCII file into a file. The input ASCII file can be a single file or an extended file (the base file plus several extension files). Load performs no conversion on the data in the input ASCII file. After the tool transfers the records to the data file, it displays the total number of records loaded.
Note The load command opens the output file in Accelerated mode; during a load operation, the database engine does not log the file. If you are using archival logging, back up your data files again after using the load command.
Extended files: If the tool finds the next extension file, it continues the load process. Do not delete any extension file created earlier by the save and recover commands. If the file has three extensions and the user deletes the second one, load stops loading records after processing the first extension file.
If save or recover created three extension files and a fourth one exists from a previous save or recover, load reads the records from the fourth extension and inserts them into the database engine file. If a fourth file exists, then you need to delete it before starting the load process.
Before running the
load command, you must create the input ASCII file and the data file. You can create the input ASCII file using a standard text editor or an application. The input ASCII file must have the required file format (see
Importing and Exporting ASCII File Format). You can create the data file using either the
Create or the
Clone command.
Format
butil -load unformattedFile outputFile [/O<owner |*>] [/UIDuname /PWDpword [/DBdbname]]
unformattedFile | The fully qualified name of the ASCII file containing the records to load into a data file. For Windows platforms, you do not need to specify the name of the path if the data file resides in the same directory as your current directory. |
outputFile | The fully qualified name of the data file into which to insert the records. When you run butil for Windows platforms, you do not need to specify the name of the path if the data file resides in the same directory as your current directory. |
/Oowner | The owner name for the data file, if required. |
/UID<name> /UIDuname | Specifies the name of the user authorized to access a database with security enabled. |
/PWD<word> /PWDpword | Specifies the password for the user who is identified by uname. Pword must be supplied if uname is specified. |
/DB<name> /DBdbname | Specifies the name of the database on which security is enabled. If omitted, the default database is assumed. |
Example
The following example loads sequential records from the course.txt file into the course.mkd file. The owner name of the course.mkd file is Sandy.
butil -load course.txt course.mkd /OSandy
Recover
The
recover command extracts data from a MicroKernel file and places it in an ASCII file that has the same format as the input ASCII file that the
Load command uses. This is often useful for extracting some or all of the data from a damaged MicroKernel file. The
recover command may be able to retrieve many, if not all, of the file’s records. You can then use the
load command to insert the recovered records into a new, undamaged MicroKernel file.
Note The Maintenance tool performs no conversion on the data in the records. Therefore, if you use a text editor to modify an output file containing binary data, be aware that some text editors may change the binary data, causing the results to be unpredictable.
Format
BUTIL -RECOVER sourceFile unformattedFile [/O<owner |*>]
[/Q] [/J] [/I] [/UIDuname /PWDpword [/DBdbname]]
sourceFile | The fully qualified name of the data file from which to recover data. When you run butil for Windows platforms, you do not need to specify the name of the path if the data file resides in the same directory as your current directory. |
unformattedFile | The fully qualified name of the ASCII file where the tool should store the recovered records. |
/Oowner | The owner name for the data file, if required. |
/Q | Indicates whether to replace an existing unformatted file. By default, the Maintenance tool overwrites the existing files. If you specify this option and a file with the same name exists, the tool returns an error message.
The tool also checks whether the database engine file to be recovered is extended. If the file is extended, the tool checks for files with the same name as the potential unformatted extension file. If one of those files exists, the tool returns an error message. |
/J | Indicates backward reading of the file. If you specify this option, the tool recovers data from the database engine file using step last and previous operations. The default is forward reading, using step first and next operations. |
/I | Indicates forward reading of the file. Although the default is forward reading, you can use this option to indicate forward and backward reading. This means that if you specify both /I and /J, respectively, the tool reads the file forward until it fails. Then it starts at the end of the file and reads backwards until it reaches the record that failed previously or encounters another failure.
If you specify /J first, the tool reads backwards and then reads forward. |
/UID<name> /UIDuname | Specifies the name of the user authorized to access a database with security enabled. |
/PWD<word> /PWDpword | Specifies the password for the user who is identified by uname. Pword must be supplied if uname is specified. |
/DB<name> /DBdbname | Specifies the name of the database on which security is enabled. If omitted, the default database is assumed. |
For each record in the source file, if the recover command receives a variable page error (Status Code 54), it places all the data it can obtain from the current record in the unformatted file and continues the recovery process.
The tool produces the following messages:
•Informs you about the name of the last extension file created.
•Checks if the next extension file exists, and if so, tells you to delete it.
•If you move the extended unformatted files to a different location, you are prompted to move the base file and all of its extension files.
Example
The following statement extracts records from course.mkd and writes them to course.txt.
butil -recover course.mkd course.txt
Save
The
save command retrieves records from a MicroKernel file using a specified index path and places them in an ASCII file that is compatible with the required format for the
load command. You can then edit the ASCII file and use the
load command to store the edited data in another data file. (See
Importing and Exporting ASCII File Format for more information about the ASCII file format.)
Save generates a single record in the output ASCII file for each record in the input data file. Upon completion, save displays the total number of records saved.
Note The Maintenance tool performs no conversion on the data in the records. Therefore, if you use a text editor to modify an output file containing binary data, be aware that some text editors may change the binary data, causing the results to be unpredictable.
Format
butil -save sourceFile unformattedFile [Y indexFile | N <keyNumber | -1>] [/O<owner1 | *> [/O<owner2 | *>]] [/Q] [/J] [/I] [/UIDuname /PWDpword [/DBdbname]]
sourceFile | The fully qualified name of the data file containing the records to save. When you run butil for Windows platforms, you do not need to specify the name of the path if the data file resides in the same directory as your current directory. |
unformattedFile | The fully qualified name of the ASCII file where you want the tool to store the records. |
indexFile | The fully qualified name of an external index file by which to save records if you do not want to save records using the default of the lowest key number. |
keyNumber | The key number (other than 0) by which to save records if you do not want to save records using the default of the lowest key number. |
-1 | The specification for saving the records in physical order using the Btrieve Step operations. |
/Oowner1 | The owner name for the source file, if required. If only the index file requires an owner name, specify /O followed by a blank for owner1. |
/Oowner2 | The owner name for the index file, if required. |
/Q | Indicates whether to replace an existing unformatted file. By default, the Maintenance tool overwrites the existing files. If you specify this option and a file with the same name exists, the tool returns an error message.
The tool also checks whether the database engine file to be saved is extended. If the file is extended, the tool checks for files with the same name as the potential unformatted extension files. If one of those files exists, the tool returns an error message. |
/J | Indicates backward reading of the file. If you specify this option, the tool recovers data from the database engine file using get last and previous operations. The default is forward reading, using get first and next operations. |
/I | Indicates forward reading of the file. Although the default is forward reading, you can use this option to indicate forward and backward reading. This means that if you specify both /I and /J, respectively, the tool reads the file forward until it fails. Then it starts at the end of the file and reads backwards until it reaches the record that failed previously or encounters another failure.
If you specify /J first, the tool reads backwards and then reads forward. |
/UID<name> /UIDuname | Specifies the name of the user authorized to access a database with security enabled. |
/PWD<word> /PWDpword | Specifies the password for the user who is identified by uname. Pword must be supplied if uname is specified. |
/DB<name> /DBdbname | Specifies the name of the database on which security is enabled. If omitted, the default database is assumed. |
The tool produces the following messages:
•Informs you about the name of the last extension file created.
•Checks if the next extension file exists, and if so, tells you to delete it.
•If you move the extended unformatted files to a different location, you are prompted to move the base file and all of its extension files.
Examples
The following two examples illustrate how to use the save command to retrieve records from a data file.
This example uses a newcrs.idx external index file to retrieve records from the course.mkd file and store them in an unformatted text file called course.txt:
butil save course.mkd course.txt newcrs.idx
The following example retrieves records from the course.mkd file using key number 3 and stores them in an unformatted text file called course.txt:
butil -save course.mkd course.txt n 3
Creating and Modifying Data Files
This section includes detailed information on creating and modifying data files using the following butil commands:
Clone,
Clrowner,
Create,
Drop,
Index,
Setowner, and
Sindex. This section also includes information about removing unused space in a Btrieve data file, which is discussed in
Compacting Btrieve Data Files.
Caution No two files can share the same file name and differ only in their file name extension if both files are in the same directory. For example, do not name a data file Invoice.btr and another one Invoice.mkd in the same directory. This restriction applies because the database engine uses the file name for various areas of functionality while ignoring the file name extension. Since only the file name is used to differentiate files, files that differ only in their file name extension look identical to the database engine.
Table 74 Commands to Create and Modify Data Files
Command | Description |
| Creates a new, empty data file using an existing file’s specifications. |
| Clears the owner name of a data file. |
| Creates a data file. |
| Drops an index. |
| Creates an external index file. |
| Assigns an owner name to a data file. |
| Creates an index. |
Clone
The clone command creates a new, empty file with the same file specifications as an existing file (including any supplemental indexes, but excluding the owner name). The new data file includes all the defined key characteristics (such as key position, key length, or duplicate key values) contained in the existing file.
The
clone command ignores all MicroKernel configuration options that affect file statistics (such as
System Data)
except file version. The
clone command creates a new file using the database engine file version you specify with the
Create File Version option.
Format
BUTIL -CLONE outputFile sourceFile [/O<owner | *>] [/pagecompresson | /pagecompressoff] [/recordcompresson | /recordcompressoff] [/UIDuname /PWDpword [/DBdbname]] [/S]
outputFile | The fully qualified file name to use for the new, empty data file. When you run butil for Windows platforms, you do not need to specify the name of the path if the data file resides in the same directory as your current directory. |
sourceFile | The fully qualified file name of the existing data file to replicate.When you run butil for Windows platforms, you do not need to specify the name of the path if the data file resides in the same directory as your current directory. |
/Oowner | The owner name, if any, for the source data file. Note that an owner name in the source file is not cloned to the output file. If an owner name is needed in the new file, it must be added separately. See
Owner Names for more information. |
/pagecompresson | Turns on page compression for outputFile provided the Create File Version in the compatibility properties for the database engine is 9.5 or 13.0. |
/pagecompressoff | Turns off page compression for outputFile. This parameter has no effect if sourceFile does not use page compression. |
/recordcompresson | Turns on record compression for outputFile. |
/recordcompressoff | Turns off record compression for outputFile. This parameter has no effect if sourceFile does not contain record compression. |
/UID<name> /UIDuname | Specifies the name of the user authorized to access a database with security enabled. |
/PWD<word> /PWDpword | Specifies the password for the user who is identified by uname. Pword must be supplied if uname is specified. |
/DB<name> /DBdbname | Specifies the name of the database on which security is enabled. If omitted, the default database is assumed. |
Remarks
Btrieve 6.0 and later allows a maximum of 23 key segments in a data file with a page size of 1024 bytes. Therefore, the
clone command sets the page size in the new data file to 2048 bytes if the existing data file contains 24 key segments and has a page size of 1024 bytes. This occurs if the existing data file has a format earlier than 6.0 and the database engine was not loaded with the
Create File Version option set to 5.
x or 6.
x.
If you are cloning a pre-7.x file, ensure that the database engine is configured to create the file format version that you want the new file to be. For example, if you want to clone a 6.15 file in 9.5 format, in the database engine Compatibility properties, set Create File Version to 9.5.
Note If your source file is in 8.x, 9.5, or 13.0 format and contains no system data, your output file also will contain no system data, regardless of the database engine configuration. To add system data to an existing file, see Getting Started with PSQL.
If you are trying to recover from receiving status code 30 (file specified is not a MicroKernel file) and you suspect that the header page of the source file might be damaged, try creating the new MicroKernel file using the
Create command with a description file.
Example
The following command creates the newcrs.mkd file by cloning the course.mkd file.
butil -clone newcrs.mkd course.mkd
Clrowner
The CLROWNER command clears the owner name of a MicroKernel file.
Format
BUTIL -CLROWNER sourceFile </O<owner | *> [/UIDuname /PWDpword [/DBdbname]]
sourceFile | The fully qualified file name of the data file. When you run butil on Windows platforms, you do not need to specify the name of the path if the data file resides in the same directory as your current directory. |
/Oowner | The owner name to clear. See
Owner Names for more information. |
/UID<name> /UIDuname | Specifies the name of the user authorized to access a database with security enabled. |
/PWD<word> /PWDpword | Specifies the password for the user who is identified by uname. Pword must be supplied if uname is specified. |
/DB<name> /DBdbname | Specifies the name of the database on which security is enabled. If omitted, the default database is assumed. |
Example
The following command clears the owner name for the file tuition.mkd. The owner name is Sandy.
butil -clrowner tuition.mkd /OSandy
Create
The
CREATE command generates an empty MicroKernel file using the characteristics you specify in a description file. Before you can use the
CREATE command, you must create a description file to specify the new key characteristics. For more information, see
Description Files.
Format
BUTIL -CREATE outputFile descriptionFile [< Y | N >] [/UIDuname /PWDpword [/DBdbname]]
outputFile | The fully qualified file name of the database engine file to create. If the file name is the name of an existing MicroKernel file, this command creates a new, empty file in place of the existing file. Any data that was stored in the existing file is lost and cannot be recovered. When you run butil for Windows platforms, you do not need to specify the name of the path if the data file resides in the same directory as your current directory. |
descriptionFile | The fully qualified name of the description file containing the specifications for the new MicroKernel file. |
Y | N | Indicates whether to replace an existing file. If you specify N but a MicroKernel file with the same name exists, the tool returns an error message. The default is Y. |
/UID<name> /UIDuname | Specifies the name of the user authorized to access a database with security enabled. |
/PWD<word> /PWDpword | Specifies the password for the user who is identified by uname. Pword must be supplied if uname is specified. |
/DB<name> /DBdbname | Specifies the name of the database on which security is enabled. If omitted, the default database is assumed. |
Example
The following command creates a file named course.mkd using the description provided in the create.des description file.
butil -create course.mkd create.des
Sample Description File for the CREATE Command
The sample description file shown in Figure
34 creates a MicroKernel formatted file. The file is specified to have a page size of 512 bytes and 2 keys. The fixed-length portion of each record in the file is set to 98 bytes. The file specifies variable-length records with no blank truncation, record compression, and variable-tail allocation tables (VATs). The free space threshold is set to 20 percent. Allocation is set to 100 pages. The MicroKernel preallocates 100 pages, or 51,200 bytes, when it creates the file.
Figure 34 Sample Description File for the CREATE Command
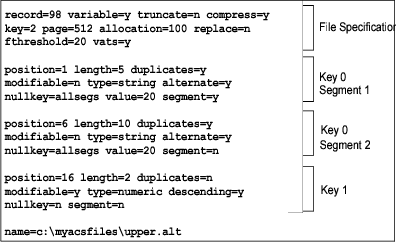
Key 0 is a segmented key with two duplicatable, nonmodifiable string segments and a null value of 20 hexadecimal (space) specified for both segments. Key 0 uses the collating sequence upper.alt.
Key 1 is a numeric, nonsegmented key that does not allow duplicates but permits modification. It is sorted in descending order.
Drop
The DROP command removes an index from a file and adjusts the key numbers of any remaining indexes, subtracting 1 from each subsequent key number. If you do not want to renumber the keys, you can add 128 to the key number you specify to be dropped. This renumbering feature is available only for 6.0 and later files.
Format
BUTIL -DROP sourceFile < keyNumber | SYSKEY >
[/O<owner | *>] [/UIDuname /PWDpword [/DBdbname]]
sourceFile | The fully qualified name of the file from which you are dropping the index. When you run butil for Windows platforms, you do not need to specify the name of the path if the data file resides in the same directory as your current directory. |
keyNumber | The number of the key to remove. To preserve the original key numbers, add a 128 bias to the key number you specify. |
SYSKEY | Instructs the tool to drop the system-defined log key (also called system data). Dropping the system-defined log key does not delete values from the records; the database engine still assigns unique system-defined log key values to newly inserted records. |
| However, the database engine cannot perform logging for a file from which the system-defined log key is dropped, if no user-defined unique keys exist. For this reason, you should use this option only if you suspect that the system-defined log key is corrupt and you intend to readd it.
The SINDEX command allows you to reuse the system-defined log key once you have dropped it. |
/Oowner | The owner name for the file, if required. See
Owner Names for more information. |
/UID<name> /UIDuname | Specifies the name of the user authorized to access a database with security enabled. |
/PWD<word> /PWDpword | Specifies the password for the user who is identified by uname. Pword must be supplied if uname is specified. |
/DB<name> /DBdbname | Specifies the name of the database on which security is enabled. If omitted, the default database is assumed. |
Examples
In both of the following examples, course.mkd has three keys. The original keys in the file are numbered 0, 1, and 2.
In the first example, the butil -drop command drops key number 1 from the course.mkd file and renumbers the remaining key numbers as 0 and 1.
butil -drop course.mkd 1
In the following example, the butil –drop command drops key number 1, but does not renumber the keys. The key numbers remain 0 and 2.
butil -drop course.mkd 129
Index
The
INDEX command builds an external index file for an existing MicroKernel file, based on a field not previously specified as a key in the existing file. Before you can use the
INDEX command, you must create a description file to specify the new key characteristics. For more information about description files, see
Description Files.
The records in the new file consist of the following:
•The 4byte address of each record in the existing data file.
•The new key value on which to sort.
Note If the key length you specify in the description file is 10 bytes, the record length of the external index file is 14 bytes (10 plus the 4byte address).
Format
BUTIL -INDEX sourceFile indexFile descriptionFile [/O<owner | *>]
[/O<owner | *>] [/UIDuname /PWDpword [/DBdbname]]
sourceFile | The fully qualified name of the existing file for which to build an external index. When you run butil for Windows platforms, you do not need to specify the name of the path if the data file resides in the same directory as your current directory. |
indexFile | The fully qualified name of the index file in which the database engine should store the external index. |
descriptionFile | The fully qualified name of the description file you have created containing the new key definition. The description file should contain a definition for each segment of the new key. |
/Oowner | The owner name for the data file, if required. See
Owner Names for more information. |
/UID<name> /UIDuname | Specifies the name of the user authorized to access a database with security enabled. |
/PWD<word> /PWDpword | Specifies the password for the user who is identified by uname. Pword must be supplied if uname is specified. |
/DB<name> /DBdbname | Specifies the name of the database on which security is enabled. If omitted, the default database is assumed. |
Remarks
The
INDEX command creates the external index file and then displays the number of records that were indexed. To retrieve the data file’s records using the external index file, use the
Save command.
Sample Description File for the INDEX Command
The description file shown in the following illustration defines a new key with one segment. The key begins at byte 30 of the record and is 10 bytes long. It enables duplicates, is modifiable, is a STRING type, and uses no alternate collating sequence.
Figure 35 Sample Description File for INDEX Command
Example
The following command creates an external index file called newcrs.idx using a data file called course.mkd. The course.mkd file does not require an owner name. The description file containing the definition for the new key is called newcrs.des.
butil -index course.mkd newcrs.idx newcrs.des
Setowner
The
SETOWNER command sets an owner name for a data file. See
Owner Names for more information.
Format
BUTIL -SETOWNER sourceFile /O<owner | *> level [/L] [/UIDuname /PWDpword [/DBdbname]]
sourceFile | The fully qualified name of the data file. When you run butil on Windows platforms, you do not need to specify the name of the path if the data file resides in the same directory as your current directory. |
/Oowner | The owner name to be set. |
level | The type of access restriction for the data file. The possible values for this parameter are as follows: Note that level must immediately follow the /O parameter. |
| 0: Requires an owner name for any access mode (no data encryption) |
| 1: Permits read access without an owner name (no data encryption) |
| 2: Requires an owner name for any access mode (with data encryption) |
| 3: Permits read access without an owner name (with data encryption) |
/L | Designates a long owner name. Owner names are case sensitive and can be short or long. A short owner name can be up to 8 bytes long. A long owner name can be up to 24 bytes long. For restrictions pertaining to long owner names, see the
Procedure topic in Btrieve API Guide for
Set Owner (29). |
/UID<name> /UIDuname | Specifies the name of the user authorized to access a database with security enabled. |
/PWD<word> /PWDpword | Specifies the password for the user who is identified by uname. Pword must be supplied if uname is specified. |
/DB<name> /DBdbname | Specifies the name of the database on which security is enabled. If omitted, the default database is assumed. |
Examples
The following example creates a short owner for the course.mkd data file. The owner name is Sandy, and the restriction level is 1.
butil -setowner course.mkd /OSandy 1
The following example creates a long owner name for the billing.mkd data file, encrypts the owner name and file, and restricts all access modes.
butil -setowner billing.mkd /Ohr#Admin$945k7YY%svr 2 /L
Sindex
The SINDEX command creates an additional index for an existing MicroKernel file. By default, the key number of the new index is one higher than the previous highest key number for the data file, or you can instruct the database engine to use a specific key number. An exception is if a DROP command previously removed an index without renumbering the remaining keys, thus producing an unused key number; in this case, the new index receives the first unused number.
You can instruct the database engine to use a specific key number for the new index with the key number option. The key number you specify must be a valid key number that is not yet used in the file. If you specify an invalid key number, you receive Status Code 6.
If you do not use the
SYSKEY option with this command, you must create a description file that defines key specifications for the index before you can use the
SINDEX command. For more information about description files, see
Description Files.
Format
BUTIL -SINDEX sourceFile <descriptionFile | SYSKEY> [keyNumber]
[/O<owner | *>] [/O<owner | *>] [/UIDuname /PWDpword [/DBdbname]]
sourceFile | The fully qualified name of the existing file for which to build an external index. When you run butil for Windows platforms, you do not need to specify the name of the path if the data file resides in the same directory as your current directory. |
descriptionFile | The fully qualified name of the description file you have created containing the new key definition. The description file should contain a definition for each segment of the new key. |
SYSKEY | Instructs the tool to readd the system key on a file in which the system key was dropped. |
/Oowner | The owner name for the data file, if required. See
Owner Names for more information. |
/UID<name> /UIDuname | Specifies the name of the user authorized to access a database with security enabled. |
/PWD<word> /PWDpword | Specifies the password for the user who is identified by uname. Pword must be supplied if uname is specified. |
/DB<name> /DBdbname | Specifies the name of the database on which security is enabled. If omitted, the default database is assumed. |
Examples
The following example adds an index to the course.mkd file. The name of the description file is newidx.des.
butil -sindex course.mkd newidx.des
The following example adds the system-defined key to the course.mkd file. The system-defined key was dropped.
butil -sindex course.mkd syskey
Compacting Btrieve Data Files
You can use several commands in the butil (
Clone,
Recover, and
Load, respectively) to remove unused space in a data file to decrease its size.
►To compact a Btrieve data file
1 Rename your data file and then use the
Clone option to create a blank data file using the original file name.
2 Use
Recover to save the data from the clone file to an unformatted text file in sequential order.
3 Use
Load to load the recovered data into the clone.
Every record containing data is loaded into the newly created data file without blank records. You can also perform this operation in the Btrieve Interactive Maintenance tool.
Managing the Page Cache for Files
To improve performance, butil allows you to manage page caching for a file using cache and purge commands.
Notes
When butil -cache and -purge commands are executed from a client cache or reporting engine, their actions apply only to the file in the local cache.
In order for a file to remain in the client cache, one of two things must be true:
•No other machines must try to write to the file while it is closed.
•At least one application must keep the file open on the client machine.
When the client cache engine is installed as an application, it shuts down and empties the cache shortly after the client closes all files. This is not an issue for the client cache engine installed as a service or for the reporting engine.
Cache
The CACHE command preloads pages for a file into cache, returning when either the file is fully cached or the cache is full.
Format
BUTIL -cache <sourceFile>
sourceFile | The fully qualified name of the data file to be preloaded into cache. For Windows platforms, you do not need to specify the name of the path if the data file resides in the same directory as your current directory. |
Purge
The PURGE command flushes all unneeded cached pages for a file. Returns immediately if the file has open handles.
Format
BUTIL -purge <sourceFile>
sourceFile | The fully qualified name of the data file to be purged. For Windows platforms, you do not need to specify the name of the path if the data file resides in the same directory as your current directory. |
Viewing Data File Statistics
This topic includes information about generating a report using STAT on characteristics and statistics of a data file.
Stat
The STAT command generates a report that contains defined characteristics of a data file and statistics about file contents. You can use this command to determine whether the database engine can log statistics on the file using the transaction durability feature. The STAT command reports indexes the same whether they were created by the Create Supplemental Index operation (in Btrieve 6.0 and later) or the Create operation.
Format
BUTIL -STAT <sourceFile> [/O<owner | *>] [/O<owner | *>] [/UIDuname /PWDpword [/DBdbname]]
sourceFile | The fully qualified name of the data file for which to report statistics. For Windows platforms, you do not need to specify the name of the path if the data file resides in the same directory as your current directory. |
/Oowner | The owner name for the data file, if required. See
Owner Names for more information. |
/UID<name> /UIDuname | Specifies the name of the user authorized to access a database with security enabled. |
/PWD<word> /PWDpword | Specifies the password for the user who is identified by uname. Pword must be supplied if uname is specified. |
/DB<name> /DBdbname | Specifies the name of the database on which security is enabled. If omitted, the default database is assumed. |
File Statistics Example
The following example shows statistics for the file patients.dta.
butil -stat patients.dta
The result of this command lists the following:
**************************************************
File Statistics for patients.dta
File Version = 8.00
Page Size = 2048
Page Preallocation = No
Key Only = No
Extended = No
Total Number of Records = 16
Record Length = 104
Record Compression = No
Variable Records = No
Available Linked Duplicate Keys = 0
Balanced Key = No
Log Key = 1
System Data = No
Total Number of Keys = 3
Total Number of Segments = 4
Key Segment Position Length Type Flags Null Values* Unique ACS Values
0 1 21 20 String MD -- 16 0
0 2 7 12 String MD -- 16 0
1 1 1 6 String M -- 16 0
2 1 83 10 String MD -- 7 0
Alternate Collating Sequence (ACS) List:
0 UPPER
Legend:
< = Descending Order
D = Duplicates Allowed
I = Case Insensitive
M = Modifiable
R = Repeat Duplicate
A = Any Segment (Manual)
L = All Segments (Null)
* = The values in this column are hexadecimal.
?? = Unknown
-- = Not Specified
This example shows that the file version of patients.dta is 8.0, indicating the earliest Btrieve version that can read the file format. The file has a page size of 2048 bytes and no preallocated pages. This is not a key-only file, nor an extended file.
Sixteen records have been inserted into the file. The file was defined with a record length of 104 bytes, does not use record compression, and does not allow variable-length records.
The file has no available linked duplicate keys. It does not use balanced indexing. The MicroKernel performs logging using Key 1, and the file contains no system-defined data. It has three keys comprised of four key segments.
Note Indexes created with
Sindex are designated with the letter R by default
unless you specified the Reserved Duplicate Pointer element.
The statistics report also provides information about specific keys. For example, the report shows that Key 0 consists of two segments, allows duplicates, and is modifiable. Furthermore:
•The first segment starts in position 21, is 20 characters long, allows duplicates, is modifiable, and will be sorted as a string type. The dashes indicate that a null value was not defined. The Unique Values column indicates that 16 unique values were inserted for this segment. This segment uses the upper.alt alternate collating sequence file.
•The second segment starts in position 7, is 12 characters long, allows duplicates, is modifiable, and will be sorted as a string type. Sixteen unique values were inserted for this segment. This segment uses the upper.alt alternate collating sequence file.
Key 1 is the key the database engine uses in logging this file. It consists of one segment. It starts in position 1, is 6 characters long, does not allow duplicates, is modifiable, and will be sorted as a string type. Sixteen unique values were inserted for this key. It uses the upper.alt alternate collating sequence file.
Key 2 consists of one segment. It starts in position 83, is 10 characters long, allows duplicates, is modifiable, and will be sorted as a string type. Seven unique key values were inserted for this key. It uses the upper.alt alternate collating sequence file.
File Version Notes
When asked for the file format version of a file, the database engine gives the earliest engine version that can read the file. For example, if you have a file created in 5.x format, it may be reported as a version 3.x file because it uses no 4.x or 5.x features. Starting with the 6.x format, the file itself contains a version stamp. Before 6.x, the only way to determine file format version was to inspect the features used in the file, since each new file version has features not available in previous ones.
For version 5.x and earlier files, the following table shows the features used to determine the file format version.
This file format version is reported as ... | ... if one or more of these features are in use |
5.x | Compressed records
Key only file |
4.x | Extended key types
Variable length records
Index added by Create Index operation |
3.x | None of the above |
Displaying MicroKernel Engine Version
This section includes detailed information about displaying the version of the MicroKernel Engine using the VER command.
Ver
The VER command returns the version number of both the MicroKernel Engine and the Requester (the access module).
Format
butil -ver
Remarks
When you run the VER command, the tool displays messages similar to the following:
The Btrieve Requester version is 11.00.
The Btrieve Version is 11.00.
Unloading the MicroKernel Engine and Requester (DOS only)
Stop
Use the STOP command to unload the MicroKernel Engine and, if applicable, the Requester.
Format
butil -stop
Performing Continuous Operations
The commands pertaining to continuous operations, startbu and endbu, are discussed in the chapter
Logging, Backup, and Restore.
Performing Archival Logging
The Maintenance tool (GUI or butil command line) provides a way to roll forward archival log files into the data files. See also the chapter
Logging, Backup, and Restore.
The butil rollfwd command recovers changes made to a data file between the time of the last backup and a system failure. If a system failure occurs, you can restore the backup copy of your data file and then use the butil rollfwd command, which applies all changes stored in the archival log to your restored data files. Do not use this command unless you have restored data files from backup.
Note You cannot take advantage of the rollfwd command unless you both enable the MicroKernel
Archival Logging Selected Files option
and back up your files
before a system failure occurs.
You can also use the rollfwd command to produce an output file of logged operations. The rollfwd command can produce the output file either before you roll changes forward or at the same time as the roll forward.
You can roll forward a single file, all data files on a volume, all data files on a drive, or a list of files, volumes, and/or drives.
Using the GUI
1 Access Maintenance from the operating system Start menu or Apps screen or from the Tools menu in PSQL Control Center.
2 Within the Maintenance window, click Data > Roll Forward The Roll Forward dialog box appears.
Figure 36 Roll Forward Dialog
3 Select the specific operation type: single file, list of files, volume name, or drive letter. When you select either volume name or drive letter, you must insert a back slash (\) or forward slash (/) at the end (for example, \\server\vol1\ or D:\).
4 You can generate a log file, called a dump file, of all the Btrieve operations required to perform the roll forward tasks.
By default, this file is not created. Select the Generate Dump File check box to generate a file. You can also specify the following options.
Table 75 Roll Forward GUI Options
Only Create Dump File | Indicates that only the dump file is to be created, and the roll forward operation is not to be performed. |
Dump File Name | Contains the name of the dump file, which must begin with a slash and not contain a drive letter or server/volume name. |
Data Buffer Length | Indicates the number of data buffer bytes to write to the dump file for each Btrieve operation. |
Key Buffer Length | Indicates the number of key buffer bytes to write to the dump file for each Btrieve operation. |
Display Numbers as HEX | If you select this option, the numbers in the dump file output are formatted as hexadecimal. If you do not select this check box, the numbers are displayed in decimal format. |
Verbose | Includes additional information like user name, network address, and time stamp in the dump file. |
5 Click Execute to generate the dump file and/or perform the roll forward operation. If the data is valid, the Roll Forward Status dialog box appears.
Figure 37 Roll Forward Status Dialog Box
As files are processed, they are added to the scrolling list box which displays the file name and the PSQL status code returned from the roll forward operation.
If an error occurs during processing, the Roll Forward Continue on Error dialog box appears. This dialog box allows you to continue without being prompted again, to continue and be prompted again, or to stop processing files.
Using the Command Line
This section explains the syntax for the command line usage of Roll Forward.
BUTIL -ROLLFWD <sourceFile | drive | @listFile>
[</L[dumpFile] | /W[dumpFile]> [/T<dataLength>]
[/E<keyLength>] [/H] [/V] [/O<ownerList | owner>|*]]
[/A] [/UID<name> <PWD<word>> [DB<name>]]
sourceFile | The fully qualified name of a data file for which to roll forward changes. For Windows platforms, you do not need to specify the name of the path if the data file resides in the same directory as your current directory. |
drive | A drive letter for which to roll forward changes. End the volume name with a backslash (\) or forward slash (/), as in F:\ or F:/. |
listFile | The fully qualified name of a text file containing the paths of files, volumes, or drives for which to roll forward changes. Separate these paths with a carriage return/line feed. If the Maintenance tool encounters an error, the tool stops rolling forward the current file, but does not roll back the changes already made. If you specify the /A option, the tool continues rolling forward with the next file. |
/LdumpFile | Produces an output file, but does not roll forward. |
/WdumpFile | Rolls forward and produces an output file. |
dumpFile | The file name of the output file to which the Maintenance tool writes a list of logged operations. The default is \BLOG\BROLL.LST, relative to the root of the physical drive. The file name cannot contain a drive letter or volume name and must start with a forward slash (/) or backslash (\). The Maintenance tool places the file on the same volume as the BLOG.CFG file. |
/TdataLength | Specifies the length of the operation’s data buffer to write to the output file. If you do not specify this option, the tool does not include data buffer contents in the output file. |
/EkeyLength | Specifies the length of the operation’s key buffer to write to the output file. If you do not specify this option, the tool does not include key buffer contents in the output file. |
/H | Instructs the tool to show numbers in the output file in hexadecimal notation. If you do not specify this option, numbers in the output file are in ASCII format. This option affects the format of the Entry Count, Op Code, Key Number, and Data Length fields. |
/V | Instructs the tool to include additional information (such as the user name, network address, and time stamp) in the output file. |
/O | Specifies the owner name of the data file, if required. An owner name is required if you request an output file of logged operations and the backup copy of the data file has an owner name for read-only access. If more than one file has an owner name, the respective owner names must be separated by commas. See
Owner Names for more information. |
/A | Specifies that if you are rolling back more than one file and the Maintenance tool encounters an error, the tool continues rolling forward with the next file. When you do not specify this option, the tool stops rolling forward if it encounters an error. The tool does not roll back the changes already made.
Note: When you use the /A option, you might want to redirect output to a file, as described in
Redirecting Error Messages and
Command Files. |
/UID<name> /UIDuname | Specifies the name of the user authorized to access a database with security enabled. |
/PWD<word> /PWDpword | Specifies the password for the user who is identified by uname. Pword must be supplied if uname is specified. |
/DB<name> /DBdbname | Specifies the name of the database on which security is enabled. If omitted, the default database is assumed. |
Note If the key buffer or the data buffer is not an input parameter for a Btrieve operation, nothing is written to the dump file.
Examples
Example A The following example recovers changes to the class.mkd file from the default archival log and log location.
butil -rollfwd file_path\PSQL\Demodata\class.mkd
For default file locations, see
Where are the PSQL files installed? in
Getting Started with PSQL.
Example B This example recovers changes and outputs them to all files on the d:\ volume with the following options:
•Use default dump file.
•Dump 32 bytes of the data buffer.
•Dump 4 bytes of the key buffer.
•Dump in hex mode.
butil -rollfwd d:\ /W /H /T32 /E4
Example C The following example does not perform roll forward but only outputs the changes to the files listed in files.txt with the following dump options:
•Use d:\temp\files.lst as the dump file.
•Use verbose mode.
•Data files have owner names: own123 and own321.
•Do not dump data or key buffer.
butil -rollfwd d:\temp\files.txt /L\temp\files.lst /V /Oown123,own321