Testing Btrieve Operations
How to Perform Btrieve Operations with Function Executor
The following topics cover use of the Function Executor tool:
Function Executor Concepts
This section contains the following topics:
Overview
Function Executor runs on Windows. With this interactive tool, you can learn how Btrieve operations work. Btrieve operations are the same as MicroKernel Engine operations.
By allowing execution of Btrieve operations one at a time, Function Executor enables application developers to simulate the operations of a Btrieve application. This simulation can isolate the database calls from the rest of your application, which can help in testing and debugging your program.
Function Executor is primarily a tool for application developers. This chapter assumes that you have a basic knowledge of Btrieve operations. For more information about Btrieve operations, refer to the Btrieve API Guide that is available in the Developer Reference.
What Function Executor Can Do
•Perform Btrieve operations while monitoring the contents of memory structures.
•Allow you to capture a series of Btrieve operations and save them as a history file for later playback
•Display the Btrieve version for clients, and local and remote engines.
•Display the Btrieve characteristics of data files and allow you to save those characteristics as a template (description file) or create a new file based on those characteristics. See
File Statistics for more information.
Function Executor Features
Function Executor features include the following:
Editor Status Bar
The status bar contains the following elements:
| The last/current status code is shown in the editor window’s status bar at the bottom of the window for the open file, and appears red if the last status was not zero. |
| Placing the mouse cursor over the status code shows a description of the status and what operation caused it. You can also click the display in red in order to display the full help for the status code. See
To get help for a status code for more information. |
| When your cursor is in the input area on the main window of Function Executor, the status bar displays the offset within the buffer: the hex, the decimal, and the ASCII value of the byte you are presently on. |
| The status bar also indicates how many operations have been performed when there are multiple items in the queue. Normally this displays 1 of 1, but if you are executing multiple operations, it will display the count as the operations are executed. |
| The status bar also displays when you are in a transaction. |
Statistics
Clicking the File Statistics icon displays a dialog box listing statistics for the currently open file. You can print these statistics to a text file or save them to a description file usable by BUTIL -CREATE. You may also create a new blank file with the same characteristics.
Get and GetExt
From the Get menu, you can retrieve the First, Next, Previous, and Last records in the table. The GetExt menu includes the Goto Percent, Get Position, and Find Percent commands.
The Get and GetExt commands are available from both the menu bar and toolbar. The toolbar offers Step (Physical) and Get (Logical), allowing you to move either through the natural order of the file (physical) or in a specific order (logical).
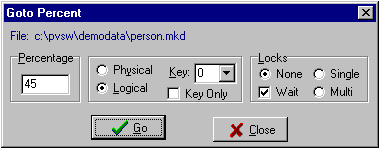
Goto Percent allows you to choose whether to jump to a point within the physical layout of the file, or down any key path, limited to the keys defined in the file. You can also set lock biases using the option buttons in the Locks group box.
Find Percentage is the opposite of Goto Percent. It tells you how far into the data you are, depending on whether you are stepping through the file logically or physically.
Transaction Toolbar
The Transaction toolbar lets you start, stop, and abort transactions. You can set all aspects of the Transaction API through this toolbar, and the operation is executed immediately. The Transaction status also appears on the main window status bar, since it affects all open files for the client ID.
Login Dialog
The Login dialog box allows you to perform the Btrieve login operation via a GUI interface. For more information, see topics about database security and its configuration.
History Log
When you perform operations using the Function Executor tool, they are recorded in a History log. You can use this log to perform the operations contained therein, or save the history as a file that you can later reload and step through.
See the following topics for more information about the History log:
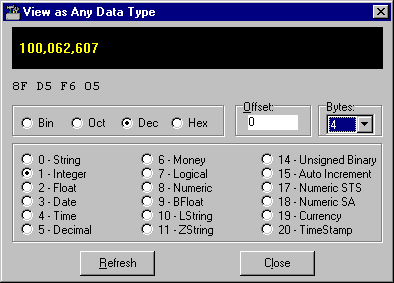
Viewing as Any Data Type
When a file is open, you can right-click any position in the buffer and select Show As. A dialog box appears in which you can view the bytes at the chosen buffer position as any data type.
Table
57 lists controls available Function Executor.
Table 57 Function Executor Controls
Control | Description |
Repeat | Allows you to repeat commands. |
Create | Allows you to create a new file. |
File Statistics | Gives information from the BSTAT function. You can print these statistics. |
MDI | The Multiple Document Interface permits the opening of multiple files. |
Reset | Reset Client ID |
Stop | Btrieve Stop |
Version | Btrieve Version |
Automatic Mode in Function Executor
For each open file (see
Application Window), you have the option of performing Btrieve operations with or without the assistance of Function Executor. You do not need to make any configuration changes to use one method or the other. Whether you use automatic mode or manual mode depends on which GUI controls you use.
Figure 9 Automatic Mode and Manual Mode Controls
Note Selections from the menus (see
Application Window) also are part of the automatic mode.
When you click a button in the automatic mode area, the following assistance is provided by the tool:
•Data buffers and data lengths are set automatically to prevent status code 22.
•Information is requested appropriate to the operation.
Where to Learn More
Function Executor is a valuable tool for program developers, but it assumes you have a working knowledge of Btrieve fundamentals. See the following topics to understand all of the features of this tool:
•MicroKernel Engine fundamentals in PSQL Programmer's Guide
•Btrieve API Guide
•Various security topics in the advanced user documentation
Function Executor Graphical User Interface
This topic describes the objects on Function Executor graphical user interface (GUI).
Application Window
The table below the following image explains the window components. Click an area of the image for which you want more information.
Table 58 Function Executor Application Window
GUI Object | Description | Related Information |
File menu | Allows you to perform the following commands and Btrieve operations: •Login and Logout •Open and Close •New •Print Setup •Set Owner Name and Clear Owner Name •Start Continuous Operations or End Continuous Operations •Reset, Stop, and Exit | |
Get menu | Allows you to perform the following Btrieve operations: •Get First and Get Next •Get Previous and Get Last •Get Greater Than and Get Greater or Equal •Get Less and Get Less or Equal | |
GetExt menu | Allows you to perform the following Btrieve operations: •Goto Percent •Get Position •Find Percent | |
Step menu | Allows you to perform the following Btrieve operations: •Step First and Step Next •Step Previous and Step Last | |
Updates menu | Allows you to perform the following Btrieve operations: •Insert, Update, and Delete You can also release locks using this menu. | |
View menu | Allows you to display GUI elements: •Toolbars (main and transactions) •History window •File statistics window •Engine version using the Btrieve Version operations | |
Tools menu | Allows you to perform the following Btrieve operations: •Get Directory and Set Directory | |
Window menu | Allows you to perform windowing operations: •Cascade windows and Tile windows •Select from a list of open windows | |
Help menu | Allows you to select from a list of help resources for this tool. | |
Open  | Displays a dialog box from which you select a Btrieve file to open. | |
Create  | Displays a dialog box with which you can create a new Btrieve file. | |
Reset  | Resets the current client connection (Btrieve operation 28) and closes all files opened with that client ID. | |
Stop  | Terminates transactional services (Btrieve operation 25) and closes all open files. | |
Statistics  | Displays a dialog box listing the currently opened file’s statistics. You can print these statistics to a text file or save them to a description file usable by BUTIL -CREATE | |
Version  | Displays information about the version of PSQL (using Btrieve operation 26) that you are running. If no file is open, you will see information about the requester DLLs and any local MicroKernel engine. If you open a file on a remote server, you will see information about the server and requester DLLs. | |
Status Codes Help  | If no file is open, displays Status Codes help file. If file is open and a status code is active, displays help for that particular status code. | |
Show help  | Toggles whether a pop-up dialog box displays when a non-zero status code is received. | |
Show history  | Toggles whether the History window is displayed. | |
Operation count | Indicates the current operation number. This is used when you set the Repeat to a value greater than one. | |
Transaction state  | Indicates the current state of any transactions. Can be: •Blank, if no transaction is in effect •Concurrent •Exclusive | |
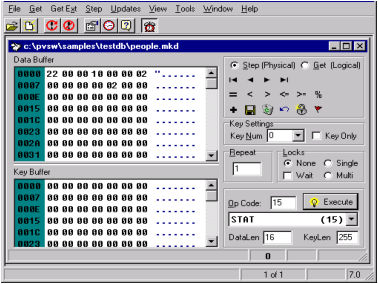
Main Window
A main window displays for every open file. Click an area of the image for which you want more information.
Table 59 Function Executor Main Window for an Open File
GUI Object | Description | Related Information |
Title Bar | Lists the full path of the open data file. | |
Data Buffer | Specifies a data value. For read and write operations, the Data Buffer contains records. For other operations, the Data Buffer contains file specifications, filtering conditions, and other information the database engine needs for processing the operation. This control corresponds with the Data Buffer parameter. | |
Key Buffer | Specify the path for the data file for which you want to perform a Btrieve operation. | |
Step vs. Get | Toggles between Step and Get operations | |
Get/Step First | Performs the Get or Step Next operation | |
Get/Step Prev | Performs the Get or Step Previous operation | |
Get/Step Next | Performs the Get or Step Next operation | |
Get/Step Last | Performs the Get or Step Last operation | |
Get Equal | Performs the Get Equal operation | |
Get Less Than | Performs the Get Less Than operation | |
Get Greater Than | Performs the Get Greater Than operation | |
Get Less or Equal Than | Performs the Get Less or Equal Than Operation | |
Get Greater or Equal Than | Performs the Get Greater or Equal Than Operation | |
Get/Find Percent | Performs the Get or Find Percent operations | |
Insert | Performs the Insert operation | |
Update | Performs the Update operation | |
Delete | Performs the Delete operation | |
Cancel | Cancels the recent changes | |
Unlock | Releases any locks. | |
Set or Goto Bookmark | Sets or positions at a previously defined bookmark. | |
Key Num | For most Get operations, specifies a key number, or index path, to follow for the current operation. For other operations, specifies such information as file open mode, encryption, or logical disk drive. This control corresponds with the Key Number parameter. | |
Key Only | Specifies to get key only, not data. | |
Repeat | Repeats the operation the number of times you specify. | |
Locks | Specifies the locking behavior you want in for the current operation. | |
Op Code | Specifies the current operation code plus its bias (if any). The default is 0. If you are familiar with Btrieve operation codes, you can enter the desired code. Otherwise, use the List box to specify an operation. This control corresponds with the Operation Code parameter. | |
Execute button | Performs the currently specified operation. | |
Operations list | Lists all Btrieve operations and their codes. The default is Open (0). You can move quickly through the list by entering the first letter of the operation you want to perform. | |
DataLen | Specifies the length (in bytes) of the Data Buffer. The default is 1024. For every operation that requires a data buffer, you must specify a buffer length. On many operations, the database engine returns a value to the Data Length. Generally, you should always specify a Data Length before you execute an operation. This control corresponds with the Data Buffer Length parameter. | |
Status Code Indicator | Displays a numeric status code returned by the database engine and a brief message explaining the result of a Btrieve operation. For detailed information about these status codes and messages, refer to the Status Codes and Messages manual. | |
Continuous Operations Indicator | Displays the following on the bottom row of the file window if the file is in Continuous Operations mode (operation 42). | |
Login and Logout
The Login and Logout dialog boxes allows you to perform the Btrieve login and logout operations for the database engine. Click an area of either image for which you want more information.
Figure 10 Login Dialog

Figure 11 Logout Dialog
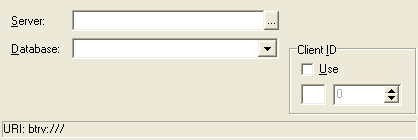
Table 60 Function Executor Login and Logout Dialogs
GUI Object | Description |
Server | Specifies the server where the database resides that you wish to log in to or log out from. Note that a server name is required to access a database on a Linux or macOS operating system. See also
Database URIs in PSQL Programmer's Guide. |
Database | Specifies the database on the server to which you want to authenticate. |
User Name | The user name you want to authenticate against the database. |
Password | The password for the user name. |
Client ID | If you want this login or logout to apply to a specific client ID, click Use and specify the range. Otherwise, leave as is. See
Client ID in Btrieve API Guide. |
URI String | As you enter information in the forms, the URI resulting from your selections is shown in this area. |
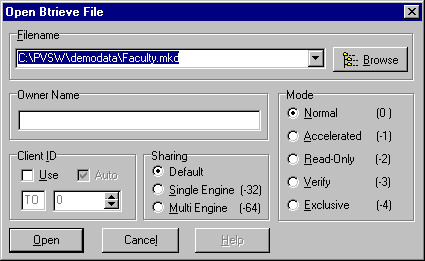
Open File Dialog
This dialog box allows you to open a file. Click an area of the image for which you want more information.
Table 61 Function Executor Open File Dialog
GUI Object | Description | Related Information |
Filename | Sets the location and name of the file that you want to open. | |
Owner name | Serves as a password for the Btrieve file, which is required to gain access to the file. A short owner name can be up to 8 bytes. A long owner name can be up to 24 bytes or if expressed as hexadecimal, 34-50 bytes. If you set a long owner name, then certain restrictions apply. For more information, see
Owner Names in Advanced Operations Guide. | |
Mode | Sets the state of the file when it is opened. Based on the state, the database engine knows certain conditions that apply to the opened file. For example, a condition could be that the file can be read but not updated (read-only). | See Btrieve API Guide for an explanation of modes. |
Client ID | If you want this login to apply to a specific client ID, click Use and set the range. Otherwise, leave as is. | |
Sharing | The database engine ignores the Sharing options. The Sharing options applied only to a legacy version of the engine, Btrieve 6.15. | |
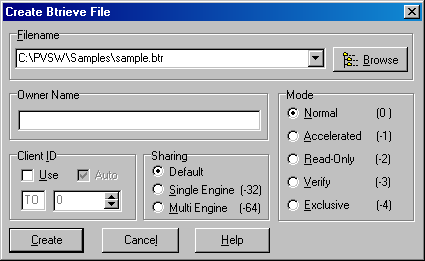
Create a Btrieve File
This dialog box allows you to create a Btrieve file based on an already open file. Click an area of the image for which you want more information.
Table 62 Function Executor Create File Dialog
GUI Object | Description | Related Information |
Filename | Sets the location and name of the file that you want to create. | |
Owner name | Serves as a password for the Btrieve file, which is required to gain access to the file. A short owner name can be up to 8 bytes. A long owner name can be up to 24 bytes or if expressed as hexadecimal, 34-50 bytes. If you set a long owner name, then certain restrictions apply. For more information, see
Owner Names in Advanced Operations Guide. | |
Mode | Sets the state of the file when it is opened. Based on the state, the database engine knows certain conditions that apply to the opened file. For example, a condition could be that the file can be read but not updated (read-only). | See
Open Modes in Btrieve API Guide for an explanation of modes. |
Client ID | If you want this login to apply to a specific client ID, click Use and set the range. Otherwise, leave as is. | |
Sharing | The database engine ignores the Sharing options. The Sharing options apply only to a legacy version of the database engine, Btrieve 6.15. | |
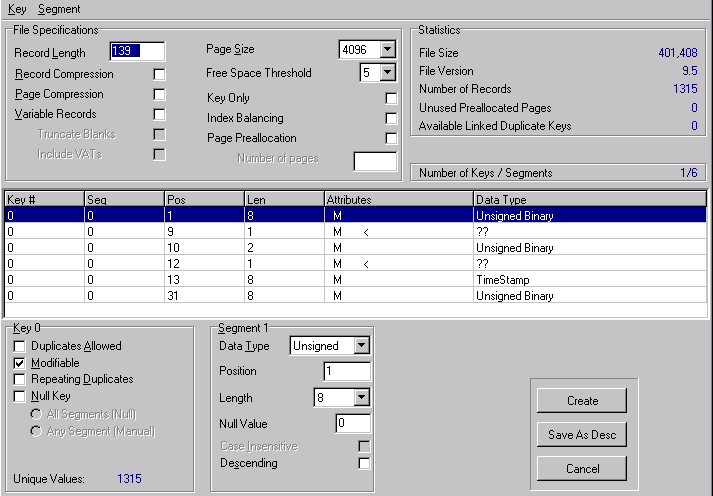
Create New Btrieve File Dialog
This dialog box allows you to specify additional characteristics for the file being created. Click an area of the image for which you want more information.
Table 63 Function Executor Create File Dialog (Advanced)
GUI Object | Description | Related Information |
Key and Segment commands | Allow you to add or delete a key or to add, insert, or delete a key segment. | |
File Specifications | Displays and allows you to modify characteristics of the file. | |
Statistics | Provides read-only information about the file. | |
Key and segment matrix | Displays the keys and segments for the file, listing the starting position, length, attributes, and data type for them. Clicking a row allows you to see, and modify if you want, information in the Key and Segment blocks. | |
Key | Displays and allows you to modify characteristics of a key. | |
Segment | Displays and allows you to modify characteristics of a key segment. | |
Command buttons | Allow you create a data file, a description, or to cancel the dialog box. | |
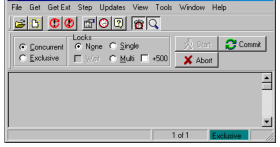
Transactions Toolbar
When a file is open, you can show the Transactions toolbar by selecting View > Toolbars > Transactions. This toolbar allows you to manually control transactions. Click an area of the following image to learn about what you can do with this toolbar.
Table 64 Function Executor Transactions Dialog
GUI Object | Description | Related Information |
Main application window | Main features of the program. | |
Transaction type | Specifies whether you want an exclusive or concurrent transaction. | |
Lock information | Specifies the type of locking you want in the transaction. | |
Start transaction button | Starts a transaction. | |
Commit transaction button | Commits the active transaction. | |
Abort transaction button | Cancels the active transaction and rolls back any changes made. | |
File area | This area contains one or more open files. | |
Transaction indicator | Indicates whether you are currently in a transaction. If you are in a transaction, this display will show either Concurrent or Exclusive. | |
File Statistics
When a file is open, you can show the File Statistics window by selecting View > File Statistics, clicking the File Statistics icon in the tool bar, or pressing Ctrl+S. It allows you to see the statistics for the file. Click an area of the following image to learn about what you can do in this window.
Table 65 Function Executor File Statistics Dialog
GUI Object | Description |
File information | Displays statistical information about the file. |
Flags | Allows you to view the flags set for this file. Any flag that is set will have a check mark next to its listing in the dialog box. |
Keys | Allows you to view the keys defined in this file. |
Key legend | Describes the single letter values that indicate Key attributes for the file. •D = DUP (Duplicatable) •M = MOD (Modifiable) •R = REPEAT_DUPS_KEY (repeating duplicates key) •A= NUL (All segment Null key) •L = MANUAL_KEY (any segment null key) •< = DESC_KEY (descending key value) •I = NOCASE_KEY (case-insensitive key) See also
Key Attributes in PSQL Programmer's Guide. |
Print button | Allows you to print the file statistics. Set up the printer using the File menu. |
Save button | Allows you to save the current file statistics to a description file, which you can later use to make a new file with the same characteristics. |
Exclamation point (create new file) | Allows you to create a new file based on these file statistics. |
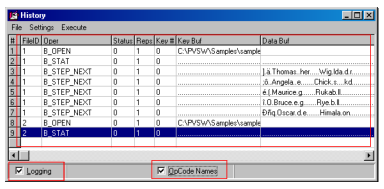
History
This dialog box allows you to see all the operations you have performed. Click an area of the image for which you want more information.
Table 66 Function Executor History Dialog
GUI Object | Description | Related Information |
File menu | Allows you to perform the following operations: •Import a history file •Export a history file •Close the history window | |
Settings menu | Allows you to specify the visual attributes of the History window. •Save on Exit - specifies whether you want your customization of the History window to be saved between sessions. •Defaults - Resets the History window to default settings. This removes any settings you specified. •Docked - Toggles the state of the History window between a separate window and one that is attached to the
Application Window. •Stay On Top- toggles the state of the History window between one that can lose focus and one that cannot. | |
Execute command | Loads the History Playback window | |
List of operations | Lists operations that you have recently performed. Each operation is logged with the following information: •FileID •Operation name or number depending on the status of the OpCodeNames check box. •Status code when that operation was performed •Number of times that operation was performed. •Key number set for the operation. •Contents of the key buffer. •Contents of the data buffer. | |
Logging | Toggles the inclusion of future operations in the history list. | |
OpCode Names | Toggles the display in the Operation column between operation code names (such as B_OPEN) and operation code numbers (such as 0 for B_OPEN) | |
Function Executor Tasks
Function Executor tasks are grouped into the following categories:
Starting Function Executor Tasks
►To start Function Executor
1 Access Function Executor from the operating system Start menu or Apps screen or from the Tools menu in PSQL Control Center.
2 The main window appears.
Figure 12 Function Executor Main Window
Performing Operations Tasks
Because Btrieve provides many operations, this chapter cannot explain them all. The following sections discuss some common operations as well as some new ways of performing them with the Function Executor.
Note Selecting options from all menus performs the intended operation immediately. It does not fill in the grid and wait for you to execute the command as in previous versions. Also, closing the form closes each open file. No longer do you need to manually perform the close operation.
General Operations-Related Tasks
For other tasks, see these sections:
►To get help for a status code
1 When a status code is received using Function Executor, it is displayed on the status bar of the open file.
Move your mouse so it hovers over the status code that is displayed in red.
Figure 13 Status Code Received
2 If you click the status code indicator, the full documentation for the status code is displayed as shown in Figure
14.
Figure 14 Status Code Documentation
Opening a File Tasks
►To open a data file with Function Executor
1 From the File menu, select Open. The following dialog box appears:
Figure 15 Open Btrieve File Dialog Box
.
Note Client ID: If you have Use disabled, Function Executor will use a BTRV() function call. If Use is enabled, it will use a BTRVID() function call for each operation you execute on this file. With Auto enabled, Function Executor will generate a client ID for you. If you have Auto disabled, then you may enter values manually.
2 Click Browse.
3 Double-click the desired file name.
Other Ways to Open a File with Function Executor
•You can drag a file from Windows Explorer into the Open dialog box. This step fills in the file name for you.
•You can drag one or more files into the main window.
•After opening a file to display the editor window, you can use the OpCode 0 to open another file. The file appears in a new window.
•You can run Function Executor from a command prompt and specify a list of file names to open. For example:
WBExec32 person.mkd billing.mkd
You can even use wildcard characters:
WBExec32 *.mkd
Also, in Windows you can associate files with .btr, .dat, .mkd, or any other extension with Function Executor. Then when you double-click the file in Windows Explorer, Function Executor opens it.
Creating a Btrieve File Tasks
There are two options in creating a Btrieve file with Function Executor. If a file is already open, you can clone it. Otherwise, you can start from scratch.
Caution The Btrieve engine uses file names in ways that ignore extensions. Because of this, no two files in the same directory should share a file name and differ only in their file name extension. For example, do not name one data file invoice.btr and another invoice.mkd.
Method 1: Using a current file as a template
1 From the File menu, select New. The following dialog box will appear:
Figure 16 Modify File Definition Dialog Box
2 You can manipulate keys from this dialog box as well. You can Add, Create, or Insert Segments from the Key menu. You can also save the new file as a description for use with BUtil create. Select Save As Desc and indicate the name and location where you would like the file saved.
3 To create the file, click Create. This will open the file and display a message indicating success.
Method 2: Creating a new file from scratch
1 Click the Create icon on the main toolbar; or, if no file is open yet, you may click File and then New, as before.
2 If a file is already open on screen, a drop down box will appear. Choose Create New File from Scratch.
3 The same dialog box as before will appear, but it will be blank - allowing you to input brand new values.
4 Start by adding a new Key using the Key menu, or press Ctrl-A.
5 Fill in the attributes for the key in the lower section of the dialog box.
6 Continue adding or removing new keys and segments as desired, using the menus or right-clicking the key in the list.
7 Now click the Create button to execute the B_Create (14) operation. This will automatically open the file on screen as well.
History Tasks
The following tasks are related to the History feature:
►To display the History window
1 Click View > History or click the History button.
►To toggle the docking status of the History window
2 In the history items window, click the display to check or clear the Docked option as shown in the following figure:
Figure 17 Undocking the History window
When docked, the History window is connected to the application window as shown here. When not docked, the History window is a distinct window.
►To toggle the Always On Top status of the History window
3 In the history items window, right-click the display and check or clear the Stays On Top selection.
►To reset the History window to default settings
2 In the history items window, right-click the display and select Settings > Defaults.