SQL Editor
A Tour of the SQL Editor
The following topics show how to use the PSQL Structured Query Language:
SQL Editor Concepts
This section contains the following topics:
Overview
SQL Editor is one of the editors within PSQL Control Center (PCC). The editor allows you to run Structured Query Language (SQL) statements against a PSQL database. With SQL statements, you may retrieve, create, change, or delete data in a database provided that you have database permissions to perform these actions.
The SQL statements that you may use with SQL Editor are documented in
SQL Engine Reference. See especially
SQL Grammar in PSQL.
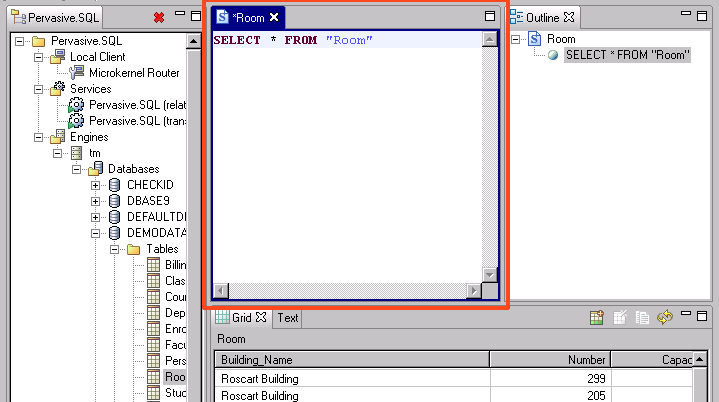
Figure 18 SQL Editor
Caution Backup all your data definition files (DDFs) and data files before you perform functions through SQL Editor. This tool gives you the ability to modify your database table definitions and data. You could inadvertently change your files in an irreversible manner. Full recovery is possible if you have performed a backup.
Statement Separators
SQL Editor requires a way to differentiate where one statement ends and another begins. The way to differentiate statements is to place a statement separator at the end of each statement. SQL Editor accepts only the pound sign (#) and the semicolon (;) as statement separators. See
To select a SQL statement separator.
If you are not using temporary tables, you may use either separator solely or mix their usage within a set of SQL statements. That is, some statements can end with a pound sign and others with a semicolon if you so choose.
Temporary tables begin with “#” or “##.” If you use temporary tables, the pound sign may not be used as a statement separator. Instead, set the statement separator to the semicolon.
Restrictions
The following actions and SQL statements are not supported in SQL Editor:
•Creating a database
•Use of dynamic parameters (indicated by a question mark)
•You cannot edit views, stored procedures, user-defined functions, or triggers that contain characters outside of the database code page. You must first drop them and then reenter them from an edited source file.
Displaying Statement Results
SQL Editor displays the results of running SQL statements in the following PCC window views:
•Grid
•Text
In addition, by default, an Outline window view displays a list of the SQL statements in SQL Editor, typically with a shorter line length. For example, you may want the Outline view to show only the first 5 words of each SQL statement in SQL Editor.
Grid Window View
PCC provides a command to execute an individual SQL statement in SQL Editor so that the results appear in the Grid view. The command is called Execute in Grid and can be invoked from the SQL menu, from a tool bar button, or from within the Outline view.
Identifying the Grid Window
The Grid window view, or Grid for short, displays table columns and data. The Grid uses a spreadsheet format to show the results returned by SELECT statements.
Figure 19 Grid Window View
Modifying Data and Adding Rows
The Grid allows you to directly change database data by changing the values in the grid cells. You can also add rows to your table with the Grid. You must have the proper table permissions to affect the database data.
Records Affected and Scrolling
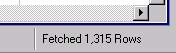
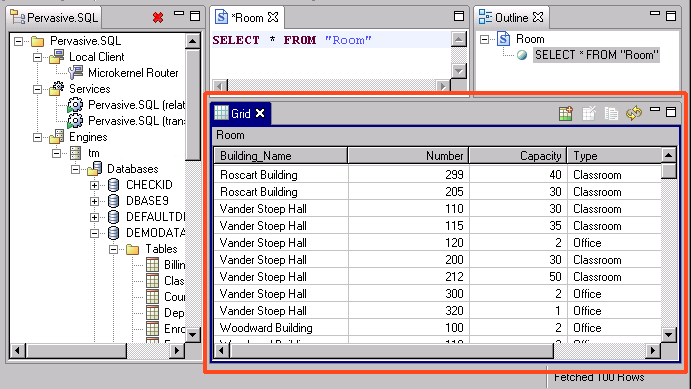
The Grid caches results locally and initially retrieves 100 records. The Grid displays as many records as its vertical size permits.
As you scroll the vertical scroll bar, more records are retrieved and made available to the Grid. The number of records retrieved appears in the lower right corner of the main window.
Once you scroll to the bottom, the rows fetched indicator reports the total number of records returned by the SQL statement.
Text Window View
PCC provides a command to execute an individual SQL statement in SQL Editor so that the results appear in the Text view. The command is called Execute in Text and can be invoked from the SQL menu or from a toolbar button.
The Text window view is automatically used for the results of any SQL statement that is not a SELECT statement. For example, suppose you want to delete some records and have typed a DELETE statement into SQL Editor. If you select the menu command Execute in Grid, SQL Editor returns the results to the Text window view, not to the Grid window view.
A command also exists to execute all statements sequentially in the SQL Editor. The command is called Execute All SQL Statements and can be invoked from the SQL menu, from a toolbar button, or from within the Outline view. Results from this command always display in the Text view regardless of the statements in SQL Editor.
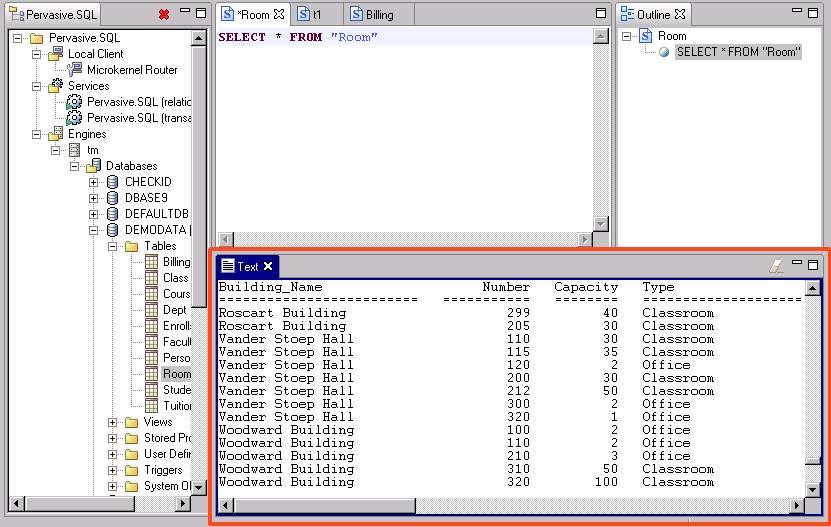
Identifying the Text Window
The Text window view shows in a text format the result of running SQL statements. You cannot change the data values in the database by changing the text, but you can copy the text.
You may use the Text window view for SELECT statements to show data returned. The data returned appears in a columnar format with each field represented as an underlined heading. The data appears as rows below the headings.
For how to change the font used by the Text window, see To set preferences for Text Output, click Text Output.
For PCC running on an operating system set to an English language locale, the system selects a default font. For non-English locales, PCC seeks to match a default or system font if such can be found. Otherwise it will try to select similar font.
Figure 20 Text Window View
If execution stops because of an error, the Text window view lists the statement that was last run. Knowing the last statement run can help you troubleshoot problems.
Scrolling and Positioning
As a convenience, the Text window view automatically scrolls to the top line of the data returned by the last statement executed. For example, suppose that you execute the following two statements sequentially in SQL Editor, each time sending the results to the Text window view: SELECT * FROM Class and SELECT * FROM Billing.
The Text window view automatically scrolls to the top of the data returned by SELECT * FROM Billing, the last statement executed.
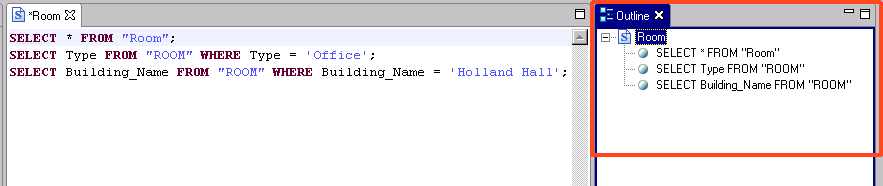
Outline Window View
The Outline window view allows you to view the SQL statements in a tree structure. The root node of the tree is the same name as the name of the SQL Editor session to which the outline corresponds.
Figure 21 Outline Window View
The number of words displayed in the Outline window view depends on your preferences setting. To set preferences for SQL Editor, click SQL Editor.
You can also execute statements from the Outline window view. The Outline view allows you to select multiple statements by clicking while pressing the Ctrl key. For example, if your Outline view shows three statements as in the figure above, you may choose to execute statements 1 and 3 but not 2. See
To run SQL statements in Outline view.
Working with Common SQL Objects
Some SQL objects are dealt with commonly. As a convenience for you, PCC shows the following objects in PSQL Explorer and provides commands for their creation and editing:
•Triggers
•Stored procedures
•User-defined functions
•Views
When you use commands to create one of these objects, SQL Editor provides SQL syntax for that object to help you get started. For example, if you choose to create a new view, SQL Editor contains the syntax CREATE VIEW <viewname> AS.
Tip You can hover the mouse cursor on a SQL statement to obtain a tool tip on the syntax, which also includes an example.
SQL Editor provides the newly created object with a default name of object_n, where object is the name of the object and n is an integer that starts with one and increments by one. For example, if you create a new view, SQL Editor contains a new tab named View_1. After you save the object with a name of your choice, the tab reflects the saved name.
The following table defines the common objects and refers you to SQL Engine Reference for additional information.
Table 13 Description of Common SQL Objects in PCC
Object | Description | Related Information |
Triggers | A type of stored procedure that are automatically executed when data in a table is modified with an INSERT, UPDATE, or DELETE. |
CREATE TRIGGER in SQL Engine Reference |
Stored procedures | A collection of one or more SQL statements that can take and return user-supplied parameters. |
CREATE PROCEDURE in SQL Engine Reference |
User-defined functions | A scalar routine that returns a value. |
CREATE FUNCTION in SQL Engine Reference |
Views | A database object that stores a query and behaves like a table. |
CREATE VIEW in SQL Engine Reference |
SQL Editor Used in SQL View Tab of Table Editor
SQL Editor is also used in the SQL View Page of Table Editor. See
SQL View Page.
SQL Editor Tasks
This section explains the tasks that you perform with SQL Editor. The tasks are divided into the following categories:
Category | Description |
| Orient you to the overall use of SQL Editor |
| Apply to the running of SQL statements |
| Apply to using the Grid |
| Apply to using the Text window |
| Apply to using the Outline window |
| Apply to stored procedures, triggers, user-defined functions, and views |
Note If you use SQL Editor to change the structure of table with SQL statements, refresh the PSQL Explorer to see the change. Right-click the Tables node in PSQL Explorer and select Refresh.
General Tasks
General tasks orient you to the overall use of SQL Editor.
Execution Tasks
Execution tasks apply to the running of SQL statements.
Grid Tasks
Grid tasks apply to working with the Grid window.
Text View Tasks
Text view tasks apply to working with the Text window.
Outline View Tasks
Outline view tasks apply to working with the Outline window.
Common SQL Object Tasks
Common SQL objects contain stored procedures, triggers, user-defined functions, and views.
General Tasks
►To start SQL Editor for a new SQL script
In PCC you can start SQL Editor in three ways:
•Right-click the database where you want to run the SQL script and select SQL Document.
•In the menu bar, click

.
•Click File > New > SQL Document
For the second and third options, PCC opens a Select Database dialog box for you either to:
•Click a listed database in which to run the SQL script.
•Select the None check box if the SQL script does not apply to a specific database.
When you choose a database, you can check the Set selected database as default for this session option to automatically continue using the same database each time you create a new SQL script.
You can open the Select Database dialog manually by selecting SQL > Select Database.
The first SQL script is named SQLDoc1. Script names then increment by 1 to create SQLDoc2, SQLDoc3, and so on. Closing and reopening PCC resets the numbering to 1.
►To start SQL Editor by displaying all records in a table
2 Expand the Engines and Databases nodes in PSQL Explorer.
3 For the desired database, expand the Tables node.
4 Double-click the table for which you want to see all records (or right-click the table and select Open).
By default, PCC open SQL Editor and executes a SELECT * FROM statement for the table. Note that the SELECT statement can fail depending on user and column-level permissions.
►To set database context for a SQL query
The commands to execute SQL statements are disabled until a database is specified as the context to which the SQL statement applies.
2 Perform one of the following actions:
•For a new SQL statement, click
File >
New >
SQL Document or click
.
The
Select Database dialog appears. Click the database in the list for which you want the SQL document to apply and click
OK.
•If SQL Editor already contains SQL statements not associated with a database, click

.
The
Select Database dialog appears. Click the database in the list for which you want the SQL document to apply.
3 Click OK.
Note Select the
Set selected database as default for this session option to use the selected database whenever you open a new SQL Editor tab. If you leave this option unselected, you will be prompted to select a database each time you open a new SQL Editor tab.
To clear the default database:
Open the Select Database dialog by clicking
, and clear the
Set selected database as default for this session option.
or
Click
Windows >
Preferences and select the
General node. Clear
Do not prompt for new database each time a SQL document is opened.
The selected database is not maintained across PCC sessions. If you close and reopen PCC, you will have to select a new default database context.
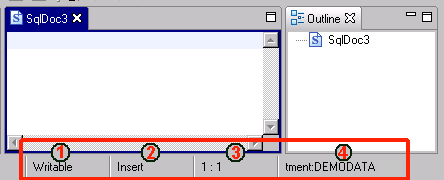
►To identify editor settings for SQL Editor
1 Ensure that the cursor is positioned in SQL Editor.
2 Observe the information blocks along the bottom of the PCC window.
Block | Meaning |
1 | Identifies whether SQL Editor accepts character input (Writable). |
2 | Indicates whether the editor is in insert mode or overwrite mode for character input. The Insert key toggles the mode. Note that the cursor changes shape for each mode. |
3 | Indicates the row and column at which the cursor is positioned. The first value represents the row, the second the column. In the image above, the cursor is positioned on the first row at the first character position. |
4 | Identifies the computer and the database to which the SQL document applies. The computer name is listed first followed by the database name. In the image above, the computer is “tment” and the database is “DEMODATA.” Note: If None is specified as the database context, then the text “No Database Selected” appears instead of the name of the computer and database. The commands to execute SQL statements are disabled if None is specified. See
To set database context for a SQL query. |
►To create a SQL query or script
By default, when you start SQL Editor, you may enter SQL statements. A script is one or more SQL statements saved as a text file.
2 Type the SQL statements into SQL Editor.
Separate SQL statements with a delimiter. You can use a pound sign (#) or a semicolon (;).
3 Optionally, click File > Save As to save the SQL statements as a text file.
►To open a SQL script
You can execute the statements in SQL Editor after you open a script in the editor.
1 In PCC, click File > Open.
On its first use, the Open dialog displays the location known by the operating system as the home directory of the current user, which on Windows systems is C:\Users\username.
2 Navigate to the location of the script file and open it.
The Open dialog remembers the file location for future use.
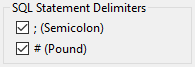
►To select a SQL statement separator
1 In PCC, select Window > Preferences.
2 Expand the PSQL node and click SQL Editor.
3 In the SQL Editor preferences, both options for
SQL Statement Delimiters are selected by default.
PCC uses these delimiters to identify the end of a SQL statement. It sends each statement to the database engine and displays results before sending the next statement.
If you use a pound sign as a separator in a script but do not select the # (Pound) option, PSQL returns an error when you run the script.
If you use a semicolon as a separator in a script but do not select the ; (Semicolon) option, PSQL returns no error because it recognizes semicolons as separators by default. However, PCC will not return the results for all statements. Instead, it displays results for only one statement, either only the first statement in the script or all of the statements treated as a single statement.
►To type comments into SQL Editor
Single-line comments are indicated by double dashes (--) or double slashes (//). Each comment must be on a separate new line or after the statement separator of an existing line.
SQL Editor also supports the use of a block comments spanning multiple lines that start with a slash and asterisk and end with an asterisk and a slash (/* */).
1 Click at the beginning of the line where you want a comment.
2 Type “--” or “//” followed by your comment text.
The following example shows valid comments.
SELECT * FROM t1#
-- This is a valid comment
// and so is this
SELECT * FROM t2# -- This is valid after the # sign
The following example shows multi-line comments.
SELECT * FROM t1# -- single line comment
/* This is a comment block that spans two lines.
Statements inside this block are ignored */
SELECT * FROM t2#
►To cancel (undo) or restore (redo) typing actions in SQL Editor
1 Perform one of the following actions:
•Click Edit > Undo (or press Ctrl+Z) to cancel typing actions.
•Click Edit > Redo (or press Ctrl+Y) to restore typing actions.
►To find text or replace text in SQL Editor
1 Click Edit > Find/Replace (or press Ctrl+F).
A dialog appears on which you specify a text string to find or replace.
►To select text in SQL Editor
1 Perform one of the following actions:
•Drag the cursor across the text you want to select.
•Click Edit > Select All to select all of the contents of SQL Editor.
►To perform basic editing functions in SQL Editor
1 Click Edit then select the function you want: cut, copy, paste, and so forth.
Statement Execution Tasks
►To enable the execution commands and icons for SQL statements
►To run a single SQL statement in SQL Editor
1 Position the cursor on the statement or select the statement.
2 Perform one of the following actions:
•Click SQL > Execute in Grid or SQL > Execute in Text.
•Press F9 or Shift+F9.
•Click

or

.
Note SQL Editor automatically uses the Text window view for the results of SQL statements that are not SELECT statements. Only SELECT statements use the Grid window view.
►To run selected SQL statements in SQL Editor
1 Drag the cursor across the statement that you want to run.
You may select one or more statements.
2 Perform one of the following actions:
•Click SQL > Execute in Text or SQL > Execute All SQL Statements.
•Press Shift+F9.
•Click
or

.
Note SQL Editor automatically uses the Text window view for the results of SQL statements that are not SELECT statements. Only SELECT statements use the Grid window view.
►To run all SQL statements in SQL Editor
1 Click
SQL >
Execute All SQL Statements, press
F10, or click
.
Ensure that either no statements are selected or that all statements are selected. If you select a portion of the statements in SQL Editor, only the selected portion executes.
►To run SQL statements in Outline view
1 To execute all statements in Outline view, right-click the root node and select Execute All Statements.
To execute one or more statements, click the desired statements.
Note that you can select multiple statements by using Ctrl+click. The statements do not have to be contiguous.
2 If multiple statements are selected, right-click one of the selected statements, and select Execute Selected Statements.
3 If a single statement is selected, perform one of the following actions:
•Right-click the statement and select Execute in Grid or Execute in Text.
•Press F9 or Shift+F9.
•Click
or
.
Note SQL Editor automatically uses the Text view for the results of SQL statements that are not SELECT statements. Only SELECT statements use the Grid.
Grid Tasks
►To change data within the Grid
1 Click the Grid cell that contains the value you want to change.
Tip By default, the entire contents becomes selected when you click the cell. Press Delete or Backspace to delete the entire contents of the cell.
2 Change the data in the cell.
3 Move the cursor outside of the cell (for instance, press Tab or click outside of the cell).
Caution Moving the cursor from the cell automatically saves the data changes to physical storage. You cannot explicitly save the changes made to the cell.
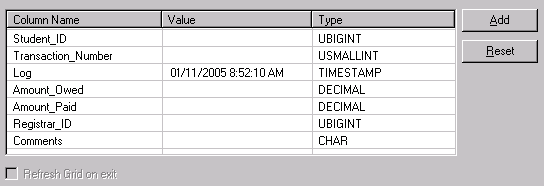
►To add rows of data to the Grid
1 Click

on the Grid.
The Add Rows dialog appears. For example, the following illustration shows the dialog for the “Billing” table that is part of the sample database Demodata.
2 Click in the Value cell for each Column Name and type the desired value.
The value must be a data type valid for that column.
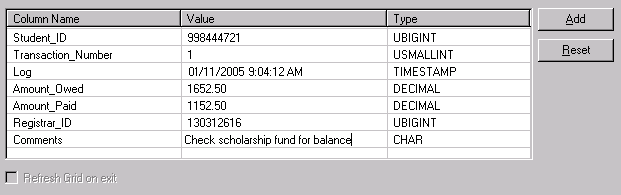
Tip You can copy data from Grid cells and paste it into the Value cells. Click a Grid cell then right-click. Click Copy. Click a Value cell on the Add Rows dialog then right-click. Click Paste. Also note that Ctrl+C and Ctrl+V provide the copy and paste actions, respectively.
3 Click Add.
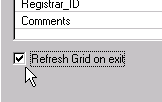
The record is added to the table. Also note that the option Refresh Grid on Exit becomes enabled.
If you want to add multiple records, you can change values for specific value cells then click Add. If you want to clear all of the value cells, click Reset.
4 Optionally, click Refresh Grid on Exit if you want the table data refreshed .
When you close the Add Rows dialog, a refresh executes the statement last executed in SQL Editor.
5 Click Close.
If Refresh Grid on Exit is enabled, the Grid displays the records that you just added (assuming that the last statement executed in SQL Editor was SELECT * FROM Billing).
►To delete rows of data from the Grid
Caution Deleting a row from the Grid removes that record from physical storage. No undo feature is available to reclaim the deleted record.
1 Click any cell within the row (the record) that you want to delete.
You may also select and delete multiple rows. To select multiple rows, press and hold down the Shift or Ctrl key, then click a cell in each desired row.
2 Click
Edit >
Delete or click

.
3 Click OK to confirm the deletion.
►To enter a date, time, or timestamp data type in the Grid using scalar functions
1 As a convenience, you can enter the following scalar functions for date, time, and timestamp in Grid cells:
Data Type | Scalar Function1 As Typed in Grid Cell |
Date | •now() •curdate() See also
NOW ( ) and
CURDATE( ), both in SQL Engine Reference. |
Time | •now() •curtime() See also
NOW ( ) and
CURTIME( ) in SQL Engine Reference. |
Timestamp | •now() See also
NOW ( ) in SQL Engine Reference. |
1 The names are case insensitive. NOW() and now() are equivalent. The parentheses are required. That is, NOW is invalid but NOW() is valid. |
Note You can also omit the seconds for a time data type, provided that you include AM or PM. For example, 10:30 AM is a valid entry. Time defaults to AM if you omit AM or PM. For example, 10:30:00 is entered as 10:30:00 AM.
►To refresh data in the Grid
1 Click

on the Grid.
A refresh executes the statement last executed in SQL Editor and displays the results in the Grid.
►To copy data from the Grid
1 Perform on of the following actions:
•To select the data for an individual cell, click in the cell, then click

(or right-click and select
Copy).
By default, the entire content of the cell is selected.
•To select an entire row, right-click any cell and select
Copy Text or click
.
You may also select multiple rows. To select multiple rows, press and hold down the Shift or Ctrl key, then click a cell in each desired row.
Note When you copy an entire row or multiple rows, the rows are pasted in the same layout as they appear in the Text window view. You can specify the number of characters between the pasted columns. Click Window then expand the PSQL node in the Preferences tree. Click Text Output in the tree and set the desired value for Number of spaces between columns.
Text Window Tasks
►To clear results from Text view
1 Click

on the
Text view.
►To select and copy text from Text view
1 Perform one of the following actions:
•Drag the cursor across the text you want to select.
•Right-click within the Text view and select Select All.
2 Right-click and select Copy.
Outline View Tasks
►To minimize, maximize, or restore Outline view size
1 Click the desired sizing button:
Button | Sizing Action |
| Minimizes the Outline window |
| Maximizes the Outline window |
| Restores the Outline window to its size before it was minimized |
Common SQL Objects Tasks
Common SQL objects include stored procedures, triggers, user-defined functions, and views.
►To create a common SQL object
1 In PCC PSQL Explorer, expand the Engines node and the registered server nodes to display the available databases.
2 Right-click the database where you want the object to apply. You can also right-click any node under the database.
3 Click New then one of the following depending on the object that you want to create:
•Function
•Stored procedure
•Trigger
•View
A new SQL Editor is opened that contains a default name for the object on a tab. The name is in the form object_n, where object is the name of the object and n is an integer that starts with one and increments by one. For example, if you create a new view, a new SQL Editor contains a tab named “View_1.” After you save the object with a name of your choice, the tab reflects the saved name.
4 Modify the skeletal SQL statement for the common object.
Tip Hover the mouse cursor on the statement to obtain a tool tip on the syntax, which also includes an example.
5 Click
File >
Save or

.
►To edit a common SQL object
1 In PCC PSQL Explorer, click the database where you want to edit the common SQL object.
2 Expand the node for the object (function, stored procedures, user-defined functions, or triggers) that you want to modify.
3 Double-click the object that you want to edit or right-click the object and select Edit.
A new SQL Editor is opened that contains a tab. The tab name reflects the name by which you saved the object.
►To delete a common SQL object
1 In PCC PSQL Explorer, click the database in the list for which you want to delete the common SQL object.
2 Expand the node for the object (function, stored procedures, user-defined functions, or triggers) that you want to delete.
3 Click the object that you want to delete, then perform one of the following actions:
•Right-click and select Delete.
•Press Delete.
•Click

on PSQL Explorer.
Note that you can select multiple objects for deletion by using Ctrl+click or Shift+click.