Table Editor
A Tour of PCC Table Editor
The following topics describe how to work with tables:
Table Editor Concepts
Table Editor concepts are covered in the following topics:
Overview
Table Editor is one of the editor windows within PSQL Control Center (PCC). Table Editor is a special type of editor that contains multiple pages. The pages are represented by tabs across the bottom of the editor. The editor allows you to add, delete, or change the characteristics of columns within a table. The table may be one newly created or an existing table that you want to edit.
To modify tables with Table Editor, you must have full administrator rights on the machine on which the database engine is running
even if you are a member of the Pervasive_Admin group. See
Granting Administrative Rights for the Database Engine and
Database Security in
Advanced Operations Guide.
Caution Back up all your data definition files (DDFs) and data files before you perform functions through Table Editor. This tool gives you the ability to modify your database table definitions and data. If you inadvertently set the options incorrectly or enter incorrect data, you could change your files in an irreversible manner. Full recovery is possible from a backup.
Table Editor Pages
Table Editor displays the following pages that serve as work areas:
You can switch among these pages by clicking their tabs at the bottom of the Table Editor panel.
Note Save your changes before switching pages.
Columns Page
The Columns page lets you add, delete, modify columns, and set primary keys. See
Columns Page for a description of the areas on the Columns page. See
Columns Tasks for tasks that you can do on the page.
Indexes Page
The Indexes page lets you add and modify indexes and index segments. See
Indexes Tasks for tasks that you can do on the page.
Foreign Keys Page
The Foreign Keys page lets you add and modify foreign keys. See
Foreign Keys Tasks for tasks that you can do on the page.
SQL View Page
The SQL View page lets you view the CREATE TABLE and ALTER TABLE statements that apply to the table. Note that SQL View is display only. You cannot modify the SQL statements but you can copy them. See
SQL View Tasks for tasks that you can do on the page.
The SQL View page reflects changes made on the other pages as explained below.
CREATE Statements
The CREATE TABLE statement shows the SQL used to create the table. For a new table, one that has not yet been saved, the CREATE TABLE statement reflects the SQL used to implement edits from the other three tabbed dialogs. For example, if you create a new table named MyNewTable, SQL View initially shows the following CREATE statement:
CREATE TABLE MyNewTable(
);
If you were to add two CHAR columns to the new table on the Columns page, SQL View reflects this in the CREATE statement:
CREATE TABLE MyNewTable(
"FirstName" CHAR(20),
"LastName" CHAR(30)
);
If a table has been saved (already exists), then the CREATE TABLE statement shows the SQL that created the table. For example, if you were to edit the Course table provided with the sample database Demodata, SQL View shows the following CREATE statements:
CREATE TABLE Course(
"Name" CHAR(7) NOT NULL ,
"Description" CHAR(50),
"Credit_Hours" USMALLINT,
"Dept_Name" CHAR(20) NOT NULL
);
CREATE INDEX Course_Name ON Course("Name");
CREATE UNIQUE INDEX DeptName ON Course("Dept_Name");
Note To create tables, database security must be disabled or in the database security properties your user account must have Create Table permission.
ALTER Statements
When you are editing an existing table, the ALTER TABLE statements show what SQL is used to implement edits from the other three Table Editor pages. For example, suppose that you edit the “Course” table provided with the sample database Demodata. On the Index page, you change the sort order for the “Name” index segment from ascending to descending. SQL View shows the following ALTER statements:
DROP INDEX Course.Course_Name;
CREATE INDEX Course_Name ON Course("Name" DESC);
Saving a table clears the ALTER TABLE statements because no changes are pending.
Data Types
See
PSQL Supported Data Types in
SQL Engine Reference for a list of the data types supported by the database engine. You may use any data types listed there that also appear in the Type selection list on the Columns page in Table Editor.
Null Values
The ability to modify the null attribute of a column is subject to the following restrictions:
•The target column cannot have a primary or foreign key constraint defined on it.
•If converting the old type to the new type causes an overflow (arithmetic or size), the ALTER TABLE operation is aborted.
•If a nullable column contains NULL values, the column cannot be changed to a nonnullable column.
If you must change the data type of a key column, you can do so by deleting the index key, changing the data type, and reentering the key. Keep in mind that you must ensure that all associated index key columns in the database remain synchronized.
For example, if you have a primary index key in table T1 that is referenced by foreign keys in tables T2 and T3, you must first delete the foreign keys. Then you delete the primary key and change all three columns to the same data type and size. Finally, you must reenter the primary key and then the foreign keys.
For more information on nulls, see the following:
•
INSERT in
SQL Engine Reference Table Editor Graphical User Interface
The Table Editor interface provides work areas called pages for the following:
Columns Page
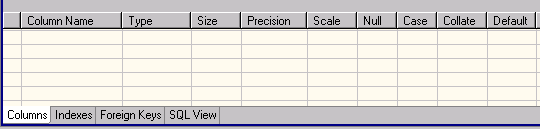
The Columns page can be considered the primary page of Table Editor just as columns and rows are central to tables. The following illustration shows the Columns page of Table Editor. The table below the image describes the GUI objects. Click an area of the image for which you want more information.
See also
Columns Tasks for the tasks that you perform on the page.
Figure 17 Columns Page
GUI Object | Description | Related Information |
Column Name | Specifies the alpha-numeric name for the column. |
Relational Engine Limits in SQL Engine Reference |
Type | Specifies the data type of the column. | |
Size | Specifies how many bytes are permitted for the data type. A shaded cell indicates that size does not apply. | |
Precision | Specifies the number of significant digits for floating point values. A shaded cell indicates that precision does not apply. | |
Scale | Specifies the number of significant digits that are to the right of the decimal point for floating point values. A shaded cell indicates that scale does not apply. | |
Null | Specifies whether NULL values are allowed for the data type. A shaded square (  ) indicates that nulls do not apply to the data type. A checked square (  ) indicates that NULL values are allowed for the data type. | |
Case | Specifies whether the database engine uses case-sensitive or case-insensitive comparisons when searching for character values in the database. A checked square ( ) indicates that case-insensitive values are used. A shaded square ( ) indicates that case sensitivity does not apply to the data type. | |
Collate | Specifies that an alternating collating sequence (ACS) or International Sort Rule (ISR) is used for sorting. Contains the ACS path name or ISR name. | |
Default | Specifies a default value for the column. The default value is used if you perform a SQL INSERT for a row but do not provide a value for the column. | |
Indexes Page
The Indexes page allows you to add and delete indexes. The Indexes page is explained within the context of the tasks that you perform for indexes. See
Indexes Tasks.
Foreign Keys Page
The Foreign Keys page allows you to add and delete foreign keys. The Foreign Keys page is explained within the context of the tasks that you perform for foreign keys. See
Foreign Keys Tasks.
SQL View Page
The SQL View page displays, and allows you to copy, the SQL statements used to create or alter the table. The CREATE TABLE panel displays the SQL with which you could create the same table. The ALTER TABLE panel reflects any editing changes to an existing table that you make with Table Editor. When you save the table changes, the ALTER TABLE panel is cleared and the ALTER statement(s) becomes part of the CREATE TABLE statement.
The SQL View page is further explained within the context of the tasks that you can perform. See
SQL View Tasks.
Table Editor Tasks
This section explains the tasks that you perform with Table Editor. The tasks are divided into the following categories:
Category | Description |
| Orient you to the overall use of Table Editor |
| Apply to using the Columns page |
| Apply to using the Indexes page |
| Apply to using the Statistic page |
| Apply to using the SQL View page |
Note You cannot save the changes to the structure of a table if any queries in SQL Editor are holding the table “open.” Close the SQL Editor holding open the table then save the changes.
General Tasks
General tasks apply to the overall use of the tool.
Getting Started
Data
Columns Tasks
Column tasks apply to the Columns page.
Indexes Tasks
Index tasks apply to the Indexes page.
Foreign Keys Tasks
Foreign keys tasks apply to the Foreign Keys page.
SQL View Tasks
SQL view tasks apply to the SQL View page.
General Tasks
►To start Table Editor for a new table
2 Expand the Engines and Databases nodes in PSQL Explorer.
3 Right-click the database to which you want to add the new table.
4 Click New > Table and type the name for new table.
Note that no two data files in the same directory can share the same file name and differ only by file name extension. For example, invoice.btr and invoice.mkd are not allowed in the same directory. The reason for this restriction is that the database engine ignores the file name extension and sees invoice.btr and invoice.mkd as the same file.
5 Click Finish.
►To start Table Editor for an existing table
2 Expand the Engines and Databases nodes in PSQL Explorer.
3 Under the database where you find the table, right-click it and select Edit.
►To work with columns
2 In the panel for the table, click the Columns page tab.
►To work with indexes
2 In the panel for the table, click the Indexes page tab.
►To work with foreign keys
2 In the panel for the table, click the Foreign Keys page tab.
►To view SQL statements applicable to the table
2 In the panel for the table, click the SQL View page tab.
►To view table data while using Table Editor
2 If the Grid window view is not displayed, click Window > Show View > Grid.
By default, the Grid shows all data for the table (the result of a SELECT * FROM table statement).
Caution The Grid allows you to change data by changing grid cell values. See
Grid Tasks.
►To identify tables with changes that have not been saved
1 Observe the Table Editor tab at the top. The tab contains the name of the table being created or edited. An asterisk (*) precedes the name if any modifications have occurred to columns, indexes, or foreign keys but not yet saved.

►To save changes for the table being edited
Note that you cannot undo or redo changes to a table once the table has been saved.
1 Click
File >
Save or click

.
Note You cannot save the changes to the structure of a table if the table is open in SQL Editor. Close the SQL Editor referencing the table then save the changes.
►To save changes for all tables being edited
Note that you cannot undo or redo changes to tables once the tables have been saved.
1 Click File > Save All.
Note You cannot save the changes to the structure of a table if the table is open in SQL Editor. Close the SQL Editors referencing the tables then save the changes.
►To undo changes or to redo changes
1 In the toolbar, click

to undo an action; click

to redo an action.
If multiple actions have occurred since the last save, you can repeatedly click the undo or redo toolbar buttons. When no more actions are available for undo or redo, the toolbar button becomes disabled.
Note that you cannot undo or redo changes to a table once the table has been saved.
Columns Tasks
►To insert a column between existing columns
2 Right-click an existing column row above which you want to insert a new column.
3 Click Append Column.
The new column appears above the existing column row. The default name of the inserted column is “columnn,” where n is a number that automatically increments by one. The first column you insert is column0, the second is column1 and so forth.
Tip You can also insert a column by clicking an existing column row, then pressing
Ctrl+
Insert or clicking

. Repeating either action inserts a series of columns in succession.
4 Click
File >
Save or
before changing pages within Table Editor.
►To insert a column at the end
2 Right-click anywhere on the empty column row below the last existing column row, then click Add Column.
or
Click the “Column Name” cell on the empty column row below the last existing column row and start typing a name for the column.
The default name of the inserted column is “columnn,” where “n” is a number that automatically increments by one. (The first column you insert is column0, the second column1 and so forth.)
Tip You can also insert a column at the end by clicking
or pressing
Ctrl+
Insert.
Repeating either action inserts a series of columns in succession. The insert action automatically adds the new column to the end.
3 Click
File >
Save or
before changing pages within Table Editor.
►To select a column or multiple columns
2 Click

(the column selection icon on the far left of the column row) for the desired column.
To select multiple columns, press and hold
Shift or
Ctrl, then click
for the desired additional columns.
►To delete a column
2 Right-click anywhere on the desired column row.
3 Click Drop Column.
Tip You can also delete a column by clicking an existing column row, then pressing
Ctrl+
Delete or clicking

.
You can also delete multiple columns by selecting multiple columns rows. See
To select a column or multiple columns.
4 Click
File >
Save or
before changing pages within Table Editor.
►To specify a column name
2 Click in the Column Name cell for the desired column.
3 Delete the existing column name.
4 Type the name you want.
Also, as a general rule, avoid using reserved words for column names. See
Reserved Words in
SQL Engine Reference. See also
SQL Grammar Support in
ODBC Guide.
5 Click
File >
Save or
before changing pages within Table Editor.
►To set a column data type
The data in your database is converted if you change a column data type. For a listing of data types, see
PSQL Supported Data Types in
SQL Engine Reference.
Changing a column data type sets the defaults for that type on the following: size, scale, precision, default, and collate.
2 Click in the Type cell for the desired column.
3 Open the list for data types (click

).
4 Scroll to the data type you want. (You may also type the first letter of the desired data type to scroll. Repeatedly typing the first letter scrolls to each data type that begins with that letter.)
5 Click the data type you want.
6 Click
File >
Save or
before changing pages within Table Editor.
Note Changing a data type on a column that contains a default value causes the default value to be cleared; reset the value if necessary.
►To set a column size
Data in your database is truncated if you change the column to a smaller size for the following data types:
•CHAR
•NUMERIC
•VARCHAR
2 Click in the Size cell for the desired column.
You can set a size only for applicable data types, such as CHAR. If size is not applicable, the grid cell is shaded and you will be unable to edit the Size.
3 Delete the existing size.
4 Type the size you want.
5 Click
File >
Save or
before changing pages within Table Editor.
►To set column precision
Precision specifies the number of significant digits for floating point values.
2 Click in the Precision cell for the desired column.
You can set precision only for applicable data types, such as DECIMAL. If precision is not applicable, the grid cell is shaded and you will be unable to edit the Precision.
3 Delete the existing value.
4 Type the precision value you want.
5 Click
File >
Save or
before changing pages within Table Editor.
►To set a column scale
Scale specifies the number of significant digits that are to the right of the decimal point for floating point values.
2 Click in the Scale cell for the desired column.
You can set a scale value only for applicable data types, such as NUMERIC. If scale is not applicable, the grid cell is shaded and you will be unable to edit the Scale.
3 Delete the existing value.
4 Type the scale value you want.
5 Click
File >
Save or
before changing pages within Table Editor.
►To set a column to allow or disallow nulls
For additional information about nulls, see
Rebuild Tool Concepts in
Advanced Operations Guide,
INSERT in
SQL Engine Reference, and
Null Value in the
PSQL Programmer's Guide, which is part of the PSQL Software Developer’s Kit (SDK).
2 Click the option box in the Null cell for the desired column.
You can allow nulls only for applicable data types. A shaded square indicates that null values do not apply to the data type.
Option State | Meaning |
| Nulls specified |
| Nulls allowed but not specified |
| Nulls do not apply |
3 Click
File >
Save or
before changing pages within Table Editor.
►To set case sensitivity for a column
Case sensitivity does not apply if the key uses an alternate collating sequence (ACS). You cannot specify case sensitivity and use an ACS.
2 Click the option box in the Case cell for the desired column.
You can set a collating sequence only for applicable data types. A shaded square indicates that case sensitivity does not apply to the data type.
Option State | Meaning |
| Case insensitive |
| Case sensitive |
| Case does not apply |
By default, PSQL is case sensitive when sorting string keys. Uppercase letters are sorted before lowercase letters. If you specify case insensitive, values are sorted without distinguishing case.
3 Click
File >
Save or
before changing pages within Table Editor.
►To set a column collating sequence
For additional information about collating sequences, see
Manipulating Btrieve Data Files with Maintenance in
Advanced Operations Guide and
Alternate Collating Sequences in the
PSQL Programmer's Guide, which is part of the PSQL Software Developer’s Kit (SDK).
If you use an alternate collating sequence (ACS) or International Sort Rule (ISR), you cannot specify case sensitivity. Case sensitivity does not apply if the key uses an ACS or ISR.
2 Click in the Collate cell for the desired column.
You can set an ACS or ISR only for applicable data types. If collating sequence is not applicable, the grid cell is shaded and you will be unable to edit the Collate cell.
3 Delete the existing value, if present.
4 Enter the ACS path name or ISR name.
PSQL supplies the ACS file upper.alt in its installed Samples folder. To use this file, you would type file_path\PSQL\samples\upper.alt.
Upper.alt treats upper and lower case letters the same for sorting. For example, if a database has values abc, ABC, DEF, and Def, inserted in that order, the sorting with upper.alt returns as abc, ABC, DEF, and Def. (The values abc and ABC, and the values DEF and Def are considered duplicates and are returned in the order in which they were inserted.) Normal ASCII sorting sequences upper case letters before lower case, such that the sorting would return as ABC, DEF, Def, abc.
5 Click
File >
Save or
before changing pages within Table Editor.
►To set a column default
The default value is used if you perform a SQL INSERT for a row but do not provide a value for the column.
2 Click in the Default cell for the desired column.
You can set a default only for applicable data types. If a default is not applicable, the grid cell is shaded and you will be unable to edit the Default.
3 Delete the existing value, if present.
4 Type the default value you want.
The column default can be a scalar function for certain data types:
Data Type | Scalar Function1 |
Date | •now() •curdate() See also
NOW ( ) and
CURDATE( ), both in SQL Engine Reference. |
Time | •now() •curtime() See also
NOW ( ) and
CURTIME( ) in SQL Engine Reference. |
Timestamp | •now() See also
NOW ( ) in SQL Engine Reference. |
1 The names are case insensitive. NOW() and now() are equivalent. The parentheses are required. That is, NOW is invalid but NOW() is valid. |
5 Click
File >
Save or
before changing pages within Table Editor.
►To set or remove a column as a primary key
Note that you cannot set a primary key on a column that allows nulls.
2 Click
(the column selection icon on the far left of the column row) for the desired columns.
To select multiple columns, press and hold
Shift or
Ctrl, then click
for the desired additional columns.
3 Click

(the primary key icon).
If the column(s) is not a primary key, the action sets the columns as a primary key.
If the column, or if any of the columns when multiple columns are selected, is already a primary key, the action removes the setting from all columns.
For example, suppose that column 1 is a primary key and you want columns 1, 2, and 3 to be the primary key. You press and hold Ctrl, then click columns 1, 2, and 3. When you click the primary key icon, it is removed from column 1 but not added to columns 2 and 3. If you click the primary key icon again, then columns 1, 2, and 3 are designated as primary keys.
4 Click
File >
Save or
before changing pages within Table Editor.
Index Tasks
►To create an index
Tables created with an IDENTITY, SMALLIDENTITY, or BIGIDENTITY column have unique indexes automatically created on these columns. You cannot create a second index on one of these columns unless it is included as part of a multiple-segment index. See also
AUTOINCREMENT in
SQL Engine Reference.
Table Editor permits you to include an IDENTITY, SMALLIDENTITY, or BIGIDENTITY column in the Indexes list if you have not saved the table. However, the database engine returns an error when you attempt to save the table. After you delete this column from the list, you may then save the table.
2 Click Add.
The New Index dialog displays.
3 Type the name of the new index and click OK.
The new index appears in the Indexes list and the Index Segment Details display. Note that the first column is populated into the Columns list.
Note New indexes are created by default as Normal.
4 In the Columns list, select the Column to designate for the Index or Index Segment.
Caution Indexes must have at least one Column designated. If you do not select a Column for the Index, the first column remains selected.
The default sort order is Ascending. If you need a descending sort order, select Descending from the Sort Order list for the Column you want changed.
Note Some data types, such as LONGVARBINARY, cannot be used for an index. Columns with such data types are not valid choices.
5 Continue selecting columns from the list until all the segments are added.
Note that a column can be selected for an index only once. Once selected, the column is removed from the list of choices because the column has already been designated in the index.
6 Click
File >
Save or
before changing pages within Table Editor.
See also
Creating Indexes in
PSQL Programmer's Guide, which is part of the PSQL Software Developer’s Kit (SDK).
►To create a unique index
Tables created with an IDENTITY, SMALLIDENTITY, or BIGIDENTITY column have unique indexes automatically created on these columns. You cannot create a second index on one of these columns unless it is included as part of a multiple-segment index.
Table Editor permits you to include an IDENTITY, SMALLIDENTITY, or BIGIDENTITY column in the Indexes list if you have not saved the table. However, the database engine returns an error when you attempt to save the table. After you delete this column from the list, you may then save the table.
2 Click Add.
The New Index dialog displays.
3 Type the name of the new index and click OK.
The new index appears in the Indexes list and the Index Segment Details display.
Note New indexes are created by default as Normal.
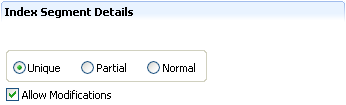
4 Select Unique in the Index Segment Details area to designate the index as unique.
Selecting Unique disables duplicatability, restricting duplicates.
Note that the first column is populated into the Columns list.
5 In the Columns list, select the Column to designate for the Index or Index Segment.
Caution Indexes must have at least one Column designated. If you do not select a Column for the Index, the first column remains selected.
The default sort order is Ascending. If you need a descending sort order, select Descending from the Sort Order list for the Column you want changed.
Note Some data types, such as LONGVARBINARY, cannot be used for an index. Columns with such data types are not valid choices.
6 Continue selecting columns from the list until all the segments are added.
Note that a column can be selected for an index only once. Once selected, the column is removed from the list of choices because the column has already been designated in the index.
7 Click
File >
Save or
before changing pages within Table Editor.
See also
Creating Indexes in
PSQL Programmer's Guide, which is part of the PSQL Software Developer’s Kit (SDK).
►To create a partial index
Tables created with an IDENTITY, SMALLIDENTITY, or BIGIDENTITY column have unique indexes automatically created on these columns. You cannot create a second index on one of these columns unless it is included as part of a multiple-segment index. See also
AUTOINCREMENT in
SQL Engine Reference.
Table Editor permits you to include an IDENTITY, SMALLIDENTITY, or BIGIDENTITY column in the Indexes list if you have not saved the table. However, the database engine returns an error when you attempt to save the table. After you delete this column from the list, you may then save the table.
2 Click Add.
The New Index dialog displays.
3 Type the name of the new index and click OK.
The new index appears in the Indexes list and the Index Segment Details display.
Note New indexes are created by default as Normal.
4 Select Partial in the Index Segment Details area to designate the index as partial.
Note that the first column is populated into the Columns list.
5 In the Columns list, select the Column to designate for the Index or Index Segment.
Caution Indexes must have at least one Column designated. If you do not select a Column for the Index, the first column remains selected.
The default sort order is Ascending. If you need a descending sort order, select Descending from the Sort Order list for the Column you want changed.
Note Partial Indexes are restricted to columns with a data type of CHAR or VARCHAR and that are designated as the only or last segment in an Index.
6 Continue selecting columns from the list until all the segments are added.
Note that a column can be selected for an index only once. Once selected, the column is removed from the list of choices because the column has already been designated in the index.
7 Click
File >
Save or
before changing pages within Table Editor.
See also
Creating Indexes in
PSQL Programmer's Guide, which is part of the PSQL Software Developer’s Kit (SDK).
►To modify an existing index
The database engine creates some indexes, such as IDENTITY, SMALLIDENTITY, or BIGIDENTITY column indexes and primary key indexes. These indexes are read-only and cannot be modified.
Table Editor permits you to include an IDENTITY, SMALLIDENTITY, or BIGIDENTITY column in the Indexes list if you have not saved the table. However, the database engine returns an error when you attempt to save the table. After you delete this column from the list, you may then save the table.
2 Click the desired index in the Indexes list.
The Index Segment Details displays.
3 Modify the segment details as desired.
4 Click
File >
Save or
before changing pages within Table Editor.
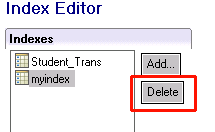
►To delete an index
The database engine creates some indexes, such as IDENTITY, SMALLIDENTITY, or BIGIDENTITY column indexes and primary key indexes. These indexes are read-only and cannot be deleted.
2 Click the desired index in the Indexes list.
3 With the Index you want to delete selected, click Delete in the Indexes list.
4 Click Yes to confirm the deletion.
5 Click
File >
Save or
before changing pages within Table Editor.
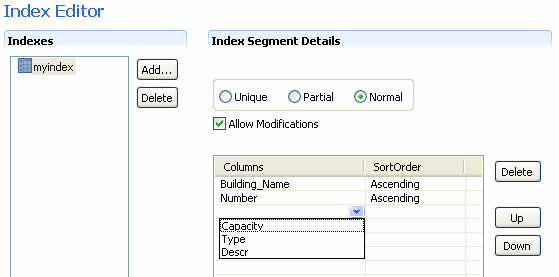
►To insert an index segment
For detailed information about segments, see
Segmentation in the
PSQL Programmer's Guide, which is part of the PSQL Software Developer’s Kit (SDK).
Tables created with an IDENTITY, SMALLIDENTITY, or BIGIDENTITY column have unique indexes automatically created on these columns. You cannot create a second index on one of these columns unless it is included as part of a multiple-segment index. See also
AUTOINCREMENT in
SQL Engine Reference.
2 Click the desired index in the Indexes list.
The Index Segment Details displays and lists the selected Index Segments.
3 Click in the first empty Columns cell, then open the Columns list (click
).
4 From the list, click the desired column for the segment.
Note Some data types, such as LONGVARBINARY, cannot be used for an index. Columns with such data types are not valid choices.
The default sort order is Ascending. If you need a descending sort order, select Descending from the Sort Order list for the Column you want changed.
5 Continue selecting columns from the list until all the segments are added.
Note that a column can be selected for an index only once. Once selected, the column is removed from the list of choices because the column has already been designated in the index.
6 Click
File >
Save or
before changing pages within Table Editor.
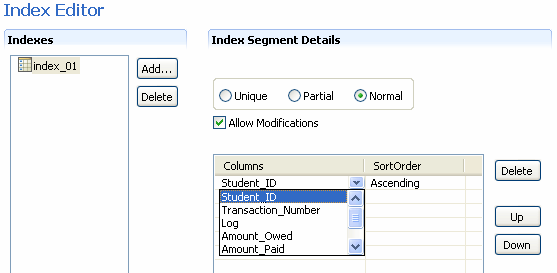
►To modify an index segment
For detailed information about segments, see
Segmentation in the
PSQL Programmer's Guide, which is part of the PSQL Software Developer’s Kit (SDK).
Tables created with an IDENTITY, SMALLIDENTITY, or BIGIDENTITY column have unique indexes automatically created on these columns. You cannot create a second index on one of these columns unless it is included as part of a multiple-segment index. See also
AUTOINCREMENT in
SQL Engine Reference.
2 Click the desired index in the Indexes list.
3 In Index Segment Details, click the desired segment in the Columns cell then open the list of columns (click
).
4 From the Columns list, click the desired column designated as the index segment.
Note Some data types, such as LONGVARBINARY, cannot be used for an index. Columns with such data types are not valid choices.
The default sort order is Ascending. If you need a descending sort order, select Descending from the Sort Order list for the Column you want changed.
5 Continue selecting columns from the list until you have completed all segment modifications.
Note that a column can be selected for an index only once. Once selected, the column is removed from the list of choices because the column has already been designated in the index.
6 Click
File >
Save or
before changing pages within Table Editor.
►To delete an index segment
Note Each index requires a minimum of one segment. To delete an index that has only one segment, delete the index itself.
2 Click the desired index in the Indexes list.
The Index Segment Details displays, listing all the designated index segments.
3 Click the desired index segment.
4 With the index segment you want to delete selected, click Delete in the Index Segment Details Columns list.
5 Click
File >
Save or
before changing pages within Table Editor.
►To arrange the order of index segments
2 Click the desired index in the Indexes list.
The Index Segment Details displays.
3 Click the index segment you want to reorder.
4 Click Up to move the segment toward the top of the segment grouping, or Down to move the segment toward the bottom.
5 Click
File >
Save or
before changing pages within Table Editor.
►To specify a sort order for an index
For detailed information about sort order, see
Sort Order in the
PSQL Programmer's Guide, which is part of the PSQL Software Developer’s Kit (SDK).
2 Click the desired index in the Indexes list.
The Index Segment Details displays.
3 Click in the Sort Columns cell then open the list of sort choices (click
).
4 From the Sort Order list, click Ascending or Descending.
The default sort order when an index segment is created is ascending.
5 Click
File >
Save or
before changing pages within Table Editor.
►To allow duplicates in an index
For detailed information about duplicates, see
Duplicatability in the
PSQL Programmer's Guide, which is part of the PSQL Software Developer’s Kit (SDK).
2 Click the desired index in the Indexes list.
The Index Segment Details displays.
3 Clear the Unique option in the Index Segment Details area by selecting one of the other options (Partial or Normal).
Note By default, indexes are created as Normal, allowing duplicates.
4 Click
File >
Save or
before changing pages within Table Editor.
►To specify index as modifiable
For detailed information about modifiability, see
Modifiability in the
PSQL Programmer's Guide, which is part of the PSQL Software Developer’s Kit (SDK).
2 Click the desired index in the Indexes list.
The Index Segment Details displays.
3 Click Allow Modifications option.
A check mark in the box indicates that the index value can be modified. Lack of a check mark indicates that the index value cannot be modified.
Option State | Meaning |
| Values can be modified |
| Values cannot be modified |
| Modifiable does not apply |
The default for all SQL data types is that the index column is modifiable.
4 Click
File >
Save or
before changing pages within Table Editor.
Foreign Keys Tasks
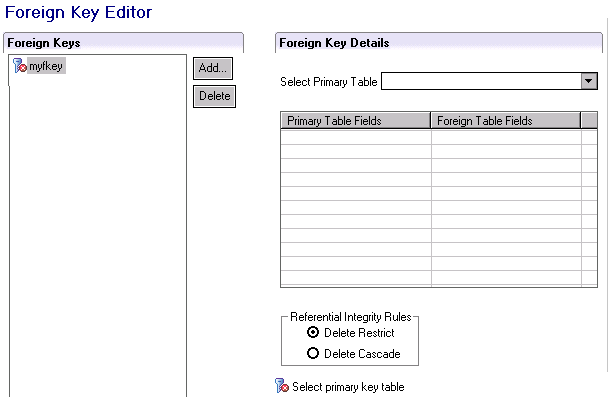
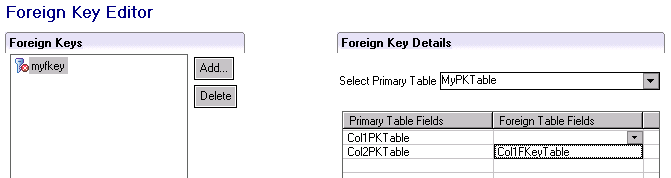
►To add a foreign key
Note that at least one table in the database must have a primary key or you cannot add a foreign key.
2 Click Add.
3 Type the name that you want for the new foreign key.
4 Click OK.
The new foreign key appears in the Foreign Keys list and the Foreign Keys Details display.
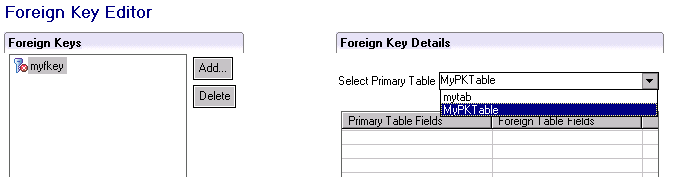
5 Click
for “Select Primary Table” to display the list of tables permissible as primary tables.
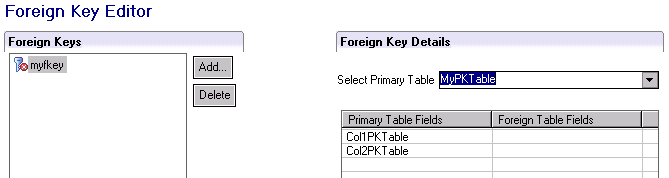
6 Click the desired table in the list (only tables with a primary key appear in the list).
The primary field(s) in the table appear in “Primary Table Fields” column.
7 Match fields in the foreign table with fields in the primary table:
Click the empty cell in the “Foreign Table Fields” column for the corresponding field in the “Primary Table Fields,” then click
to displays the list of permissible fields.
Note The data type and size of the fields must match. The list of Foreign Table Fields contains only fields that are the same data type and size as the primary table field being matched.
8 Click the desired field in the list.
9 Repeat steps
7 and
8 to match each field listed in the “Primary Table Fields” column with a field in the “Foreign Table Fields” column.
10 Click the desired referential integrity rule: Delete Restrict or Delete Cascade.
PSQL allows a circular delete cascade on a table that references itself. Because of this, use delete cascade with caution. See
Delete Restrict and
Delete Cascade, both in
Advanced Operations Guide.
11 Click
File >
Save or
before changing pages within Table Editor.
►To modify a foreign key
2 Click the desired foreign key in the Foreign Keys list.
3 The Foreign Keys Details displays.
4 As desired, select the primary table, match foreign table fields to primary table fields, and set the referential integrity rule.
See steps
5 through
10 in
To add a foreign key.
5 Click
File >
Save or
before changing pages within Table Editor.
►To delete a foreign key
2 Click the desired foreign key in the Foreign Keys list.
3 Click Delete.
4 Click Yes to confirm the deletion.
5 Click
File >
Save or
before changing pages within Table Editor.
SQL View Tasks
►To copy SQL statements
2 Position the cursor in the desired statement view: CREATE Statement or ALTER Statement.
3 With the mouse, select the desired text. (Press and hold the right mouse button then “drag” across the desired lines.)
Tip You can press Ctrl+A to select all of the text.
4 Right-click then click Copy (or press Ctrl+C).
►To maximize or restore view of SQL statements
2 For the desired statement view, CREATE Statement or ALTER Statement, click the icon in the upper right corner of the view:
Icon | Action |
| Maximizes the statement view. |
| Restores the statement view to its size prior to maximizing. |