AuditMaster captures audit data based on audit configurations. An audit configuration combines several things:
•An AuditMaster server installed with a Zen server engine
•If available, a schema imported from a Zen database
•One or more groups of files to monitor
Schemas are not required to run AuditMaster, but they make audit records human-readable as rows within tables. They also allow for more precise alerts.
When you import a schema into AuditMaster, all groups created under that schema can monitor tables that use it. In fact, when you browse for tables to add, only tables that use the schema are shown.
If you do not import a schema, you still must create a group for Btrieve files to be monitored. When you browse for files, only Btrieve files are shown.
Although you can create a single group and then add all monitored files to it, doing so may make it harder to plan the auditing you want to do. Creating more than one group, or even groups under separate imported copies of the same database schema, can simplify auditing activities.
For example, if you monitor different files for different customers, you can create a group for each customer, under which all files are for that customer. You can also import the same schema for each customer, under which all groups are for that customer. Your arrangement of imported schemas, groups, and files serves only to organize your thinking and has no affect on the audit records logged, nor on the database operations that generate them.
In summary:
•Each imported schema has one or more groups. Each group has one or more tables to monitor.
•Under an imported schema, all groups of monitored tables use only that schema.
•To monitor a Btrieve file with no schema, you must create a group where it can be added.
•A table or file can belong to only one group. Once added to a group, no other group can monitor it.
We recommend you step through the following examples to see how these concepts work in practice:
Zen data dictionary files (DDFs) provide the schema information that AMCC uses to make captured audit data human-readable and to enable querying at the field level in records. When you import a database schema in AMCC, it reads the DDFs from the data file directories for the database and stores them in its own database for use in displaying and querying audit data.
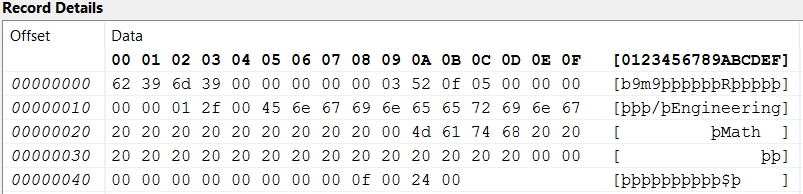
Without DDFs, data records captured from monitored files appear as hexadecimal rows, and you cannot query on specific data values. Lacking DDFs to format the display of a logged record, AuditMaster displays the insert of a record in a data file something like the following:
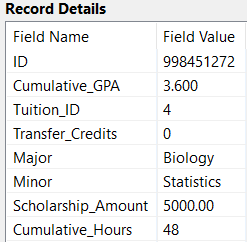
After schema import, AuditMaster can display the next logged record insert in a readable form like the following:
Importing a schema does not change the display of records already captured. Records captured before schema import continue to appear as hexadecimal characters. In the same way, removing a schema has no effect on records logged while the schema was in use, which remain readable when they are displayed in AMCC. The display of records depends on whether a schema was imported during the time the records were logged.
Note If you import the schema of a database that uses V2 metadata, and the DDF name for a table, column, or index is longer than 40 characters, AuditMaster displays only the first 40 characters. This shortened display of the table name, does not affect AM operation but may limit your ability to read some reports in the AMCC window.
The rest of this tutorial on schemas covers the following tasks:
The following example shows how to import a schema.
Note that in AMCC in the Audit Configurations tab, an imported schema named Zen Demo has been installed with AuditMaster. It is the schema for the sample Demodata database. While it can be used, for the purpose of this example, the Demodata schema is imported again in a new audit configuration.
►To import a schema from a Zen database
1 Select Tools > Import Schema or click the Import Schema button in the toolbar to open the Import Schema dialog box. The dialog lists databases on the Zen server that can be used to create an audit configuration.
2 Select the database from the list whose schema defines the tables you wish to monitor.
3 The database name is automatically entered in the Name field for the new audit configuration. You can replace it with a different name. All keyboard characters are allowed, including spaces. This name will be associated with each audit record captured for this schema.
4 Enter a description for the audit configuration. All keyboard characters are allowed, including spaces. This string will appear in the properties for the audit configuration.
5 Enter a version for the audit configuration. All keyboard characters are allowed, including spaces. This version will be associated with each audit record captured for this schema.
AMCC displays the value you enter in parentheses after the audit configuration name. Use the version to suit your needs. The only restriction is that the version must be unique for each copy of the schema that you import.
6 Click Import.
The name you chose appears as an audit configuration and version at lower left in the AMCC window. You can now add and monitor groups of tables that use the imported schema.
Keep in mind the following things about imported schemas:
•When you import a schema to create an audit configuration, AuditMaster reads table and column information from the DDFs of the database and stores it internally within AuditMaster. If the database schema is later revised, and it no longer matches the one imported into its audit configuration, then any query you run against audit records is likely to return truncated data or worse. To continue auditing the database correctly, you must import the schema into a new audit configuration and add the monitored files there. Regular queries created in Query Builder should continue to work for records captured in the new audit configuration. However, because Advanced Query Builder can search for data field information, you may need to recreate advanced queries to run against audit records captured after the database schema changed.
•If you have set Zen security policy on the DefaultDB database to Mixed or Database, then before working with a new schema for an audit configuration, you must add its path to the list of data locations for DefaultDB. See details under Running AuditMaster under Zen Security.
Removing an Audit Configuration
Removing an audit configuration deletes the imported schema, its groups, and lists of monitored tables under those groups. The specified tables will stop being monitored the next time the Zen database engine is restarted.
►To remove an audit configuration
1 In the Audit Configurations tab, right-click the name of an audit configuration and select Delete.
2 Confirm the deletion by clicking Yes.
The files that were monitored in the deleted groups are now available to add to groups in other audit configurations. Generally, you probably would need to remove an audit configuration only when a database schema changes. You would then import the new schema and recreate the groups and added files to monitor.
Configuring Data Monitoring With a Schema
This scenario shows how to set an audit configuration to monitor a group of one or more tables in a database that has data dictionary files (DDFs). It uses the Demodata sample database, which is installed with a Zen server. It also uses an existing audit configuration installed with AuditMaster, which already has the Demodata schema imported.
To create your own audit configuration, you must be an AuditMaster administrative user.
As explained in Managing Schemas, schema information in DDFs makes audit records human-readable and enables you to query for particular data values.
1 Start AMCC to open the AuditMaster window, showing the available server.
2 Right-click the server name to select Login. You may also simply expand the name to open the login dialog.
3 Enter the default user name admin and the password MASTER. If you have changed the user name and password, enter those instead.
Note The built-in user ID admin has the default password MASTER. Passwords are case-sensitive, but user names are not. This user ID and password are known only within AuditMaster and are unrelated to user accounts under Zen or Windows security.
4 Click OK.
5 Under Audit Configurations in the Tables tab, right-click the existing audit configuration Zen Demo (9) and select Add Group.
6 Enter the group name Demodata, and click OK.
Group names are not case-sensitive and can use any keyboard characters, including spaces, up to 40 characters in length. Although it is possible to reuse a group name from another audit configuration, we recommend a unique name to lessen risk of confusion when you build AuditMaster queries that use group names.
7 In the Browse Tables window under the Available Tables area, browse to the location of tables to associated with the schema for this audit configuration.
For this example, select the directory for Demodata, the Zen demonstration database. In a default Zen installation, this location is C:\ProgramData\Actian\Zen\Demodata.
8 Click the table named Billing, and click Select to move it to the Tables to Be Monitored list.
You can also click Select All to add every table in the current location.
Each table can be a member of only one group in any audit configuration. If you do not see a table where you expect it to be, check other groups in this and other audit configurations to see if it is already being monitored.
To remove an item from Tables to Be Monitored, select it and click Remove. Clicking Remove All drops all tables from the group.
Note Any query or alert based on a removed table will now fail to find audit records and will also need to be deleted and, if needed, recreated after the table has been added to another group. If the table is added back to the same group as before, the query or alert will again succeed.
9 When you are finished selecting tables for the group, click OK.
The window closes and AMCC prompts you to restart the Zen database engine.
10 Click Yes.
After the restart, monitoring begins. In the Audit Configurations tab, the new group appears with the table listed under it.
11 If you wish to makes changes, right-click the group and select Edit.
Configuring Data Monitoring Without a Schema
This scenario shows how to set an audit configuration to monitor a group of one or more Btrieve data files that have no DDFs. It uses a data file named sample.btr, which is installed with a Zen server, as well as an existing audit configuration installed with AuditMaster.
To create your own audit configuration, you must be an AuditMaster administrative user.
1 Start AMCC to open the AuditMaster window, showing the available server.
2 Right-click the server name to select Login. You may also simply expand the name to open the login dialog.
3 Enter the default user name admin and the password MASTER. If you have changed the user name and password, enter those instead.
Note The built-in user ID admin has the default password MASTER. Passwords are case-sensitive, but user names are not. This user ID and password are known only within AuditMaster and are unrelated to user accounts under Zen or Windows security.
4 Click OK.
5 Under Audit Configurations in the Btrieve Files tab, right-click the existing audit configuration Zen Generic and select Add Group.
6 Enter a group named Files, and click OK.
Group names are not case-sensitive and can use any keyboard characters, including spaces, up to 40 characters in length. Although it is possible to reuse a group name from another audit configuration, we recommend a unique name to lessen risk of confusion when you build AuditMaster queries that use group names.
7 In the Btrieve File Group window under the Available Files area, browse to the location of files to monitor. The only files displayed are Btrieve files.
For this example, select the Zen sample directory. In a default Zen installation, this location is C:\ProgramData\Actian\Zen\samples.
8 Select the file name sample.btr, and click Select to move it to the Files to Be Monitored list.
You can also click Select All to add every file in the current location.
Each file can be a member of only one group in any audit configuration. If you do not see a file where you expect it to be, check other groups and audit configurations to see if it is already being monitored.
To remove an item from Files to Be Monitored, select it and click Remove. Clicking Remove All drops all files from the group.
Note Any query or alert based on a removed file will now fail to find audit records and will also need to be deleted and, if needed, recreated after the file has been added to another group. If the file is added back to the same group as before, the query or alert will again succeed.
9 When you are finished selecting files for the group, click OK.
The window closes and AMCC prompts you to restart the Zen database engine.
10 Click Yes.
After the restart, monitoring begins. In the Audit Configurations tab, the new group appears with the file listed under it.
11 If you wish to makes changes, right-click the group and select Edit.
Monitoring Items Other than Data Files
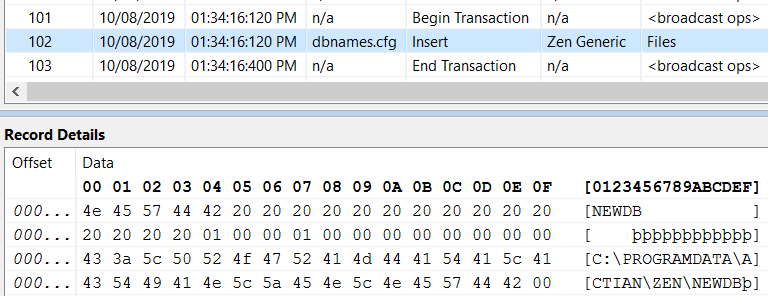
One type of Btrieve file other than a data file that you may want to monitor is the Zen server system file dbnames.cfg, found in a default installation under C:\ProgramData\Actian\Zen. It is the master list of Zen databases and their configuration settings. You may find it useful to audit it for changes such as new and dropped databases, which appear as inserts and deletes in the dbnames.cfg file. Because dbnames.cfg is a Btrieve file with no schema, its audit records are not human readable. However, they reveal text strings that provide the name and location of the database, as shown in the following example:
Operations to Audit by Table or File
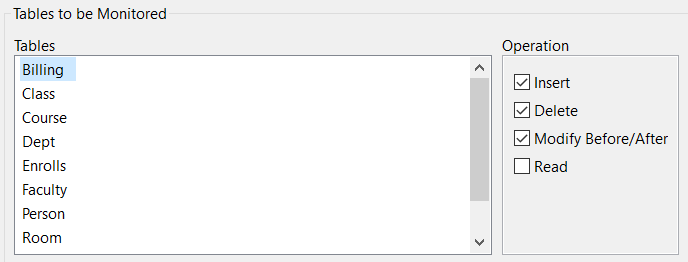
In the Table Group or Btrieve File Group window, each table or file in the group has a list of operations that can be monitored. Clicking a table or file displays the operations monitored for that item. Occurrences of the selected operations produce audit records. For example, when the Insert operation is selected, any successful insert into the monitored table or file, regardless of the method of insert, will generate an audit record.
In the following example from monitoring the Demodata sample database, the Billing table is selected to show the default selected operations when the table is added to a group.
These values can be set for each table or file independently at the time you add it to a group. As with other settings, the Zen database engine must be restarted for changes to take effect.
Note that if a selected operation fails, then no audit record is captured. However, AuditMaster also allows you to select certain errors to audit, so that when one of them occurs as part of a failed operation, that error is captured as an audit record.
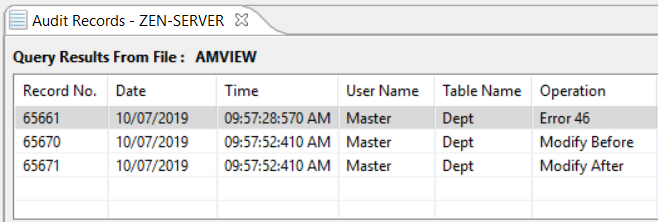
The following example shows an audit record captured when status code 46 is selected to be audited. The location of the error is the Demodata table Dept, which has been added to a group to be monitored. Status code 46 indicates an invalid owner name, which results here from an attempt to update the table using an incorrect owner name. The update operation produces no audit record because it failed. A second attempt to update the file, this time with a valid owner name, allows the update to succeed, resulting in the Modify Before and Modify After audit records.
For information about monitoring Zen database status codes, see Errors to Audit.