As an administrator, you will perform certain tasks to define how AuditMaster operates. As for adding audit configurations, the menu commands for these tasks are available only to users with administrative rights.
An audit server is a Zen server where AuditMaster is installed. The file amserver contains audit server connection settings. In a default installation, it is found in C:\ProgramData\Actian\Zen\Audit\DATA.
In an AuditMaster installation, the local Zen server is automatically added as an audit server. You can manually add a remote audit server if you have network access and file system permissions under your Windows login.
►To add a server
1 Check the server that you wish to add to make sure that the Zen database engine is running.
2 In AMCC, select Server > Add.
3 Enter the path to the amserver file for the audit server.
In a default installation, this path is \\server\PVSWAUDIT$\DATA\amserver, where server is the name of the Zen database server. Note that a custom share name may not be PVSWAUDIT$.
4 Click OK.
The server you selected is added to the data tree.
Depending on your system and network, the added name may be the machine name or the path to the amserver file.
Note If your client cannot connect successfully to the AuditMaster server, you may receive a –108 error message. The cause may be a faulty network mapping or other network problem. It may also involve a license key with too low a user count. See Authorization License.
5 Expand the new audit server to log in, or right-click it and select Login.
6 In the login dialog, enter an AuditMaster user name and password, and click OK.
The remote audit server is now ready for use.
Removing a Server
When you remove an audit server connection from an AMCC data tree, the client no longer has access to that server. However, auditing continues on the server, and existing audit records, users, and settings remain because the Zen server is where they are stored. If you add the server connection again, everything that was present before is again displayed in the data tree.
►To remove a server
1 Click an audit server in the data tree and select Server > Remove.
2 In the dialog box, select Yes to confirm.
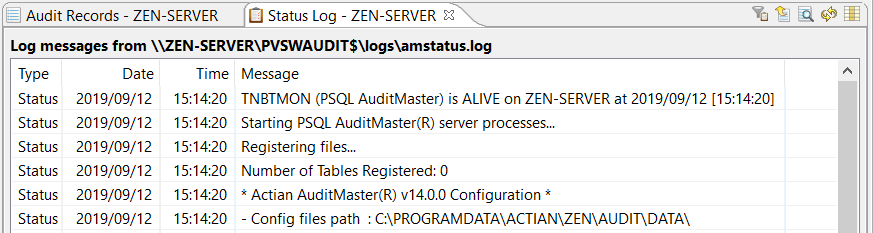
Reviewing Activity in the Status Log
The Status Log tab displays logging that AuditMaster performs on itself. The tab provides a list of status and error messages generated by AuditMaster operations. For developers, it also can be configured to capture messages for debugging purposes.
You can open the Status Log tab by selecting Admin > View Status Log.
As in the Audit Records tab, this tab offers icons for working with the content displayed. In the following table, the searching, exporting, and displaying of columns work the same as in the Audit Records tab, and links to those topics are provided. Instructions for filtering and sorting messages are given here.
Command
Description
Filter Log Messages
Filter the status log messages displayed by type and date. Status and error messages are displayed by default. You can choose to display debug messages as well.
Updates the list of logged status and error messages in the Status Log tab.
Select Columns to Display
Chooses which columns appear in the tab.
►To filter and sort status log messages
1 Open the Status Log tab.
2 Click the filter icon .
•To filter by type of message, select Debug, Error, Status, or a combination.
•To filter by specific dates, select the check box for Earliest or Latest or both and set a date range. If neither of these is selected, then the default range is from the earliest to the latest record in the current display.
3 When you are finished setting filter options, click OK.
4 You can sort messages by clicking the header of the column to use for sorting. To return the sort order to the default, close and reopen the tab.
Disabling and Enabling the Monitor
During certain procedures, such as bulk loading of records, it may be preferable to stop monitoring a database temporarily because the expected large volume of audit records does not offer the same value as in routine monitoring. In these cases, you can manually disable the AuditMaster monitor, perform procedures, and then reenable it to return to auditing normal activities.
Note You can use these steps only locally on the same machine as the monitored Zen server.
►To disable AuditMaster monitoring on an audit server
1 Log in to AMCC as an AuditMaster user with administrative permissions.
2 Under Audit Servers, right-click the name of the machine to be disabled, next to which the message "(Monitor running)" appears.
3 Select Disable Monitor.
4 When you are prompted to restart the Zen engine service, click Yes.
The message next to the machine name changes to "(Monitor disabled)." You may now perform database procedures that would have been captured as audit records.
When you are finished, use the following steps to restore auditing:
►To enable AuditMaster monitoring on an audit server
1 Log in to AMCC as an AuditMaster user with administrative permissions.
2 Under Audit Servers, right-click the name of the machine to be enabled, next to which the message "(Monitor disabled)" appears.
3 Select Enable Monitor.
4 When you are prompted to restart the Zen engine service, click Yes.
The message next to the machine name changes to "(Monitor running)." Database activity is now again being monitored according to the audit configurations that have been set.
Maintaining Users
As part of AuditMaster security, users must be authenticated to gain access to the AuditMaster system. As administrator, you define user names and provide a password for each user. You also decide whether each user has administrator privileges.
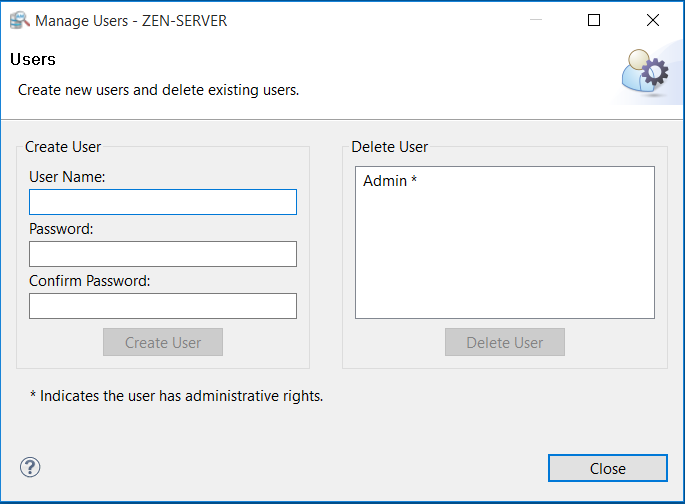
This topic covers tasks done in the User Maintenance window.
1 Select Admin > User Maintenance or click the icon in the tool bar.
2 In the Manage Users window, enter a user name and password. User names are not case sensitive, can be up to 20 characters long, and can include spaces. Passwords are case-sensitive and can be up to 40 characters long. For double-byte character sets, the user name and password lengths are 10 and 20 characters, respectively.
3 Click Create User.
4 You are asked whether to give this user AuditMaster administrator privileges. Click Yes or No.
The new user appears in the list on the right.
►To remove a user
1 Select Admin > User Maintenance.
2 In the Manage Users window, select a user in the Delete User list and click Delete User.
Maintaining Server Settings
The Server Settings window displays AuditMaster options. You can open it using the Admin > Server Settings command.
The window offers groups of settings. As shown in the following table, some of the settings can be changed, although in most cases this is not needed.
For changes to take effect, you must click the Apply or OK button. Also, except for automated archiving, the Zen database engine must restart to activate changed settings.
Setting Group
Setting
Purpose
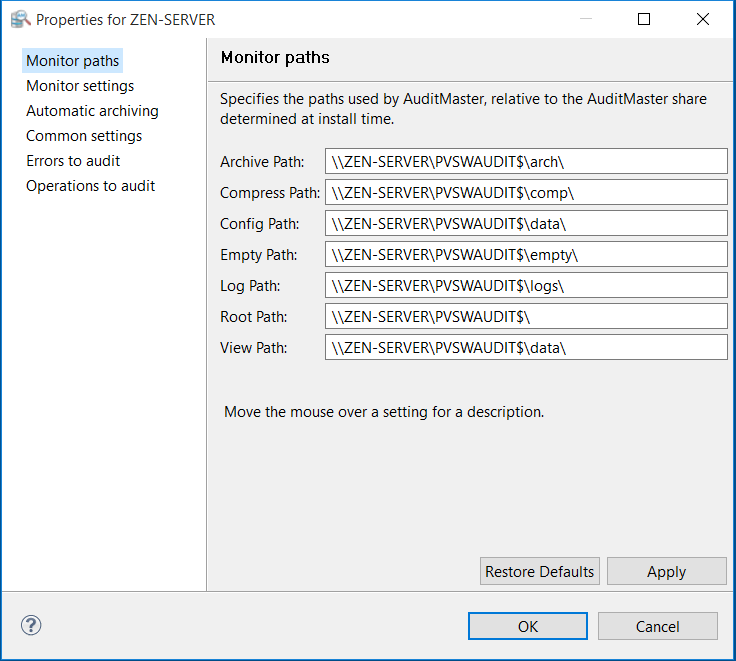
Monitor paths
Various path names
These locations are set at installation time to work with a shared volume that is also created by the AuditMaster installer. In most environments the default paths can be left as is. However, to meet security requirements the share can be manually replaced with an explicit local path name. For instructions, see Replacing the Network Share with a Local Path. Be advised that doing so blocks remote clients and restricts access to only the local system.
Monitor settings
Archives to Keep
Used with Automatic Archiving settings. By default, the value is –1, which means that the system does not limit the number of archive files. If the value is greater than zero, then the system retains only that number of the most recent files and deletes the older ones. Use of this setting may lead to unintentional loss of archived audit records. Be sure to consider the possible situations when it may be undesirable to delete archive files automatically.
Monitor settings
Mapper Threshold
Controls the frequency of automatic refreshing of the Current View File in AMCC. Default is 1, meaning 1 minute. Setting the value to zero turns off automatic refreshing. Its entry in amstatus.log is "Running Mapper after n minute(s)."
Automatic archiving
Creation of Archive Files
Configures the automatic moving of audit records into archive files. For instructions, see Automatic Archiving.
Common settings
Archive Disk Limit
Used with Automatic Archiving settings. By default, the value is –1, which means that the system does not monitor the total size of all archive files. If the value is greater than zero bytes, then the system retains only the most recent files for which the total size is less than or equal to this number of bytes and deletes the older files. Be sure to consider the possible situations when it may be undesirable to delete archive files automatically.
Common settings
Max Status Log Size
Maximum length in bytes of the amstatus.log file. Default is 10000000 (10 million) bytes. Minimum value is 1024 bytes.
Common settings
Status Log File
Location of the amstatus.log file. The default path uses the AuditMaster share PVSWAUDIT$, but you can replace it with another location.
Errors to audit
Btrieve Error Codes
Selects the Microkernel Engine status codes to log as audit events. A certain number are turned on by default. See Errors to Audit.
Operations to audit
Default operations to audit globally
For each file to be monitored, sets the Microkernel Engine events to enter by default in the audit log. These settings can be manually changed on each file. See Operations to Audit Globally.
Automatic Archiving
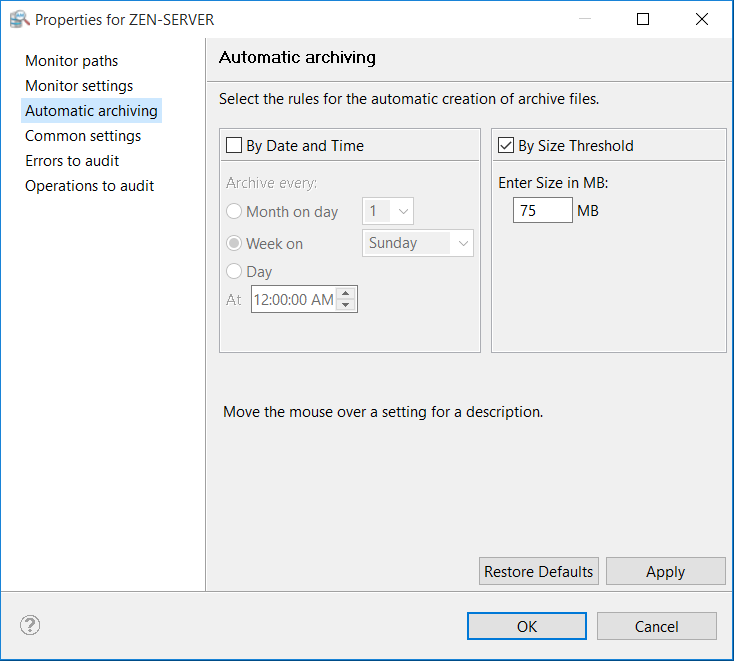
The Automatic Archiving group offers options for configuring audit record archiving.
By default, AuditMaster automatically moves audit records to an archive file when audit records in the log file reach 75 MB. Under Admin > Server Settings > Automatic Archiving, you can change this default size, choose to archive by date, or set up a combination of the two. The allowed range for the size threshold is 40–1024 MB.
If you select the check boxes for both By Date and Time and By Size Threshold, then whichever condition occurs first will prompt the system to create an archive file and clear the log file to empty.
If you clear the By Size Threshold setting and choose By Date and Time, the system still uses a 1024 MB size threshold. If the date and time you select has not occurred and the log file size reaches 1024 MB, the system will automatically archive, then when the date and time arrive, it will archive again.
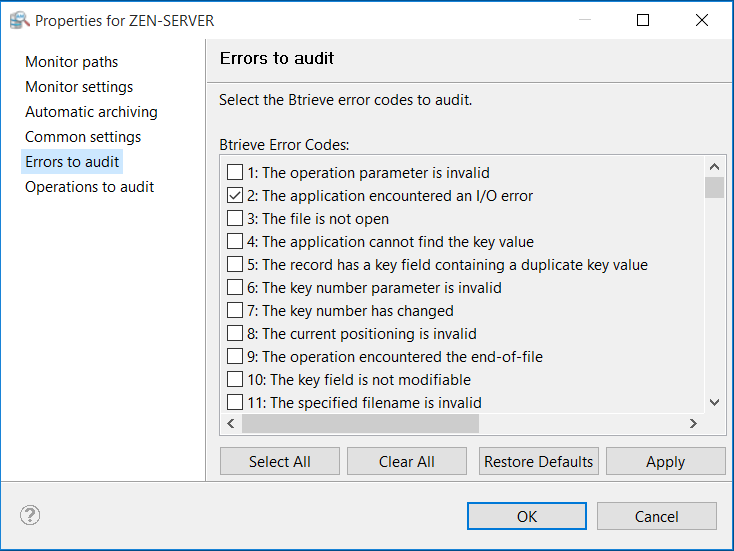
Errors to Audit
The Errors to Audit group lists a set of Microkernel Engine status codes that can be captured as audit events.
For auditing of status codes to work, all of the following must be true:
•The error to be audited is selected in this list.
•The table or file in which the error occurs is assigned to an audit group to be monitored.
•The operation being performed when the error occurs must be an audit operation for the file. For example, to log a status 46 on an update operation, you must have selected Modify Before/After for that table or file.
In the current release, the list of errors has the following codes selected by default:
If you do not want audit records captured for a particular error, clear its check box in the list.
For information about the status codes in the list, see Status Codes and Messages in the Zen database documentation.
After you make selections from the list, the Zen database engine must restart to activate them.
Operations to Audit Globally
The Operations to Audit window offers the same Insert, Delete, Modify Before/After, and Read events as in the window to create or edit a group under an audit configuration. In addition, you can also audit the session events Begin/End Transaction, Abort Transaction, and Reset. The session event Login/Logout is always audited and cannot be changed.
Unlike settings for individual files, all of these options are global for any file in any audit configuration.
At AuditMaster installation time, the defaults in this window include all operations except Read and Reset. If you select different options, they become the new defaults for any file you add to an audit group. Audit events for previously monitored files are not affected unless you select Apply to All.
Finally, if any file is removed from a group and then added again, its operations to audit settings default to the current selections in this window.
After a change is made, the Zen database engine must restart to activate the new setting.
Note In a Zen database, when the client-side cache engine is turned on, the cache engine reads an entire database page after 8 consecutive reads in anticipation of more reads. The records in the database page read by the cache engine are not audited by the monitor on the server. If auditing requires that every read be captured, verify that client caching is disabled. However, lack of engine caching can reduce database performance. In Zen Control Center, expand Local Client, right-click MicroKernel Router, and select Properties, then click Performance tuning to see the setting Use Cache Engine. By default, the setting is off.
Replacing the Network Share with a Local Path
AuditMaster installs a hidden network share to enable remote client access for AMCC from other systems. If for security reasons you would like to disable the network share to block remote access, you can replace it with an explicit local path after AuditMaster installation. This replacement can be done only on the server where AuditMaster is installed, not from a remote client. No existing audit records are affected, but auditing must stop momentarily when you restart the monitor to complete the share removal process.
Note Removing the network share will prevent remote access by all AMCC clients to the AuditMaster system. Be sure that you want to remove it.
►To replace the default network share with a local path
1 On the system where AuditMaster server is installed, open AMCC.
2 In the list of audit servers, right-click one and select Login.
3 Enter an AuditMaster administrative login name and password, and click OK.
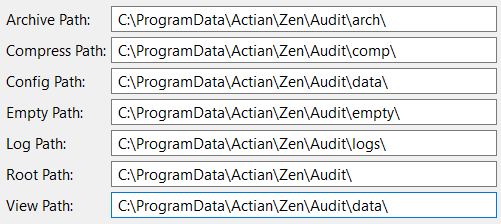
5 For each of the monitor paths, select the path name and change
\\server\PVSWAUDIT$
to
drive:\Zen root directory\Audit
where server is the name of the system on which a Zen server and the AuditMaster monitor are installed and drive and Zen root directory are, respectively, the local drive letter and absolute path name to the AuditMaster directory selected at installation time.
6 If the default installation location C:\ProgramData\Actian\Zen\ has been used, then in this example, the result would be the following:
7 Click the Apply button.
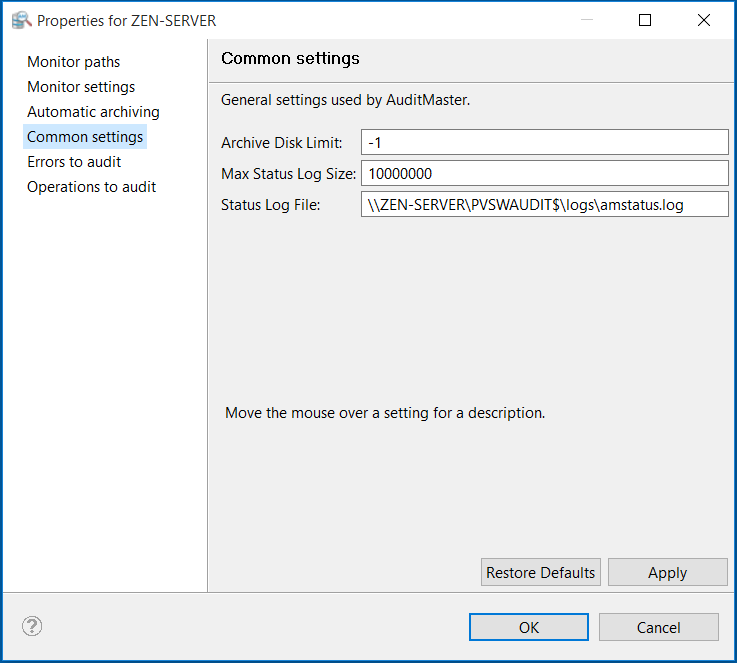
8 In the list of options, click Common Settings to display values like the following in a default installation:
9 Select the path name for the status log file and change it to
drive:\Zen root directory\Audit\logs\amstatus.log
10 After you have finished changing the values, click Apply and then OK.
When you are prompted to restart the Zen engine service, click No.
11 In AMCC select Server > Remove and when prompted to confirm, click Yes.
12 Exit AMCC.
In order to remove the network share, AuditMaster and the Zen database engine must be stopped.
13 Open ZenCC and in Zen Explorer, right-click the Services node and select Stop All Services.
14 In Windows Explorer, open the folder drive:\Zen root directory.
15 Right-click the shared folder Audit and select Properties.
16 Select the Sharing tab, then select Advanced Sharing.
17 Clear the check box Share this folder, and click OK to delete the share and close Properties.
18 In Zen Explorer, right-click the Services node and select Start All Services.
19 After the Zen database engine has restarted, add the server back to the data tree using Server > Add. as described under Adding a Server.
20 Verify that AuditMaster is working properly without a network share by opening AMCC to log in.
The new AuditMaster server is now ready to operate without a network share. Other server settings are unchanged. Previously captured audit records captured remain in the system. Only the means of the AMCC client connection has changed.


 icon in the tool bar.