The following topics describe tasks that involve running queries against the audit records. Before undertaking these tasks, be familiar with the AuditMaster interface, as described in Using AuditMaster Control Center.
AuditMaster monitors a Zen database engine for operations on Btrieve files, logs those events, and captures data from the records involved. It stores all of these things in a log file designed to receive large amounts of information. To enable you to access its contents, data is copied from the log file to a view file and prepared for running queries. As the view file grows, its query performance may slow. To remedy this, its contents can be moved to archives.
To display audit data, you run a query. AMCC offers two types of queries: regular and advanced. Regular queries use attributes of audit records to return a table of results. Advanced queries can also query for values in the database records captured with the audit records.
The following topics provide a quick introduction to working with audit records.
This basic example shows the simplest way to display audit records.
►To update the current view file
Before you query the view file, you update it first to retrieve the latest audit records from the log file.
1 In the data tree, right-click the current view file and select Update Current View File, or in the toolbar click the icon .
You may now query the view file for audit records.
2 If you would like to check the number of records in the view file and their first and last dates of capture, right-click the current view file and select Properties.
►To run a default regular query
1 Click the current view file in the data tree.
2 Do any of the following to open the Query Builder window:
•Double-click the view file.
•Right-click the file and select Query.
•Select the file and then the File > Query command.
•Select the file and then in the toolbar, select the new query icon .
•Press Alt-Q.
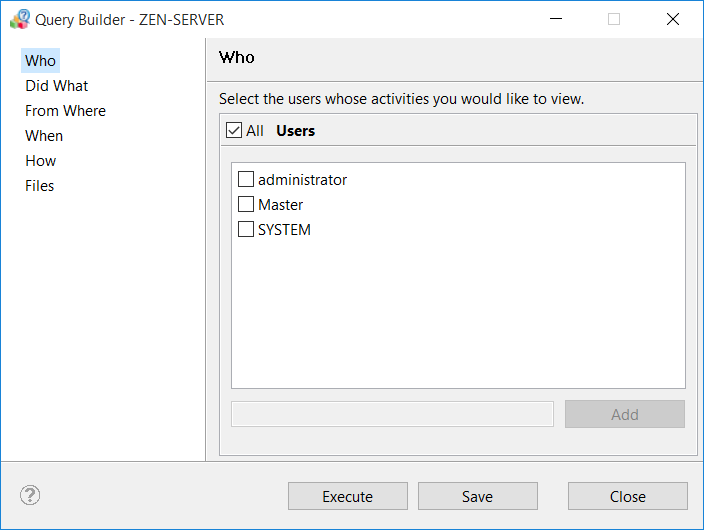
The Query Builder window opens to display the first of six groups of search conditions that you can use to restrict the query. The options shown are based on values found in the current view or archive file being queried.
For each group of search conditions, all options are selected by default except for the following:
•Under Did What, only Zen database operations and selected Zen status code messages are selected for the query. AuditMaster internal and debug messages are not selected.
•Under Files, the file checked is the one selected before the Query Builder window was opened. Any other file needed for the query must be manually added.
The selection of all options means that the query result returns every record in the view file for display in the Audit Records tab. For details about using the search conditions to restrict queries, see Running Queries.
3 Click the Execute button.
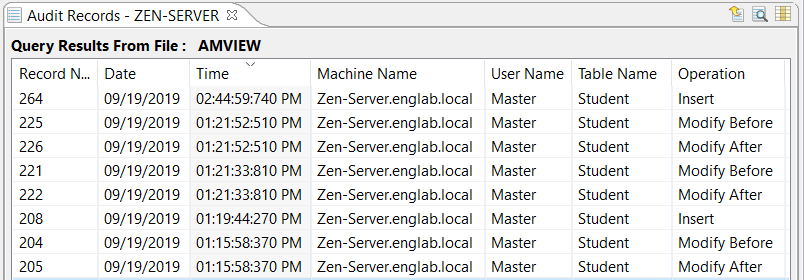
The query result appears in the Audit Records tab. The Query Builder window remains open and can be moved to view the result.
•When you are done querying, click the Close button in the Query Builder window.
Working with the Audit Records Tab
The Audit Records tab displays the results of a query. The columns in the tab show capture date and time, table name, operation, user name, and other audit information. The following table provides options for customizing and working with the display.
Click and drag the edge of a column to the desired width.
Change column order
Drag a column to the desired position.
Sort record order
Click the heading of a column to sort rows in ascending or descending order based on the values in that column. To return to the original sort order, close the tab and rerun the query.
Save these column settings
Select View > Preferences > Table Layout and click check boxes for each setting.
The following table lists all possible audit data columns. You can choose the ones to display by clicking the Select Columns to Display icon above the tab. Column order can be rearranged by dragging columns with the mouse. If you would like to save and reuse these settings, select View > Preferences > Table Layout.
Column Name
Contents
Record No.
Incremental unique number for audit record
Dependent Record
Record number for earlier related record:
•Modify-before record for modify-after record
•Begin-transaction record for end/abort transaction record
Date
Capture date for audit record
Time
Capture time for audit record
Machine Name
One of the following:
•MAC ID if event in audited file originated on same system as AuditMaster server
•IP address for local client applications using UNC address instead of simple path name
•IP address if event originated from remote client
Note: MAC addresses are not available from remote clients in the current release.
Table or data file in which event occurred. The table or file must be listed for monitoring in an audit configuration. All monitored files appear in the Tables list of the Did What tab in Query Builder.
Operation
Database event. Events can include any item in the Operations list of the Did What tab in Query Builder. SQL logins appear in this column. Selected Zen status codes also appear here when first selected in the Errors to Audit section of the Server Settings window. For details see Maintaining Server Settings.
Operation Context
BTRIEVE is the context for all data file operations.
Database Engine
Either AM Message API (internal use within AuditMaster) or Zen
Database Version
Version of Zen running on server
Product
As listed in audit configuration for monitored file
Product Version
As listed in audit configuration for monitored file
Group Name
Group for monitored file in audit configuration
Component
As listed in audit configuration for monitored file
Component Version
As listed in audit configuration for monitored file
Process Name
Process that was the source of the operation. Typically, most of these are Zen Engine, with a few actions done by AuditMaster, which are listed as Zen Monitor.
OS Version
Name and version of operating system of system where AuditMaster server is running
View File
Location of audit record, either amview (current view file) or the archive file name
Viewing Audit Record Details
To see the detail of an individual audit record, click the record in the Audit Records tab to display it in the lower part of the AMCC window. If the audit record captures changes to an application data record, both before and after values are shown and highlighted in red.
If the database schema has been imported, then the changes are readable, as in the following Demodata example. If no schema is used, then the changes are shown in hexadecimal.
Running Queries
To display audit records from a current view or archive file, you must run a query. By default, the query returns all available audit records associated with tables or data files monitored in audit configurations. You can restrict the query using search conditions for Who, Did What, From Where, When, How, and Files. For example, you can search for audited events on a particular date, for events from a selected table, or for changes that were made by only one user.
The simplest query in the Query Builder window is the default, which displays all audit records in the current view file.
►To display all available audit records
1 Right-click the view file and select Update Current View File.
2 Select the view file and select File > Query, or right-click and select Query.
3 In the Query Builder window, by default all options are selected for each search condition. To display all AuditMaster data for this file, simply select Execute.
Audit records are displayed in the grid in the upper right-hand pane of AMCC.
Instead of selecting the view file, you can select or right-click an archive file. If you want to select more than one archive file, or if you want to select both the view file and one or more archive files, see Files.
Restricting a Query
Query Builder provides sets of search conditions for restricting a query to who, did what, from where, when, how, and in which files of audit records to search.
►To restrict a query
1 In Query Builder you can select options to make a query more selective. These search conditions are on the left and are described in the following table.
To find...
Use Option...
Perform these steps...
Users For events that involve specific Zen, Windows, or AuditMaster users, as shown in the User Name column
Who
1. To find audit records involving specific users, clear the All Users check box.
2. In the list of users, select users by checking the box beside their name. The users listed are those found in the view or archive file to be queried.
You can add a user by entering a login name and clicking Add.
Operations, Groups, and Tables For audit records from selected operations, in selected tables, in selected groups, as shown in the Operation, Group Name, and Table Name columns
Did What
1. To find a type of operation, such as insert or delete, clear the All Operations check box. You can also clear All Groups or All Tables to make their lists available.
2. Select the operations and any items affected by them. Expand lists as needed to select the appropriate options. Use the Shift or Ctrl keys to extend the selection. You may select tables and files regardless of their audit configuration or group. You can also combine files with or without schemas in the same query.
Note: After clearing the All check box, when you expand a node you may still see all items selected. To remove the selection, click a single item in the list.
Machines For audit records captured on selected machines, as shown in the Machine Name column
From Where
1. To find a machine, clear the All Machines check box. The list of machine names and network addresses is now available.
2. Select one or more machines by clicking a check box. If needed, you can add a name or network address by entering it and clicking Add.
Specific Dates For audit records captured on certain dates, within a time range for each day selected, in the Date and Time columns
When
1. To search within a start and end date, clear the All Date Range check box. The Start Date and End Date calendars are now available.
2. Select a day, month, and year from the calendars or enter the date and click Set.
3. To search within a time range for each day in the date range, clear the Time Range option. Select a time from the Start Time and End Time fields. You can enter a time directly.
Note: The time range applies to each individual day in the date range – for example, between 8:00 a.m. and 5:00 p.m. each day. If All Time Range is reselected, it returns to the default of 24 hours, but the manually entered times remain and can be reactivated by clearing All Time Range again. The same is true if you set a date range and then reselect All Date Range.
Processes or Programs For audit records logged for certain processes or programs, in the Process Name column
How
1. To find a specific process or program, clear the All Processes option. The processes are now available.
2. Select a program or process by clicking the box beside the option. If the process name does not appear, use the Add field at the bottom of the pane to include it in the list.
Audit Record Files For audit records returned from selected view or archive files, as shown in the View File column
Files
1. The current view file is selected by default. You can leave it selected or clear it to exclude it from the query.
2. You can select an archive file by clicking its check box.
Note: If an archive file is not visible, it may be compressed. Close the Query Builder, decompress it, and then create your query.
2 At any time while making your selections, you can run the current query by clicking Execute.
3 Review the result in the Audit Records tab. If it is not what you need, return to Query Builder, make adjustments, and then run the query again.
4 When you are satisfied with the query, if you would like to reuse it later, click Save.
In the Save Query dialog box, enter a descriptive name for the query. You can use up to 60 characters, including spaces. Then click OK. The name can be changed later, if needed. For more information on using a saved query, see Running a Saved Query or Last Query Executed.
Building an Advanced Query
Advanced Query Builder can create more complex queries than Query Builder. It uses expressions to search audit records for specific events. If the schema has been imported, it can also query the contents of fields in data records captured with auditing data.
The Select Type and Operator columns offer the following elements for building a query expression. All text values entered are case-sensitive. The phrase “same as” refers to comparable search options in the regular Query Builder window.
Attribute
Description
(
Open parenthesis to build an expression block
Data Field
Same as selecting a table under Did What, except that you can further restrict the query at the column level and enter a value to search for or compare
Date
Same as Date Range attribute in When tab
Group
Same as Groups attribute in Did What in regular
Database Name
The name of the audit configuration where a schema was imported, rather than the name of the database itself. For Btrieve files, which have no schema, the Zen internal database DefaultDB is used.
Table
Same as Table attribute in Did What tab
Operation
Same as Operations attribute in Did What tab
How
Same as Process attribute in How tab
Rec ID
Record number in Audit Records tab of the query result
Time
Same as Time Range attribute in When tab
Where
Same as Machine Name attribute in From Where tab
Who
Same as User attribute in Who tab
and, or
Logical operators used in the Type column
=, >, >=, <=, <, in
Comparison operators used in the Operator column, plus “in” as a set operator for a list of elements
)
Close parenthesis to build an expression block
Advanced Query Examples
This topic offers two tutorials to show how to build complex queries:
The first query searches for all audit records where the cumulative GPA of a student is 3.0 or greater. The second one modifies the first one to find the date and time when the insert of a specific student occurred.
To follow the tutorials, you must first do three things:
•In AMCC, under the built-in Zen Demo audit configuration, create a group called Demo, add all of the Demodata tables to the group to begin auditing them, and restart Zen engine services.
•To make changes in one of the monitored tables, in ZenCC open a SQL document set to the Demodata database context and run this SQL script:
UPDATE Student SET Cumulative_GPA = 3.1 WHERE ID = 189602671;
UPDATE Student SET Cumulative_GPA = 3.5 WHERE ID = 189152021;
•In AMCC, right-click the current view file in the data tree and select Update Current View File. This step is essential because AuditMaster can query only the contents of the view file and archive files.
►To query for audit records of students with GPA 3.0 or greater
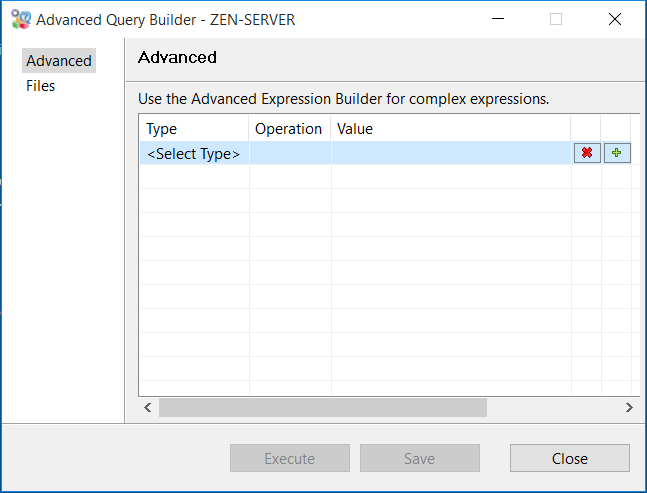
1 Do any of the following to open the Advanced Query Builder window:
•Right-click the view file and select Advanced Query.
•Select the file and then select File > Advanced Query.
•Select the file and then press Ctrl-Alt-Q.
In this window, the Advanced group of query options is selected by default and is used here. The Files group is explained under Using the Files Group in Queries.
2 In the Type column, click <Select Type>.
3 In the list of query attribute types, select Data Field.
4 For Data Field Selection, expand Zen Demo > User Tables > Student and select Cumulative_GPA.
5 In the value field at the bottom, enter 3.0 and click OK.
6 For the Data Field operator, select >= for greater than or equal to 3.0.
The Advanced Query Builder window should now look like this:
The query is now set to search for all audit records of changes in the Student table for students who have a GPA of 3.0 or greater.
7 Click Execute. Leave the window open, but move it if needed to see the AMCC window.
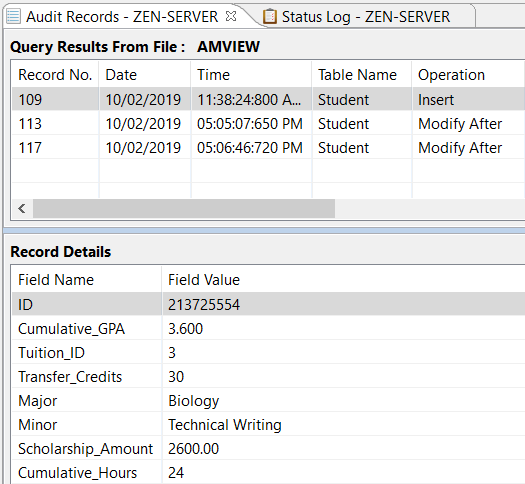
The query result is displayed in the Audit Records tab and looks like this:
Note the following things:
•The query returns these audit records because changes have occurred in their records in Demodata since auditing began on the Student table, which AuditMaster captured and which were in the current view file.
•Although Demodata contains existing records of other students with GPAs 3.0 or greater, no changes to those records have occurred, so AuditMaster has no audit records of them and AM queries return no results for them.
►To find the date and time for the insert of a particular student
In the last step of the first tutorial, you left the Advanced Query Builder window open. This second tutorial continues in that window.
1 In the query window, click the value for the Data Field, which is currently Zen Demo (9)\<User Tables>\Student\Cumulative_GPA=3.0.
2 Click the ellipsis button that appears to the right of the entry.
3 In the Data Field Selection window, change the selected data field by expanding Zen Demo > User Tables > Student and selecting ID to replace Cumulative_GPA.
4 For the ID value, enter 213725554, the number of the student in the record inserted earlier, and click OK.
5 For the Data Field operator, select = for equal to the student ID number.
6 For this example, let us imagine that you know the student must have been added in the current month, but you would like to know exactly when this happened. Click <Select Type> and select and to extend the query.
7 Click <Select Type> and select Operation.
8 For Operation Selection, expand ACTIAN ZEN and select Insert.
9 Click <Select Type> and select and to extend the query.
10 Click <Select Type> and select Date.
11 Select the first day of the current month and click OK.
12 In the line just created, for the Data Field operator select >= for greater than or equal to the first selected date.
13 Click <Select Type> and select and to continue the date range.
14 Click <Select Type>, select Date, select the last day of the current month, and click OK.
15 In this new line, for Data Field operator select <= for less than or equal to the second selected date.
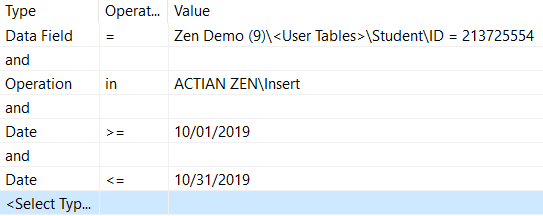
The Advanced Query Builder window should now look like this:
16 Click Execute to run the query.
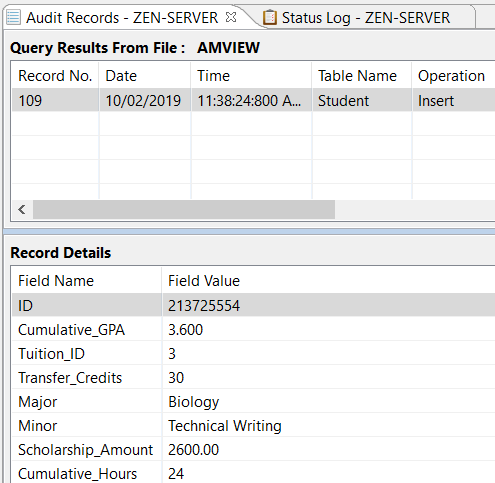
The query result is displayed in the Audit Records tab and looks like this:
Using the Files Group in Queries
In the Advanced Query Builder window, the Files group allows you to select the current view and any uncompressed archive files you would like to include in a query. You can also select only archive files.
To follow this tutorial, you must have done the following steps:
•In AMCC under Audit Servers, right-click Current View File and select Archive.
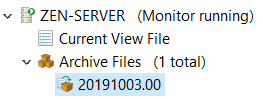
•Expand the Archive Files node in the data tree to see the name of the new file, which is named based on the archive date, which should resemble the following:
►To select files to include in a query
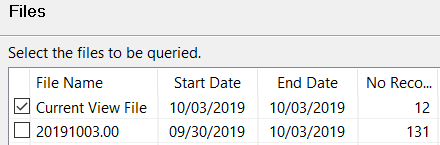
1 In the Advanced Query Builder window, click Files. The Current View File option is selected by default.
If you left only the default view file selected and ran either of the queries from the two previous Advanced Query Builder tutorials, no results would be returned. When you archived the view file, all of its audit records were moved to the new archive file.
2 To run a query against both the archive file, select it instead of Current View File. Or select them both.
Since you can query only uncompressed audit records, compressed archive files are not listed under the Files group. To see a file that is not listed, you must decompress it. For more information, see Working with Archived Audit Records.
Running a Saved Query or Last Query Executed
For each AuditMaster server, queries are stored in the data tree under Saved Queries and Last Query Executed. This section covers the following topics:
1 After creating a query in either Query Builder or Advanced Query Builder, click the Save button to name the query.
2 Enter a descriptive query name and click Save. You can leave the query builder window open.
The saved query appears with the name you gave it in the Audit Servers data tree.
►To use a saved query
1 If needed, to update the data tree, right-click the Saved Queries node and select Refresh.
2 Expand the Saved Queries node.
3 Right-click a query to see a list of commands:
•Query Current View File. Run the query against the current view file.
•Query Multiple View Files. Display available files to select the ones needed and run the query.
•Rename. Change the name of the query. You can use up to 60 characters, including spaces.
•Delete. Remove the query permanently.
Only uncompressed audit records can be queried. If a file used in a query has been compressed, you must decompress it to run the query.
Note The larger the compressed file, the longer it takes to decompress. To be sure that all records are ready to query, right-click the Archive Files node and select Refresh to update the display. When ready, the archive file icon changes from a small box in a vice to an arrow pointing to a bigger box.
►To use the last query executed
In the data tree, right-click the view file or an archive file and select Execute Last Query.
Working with Archived Audit Records
Auditing can generate large numbers of audit records. As the size of the current view file rises, queries against it can take longer to run. To improve performance, AuditMaster provides the ability to move audit records from the current view file to an archive file. Archiving can be done automatically or manually. In automatic archiving, AuditMaster creates an archive file when the current view file reaches a set limit by size or by date and time. Manual archiving must be done by a user with administrative permissions.
Archive files appear in the data tree with a file name that uses creation time in the format yyyymmdd.nn, where yyyy is the year, mm is the month, dd is the day, and nn is the number of the archive file created that day, from 00 to 99.
Compressing archive files saves as much as 90 percent disk space. AuditMaster encrypts compressed archive files to restrict access to only users within the AuditMaster system.
The following topics provide more detail on the use of archive files:
You may want to archive manually for the following reasons:
•The audit log has grown large, queries and other operations take longer, and you do not want to wait until the next automated archiving to regain performance speed.
•Automated archiving will not occur soon, but an event of interest makes it preferable to archive now.
•You wish to archive and compress records to manage disk space.
In the data tree, right-click the current view file and do one of two things:
•Select Archive.
•Select Archive and Compress. Large numbers of records can take time, so you may want to check the Status Log tab for the “Finished compressing” message. If needed, refresh the log to see the latest entries.
You cannot run a query against a compressed archive file. You must first decompress it by right-clicking and selecting Decompress.
Note In the data tree, you may sometimes need to right-click the Archive Files icon and select Refresh to update the list.
►To set the number of archive files shown
You can control the maximum number of uncompressed and compressed archive files shown in the data tree. The list displayed is the same whether the files were created manually or automatically. To open this setting, select View > Preferences > Archives.
The default setting is 30. Displaying a list shorter than the available number of files does not delete them but simply removes them from the display. Raising the number in the setting displays them again.
After changing this setting, you may need to right-click the Archive Files icon and select Refresh.
Changing this setting does not affect the display of archive files in the Manage Archives window, described in Managing Archives.
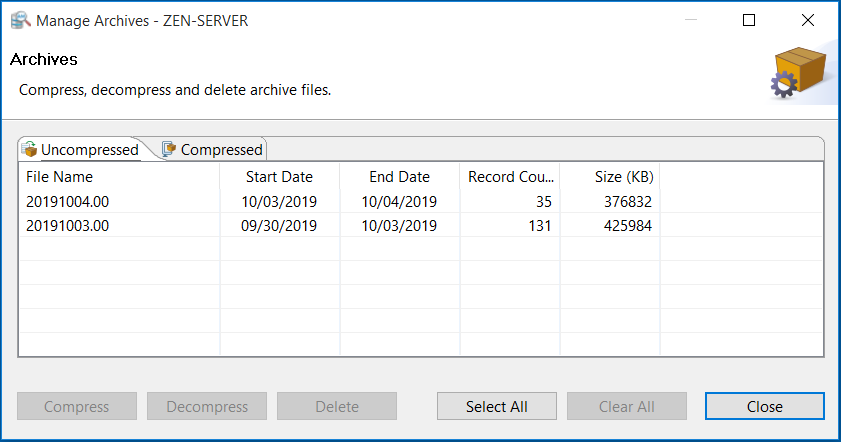
Managing Archives
In the data tree, you select only one archive file at a time. The Manage Archives window lets you work with archive files as a group. You can open it by selecting Tools > Manage Archives.
To use the window, select an archive file and use the buttons to compress, decompress, or delete it. Use the Shift or Ctrl keys to select more than one file.
Working with Alerts
AuditMaster provides an alert capability for real-time detection of a particular audit event defined by a query. When an event matching the query occurs, AuditMaster does two things:
•It flags each audit record in the alert query result with a bell icon . The bell flag becomes a permanent part of the audit record and appears in any query result that contains the record.
•It writes an entry to the Windows Application event log. This logging provides network administrators the ability to use tools for running automatic programs or sending notifications.
►To create an alert
1 In AMCC, create and save a query for the type of audit records that the alert is to detect.
Note The saved query used to create the alert must have at least one restriction. In other words, it cannot be equivalent to SELECT *. At least one search condition in the alert query must be set.
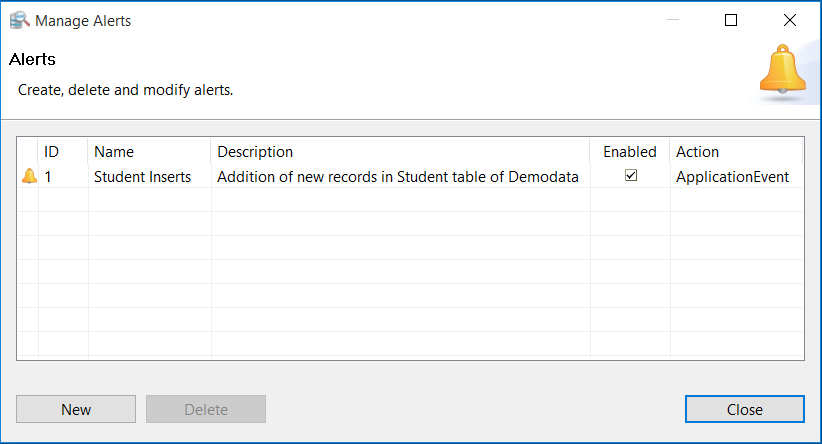
2 Select Admin > Manage Alerts to open the Manage Alerts window.
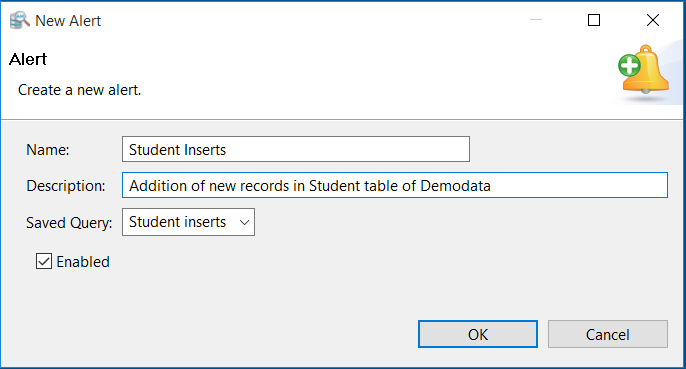
3 Click New to open a New Alert window.
4 Enter a name for this alert, using letters, numbers, or spaces up to 40 characters.
In this example, we create an alert for new students in the Demodata database.
5 Enter a description for the alert, using up to 100 characters.
6 In the Saved Query list, select the query to be used.
7 Click OK to return to the Manage Alerts window, which shows the added alert.
After the Zen database service restarts, the alert becomes active. Database activity triggers an alert when any audit record is captured that matches the selected saved query. The audit record is flagged with a bell icon that appears in any query result containing that audit record.
In addition to flagging the audit record, AuditMaster writes an entry to the Windows Application log in %SystemRoot%\System32\Winevt\Logs\Application.evtx. When displayed in Windows Event Viewer, the log entry resembles the following:
Note When you use Windows Event Viewer to see logged alerts, it may be helpful to open Filter Current Log and set the event source to Actian AuditMaster.
As shown in the following information for this event log entry, the data detail from the Zen database record is the same as that shown for the audit record in AMCC:
Alert 'Student Inserts' Fired on Record ID: 55 Alert ID: 1 Desc: Addition of new records in Student table of Demodata
Audit Information ================= Rec Id: 55 Date: 07/10/2019 Time: 17:00:07 DBMS: Actian Zen DB Ver: 14.0.41 Op Context: BTRIEVE Operation: Insert Dep Rec Id: 0 Product: Zen Demo Product Ver: 9 Component: <User Tables> Component Ver: 9 Table: Student Group: Demo Net Address: Zen-Server.englab.local Net User ID: Master Process: Zen Engine Monitor Ver: Zen Demo OS Ver: W2K 6.2.9200 Return Code: 0
Record Data ========== ID: 334651124 Cumulative_GPA: 3.400 Tuition_ID: 5 Transfer_Credits: 12 Major: Computer Science Minor: Statistics Scholarship_Amount: 0.00 Cumulative_Hours: 12
Additional Information ====================== View Path: \\ZEN-SERVER\PVSWAUDIT$\data\ Server Net ID: 192.168.149.142
Audit Alert Best Practices
In using alerts, consider the following:
•Selecting the Enabled check box activates the alert. Clearing the check box deactivates it, meaning that no audit record matching the query can trigger an alert. As a result, no bell icons will be shown for these audit records in any query result, and no entry will be written to the Windows event log.
•Dramatic and undesirable logging may arise from an alert with a broad query that is likely to match a large number of audit records. It is best practice to narrow the query to only useful information that requires additional action.
•In a similar way, if you are expecting bulk loading of a large number of data records whose audit logging will lead to alert query matches, then it may be helpful to disable those alerts before the bulk load and then reenable them afterward.
Searching Audit or Log Records
You can use the search command to find particular strings such as users, dates, times, and other values in the Audit Records tab or the Status log tab. The search feature provides a number of options, including case-sensitivity and restriction to certain tab columns.
Note Depending on the number of records and the complexity of the search criteria, it may take some time to complete your search. Whenever possible, try to narrow your criteria.
►To search audit or log records
1 Select the Audit Records or Status Log tab. Refresh the entries shown, if needed.
2 Select Tools > Search or click the Search icon to the right above the tab.
3 In the Search For field, enter a text string to find in the currently displayed audit records.
4 If needed, use the Search Options to narrow your search.
•In the Direction options, select a direction to start the search. These include, From Top row down, the Next row down, and the Previous row down.
•In the Position options, select a search position. Select Beginning of cell or Anywhere.
•To match upper and lower case spellings, select the Match Case check box.
•To match the entire search string instead of just part, select the Match Entire String check box.
5 If needed, use the Grid Area to narrow your search.
•Select Entire Grid to search all columns.
•Select Current Column to search only the column highlighted by the current match.
•Select Specific Column and choose a column name from the list.
6 Click Find Next.
If a matching string is found, it is highlighted in the tab. The Search Text window also displays its location in the query result. Continue clicking Find Next to see more matches. Once you reach the last match, clicking Find Next again displays the message “No match found.” If you want to return to an earlier match, close the Search Text window and reopen it to search again. The string you entered is saved from the last search.
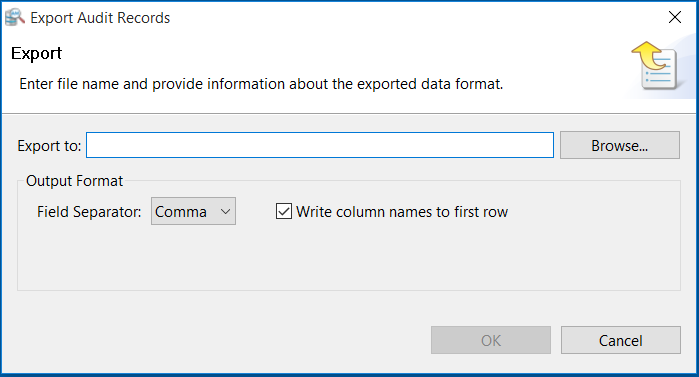
Exporting Audit or Log Records to a Text File
AuditMaster can export the displayed contents of the Audit Records or Status Log tab to a comma- or tab-delimited text file.
Only records and columns displayed in the tab are exported. You can use the Select Columns to Display setting to change which columns are included in the exported text.
►To export audit records
1 Select the Audit Records or Status Log tab. For the Audit Records tab, refresh the current view file and rerun the query, if needed.
2 Select Tools > Export or click the Export icon to the right above the tab.
3 In the Export window, click the Browse button to select a path name for the exported file.The default location is C:\Users\<user name>\<file name>. Add a file name suffix such as .txt if needed.
4 For the field separator, select comma or tab.
5 Choose whether to use the default option to write column names to the first row of the exported file.
6 Click OK to export the file.
Displaying Audit Records under Zen Security
If you run AuditMaster with Zen security enabled, field values in the User Name and Database Name columns vary with DefaultDB database security policy and type of database operation, as shown in the following table.
Table 1 User and Database Names Audited under DefaultDB Database Security
Btrieve Operations
SQL Engine Operations
Security Policy
User Name Displayed
Database Name Displayed
User Name Displayed
Database Name Displayed
Database
Database login
One of the following:
•Database name from Btrieve Login API or connection string
•Database name bound to Btrieve file on which operation executed, if any
•DefaultDB if other two unavailable
Database login
n/a
Mixed
Database login
Database login
n/a
Classic
•OS login
•Database user name if database security enabled
•OS login
•Database user name if database security enabled
n/a
Audited Btrieve operations include Select/Read, Insert, Update, Delete, Login, and Logout. For Begin Transaction, End Transaction, Abort Transaction, and Reset operations, which are not associated with a specific database, the database name is not available.
Login errors are listed with the invalid user name and database name when available. For SQL logins, the host name is not known at login time but becomes available afterward and is displayed for SQL operations.
Under Mixed security, database logins match operating system or network logins.
For more information on the relationship of AuditMaster logins to Windows and Zen database logins, see Running AuditMaster under Zen Security. For more information on database operations in a Zen security environment, see Advanced Operations Guide.
Using AuditMaster Undo
The AuditMaster Undo command makes it possible to reverse certain database events. A successful undo depends on the operation and the current state of the record involved, which may have changed again since the capture of the audit event you are reviewing. For example, in the case of an update to a data field, the Before value in the audit record Modify Before and Modify After detail shows the data that AuditMaster can attempt to restore.
Operation
Results of Undo
Insert
Deletes record, if it still exists and no other conditions stop insertion
Delete
Reinserts record if it does not exist, or if it does, so long as duplicates are allowed and no other conditions prohibit the insertion
Update
Restores Before state of record, if it still exists and no other conditions stop the update
Caution Before attempting an undo, consider the following:
•The Windows user name under which you log in and run AMCC must have write permission for the Zen database being monitored. Neither Windows nor the Zen server recognize the AuditMaster administrator and regular user accounts created within AuditMaster.
•The file listed in the audit record must not have been removed from its audit configuration group since the operation occurred.
•Undoing operations from within AuditMaster carries a risk of putting application data into an inconsistent or illogical state. You should be an advanced Zen user who understands the cautions regarding changing one part of an application database independently of another part.
•If files in an audit configuration group have the same name but different paths, undo applies only to the first file listed.
Note: Remote client logins do not support undo.
►To undo a database operation
1 In the Audit Records tab, right-click an audit record and select Undo Operation. This command is available only for appropriate operations, such as Insert, Delete, or Modify Before/After.
2 When prompted to confirm the undo attempt, click Yes, or No if you change your mind.
Note Each undo operation is captured by AuditMaster and can also be reversed by an undo.
 .
. .
.
 above the tab. Column order can be rearranged by dragging columns with the mouse. If you would like to save and reuse these settings, select View > Preferences > Table Layout.
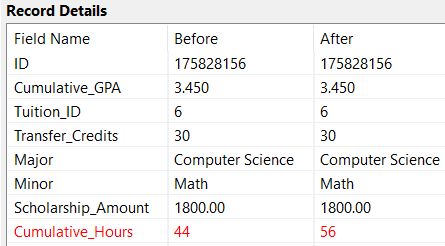

 . The bell flag becomes a permanent part of the audit record and appears in any query result that contains the record.
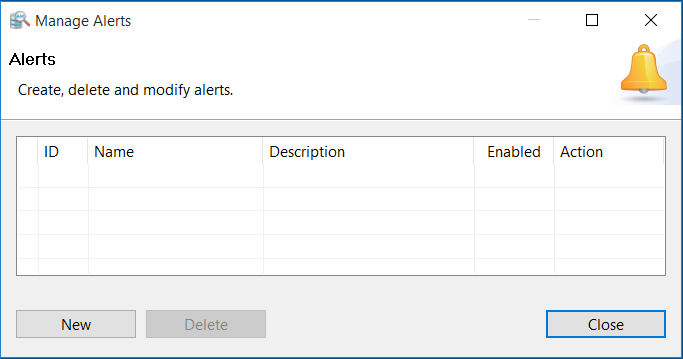

 to the right above the tab.
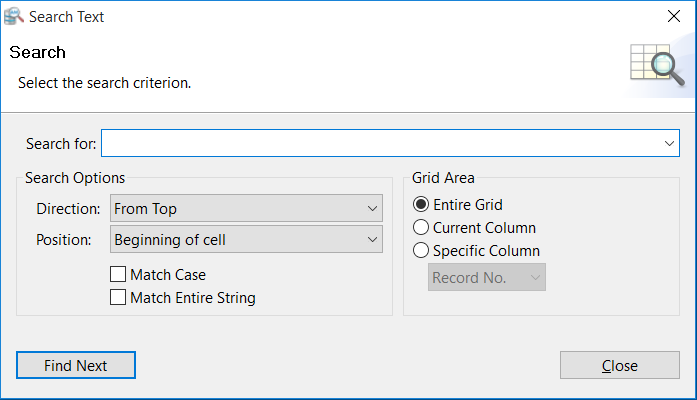
 to the right above the tab.