Be aware of the following before installing AuditMaster on any platform:
•You must have full administrator-level rights on the system where you install AuditMaster.
•We recommend you disable antivirus applications. These may be reenabled immediately after installation. If you do not disable them, expect prompts to allow installer tasks to execute.
•The Zen database engine is stopped and restarted during AM installation. Choose a time acceptable to your operations.
•If you are installing AMCC to access a Zen server when security is enabled and security policy is set to either Mixed or Database, see Running AuditMaster under Zen Security. Prepare to set up AM in a Zen secure environment by reviewing security features in Advanced Operations Guide. Note that for installation with database security enabled, you must select the Prompt for Client Credentials setting in Zen Control Center (ZenCC) in the Properties > Access window for the Zen engine.
•Installation creates a log file in the installing user's %temp% directory, where nn refers to the version:
•The 32-bit installer SetupAuditMaster32_x86.exe is not supported on 64-bit Windows.
Important Information about Upgrading from an Older Version
Actian has renamed PSQL to Zen. This renaming has resulted in new locations for AuditMaster files. To upgrade to AuditMaster v14, if you do not need your existing audit records, configurations, queries, and alerts, then all you need to do is remove the earlier AuditMaster version before installing AuditMaster v14. In the new installation, you will then create new audit configurations, queries, and alerts. Only new audit records can be queried, and previously captured audit records are no longer accessible.
On the other hand, if you wish to continue using everything in the earlier installation, then you must manually back up copies of certain file directories for reuse in the AuditMaster v14 installation. The overall steps are as follows:
1 Copy and save certain existing AuditMaster file directories.
2 Remove AuditMaster.
3 Upgrade to Zen v14.
4 Install AuditMaster v14.
5 Copy the saved files to their location in AuditMaster v14.
These tasks require starting and stopping the Zen database engine. Choose a time to do so most convenient to your data operations. Here are the detailed steps:
1 Create a directory in a backup location, such as %temp%\AM_Save.
2 Stop all database services.
3 Find the AuditMaster share location in your existing installation. Here are the default locations:
•In 64-bit Actian Zen (PSQL) v13, the default is C:\Program Files (x86)\Actian\PSQL\Audit.
•In 64-bit Actian PSQL v12 and earlier, the default is C:\Program Files (x86)\Pervasive Software\PSQL\Audit.
•In 32-bit Actian Zen (PSQL) v13, the default is C:\Program Files\Actian\PSQL\Audit.
•In 32-bit Actian Zen (PSQL) v12 and earlier, the default is C:\Program Files\Pervasive Software\PSQL\Audit.
4 From this directory, copy the following folders to the backup location you created in the first step:
•Arch
•Comp
•DATA
•Empty
5 You can now restart all database services while continuing with the rest of the steps given here.
6 If you are using a custom installation location for your existing AuditMaster installation and plan to use it again in AuditMaster v14, then write down the location for reuse in AuditMaster v14.
7 Whether a default or custom location, this share is given the default name PVSWAUDIT$. If you are using a custom share name, then the same one must be used in AuditMaster v14. To find the share name, run net share at a prompt to return information similar to the following:
PVSWAUDIT$ C:\ProgramData\Actian\Zen\Au... Automatically created by AM
This example shows the default share name. A custom name will be whatever was assigned. If the path name displayed is too long, as shown here, run net share <share name> to see the entire path.
8 Remove AuditMaster.
When you are prompted to remove all data and configuration settings, choose to leave them rather than remove them. In the installer wizard, this means not selecting the check box to remove them.
9 Upgrade to Zen v14.
10 Install AuditMaster v14 using the steps under Installing AuditMaster. If you are using a custom share name, to use the same value that you wrote down from the previous AuditMaster installation.
11 After installing AuditMaster v14, stop the Zen v14 database engine service.
12 Copy the backups of Arch, Comp, DATA, and Empty folders to C:\ProgramData\Actian\Zen\Audit in the AuditMaster v14 installation, allowing them to overwrite existing folders and their contents.
13 Restart the Zen v14 database engine.
14 Start AuditMaster Control Center (AMCC) and confirm that the configuration settings from your previous installation are working as expected and that you can view audit records. If so, then you can delete the folders in both the backup and the previous installation.
Hidden Administrative Share
When you install AuditMaster on a Zen server, the default installation settings create a hidden administrative share to certain AM components. By default, the share name is PVSWAUDIT$ for the path C:\ProgramData\Actian\Zen\Audit, but the share name can be set to another value during installation. Also, it is not required that the share be hidden. In using the share, you may need to consider the following things:
•When you install AMCC on a remote client, you must provide the client system with access to this share on the server. For details, see Accessing AuditMaster.
•For AuditMaster to work successfully, you may need to register the share with your firewall system.
•To meet security requirements, the share can be replaced with an explicit local path name. Doing so blocks remote clients and restricts access to only the local system. For instructions, see Replacing the Network Share with a Local Path.
Installing AuditMaster
AuditMaster has two parts: A server monitor and a viewer client called AuditMaster Control Center (AMCC). On Zen Enterprise Server or Cloud Server, the monitor and AMCC are installed together. On Zen Client, Reporting Engine, or Workgroup, AMCC will be installed by itself to connect to an AuditMaster server monitor on a remote Zen server to display its audit records.
An AuditMaster license authorizes one server installation, but you can install as many clients as needed across your network environment. For instructions, see Installing AuditMaster Control Center as a Client.
You must run the AuditMaster installer on the system where you are installing it. You cannot run the installer from another system to install AuditMaster locally.
Note The Zen database engine is stopped and restarted during AM installation. Choose a time acceptable to your operations
►To install AuditMaster
1 Log on to the system with administrator rights.
2 Launch the installer program in one of the following ways:
If using...
Do...
Downloaded files
Open Install_AuditMaster.exe in the download directory.
CD
Insert the CD. If installation does not start, open Install_AuditMaster.exe on the CD.
3 In the Welcome page, click Next.
4 For License Agreement, accept the terms and click Next.
5 For License Key, enter an AuditMaster license key and click Next. If you enter no key, your trial period starts now. Without a license, you can audit for the trial period. After that, auditing ends, but you can still query and view already logged audit records. For more information, see Authorization License.
6 For Installation Folders, if needed you can change the default locations. Note that for 64-bit environments, both the 32- and 64-bit components must be on the same system where a Zen server runs and must be installed to different locations. After you make any changes, click Next.
7 For Share Name, the installer asks for a share name to assign to the AuditMaster data directory path. Accept the default share name PVSWAUDIT$ or enter a different one according to your IT needs, and click Next.
8 The installer is now ready to install the program. You can click Back to change settings or click Install to continue.
9 When installation is complete, click Finish.
You can now open AuditMaster and connect to a Zen server, as described in Accessing AuditMaster.
Installing AuditMaster Control Center as a Client
AuditMaster automatically installs its Control Center client (AMCC) on a Zen server. You may also install it alone on Zen Client, Workgroup, and Reporting Engine systems. Once installed on these systems, AMCC can then connect to AuditMaster on a Zen server as a remote client to work with audit records.
►To install AMCC as a client
Zen Client, Workgroup, or Reporting Engine must be already installed and configured on the system where you install AMCC as a client.
1 Log on to the system with administrator rights.
2 Launch the installer program in one of the following ways:
If using...
Do...
Downloaded files
Open Install_AuditMaster.exe in the download directory.
CD
Insert the CD. If installation does not start, open Install_AuditMaster.exe on the CD.
3 In the Welcome page, click Next.
4 For License Agreement, accept the terms and click Next.
5 For Installation Folder, if needed you can change the default location. After you make any change, click Next.
6 The installer is now ready to install the program. You can click Back to change settings or click Install to continue.
7 When installation is complete, the installer displays a notice. Click Finish.
You can now connect to AuditMaster on a Zen server, as described in Accessing AuditMaster.
Common Questions After Installing AuditMaster
The following items contain answers to question you may have after running the installation program.
Where are the AuditMaster release notes?
The readme_am.htm file is available in three places:
•Installed with the product. The default location is C:\Program Files (x86)\Actian\Zen\Audit\Docs.
•In the root directory on the AuditMaster CD.
Do I have to configure anything in Zen Control Center (ZenCC) for AM?
No. AuditMaster requires no special settings in ZenCC. All settings and configuration are done in AMCC with the exception of the Prompt for Client Credentials option if the Zen server has Btrieve security enabled.
Does the AuditMaster installation create a log file?
Yes. Installation creates a log file in the installing user's %temp% directory, where nn is the version:
Uninstalling AuditMaster removes its components in the Audit directory of its installation location. Files in other locations are untouched and can be reused if AM is reinstalled in the same location.
Note AM removal stops and restarts the Zen database service. Choose a time acceptable to your operations.
►To remove AuditMaster
AuditMaster can be removed in the normal way from Windows Control Panel. It is listed as Actian AuditMaster v14.
►To reinstall AuditMaster and continue using existing data and settings
If you plan to reinstall AuditMaster and want to continue using the existing audit data, configuration settings, queries, and alerts, follow these steps:
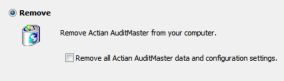
1 Before you begin removing AuditMaster, find its installation. The default location is C:\Program Files (x86)\Actian\Zen\Audit. In a custom installation, the location of this Audit directory may differ. If so, then note the location so that you can select it when you reinstall AuditMaster.
2 When you remove AuditMaster, be sure that you do not select the check box to remove existing audit data, configuration settings, queries, and alerts. Leave the default setting clear as shown in the following figure:
3 So long as you do not select this check box, you will be able to do one of the following:
•Reuse the previous installation location when you install AuditMaster again.
•Install AuditMaster in a new location and then copy any custom Audit folders to the Audit directory in the new installation.
•Upgrade from AuditMaster v13 or earlier to AuditMaster v14 or later and migrate existing audit data, configuration settings, queries, and alerts to the upgrade installation. This method is covered in detail in Important Information about Upgrading from an Older Version.
►To remove AuditMaster from a client
Removing AuditMaster on a client is the same as removing it on a server.
►To view the AuditMaster removal log
Removing AuditMaster creates the following log file in the current user's %temp% directory: