DDF Builder Tutorials
Guided Examples for Using DDF Builder
The following topics provide learning materials for using DDF Builder:
Using the DDF Builder Tutorials
This chapter provides you with two tutorials for using DDF Builder. Each tutorial provides you with basic information as to the structure of the data, a sample scenario in which the file is used, the goal of the tutorial, and the general steps needed to achieve the goals for each exercise.
Note Whether you are creating or modifying table definitions with DDF Builder, you must have some knowledge about the structure of your data. It is helpful if you know the column definitions, as well as the offsets and sizes of the fields in the Btrieve file. DDF Builder attempts to guide you with the construction of column definitions, but there are limitations as to how much guidance it can provide.
Tutorial 1 Overview
The first tutorial addresses the situation where you have a Btrieve file without the necessary table definitions needed to provide relational access. Since there are no DDFs for the Btrieve file, you first need to create DDFs. This tutorial steps you through creating a new database with empty DDFs and adding a table definition to them for the Btrieve file.
Working through this tutorial also provides you with some fundamental knowledge for working with the DDF Builder interface. If this is your first time to work with DDF Builder you may want to first become familiar with the interface and where components are located by reviewing Chapter
2,
Using DDF Builder.
Tutorial 2 Overview
The second tutorial addresses a bit more complex situation where you modify existing table definitions because they contain outdated or incorrect table definition information. This tutorial steps you through reviewing the existing table definitions and making necessary changes to the DDFs associated with a set of Btrieve files.
The second tutorial is made up of several files and lessons, each focusing on a different issue that you may encounter when trying to modify DDFs using DDF Builder. Some of the issues are automatically addressed by DDF Builder; some require you to make the modifications manually.
Before You Begin
There are only a few things you need to do to start using these tutorials. This section reviews what you need to do to begin using the tutorials in this chapter.
Backup Your Files
Creating or modifying table definitions with DDF Builder alters the structure of your database. As a precaution, you should always back up any files with which you intend to work. This includes both data files and any existing dictionary files.
Although opening your Btrieve files with DDF Builder only makes modifications to your DDFs and not your existing Btrieve files, it is still a good idea to backup all of your files or work from a copy of them. Existing table definitions could potentially be corrupted by a partial edit of the DDFs, leaving your definitions broken and unusable.
Note If you intend to make modifications to existing Btrieve files and your DDFs that provide relational access, DDF Builder is not the utility to use. PSQL Control Center allows you to change your DDFs and Btrieve files.
DDF Builder uses IN DICTIONARY calls to write table definitions to the DDFs. The Btrieve file is never written to when using DDF Builder.
Once you have backed up your data files or created a copy from which to work, you are ready to proceed with locating the files used by the tutorials.
Locate the Tutorial Files
The DDF Builder installation created the folders and files on your system for using the tutorials included in this chapter. The tutorial files are installed in the following locations from the default Application Data directory.
<Application Data>\DDFBUILDER | DDF Builder Application Files |
<Application Data>\DDFBUILDER\TUTORIALS\TUTORIAL1 | Tutorial 1 Files |
<Application Data>\DDFBUILDER\TUTORIALS\TUTORIAL2\V3 | Tutorial 2 Files (Lessons 1 and 2) |
<Application Data>\DDFBUILDER\TUTORIALS\TUTORIAL2 | Tutorial 2 Files (Lessons 3 through 8) |
Create Data Source Names (DSN)
In order to access the tutorial databases within DDF Builder, you will need to make certain that each database has an associated Data Source Name (DSN) created.
Tutorial 1 walks you through creating a DSN at the time you create the database. This is because in Tutorial 1, you only have a Btrieve file with which to begin, so the database, DDFs and DSN all have to be created from scratch.
Tutorial 2 requires that you create two DSNs in order to see the files and folders within the DDF Builder interface. One DSN points to the Tutorial 2 database and the other points to the V3 database located in the Tutorial2 folder.
The following table lists the options for creating the Tutorial 2 and V3 database DSNs in ODBC Data Source Administrator.
Data Source Name | Description | Database Name |
Tutorial2 | ODBC Access | Tutorial2 |
V3 | ODBC Access | V3 |
Tip If you need help creating a DSN using the ODBC Data Source Administrator, see the PSQL User's Guide for assistance.
Now that you have backed up your files, located the tutorial files, and created your DSNs, you are ready to start Tutorial 1.
Tutorial 1 – Creating Table Definitions with DDF Builder
Scenario
In this tutorial you have a Btrieve data file for which you need to provide ODBC access to create reports.
To do this, a table definition needs to be created for the file. Table definitions are stored in DDF files of the database. To your knowledge, there are no table definitions for this file, so you are starting from scratch.
Goals
The goal of this tutorial is to walk you through the steps necessary to provide relational access to a Btrieve file without any table definitions. To achieve the goal for this tutorial, you perform the following tasks using DDF Builder:

Create a PSQL database
Open an Existing Btrieve file
Review DDF Builder’s Findings
Define the Record Fields
Save Your Table Definitions
Review the Index Information
Preview the Defined Data
Tip As you step through creating table definitions, you learn fundamental tasks for working with DDF Builder. This tutorial is designed to call out those tasks within these instructions so that you can become familiar with the common tasks for using DDF Builder.
What You Need to Know
Any time you work with DDF Builder to create or modify table definitions, you need some knowledge as to the structure of the data. Some of this information is stored in the Btrieve file itself, such as record length and index information. The column information, however, is not stored in the Btrieve file. The column information may have been provided by the software vendor or the application developer. You can still attempt to create or modify table definitions by careful inspection of the data, but you should not use this utility without significant knowledge about the structure of your data.
For this tutorial, you know the data structure. Take a look at the structure for this file.
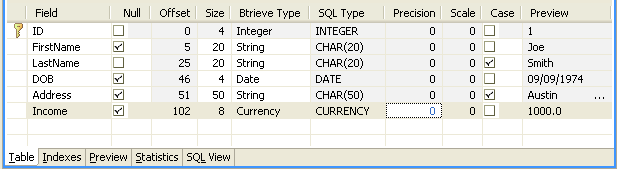
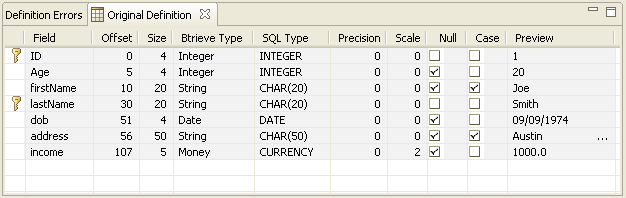
There is a Btrieve data file named CREATE_NEW.MKD. This file has a record length of 110 bytes and contains six fields. The fields are defined as follows:
Table 8 Data Structure for Creating DDFs
Field | Size | Data Type | Precision | Scale | Null | Case | Index |
ID | 4 | Int | | | N | | Y |
First Name | 20 | String | | | Y | Y | |
Last Name | 20 | String | | | N | Y | |
DOB | 4 | Date | | | Y | | |
Address | 50 | String | | | Y | Y | |
Income | 8 | Currency | 8 | 2 | Y | | |
The file contains a nonduplicatable key (unique index) set on the ID field; the index is named indx_id.
Now that you understand the data structure, you can get started. Begin by creating an empty database using DDF Builder, which provides a set of empty DDFs to define for the Btrieve file.
Create a PSQL Database
Before you can create DDFs for an existing Btrieve file, you must first create a database. Begin by starting DDF Builder if it is not already running. See
Starting DDF Builder.
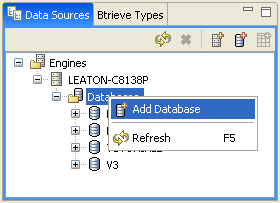
►To create a database
1 In the Data Sources Explorer, expand the tree for the machine where you are creating the database. This should be the same machine where DDF Builder is installed.
2 Right-click the Databases icon and click Add Database.
The New Database Wizard opens for you to create a new database.
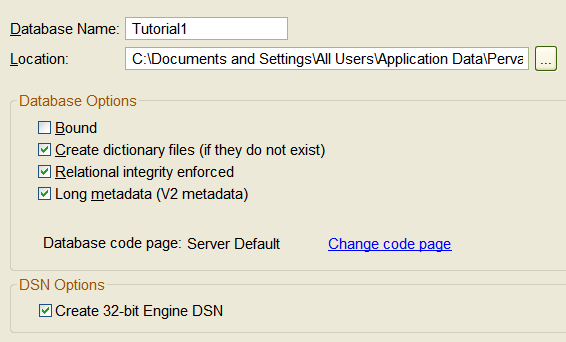
3 Complete the New Database Wizard using the following parameters:
•Database Name: Tutorial1
•Location:
<Application Data>\DDFBUILDER\TUTORIALS\TUTORIAL1\
•Bound: not checked
•Create dictionary files: checked
•Relational integrity enforced: checked
•Long Metadata (V2 Metadata): checked
•Database code page: Server Default
•Create 32-bit Engine DSN: checked
The New Database dialog should look similar to the following:
Tip Creating the database in these steps also creates a Data Source Name (DSN). When you have finished working with the tutorials, you may want to delete the DSN and database created here.
4 Click Finish to create the database and the empty DDF files in the location you specified.
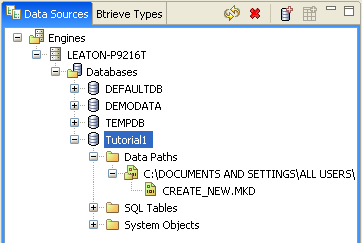
Once the database is created, it appears as a new node on the databases tree in the Data Sources Explorer.
The database node includes the Data Paths, SQL Tables, and System Objects folders. The Data Paths folder contains the locations of your Btrieve files. The SQL Tables folder contains any relational tables for the database, and the System Objects folder is the holder for your system dictionary tables, and in this case, empty data dictionary files.
Creating a PSQL database using these parameters was the first step in creating table definitions for the Btrieve file. The database you just created contains dictionary files (DDFs), but these files currently contain only definitions for the structure of the DDFs themselves. Once you open the Btrieve file in DDF Builder, you can add a table definition to the DDFs created for this database so that the data in the Btrieve file can be accessed.
Notice that the database contains no SQL Tables – only the CREATE_NEW.MKD Btrieve file used for this tutorial. That is because there are no user tables defined. The empty DDFs are located in the System Objects folder, separate from the data files. As you create table definitions, you also will create corresponding SQL tables that will access the table definitions. Continue with opening the Btrieve file in DDF Builder.
Open an Existing Btrieve File
Now that you have created DDF files in the same location as the Btrieve file, open the file in DDF Builder and see how the utility deciphers the data structure.
►To open the Btrieve file
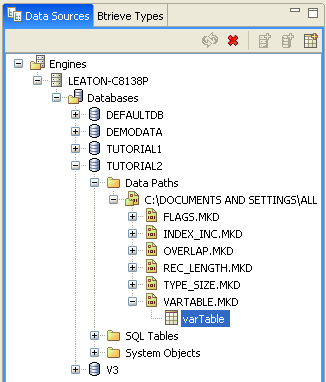
1 In DDF Builder, select the local machine and the database you just created.
The Data Sources Explorer lists the Data Path and shows the directory location where the mkd file was installed. This is the same location where you created the database. Your Tutorial1 database directory structure in the Data Sources Explorer should look similar to the following:
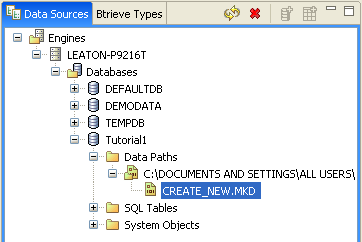
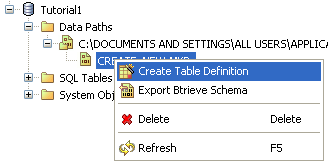
2 Right-click the CREATE_NEW.MKD folder containing the file, and select Create Table Definition.
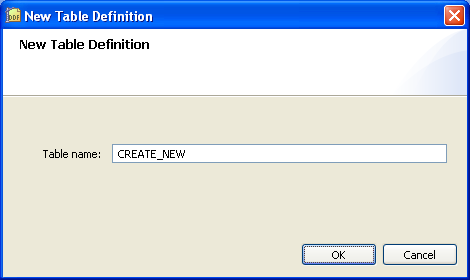
When you select to create the table definition, DDF Builder displays the New Table Definition dialog for you to associate a new table name with this set of table definitions. Think of this table as your corresponding relational table to your transactional file. When you have finished creating your table definitions, this SQL table should mirror the same structure as your original Btrieve file.
3 Enter CREATE_NEW as your Table name and click OK.
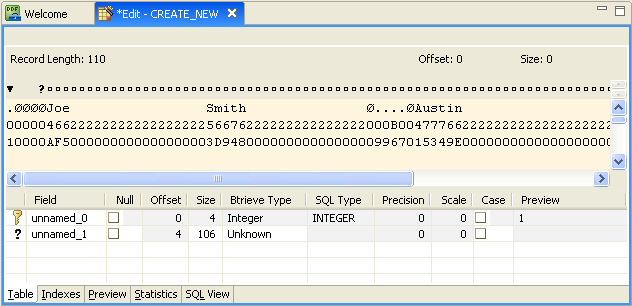
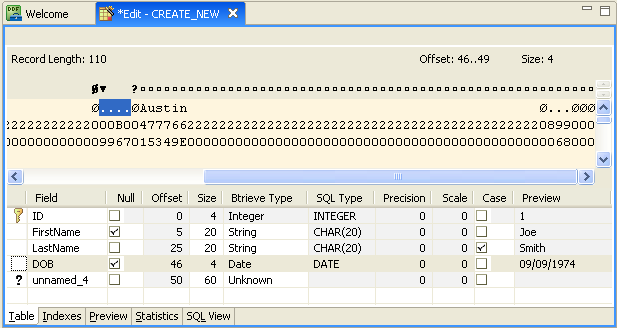
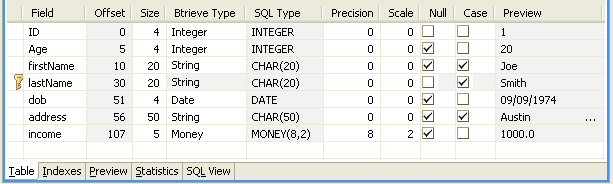
Once you provide a name for the table and click OK, DDF Builder begins to analyze the Btrieve file so that it can be opened. DDF Builder determines any known keys or indexes in the file and displays them as such inside the Table Definition Editor. Your display of the Table Definition Editor should look similar to the following:
Now that you have successfully opened the file, look at what DDF Builder found in more detail.
Review DDF Builder’s Findings
DDF Builder analyzes the data based on the file’s general statistics and the known keys or indexes in the file. In the file, DDF Builder detected a key in the first four bytes of the record and determined that the key is made up of an integer Btrieve data type. The key is illustrated in the Table Definition Editor with the key icon in the first column of the display.
The remaining parts of the record cannot be deciphered by DDF Builder, so they are grouped together and illustrated in the Table Definition Editor with the question mark icon and assigned a Btrieve type of Unknown.
Creating the table definitions for the Btrieve file involves splitting the unknown fields found by DDF Builder into the various fields you need – defining the particulars of each field as you go along.
Before you begin defining the record fields, you should make sure you understand how nulls are treated in the Table Definition Editor.
Note This tutorial uses true nulls, but it is important to note that much older versions of PSQL did not provide support for true nulls – only legacy nulls. True nulls were first introduced in Pervasive.SQL 2000. If you are working with files created prior to Pervasive.SQL 2000, you may want to skip the following section on nulls.
A Note About Nulls
When you define record fields in this tutorial, it is important to first make note if the field is nullable, since marking a section of the record as nullable adds an extra byte to the field. This is because in a Btrieve file, nullable portions of the record are designated by the use of the null indicator byte. In the raw data view of the Table Definition Editor, the null indicator byte is indicated in the byte immediately preceding the field or column. When the Null check box is selected, the null indicator byte becomes active and the size of the field is automatically reduced by one byte to accommodate for the null indicator byte.
Say you wanted to create a nullable field 50 bytes in size. You would select the field size as 51 bytes to accommodate for the null indicator byte. Once you select that the field is nullable, the size is automatically reduced to 50.
This information is helpful as you define the record fields.
Define the Record Fields
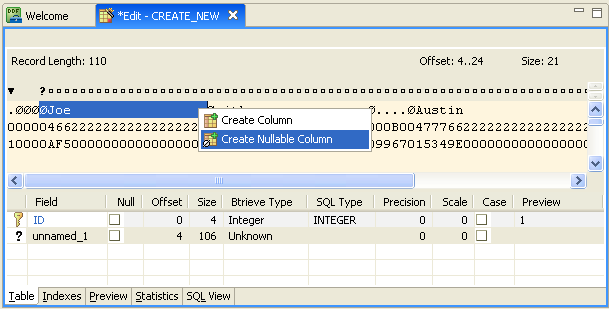
As you saw when you opened the Btrieve file, DDF Builder determined the index of four bytes and left an unknown field of 106 bytes. You define the unknown field into record fields.
►To define the record fields
Although DDF Builder determined most of the attributes for the first field, a field name could not be determined, so go ahead and name the first field.
Name a Field
1 In the grid data view, select the unnamed_0 row, and enter the values needed to reflect the following information:
•Field: ID
•Null: not checked
•Offset: 0
•Size: 4
•Btrieve Type: Integer
•SQL Type: INTEGER
•Precision: 0
•Scale: 0
•Case: not checked
DDF Builder determined a lot of the attributes for this row, so entering the field is the only change you will need to make. Be certain to verify all the values of the row.
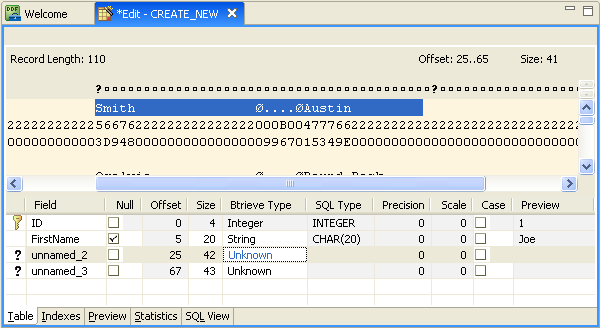
Your screen should now reflect two rows in the grid data view – the key row you just named ID and the unknown _1 row found by DDF Builder.
Now you are ready to parse out and define the unknown data.
The next field to define is nullable. The following steps outline how to select data from the raw data view and create a nullable column from that data.
Create a Nullable Column in the raw data view
2 In the raw data view, beginning at offset 4, select 21 bytes of data.
Tip To find offset 4, locate the question mark just above the first record in the raw data view, or position the cursor until the Offset indicator shows 4.
3 Right-click and select Create Nullable Column.
Tip Creating a column, whether in the raw data view or the grid data view, automatically creates a new column out of the remaining bytes in the record.
You may notice that although you selected 21 bytes, the grid data view shows the size as 20. This is because of the null indicator byte mentioned earlier. The null indicator byte is shown in the raw data view as the § symbol and accounts for the extra byte.
Now the editor shows three fields – the four byte integer (ID), the nullable column you just created (unnamed_1), and the new unknown field comprised of the remaining bytes (unnamed_2).
Before you go on, be sure and complete the definition for the nullable column you just created.
4 Select the unnamed_1 row in the grid data view.
5 Enter the values needed to reflect the following information:
•Field: FirstName
•Null: checked
•Offset: 5
•Size: 20
•Btrieve Type: String
•SQL Type: Char(20)
•Precision: 0
•Scale: 0
•Case: checked
Tip The number of bytes selected in the raw data view, along with creating the column as nullable, predetermined the size and null selections. The size also limits which data types you can select for the column.
Notice that the unknown field indicator is no longer displayed in the grid data view, once the Btrieve Type is set and the field is defined.
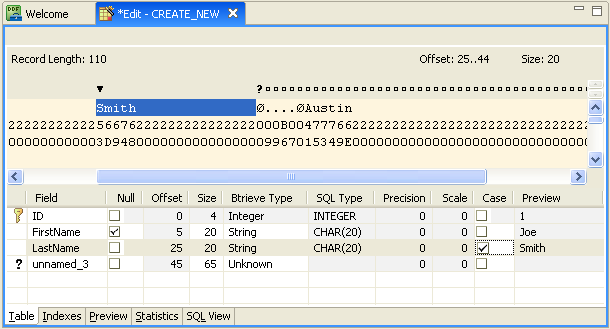
Continue defining the unknown fields in the file by splitting the unknown row into multiple columns within the grid data view.
Split a Column in the grid data view
6 Select the unnamed_2 row in the grid data view.
7 Right-click and select Split Column.
When you split the column, the result is two columns of equal, or near equal, size. This means that the 85 byte column is now two columns, one with 42 and the other with 43 bytes.
8 Select the unnamed_2 row.
9 Enter the values needed to reflect the following information:
•Field: LastName
•Null: not checked
•Offset: 25
•Size: 20
•Btrieve Type: String
•SQL Type: Char(20)
•Precision: 0
•Scale: 0
•Case: checked
When you change the size from 42 to 20, DDF Builder adds the extra 22 bytes to the unnamed_3 row.
You may have already noticed that the SQL Preview column displays the data as it is defined. This provides you a preview of how the data is interpreted by DDF Builder based on your table definitions.
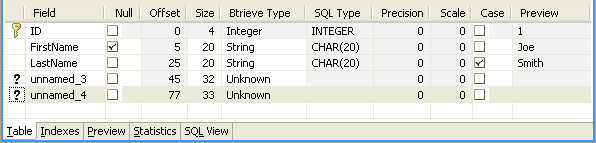
10 Right-click and select Split Column to split the unnamed_3 row.
Splitting the column changed unnamed_3 to 32 bytes and created unnamed_4 with 33 bytes.
Now define the unnamed _3; this field is nullable.
11 Select the Null checkbox so that the null indicator byte is reserved at the first of the record.
Notice how selecting the Null checkbox automatically decremented the size to 31.
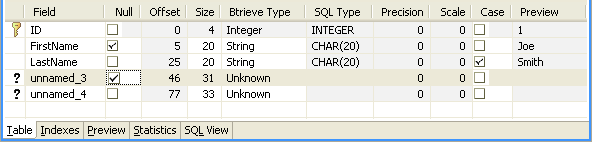
12 Select the unnamed_3 row.
13 Enter the values needed to reflect the following information:
•Field: DOB
•Null: checked
•Offset: 46
•Size: 4
•Btrieve Type: Date
•SQL Type: Date
•Precision: 0
•Scale: 0
•Case: not checked
Your table definition should now look similar to the following:
When you changed the size to 4, DDF Builder combined the remaining bytes with the next field.
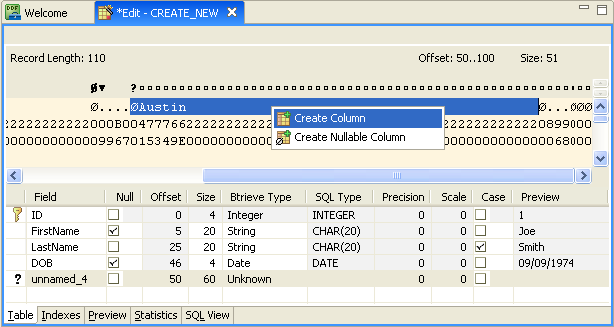
Now, there is one unknown field left with a size of 60 bytes. The data structure indicates that two more fields need defining. Use the raw data view to create the column.
Create a Column from the raw data view
14 Starting at offset 50, select 51 bytes in the raw data view.
Tip To find offset 50, locate the question mark just above the first record in the raw data view, or position the cursor until the Offset indicator shows 50.
15 Right-click and select Create Column.
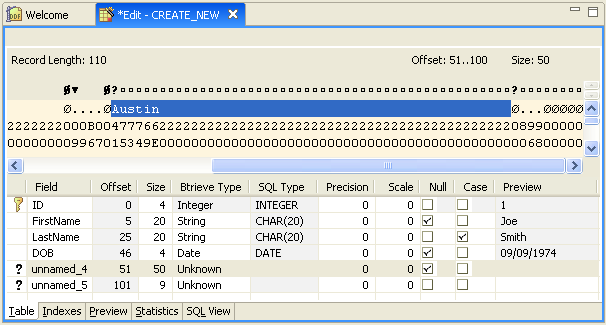
You created a not null column, but really you need a null column instead. Change the non-nullable column to nullable now using the grid data view.
Change a Non-Nullable Column to Nullable in the grid data view
16 Select the unnamed_4 row, and select the Null checkbox.
Checking the Null checkbox reserves the null byte indicator and reduces the size to 50 bytes.
17 Enter the rest of the values needed to reflect the following field information:
•Field: Address
•Null: checked
•Offset: 51
•Size: 50
•Btrieve Type: String
•SQL Type: Char(20)
•Case: checked
Your table definitions should now look similar to the following:
Lastly, define the last field in the file.
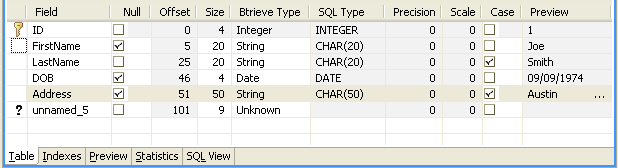
18 Select unnamed_5 row in the grid data view, then make the following changes in this order:
•Null: checked
•Field: Income
•Btrieve Type: Currency
By selecting the Null checkbox first, you automatically set the size correctly. If you had first changed the size to 8, DDF Builder would have created a new unknown column from the last remaining byte.
You have now finished defining the fields for your file. Your table definition should look like the following:
Before you proceed, be sure and save your table definition.
19 Select File > Save, or click the Save icon on the toolbar.
You have now successfully created your table definition in your DDFs. When you saved your work, SQL tables were created under the SQL Tables node of the Data Sources Explorer.
Now that you have created the table definitions, take a look at the index.
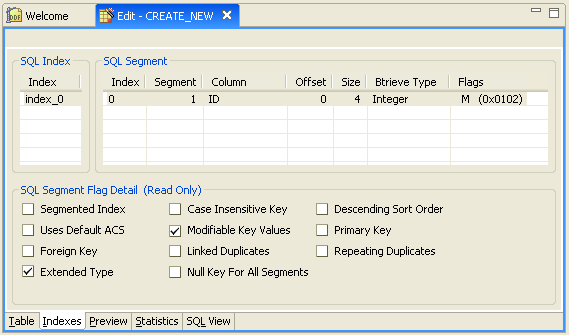
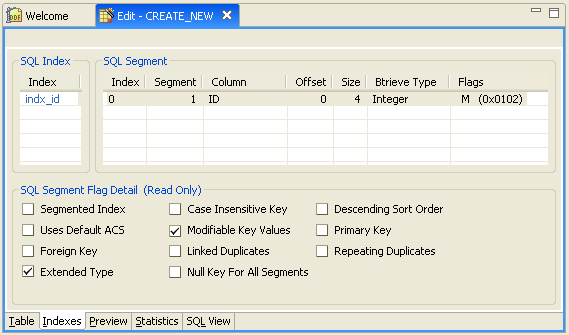
Review the Index Information
Now take a look at the indexes DDF Builder found in the file.
1 Click the Indexes tab in the Table Definition Editor.
DDF Builder can detect any index created in the file, but because Btrieve does not use index names, the index has no associated name in DDF Builder.
Although the Indexes page is primarily read-only, you can enter or alter the index name.
Name an Index
2 Select the index_0 entry in the Indexes column by double-clicking the field.
3 Enter indx_id as the name of the index from the data structure.
4 Before you proceed, be sure and save your index changes. Click File > Save to do so.
That is the extent of what DDF Builder allows you to do to Indexes.
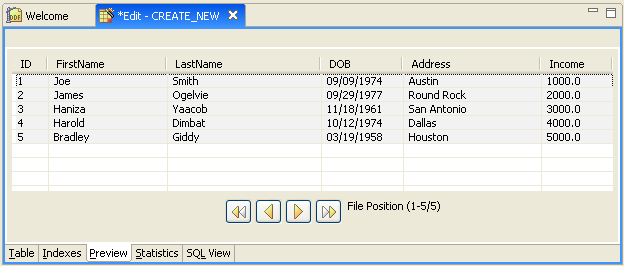
You should always preview the data once you have completed your table definitions.
Preview the Defined Data
Next, take a moment to double-check the data in the file for which you have just created table definitions.
1 With DDF Builder still open, click the Preview tab in the Table Definition Editor.
Your Preview page should look like the following:
The Preview page offers you a look at how the data in the file is formatted using the table definitions you just created. As you can see, all of the data appears reasonable for the column names and the type of data that should display.
The buttons at the bottom of this page allow you to move through the data in the file so that you can verify all of the records, or perhaps find data in an unexpected format that you may need to deal with to complete your table definitions.
If you find that some of your data does not display as you had expected, see next section,
Tutorial 2 – Modifying Table Definitions with DDF Builder.
If you make any changes to your already saved table definitions, be sure and save your work before closing DDF Builder.
Conclusion
Congratulations! You have completed Tutorial 1 and now have a set of DDFs that allow you to access the data in your Btrieve file using relational access.
The next tutorial deals with making modifications to a set of already created DDFs for a Btrieve file. The next tutorial also discusses some of the problems with DDFs that DDF Builder automatically detects.
Tip Remember, this tutorial created a new database and a DSN. If you need to remove these from your system, you may want to do that now.
Tutorial 2 – Modifying Table Definitions with DDF Builder
There are a variety of scenarios you could encounter when dealing with out-of-date or incorrect DDFs, so it would be exhaustive to try and cover each situation within the contents of this tutorial. For this reason, this tutorial is made up of several lessons, each detailing a specific situation that you might encounter when working with a Btrieve file or existing table definition. Each lesson is designed to address one problem so that you may work through the details without the particulars of other situations providing possible confusion.
This tutorial is organized in a way that allows you work through the exercises in each lesson, breaking them apart into manageable chunks of related information. You can also refer to this tutorial later as a kind of troubleshooting review to find a list of possible situations that you may encounter. From that list, you can proceed to the exact lesson that covers that situation and review possible solutions.
Scenario
You have a collection of Btrieve data files that have DDFs available, but the table definitions in the DDFs are outdated and need modifying. It may be a case of your receiving out-of-date files from the vendor, or the application was modified without making the proper updates to the DDFs.
Goals
The goal of this tutorial is to open all of the Btrieve files and existing table definitions. You need to review DDF Builder’s findings, make any necessary changes and save the table definitions using DDF Builder. The table definitions should mirror the database schema and provide an accurate representation of the data in the Btrieve files.
The following lists each lesson in this tutorial and the lists the conditions they represent.
Lesson 1 – Working with v3.00 DDFs
Scenario
In this lesson, you have a database with an existing set of table definitions. The table definitions were created with a much older version of PSQL and are no longer compatible with the version of Pervasive.SQL 2000 supported in this release of DDF Builder.
Caution DDF Builder supports version 4.xx DDFs but does not support DDFs created prior to Scalable SQL version 4.xx.
Goals
The goal is to try and open the DDFs with DDF Builder. This tutorial explains how DDF Builder handles these files and provides you with a solution so that you can convert your files to a version compatible with DDF Builder.
What You Need to Know
The files to use for this lesson reside in a folder named V3. Assuming you installed using the default installation locations, this folder is located at:
<Application Data>\DDFBUILDER\TUTORIALS\TUTORIAL2\V3
You must create a DSN for this database before continuing.
Open the Btrieve File
Begin by starting DDF Builder, if it is not already running.
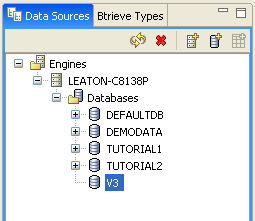
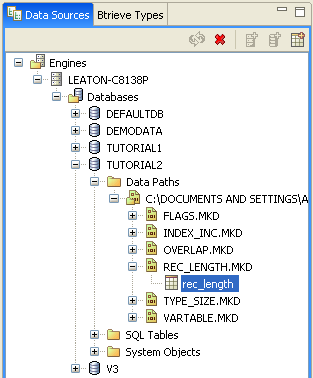
1 In the DDF Builder Data Sources Explorer, expand the Databases node to see all of the available databases.
2 Locate the V3 database in the list.
3 Double-click the V3 database icon.
The following message opens:
4 Click Ok to close the message window.
You are unable to open these files because they were originally created with a version of the product that is no longer supported.
Understanding the Warning Message
DDF Builder is unable to open Scalable SQL v3.00 data dictionary files because the format used at that time (Scalable SQL 3.01) is no longer supported.
Tip DDF Builder is supported on PSQL v9 and later versions. DDFs created with Scalable SQL v4.00 and later are supported along with Btrieve data files v6.x and later.
How To Convert My Files
If you have older DDFs you need to convert them to the new format. Use the following steps.
1 Backup your existing, old database by copying the data files and DDFs to a different storage location.
2 Export the table schema for all tables in your old database using PSQL Control Center (PCC). See
To export a database schema in
PSQL User's Guide. Ensure that you select the export option “add IN DICTIONARY clause to CREATE statements.”
3 Ensure that the CREATE INDEX statements in the export file put the index segments in the correct order for each table.
The indexes for the tables must be in the same order as in the original data files. The exported table schemas put the indexes in alphabetical order, so you may need to rearrange the statements.
To determine the sequential order of the indexes, you can use the butil -stat command against the original data file. See
Viewing Data File Statistics in
Advanced Operations Guide. Another method is to use the dbo.fSQLStatistics catalog function. See
dbo.fSQLStatistics in
SQL Engine Reference.
4 Typically, because you are converting old files, you need to add the following line to the export schema file as the first line in the file:
SET TRUENULLCREATE = OFF;
Add the following line as the last line of the file:
SET TRUENULLCREATE = ON;
6 In PCC’s SQL Editor, execute the CREATE TABLE SQL statements in the export schema file against the new database to create all of the tables. See
To open a SQL script in
PSQL User's Guide.
7 Copy the old PSQL data files – not the DDFs – from the old database to the storage location for the new database data files.
You should be able to access your existing data via SQL (for example, with PCC).
8 Use DDF Builder to build table definitions for any Btrieve files that did not have a definition and to correct problem definitions. See also
Conversion Notes.
Conversion Notes
The steps above are the most direct for simple data files. Try the steps first to determine the results of the conversion.
You may encounter two situations that require additional effort:
Alternating Collating Sequences
If a table column uses an alternating collating sequence (ACS), you must manually modify the CREATE TABLE statement. PCC does not include an ACS when you export a table schema.
To determine if a column uses an ACS, check table consistency with DDF Builder (see
Check Table Consistency). If a message informs you of an attribute mismatch with physical key file segment, then the column uses an ACS.
The following example is a modified CREATE TABLE statement in which collating was added manually:
SET TRUENULLCREATE = OFF;
CREATE TABLE "PATAPP" IN DICTIONARY USING 'PATAPP.DTA' (
"ID" CHAR(6) NOT NULL COLLATE 'UPPER.alt',
"Appointment Date" DATE NOT NULL,
"Appointment Time" TIME NOT NULL,
"AMPM" CHAR(4) NOT NULL COLLATE 'UPPER.alt',
"Doctor" CHAR(12) NOT NULL,
"Code" CHAR(3) NOT NULL COLLATE 'UPPER.alt',
"Amount Paid" MONEY(14,2) NOT NULL,
"Date Paid" DATE NOT NULL);
CREATE INDEX "index_0" IN DICTIONARY ON "PATAPP" (
"Appointment Date" ,
"AMPM" ,
"Appointment Time" );
CREATE INDEX "index_1" IN DICTIONARY ON "PATAPP" (
"ID" );
CREATE INDEX "index_2" IN DICTIONARY ON "PATAPP" (
"Code" );
SET TRUENULLCREATE = ON;
Also, if the indexes are not in the correct sequence for the table, you must rearrange the CREATE INDEX statements to put the index segments in the correct sequence.
Table Definitions That Require Using PCC and DDF Builder
Some table definitions may be so difficult to resolve that you have to use both PCC and DDF Builder. If columns are marked as “unknown” in DDF Builder, you may need to view the table in PCC’s Table Editor, then define the columns similarly in DDF Builder. Using both utilities and a back-and-forth method, you should be able to complete the table definitions.
Conclusion
This lesson introduced you to how DDF Builder handles Scalable SQL v3.01 DDFs and provided you with a solution for converting your files so that they may work with current versions of the software.
You also learned that databases created with Scalable SQL v3.01 DDFs are likely to contain Btrieve data files with a pre v6.x file format and must be rebuilt before using DDF Builder.
Lesson 2 – Working with Pre v6.x File Formats
Scenario
In this lesson, you have Btrieve files with an existing set of table definitions. Btrieve files in a pre v6.x format are no longer compatible with the version of PSQL supported in this release of DDF Builder.
Caution DDF Builder supports version 6.x files but does not support files created prior to version 6.x.
Goals
The goal is to try and open the files with DDF Builder. This tutorial explains how DDF Builder handles pre v6.x file formats and v6.x and later file formats. This tutorial also provides a solution to make the files compatible with DDF Builder.
What You Need to Know
The files to use for this lesson and the remaining lessons in this tutorial reside in a folder named Tutorial2. Assuming you installed using the default installation locations, this folder is located at:
<Application Data>\DDFBUILDER\TUTORIALS\TUTORIAL2
You must create a DSN for this database before continuing.
The files specific to this lesson are KO.BTR and KO.MKD.
Open the Btrieve File
Begin by starting DDF Builder, if it is not already running.
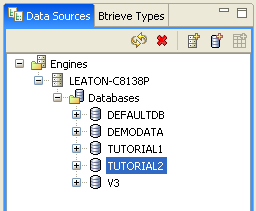
1 In the DDF Builder Data Sources Explorer, expand the Databases node to see all of the available databases.
2 Locate the Tutorial2 database in the list.
3 Double-click the Tutorial2 database icon.
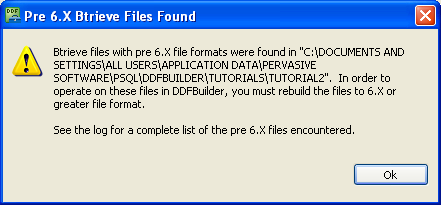
The following message opens:
4 Click Ok to close the message window.
You are unable to open all of the files because some files in the folder are pre v6.x.
Understanding the Warning Message
DDF Builder is unable to open files that are version 5.x and earlier because that format is no longer fully supported. To use the pre v6.x files, you must rebuild the files to a 6.x version or greater file format.
Tip DDF Builder is supported on PSQL v9 and later.
Before you rebuild the version 5.x and earlier files, check the log file to determine exactly which files you need to rebuild.
View the Log File
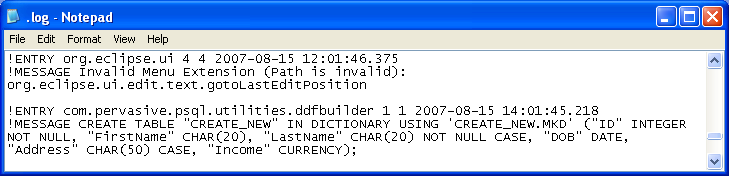
The files you need to rebuild are listed in the DDF Builder log file.
►To access the log file
1 With DDF Builder running, click Help.
2 Click DDF Builder Log File.
The Log file opens in the default text editor on your system. The following is a sample from the log file for this lesson.
Notice that the log file lists each pre v6.x file, including the full data path for the file. Using this data path, you can locate the files that need rebuilding.
How To Rebuild My Files
Use the PSQL Rebuild Utility to rebuild your files to version 6.x or later. The Rebuild Utility is installed as one of the core utilities of PSQL and is available from the Tools menu of the PSQL Control Center.
Where To Go From Here
The Rebuild Utility is available from the PSQL Control Center. For information on using this utility, see “Converting Data Files,” in the Advanced Operations Guide.
Conclusion
This lesson introduced you to how DDF Builder handles pre 6.x version file formats and provided you with a solution for rebuilding your files to work with them in DDF Builder.
Lesson 3 – Invalid Data Types and Sizes
Scenario
In this lesson, you have a Btrieve file with incorrect data types and sizes. As a result of this, the data does not format in a way that is understandable.
Goals
The goal is to open the file’s existing table definitions with DDF Builder. You will inspect all the data types and sizes using the Btrieve Types view and make the modifications needed so that the data is formatted using the correct data type for the field size.
What You Need to Know
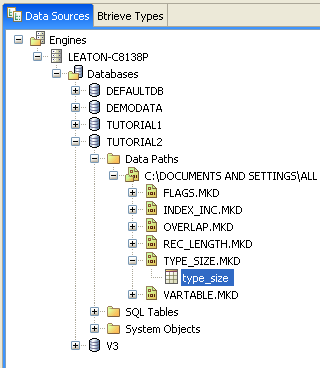
For this lesson, use the file named Type_Size.MKD. This file resides in a folder named Tutorial2. Assuming you installed using the default installation locations, this folder is located at:
<Application Data>\DDFBUILDER\TUTORIALS\TUTORIAL2
This folder is part of the Tutorial2 database.
Note You must have a Data Source Name (DSN) that points to this database in order to access the data in this tutorial. If you have not yet created this DSN, refer to
Create Data Source Names (DSN).
Open the Btrieve File
You should have DDF Builder already running from the last lesson. If not, begin by starting DDF Builder.
1 In the DDF Builder expand the Data Sources Explorer nodes, and locate the Tutorial2 database in the list.
2 Double-click the Tutorial2 database icon to expand the nodes.
3 Expand the nodes until the Type_Size.MKD file and the associated SQL table display.
4 Double-click the type_size SQL table, or right-click and select Edit Table Definition.
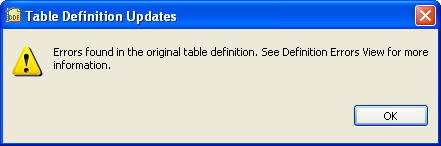
The Table Definition Editor opens and displays the following message:
This message tells you that DDF Builder has analyzed your existing table definitions and found problems with those definitions. As a result of this, DDF Builder had to make some modifications to open and display the existing table definitions.
5 Click OK to clear the message and display the table definition.
Look for Inconsistencies
Begin by looking at the DDF Builder interface to review the inconsistencies with which you are dealing. Specifically, look at the grid data view and the Definition Errors window.
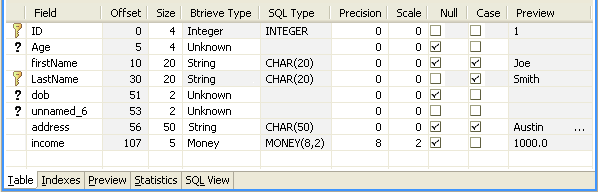
The grid data view of the Table Definition Editor shows your existing table definition with the modifications that DDF Builder made.
Note DDF Builder changes are not automatically saved. Any modifications made by DDF Builder must be saved.
In this example, DDF Builder gives visual indications as to the columns that need attention by adding the unknown column indicator to the fields that are new or that DDF Builder changed to an unknown type.
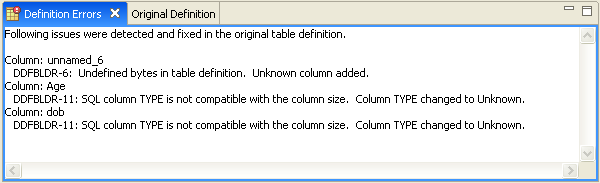
A list of the issues DDF Builder detected and changed display in the Definition Errors view.
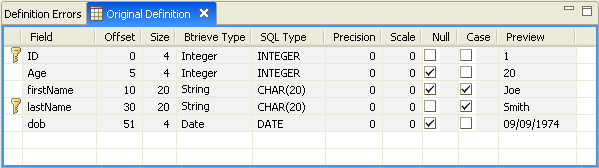
The original table definition, before DDF Builder made any changes, is available from the Original Definition view.
Understanding the Errors
The Definition Errors view tells the following:
•where the problems are located
•what problems DDF Builder found
•what changes, if any, DDF Builder made to the original table definition
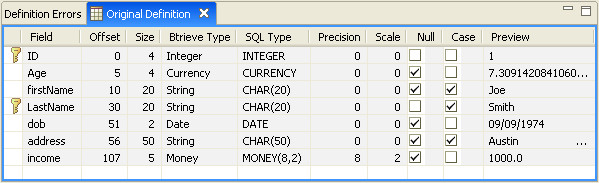
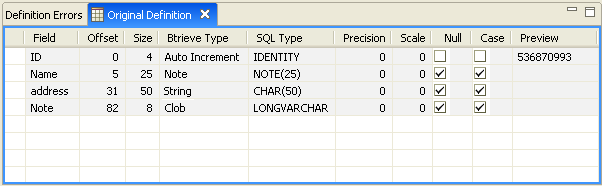
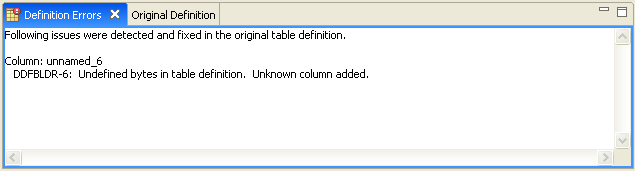
The Definition Errors lists three problems:.
Where the problem is located... | The problem DDF Builder found... | What needs to be done now... |
Column: unnamed_6 | DDFBLDR-6: Undefined bytes in table definition. Unknown column added. | You must define the Unknown column that DDF Builder added to account for the undefined bytes. |
Column: Age | DDFBLDR-11: SQL column type is not compatible with the column size. Column type changed to Unknown. | You must define the column type that DDF Builder changed to Unknown. |
Column: dob | DDFBLDR-11: SQL column type is not compatible with the column size. Column type changed to Unknown. | You must define the column type that DDF Builder changed to Unknown. |
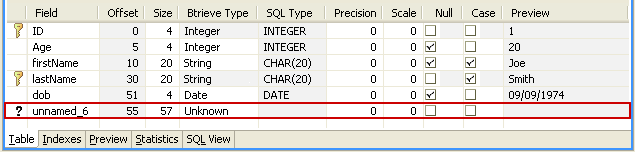
The first error shows that the file contains a group of bytes that were undefined in the original table definition. DDF Builder created a new column from these undefined bytes and named the column unnamed_6.
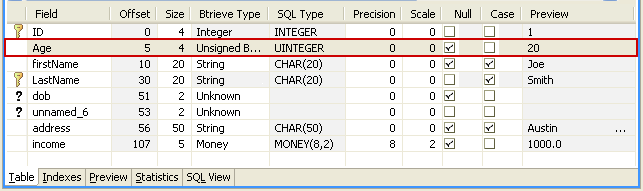
The file also contains two fields (Age and dob) where the column data type was invalid for the column size. In both cases, the type for these fields has been changed to Unknown. Before you look at the Age column in depth, first review what DDF Builder can and cannot determine.
Invalid Type and Size
DDF Builder cannot confirm the size of a field based on the specified data type, but can only verify that the types available are valid for the defined size. DDF Builder can detect the problems found, make generic changes, and record the changes made, but it cannot determine if the type selected is correct.
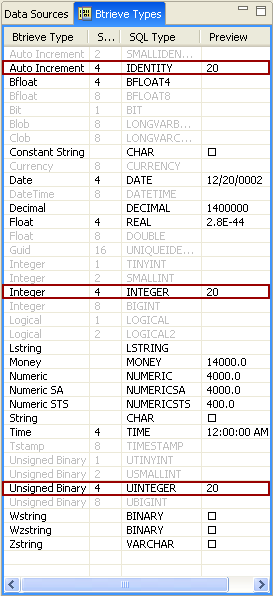
DDF Builder limits the data types from which you can select, based on the field size. So when looking at the first invalid type and size in the Age column, for example, the size is four bytes. The Btrieve Type drop-down list in the grid data view is only populated with data types that can have a four byte size. Instead of trying each of the data types DDF Builder lets you select from, look at the data in the Btrieve Types view and the Preview page to determine an appropriate data type.
Next review the data types that can allow four bytes and preview the data in the file to see which data type is the most suitable.
Review Data Types and Sizes
To get a close look at the data with the possible data types for the field size, use the Btrieve Types view on the left side of the Table Definition Editor.
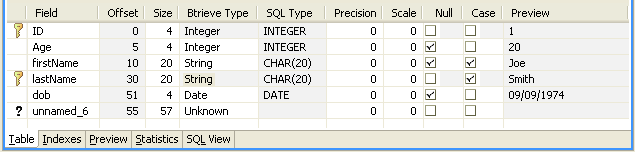
1 With the Table Definition Editor open, select the Age column so that the row is highlighted.
Tip Selecting the Age column in the table definition allows you to see specific data in the Btrieve Types tab, as discussed next.
2 Now, click the Btrieve Types tab on the left side of the DDF Builder interface. The Btrieve Types tab view should look similar to the following:
Tip For more information about the Btrieve Types view, see
Btrieve Types.
3 Carefully review the data as it appears in the Preview column of the Btrieve Types view.
The Btrieve Types view only shows data types that can be four bytes in size. This is extremely helpful because it allows you to filter out all other data types that are invalid.
Knowing that the column represents an age and is four bytes in size, you can see that only three possible data types can work with the data.
Next, you can eliminate Auto Increment as a possible data type, since you know that using the Auto Increment data type automatically increases each new record by a value of one. After all, nobody likes adding a year to their age!
By a process of elimination you are now down to two possible data types from the Btrieve Types list – Integer and Unsigned Binary.
The Integer and Unsigned Binary data types are very similar in nature. Try each of these data types and see how the data gets interpreted. First, select Integer as the Btrieve data type for the Age column.
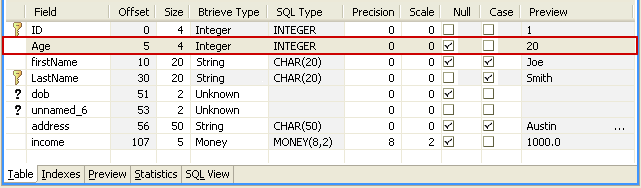
4 Select Integer from the Btrieve Type drop-down list.
You can see in the grid data view’s Preview column, that the data looks acceptable. Take a moment though, and look at all the data in the file via the Preview page.
5 Click the Preview page in the Table Definition Editor. You can see all of the data in the file in a readable layout.
Looking at all the data in the file helps to reconcile the invalid data type with more confidence, since you can quickly look at all the records in the file.
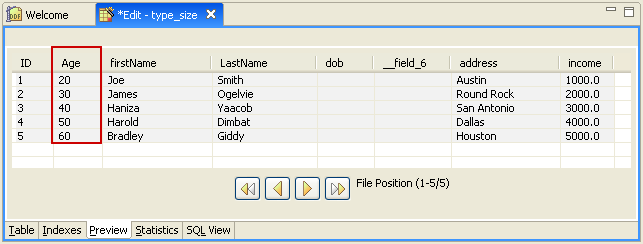
You can see that using the Integer data type, the data is formatted in what appears to be a suitable manner. Be sure though, and run the same review using the Unsigned Binary data type.
6 Select Unsigned Binary from the Btrieve Type drop-down list.
Again, the grid data view’s Preview column shows the data in an acceptable format. Be certain though, and look at all the data in the file via the Preview page, as you did when you used the Integer data type.
7 Click the Preview page in the Table Definition Editor to see all of the data in the file in a readable layout.
Both the Integer and the Unsigned Binary data types format the data in a manner that is acceptable and understandable, and both these data types support 1, 2, 4, and 8 bytes. So it seems there is no compelling reason to select one data type over another. This example clearly shows that you must know the basic and underlying structure of your data if you are creating or modifying table definitions.
Make the Final Changes
Now that you have reviewed the possible data types and the formatted data, select the Integer data type for the Age column.
This resolves the first table definition error. You cannot save the table definition though, until you resolve the other errors.
Tip You cannot save your table definitions until you resolve all Unknown types and account for every byte in the record.
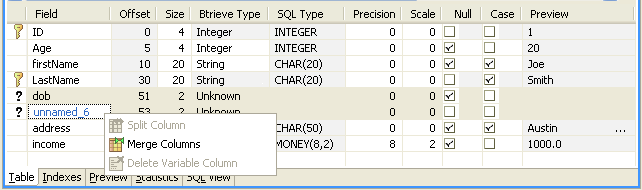
The next two fields are side by side, and you should look at them collectively. To resolve the two remaining table definition errors, you need to consider them as a single error.
First, you know that DDF Builder noted that the dob field had a defined data type (Date) that is invalid for the column’s size of two bytes. As a result, DDF Builder changed the data type to Unknown.
Secondly, there were two bytes that were undefined in the original table definition. DDF Builder created a new column (unnamed_6) from these two bytes and gave them an Unknown type.
The intended data type for the dob field is Date, and the Date data type requires a field of four bytes. By merging both the dob and the unnamed_6 columns, you can create a four-byte field that is appropriate for the Date data type. You need to verify though, as you did with the previous error, that the data is understandable and acceptable using the Date data type and with the two columns merged.
1 In the Table Definition Editor, select both the dob column and the unnamed_6 column (use the Shift key).
2 Right-click and select Merge Columns.
The two columns are merged into one, making a four-byte column.
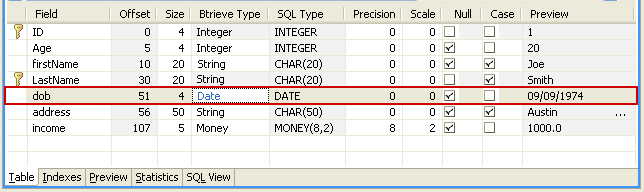
3 Select Date from the Btrieve Type drop-down list.
Once you enter this information and tab through the rest of the column fields, notice that adding the Date data type formatted the data appropriately in the visible record.
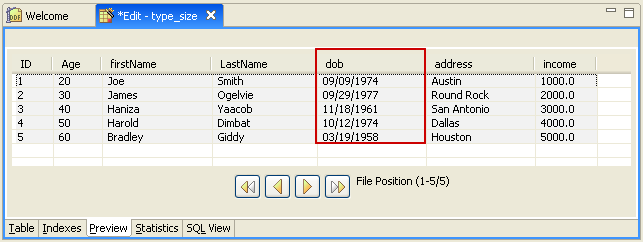
It is a good idea to check the Preview page to see how all the data is handled with the Date data type.
4 Click the Preview tab at the bottom of the grid data view.
Looking at the dob column in the Preview page, you can see that all of the data is formatted in an acceptable and understandable format.
Save the Table Definition
Now that you have completed the table definition, you must save your work for the changes to take effect. Before you save the work, take one final look at the table definitions. Your data grid view should look similar to the following:
You can take a quick glance and see that all of the Btrieve Types have been defined, you have no undefined fields remaining and every byte is accounted for. You can now save your table definition.
1 From the menu bar, click File > Save.
Conclusion
This lesson introduced you to how DDF Builder handles data types and sizes that are not compatible with each other. It showed you how invalid data types and sizes might be displayed within an existing table definition and provided you with some sample solutions for modifying your table definitions so that the sizes and data types are compatible and information is proper and accurate.
Lesson 4 – Overlapping Column Definitions
Scenario
In this lesson you have an existing table definition that contains two column definitions that share some of the same bytes in the file. This creates an overlapping column definition that must be corrected.
Goals
The goal is to open the file with DDF Builder and see if DDF Builder makes any updates to the definitions. You will inspect any changes that DDF Builder implements and discuss changes needed to fix the overlapping column definition.
Note DDF Builder recommends solutions to fix the overlapping column definitions in your file and allows you to save those changes.
What You Need to Know
For this lesson, use the file named OVERLAP.MKD. This file resides in a folder named Tutorial2. Assuming you installed using the default installation locations, this folder is located at:
<Application Data>\DDFBUILDER\TUTORIALS\TUTORIAL2
This folder is part of the Tutorial2 database.
Note You must have a Data Source Name (DSN) that points to this database in order to access the data in this tutorial. If you have not yet created this DSN, refer to
Create Data Source Names (DSN).
Open the Btrieve File
You should have DDF Builder already running from the last lesson. If not, begin by starting DDF Builder.
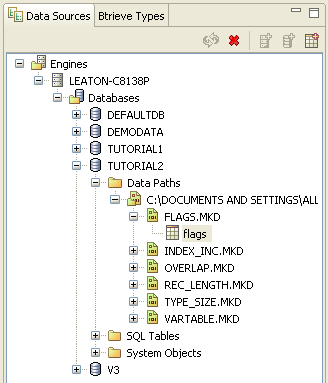
1 In the DDF Builder expand the Data Sources Explorer nodes, and locate the Tutorial2 database in the list.
2 Double-click the Tutorial2 database icon to expand the nodes.
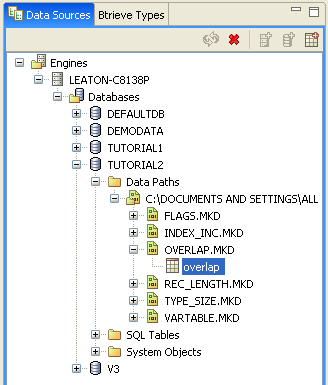
3 Expand the nodes until the OVERLAP.MKD file and the associated SQL table display.
4 Double-click the overlap SQL table, or right-click and select Edit Table Definition.
The Table Definition Editor opens and displays the following message:
This message tells you that DDF Builder has analyzed your existing table definitions and found problems with those definitions. As a result of this, DDF Builder had to make some modifications to open and display the existing table definitions.
5 Click OK to clear the message and display the table definition.
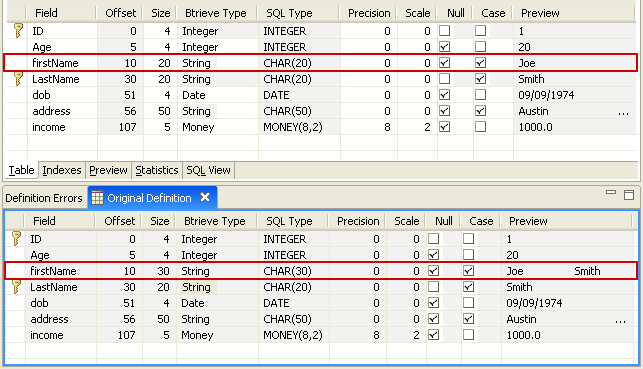
Look for Inconsistencies
Begin by looking at the DDF Builder interface to see the differences between the original definition and the modifications that DDF Builder made, as well as reviewing the errors reported.
The Table Definition Editor’s grid data view shows the existing table definition with the modifications made by DDF Builder.
No unknown icons or other visual indicators bring to your attention the fields that are altered or added.
The Definition Errors window displays the issues DDF Builder detected and changed.
The original table definition, before DDF Builder made any changes, is always available from the Original Definition view.
Note DDF Builder changes are not automatically saved. Any modifications made by DDF Builder must be saved.
In a moment compare the original definition to the modified definition, but first take a look at the error DDF Builder reported.
Understanding the Errors
The Definition Errors view tells the following:
•where the problems are located
•what problems DDF Builder found
•what changes, if any, DDF Builder made to the original table definition
The Definition Errors lists one problem; look at that problem a bit more in-depth.
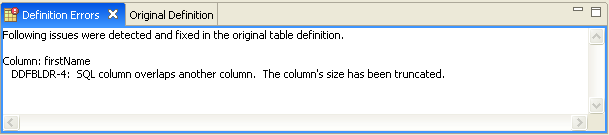
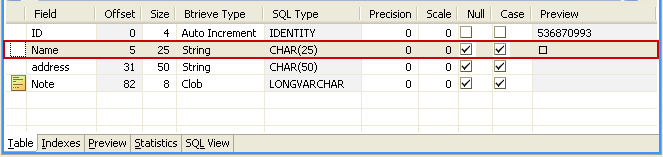
Where the problem is located... | The problem DDF Builder found... | What needs to be done now... |
Column: firstName | DDFBLDR-4: SQL column overlaps another column. The column’s size has been truncated. | The column that DDF Builder named (firstName) overlaps another column. To eliminate the overlapping columns and make certain that both the table definition and the Btrieve file have the same record length, DDF Builder shortened the column size. |
The error DDF Builder reported is an overlapping column definition. This means the table definition contains definitions for two columns that share some of the same bytes.
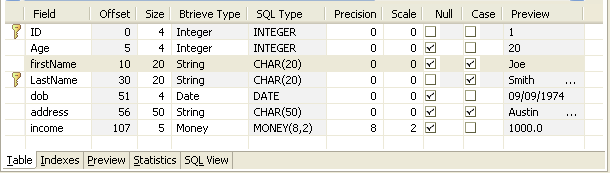
DDF Builder automatically reduced the size of the firstName column so that it no longer overlaps with the next column. Now the column lengths match and no bytes are defined across multiple columns.
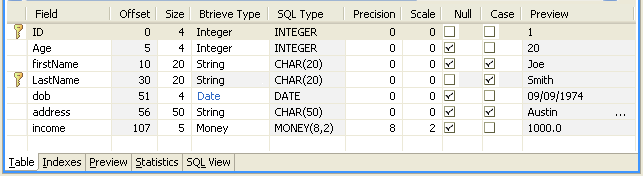
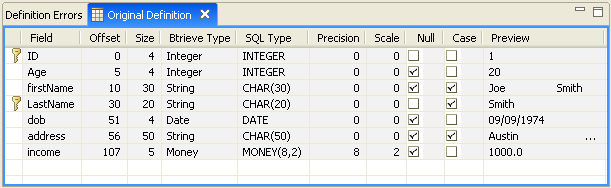
You can see the overlapping columns by comparing the grid data view with the original definition.
Notice in the original definition the firstName field has a size of 30, compared to a size of 20 in the modified definition. The original definition shows both a first name (Joe) and last name (Smith) in the Preview column. The modified definition, with the smaller size, only shows the first name in the Preview column, as you would expect.
Accept or Reject Changes
Making comparisons between the original definition and the definition that DDF Builder modifies, along with verifying how the data is formatted, helps you determine whether or not to accept the changes made by DDF Builder.
As a result of the changes that DDF Builder made, the data appears more in a manner that you would expect, and you can be assured that column lengths match.
Now that you have reviewed the differences in the files, understand the changes that DDF Builder made, and can verify the data is proper, you are ready to accept the changes.
Save the Table Definition
Any time that changes are made to your table definitions, whether they are made by you or by DDF Builder, they must be saved in order for them to take effect. Before you save the table definition, it is a good idea to take one final look at the definition and the Preview tab to make certain that all fields are defined and every byte is accounted for.
Note You cannot save a table definition with fields that contain a Btrieve Type of Unknown or that contain bytes that are unaccounted for.
You can see all of the Btrieve Types are defined and every byte in the record is accounted for. You can now save your table definition.
1 From the menu bar, click File > Save to save the table definition.
The table definition DDF Builder modified to fix the overlapping column definition is now saved as your current definition.
Conclusion
This lesson introduced you to how DDF Builder deals with overlapping column definitions and the kind of changes DDF Builder implements to resolve overlapping columns. It showed you ways to compare the definition modified by DDF Builder with the original definition to determine if changes should be accepted or rejected.
Lesson 5 – File/Field Flag Inconsistencies
Scenario
In this lesson, you have a Btrieve file with flags set for a field that are inconsistent with the SQL column flags set in the table definition.
Goals
The goal is to open the file with DDF Builder and see if DDF Builder makes any updates to the definitions. You will inspect any changes that DDF Builder implements and discuss changes, if any, that are needed to fix the flag inconsistencies.
What You Need to Know
For this lesson, used the file named FLAGS.MKD. This file resides in a folder named Tutorial2. Assuming you installed using the default installation locations, this folder is located at:
<Application Data>\DDFBUILDER\TUTORIALS\TUTORIAL2
This folder is part of the Tutorial2 database.
Note You must have a Data Source Name (DSN) that points to this database in order to access the data in this tutorial. If you have not yet created this DSN, refer to
Create Data Source Names (DSN).
Open the Btrieve File
You should have DDF Builder already running from the last lesson. If not, begin by starting DDF Builder.
1 In the DDF Builder expand the Data Sources Explorer nodes, and locate the Tutorial2 database in the list.
2 Double-click the Tutorial2 database icon to expand the nodes.
3 Expand the nodes until the FLAGS.MKD file and the associated SQL table display.
4 Double-click the flags SQL table, or right-click and select Edit Table Definition.
The Table Definition Editor opens and displays the following message:
This message tells you that DDF Builder analyzed your existing table definitions and found problems with those definitions. As a result of this, DDF Builder had to make some modifications to open and display the existing table definitions.
5 Click OK to clear the message and display the table definition.
Look for Inconsistencies
Begin by looking at the DDF Builder interface to review the inconsistencies with which you are dealing. First look at the grid data view and the Definition Errors window.
The grid data view of the Table Definition Editor shows your existing table definition with the modifications that DDF Builder made.
Note DDF Builder changes are not automatically saved. Any modifications made by DDF Builder must be saved.
For this lesson, DDF Builder does not give any visual indications as to the columns that need attention. No unknown column indicators suggest that any of the fields have been altered.
A list of the issues DDF Builder detected and changed display in the Definition Errors view.
Now, take a moment to look at the original table definition. The original table definition, before DDF Builder made any changes, is available from the Original Definition view.
Before you proceed with the details of the inconsistencies in the table definitions, make sure that you understand the definition errors reported by DDF Builder.
Understanding the Errors
The Definition Errors view tells the following:
•where the problems are located
•what problems DDF Builder found
•what changes, if any, DDF Builder made to the original table definition
The Definition Errors list one problem:
Where the problem is located... | The problem DDF Builder found... | What needs to be done now... |
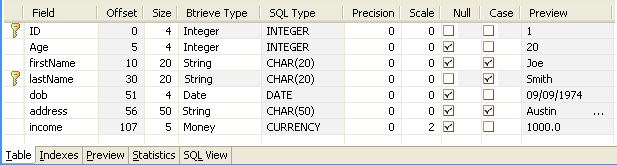
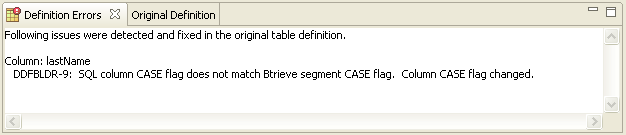
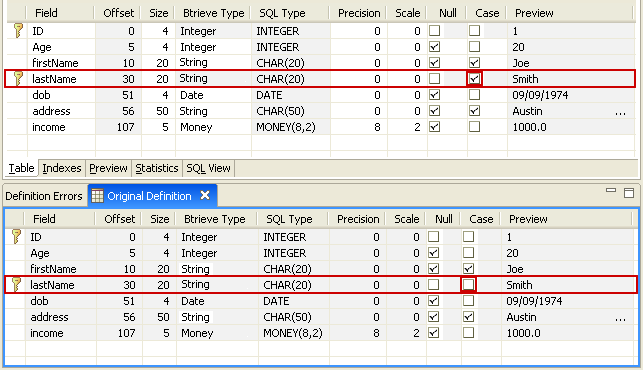
Column: lastName | DDFBLDR-9: SQL column CASE flag does not match Btrieve segment CASE flag. Column CASE flag changed. | You need to verify if the field should have the CASE flag set or not and either accept or reject the DDF Builder changes. |
The error indicates a Case flag set on a SQL column but the flag was not set on the corresponding Btrieve segment. Since DDF Builder does not change the Btrieve file, the SQL table has been modified to match the specifics of the Btrieve file. To make certain this is the situation, compare the current table definition to the original definition.
The definition error lists the problem is with the lastName column’s Case setting. If you compare the lastName fields of the current and original table definition, you can quickly see the difference.
From the comparison, you can determine the following:
•The original, or existing, definition did not have the Case flag set on the lastName field.
•The current definition (updated by DDF Builder) does have the Case flag set on the lastName field.
DDF Builder made changes based upon the Btrieve file. Remember, DDF Builder cannot change your Btrieve file, only the table definitions that determine the structure of your Btrieve file. That being the case, DDF Builder changed the original definition (without the Case flag) to allow for the lastName field to use the Case flag.
Note The lastName field is used as an index. You cannot clear the Case flag from the lastName field because it is an index.
Accept or Reject Changes
You have determined the cause of the definition error and understand what changes DDF Builder made. Now you need to either accept or reject the changes that DDF Builder made to the table definition.
If the changes DDF Builder made are incorrect, you would reject the changes and create a new table definition from scratch, since you are unable to change the Case setting for a field marked as an index.
However, for the purpose of this lesson, accept the changes that DDF Builder made. You want the Case flag set on the lastName field.
Save the Table Definition
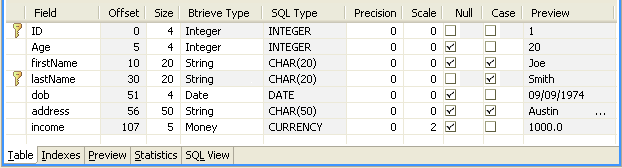
Now that you have reviewed the table definition error and changes, you must save your work in order for the change to take effect. Before you save your work, take one final look at the table definition. Your data grid view should look similar to the following:
Take a quick glance and verify that all of the Btrieve Types are defined, there are no undefined fields remaining and every byte is accounted for. You can now save your table definition.
1 From the menu bar, click File > Save to save the table definition.
Your updated table definition is now saved to use the Case flag setting on the lastName field.
Conclusion
This lesson introduced you to how DDF Builder handles flag settings that differ from the Btrieve file and the existing table definition. It showed you how the grid data view and the original definitions view can be used to compare changes made by DDF Builder. This lesson also showed you that altering a field set as an index is not allowed in DDF Builder. Strategies for rejecting or accepting the changes made by DDF Builder were also discussed.
Lesson 6 – Index Inconsistencies
Scenario
In this lesson, you have a Btrieve file with indexes set that are inconsistent with the indexes set in the table definition.
Goals
The goal is to open the file with DDF Builder and see if DDF Builder updates any of the definitions. You will inspect any changes that DDF Builder implements and discuss changes that are needed to fix the index inconsistencies.
Tip DDF Builder recommends solutions to fix the inconsistencies in your indexes and allows you to save those changes.
What You Need to Know
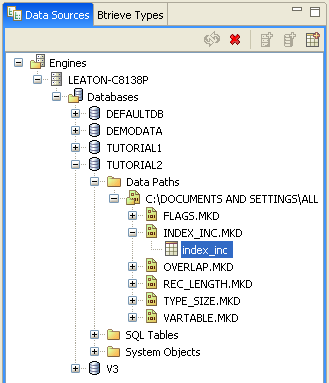
For this lesson, use the file named INDEX_INC.MKD. This file resides in a folder named Tutorial2. Assuming you installed using the default installation locations, this folder is located at:
<Application Data>\DDFBUILDER\TUTORIALS\TUTORIAL2
This folder is part of the Tutorial2 database.
Note You must have a Data Source Name (DSN) that points to this database in order to access the data in this tutorial. If you have not yet created this DSN, refer to
Create Data Source Names (DSN).
Open the Btrieve File
You should have DDF Builder already running from the last lesson. If not, begin by starting DDF Builder.
1 In the DDF Builder expand the Data Sources Explorer nodes, and locate the Tutorial2 database in the list.
2 Double-click the Tutorial2 database icon to expand the nodes.
3 Expand the nodes until all the files display.
4 Double-click the index_inc SQL table, or right-click and select Edit Table Definition.
The Table Definition Editor opens and displays the following message:
This message tells you that DDF Builder has analyzed your existing table definitions and found problems with those definitions. As a result of this, DDF Builder had to make some modifications to open and display the existing table definitions.
5 Click OK to clear the message and display the table definition.
Look for Inconsistencies
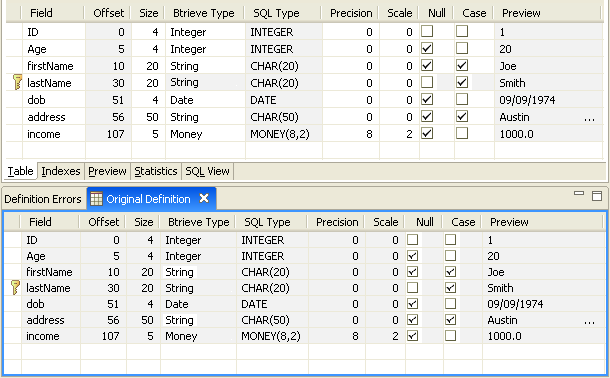
Begin by looking at the DDF Builder interface to review the inconsistencies found. Start by doing a quick comparison of the grid data view to the original definition.
For this lesson, DDF Builder does not give any visual indications as to the columns that need attention. No unknown column indicators suggest that any of the fields have been altered.
Interestingly enough, you can compare these two definitions and find no differences. Although DDF Builder has made changes, they do not appear in the table definition views because the issues DDF Builder corrected are in the indexes.
Before you look at the index information in detail, take a moment to review the problems listed in the Definition Errors window. A list of the issues DDF Builder detected and changed display in the Definition Errors view.
Note DDF Builder changes are not automatically saved. Any modifications made by DDF Builder must be saved.
Understanding the Errors
The Definition Errors view tells the following:
•where the problems are located
•what problems DDF Builder found
•what changes, if any, DDF Builder made to the original table definition
Tip DDF Builder cannot alter your Btrieve file. Any changes made are to the table definition and not the Btrieve file.
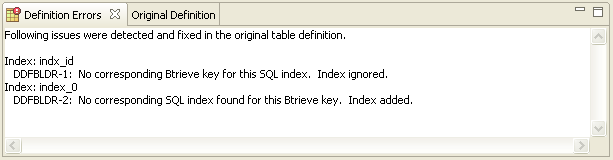
The Definition Errors lists two problems:
Where the problem is located... | The problem DDF Builder found... | What needs to be done now... |
Index: indx_id | DDFBLDR-1: No corresponding Btrieve key for this SQL index. Index ignored. | A corresponding key does not exist in the Btrieve file for a SQL index found in the table definition. Therefore, DDF Builder ignored the index, and the only action is to confirm the changes made by DDF Builder. |
Index: index_0 | DDFBLDR-2: No corresponding SQL index found for this Btrieve key. Index added. | The Btrieve file has the key and DDF Builder has added the corresponding index in the table definition. You need to verify the index in the table definition and accept the changes DDF Builder made. |
The first error shows that the existing table definition contains an index that does not exist in the Btrieve file. Because DDF Builder cannot change the Btrieve file – only alter table definitions – the index is ignored. This is important to know so that you do not try and use an index that does not exist.
The second error is the opposite situation. The existing table definition does not contain an index that is defined in the Btrieve file. DDF Builder added a SQL index to represent the index in the Btrieve file that was previously undefined.
Assign a name to the index that DDF Builder created, and accept the changes made to the table definition index.
Note In the event you have indexes created by DDF Builder that are no longer needed, you may benefit from dropping the index from the file and the table definition. Similarly, you may find that you need to add indexes that were not defined when DDF Builder modified your table definitions. In either case, refer to the PSQL Programmer's Guide for information on adding and dropping indexes.
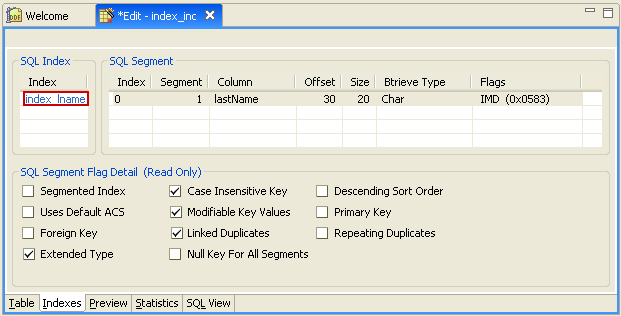
Name the Index
1 Select the Indexes tab in the Table Definition Editor.
2 Double-click the index_0 entry in the Index column.
3 Enter index_lname as the name of the index.
Note To see the indexes defined on the Btrieve file, click the Statistics tab.
Save the Table Definition
Now that you verified the index DDF Builder added to the table definition, save your work for the changes to take effect. Before you save your work, take one final look at the table definition.
All of the Btrieve Types have been defined, there are no undefined fields remaining and every byte is accounted for. You can now save your table definition.
1 From the menu bar, click File > Save to save the table definition.
Conclusion
Congratulations, you have successfully saved your table definition. This lesson introduced you to some of the inconsistencies in indexes that DDF Builder recognizes. It also covered the modifications that DDF Builder makes and how you save the updated table definition.
Lesson 7 – Variable Length Record Mismatch
Scenario
In this lesson, you have a Btrieve file with a different variable length record than the variable length record set in the table definition.
Goals
The goal is to open the file with DDF Builder and see if DDF Builder makes any updates to the definitions. You will inspect any changes that DDF Builder implements and discuss changes needed to make to fix the variable length record mismatch.
Note Currently DDF Builder does not recommend solutions to fix the variable length record mismatch.
What You Need to Know
For this lesson, use the file named VARTABLE.MKD. This file resides in a folder named Tutorial2. Assuming you installed using the default installation locations, this folder is located at:
<Application Data>\DDFBUILDER\TUTORIALS\TUTORIAL2
This folder is part of the Tutorial2 database.
Note You must have a Data Source Name (DSN) that points to this database in order to access the data in this tutorial. If you have not yet created this DSN, refer to
Create Data Source Names (DSN).
Open the Btrieve File
You should have DDF Builder already running from the last lesson. If not, begin by starting DDF Builder.
1 In the DDF Builder expand the Data Sources Explorer nodes, and locate the Tutorial2 database in the list.
2 Double-click the Tutorial2 database icon to expand the nodes.
3 Expand the nodes until all the files display.
4 Double-click the vartable SQL table, or right-click and select Edit Table Definition.
The Table Definition Editor opens and displays the following message:
This message tells you that DDF Builder has analyzed your existing table definitions and found problems with those definitions. As a result of this, DDF Builder had to make some modifications to open and display the existing table definitions.
5 Click OK to clear the message and display the table definition.
Look for Inconsistencies
Begin by looking at the DDF Builder interface to review the differences between the original definition and the modifications that DDF Builder made, as well as reviewing the errors reported.
The Table Definition Editor’s grid data view shows the modified table definition.
Note DDF Builder changes are not automatically saved. Any modifications made by DDF Builder must be saved.
DDF Builder gives you visual indications as to the columns that need attention by adding the unknown column indicator to the fields that are altered or added. In addition, the variable column indicator is added to columns that contain an unknown variable.
A list of the issues DDF Builder detected and changed display in the Definition Errors view.
The original table definition, before DDF Builder made any changes, is available from the Original Definition view.
Understanding the Errors
The Definition Errors view tells the following:
•where the problems are located
•what problems DDF Builder found
•what changes, if any, DDF Builder made to the original table definition.
The Definition Errors lists two problems:
Where the problem is located... | The problem DDF Builder found... | What needs to be done now... |
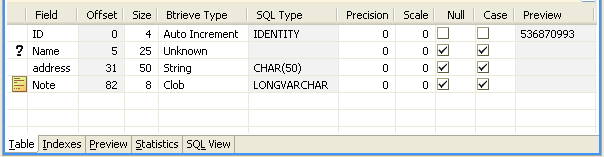
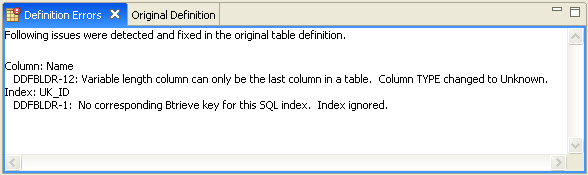
Column: Name | DDFBLDR-12: Legacy variable length column can only be the last column in a table. Column TYPE changed to Unknown. | The existing SQL table definition contains a NOTE or LVAR data type column in the middle of the table. DDF Builder changed the data type to Unknown because variable length columns must be the last column in the table. You must define the column that DDF Builder changed to Unknown. |
Index: UK_ID | DDFBLDR-1: No corresponding Btrieve key for this SQL index. Index ignored. | A corresponding key does not exist in the Btrieve file for a SQL index found in the table definition. Therefore, DDF Builder ignored the index, and the only action is to confirm the changes made by DDF Builder. |
The DDFBLDR-12 error results from a variable length field that does not occur as the last column in the table definition. Because the file contained a variable length field in a place other than the last column, DDF Builder changed the data type of this field to Unknown.
To fix the variable length field issue, define the unknown field with an appropriate data type, as discussed in the next section.
The last error reported is an index that DDF Builder found in the existing table definition that does not have a corresponding key in the Btrieve file. In the course of this lesson, this error is not addressed, only the variable length field. For information on resolving errors pertaining to indexes, see
Lesson 6 – Index Inconsistencies.
Define the Unknown Field
Define the unknown field in the grid data view of the Table Definition Editor.
1 Click to select the Name field.
2 Select String from the Btrieve Type drop-down list.
Note Editing columns in a variable portion of a table is not recommended if your definition contains BLOB or CLOB data types.
Save the Table Definition
You have defined the Unknown field and fixed all of the issues, now save the table definition.
Before you save your work, take one final look at the table definition.
The table definition shows no undefined fields remaining and every byte is accounted for. You can now save your table definition.
1 From the menu bar, click File > Save to save the table definition.
Conclusion
Congratulations, you have successfully saved your table definition and corrected your variable length field. This lesson introduced you to how DDF Builder deals with variable length fields that are not at the end of the record. It also showed you how to define the field and create a valid table definition for the file.
Lesson 8 – Record Length Mismatch
Scenario
In this lesson, you have a Btrieve file with a different record length than the record length set in the table definition.
Goals
The goal is to open the file with DDF Builder and see if DDF Builder makes any updates to the definitions. You will inspect any changes that DDF Builder implements and discuss changes that are needed to fix the record length mismatch.
Tip DDF Builder recommends solutions to fix the record length mismatch and allows you to save those changes.
What You Need to Know
For this lesson, use the file named rec_length.mkd. This file resides in a folder named Tutorial2. Assuming you installed using the default installation locations, this folder is located at:
<Application Data>\DDFBUILDER\TUTORIALS\TUTORIAL2
This folder is part of the Tutorial2 database.
Note You must have a Data Source Name (DSN) that points to this database in order to access the data in this tutorial. If you have not yet created this DSN, refer to
Create Data Source Names (DSN).
Open the Btrieve File
You should have DDF Builder already running from the last lesson. If not, begin by starting DDF Builder.
1 In the DDF Builder expand the Data Sources Explorer nodes, and locate the Tutorial2 database in the list.
2 Double-click the Tutorial2 database icon to expand the nodes.
3 Expand the nodes until all the files display.
4 Double-click the rec_length SQL table, or right-click and select Edit Table Definition.
The Table Definition Editor opens and displays the following message:
This message tells you that DDF Builder has analyzed the existing table definitions and found problems with those definitions. As a result of this, DDF Builder had to make some modifications to open and display the existing table definitions.
5 Click OK to clear the message and display the table definition.
Look for Inconsistencies
Begin by looking at the DDF Builder interface to review the differences between the original definition and the modifications that DDF Builder made, as well as reviewing the errors reported.
The Table Definition Editor’s grid data view shows the modified table definition.
Note DDF Builder changes are not automatically saved. Any modifications made by DDF Builder must be saved.
DDF Builder gives you visual indications as to the columns that need attention by adding the unknown column indicator to the fields that are altered or added.
A list of the issues DDF Builder detected and changed display in the Definition Errors view.
The original table definition, before DDF Builder made any changes, is available from the Original Definition view.
Understanding the Errors
The Definition Errors view tells the following:
•where the problems are located
•what problems DDF Builder found
•what changes, if any, DDF Builder made to the original table definition.
The Definition Errors lists one problem:
Where the problem is located... | The problem DDF Builder found... | What needs to be done now... |
Column: unnamed_6 | DDFBLDR-6: Undefined bytes in table definition. Unknown column added. | You must define the Unknown column that DDF Builder added to account for the undefined bytes. |
The error reported by DDF Builder indicates a record length mismatch.
Tip You can see the original record length for the Btrieve file by clicking the Statistics tab.
This means that the table definition did not contain fields to account for all the bytes in the record. DDF Builder created a new column with the unknown data type to account for these bytes.
Defining and accounting for all of the bytes creates a table definition that accurately matches the Btrieve file. Look at the bytes at the bottom of the grid data view in the row named unnamed_6.
Now define the unknown field so that the record lengths match between the file and the table definition.
Define the Field
Next, define the unknown field in the grid data view of the Table Definition Editor.
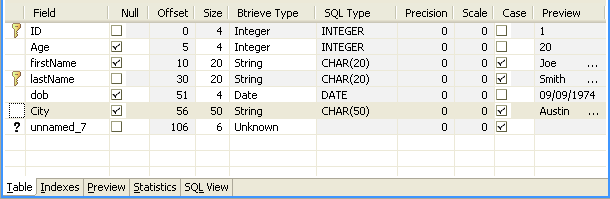
1 Click to select the last row in the grid data view.
2 Select the unnamed_6 Field and enter City for the field name.
3 Check the Null check box.
4 Change the Size to reflect 50 bytes.
5 In the Btrieve Type column, select String from the drop-down list.
6 Select Case check box.
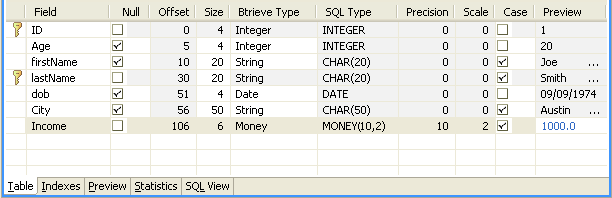
Your table definition should now look similar to the following:
7 Now, click to select the unnamed_7 row in the grid data view.
8 Select the unnamed_7 Field and enter Income for the field name.
9 In the Btrieve Type column select Money from the drop-down list.
10 Leave the Precision at 10; the Scale should remain at 2.
Your table definition should now look similar to the following:
Now that all the unknown fields are defined and every byte is accounted for, save the table definition.
Save the Definition
Save the table definition so that you save your work and apply the changes.
1 From the menu bar, click File > Save to save the table definition.
Conclusion
Congratulations, you have successfully saved your table definition and corrected the record length mismatch. This lesson introduced you to how DDF Builder deals with differing record lengths. It also showed you how to define the field, split the column by resizing and create a valid table definition for the file.