Managing Data
The following topics cover data management:
• Keys
Overview of Managing Data
This section covers the following tasks:
• Defining relationships among tables
• Administering database security
• Controlling concurrency
• Atomicity in SQL databases
In most cases, you can use SQL statements to perform these database management tasks.
You can also enter the SQL statements using the SQL Data Manager. For more information about using SQL Data Manager, see Zen User’s Guide.
Defining Relationships Among Tables
You can use referential integrity (RI) with Zen to define how each table is related to other tables in the database. RI assures that when a column (or group of columns) in one table refers to a column (or group of columns) in another table, changes to those columns are synchronized. RI provides a set of rules that define the relationships between tables. These rules are known as referential constraints. (Referential constraints are also informally referred to as relationships.)
When you define referential constraints for tables in a database, the MicroKernel Engine enforces the constraints across all applications that access those tables. This frees the applications from checking table references independently each time an application changes a table.
You must name your database in order to use RI. Once you have defined referential constraints, each affected data file contains the database name. When someone attempts to update a file, the MicroKernel Engine uses the database name to locate the data dictionary containing the applicable RI definitions and checks the update against those RI constraints. This prevents Zen applications from compromising RI, since the MicroKernel Engine blocks updates that do not meet referential constraints.
To define referential constraints on the tables in a database, use CREATE TABLE and ALTER TABLE statements. For syntax information, see the following topics in SQL Engine Reference:
Referential Integrity Definitions
The following definitions are useful in understanding referential integrity.
• A parent table is a table that contains a primary key referenced by a foreign key.
• A parent row is a row in a parent table whose primary key value matches a foreign key value.
• A delete-connected table occurs if your deletion of rows in one table causes the deletion of rows in a second table. The following conditions determine whether tables are delete-connected:
• A self-referencing table is delete-connected to itself.
• Dependent tables are always delete-connected to their parents, regardless of the delete rule.
• A table is delete-connected to its grandparents when the delete rules between the parent and grandparents is CASCADE.
• A dependent table is a table that contains one or more foreign keys. Each of these foreign keys can reference a primary key in either the same or a different table. A dependent table can contain multiple foreign keys.
Every foreign key value in a dependent table must have a matching primary key value in the associated parent table. In other words, if a foreign key contains a particular value, the primary key of one of the rows in the foreign key's parent table must also contain that value.
Attempting to insert a row into a dependent table fails if the parent table for each referential constraint does not have a matching primary key value for the foreign key value in the dependent table row being inserted. Attempting to delete a row in a parent table to which foreign keys currently refer either fails or causes the dependent rows to be deleted as well, depending on how you have defined the referential constraints.
• A dependent row is a row in a dependent table; its foreign key value depends on a matching primary key value in the associated parent row.
• An orphan row is a row in a dependent table that has a foreign key value that does not exist in the index corresponding to the parent table's primary key. The dependent key value does not have a corresponding parent key value.
• A reference is a foreign key that refers to a primary key.
• A reference path is a particular set of references between dependent and parent tables.
• A descendant is a dependent table on a reference path. It may be one or more references removed from the path's original parent table.
• A self-referencing table is a table that is its own parent table; the table contains a foreign key that references its primary key.
• A cycle is a reference path in which the parent table is its own descendant.
Keys
To use referential integrity, you must define keys. Keys can be either primary and foreign.
A primary key is a column or group of columns whose value uniquely identifies each row in a table. Because the key value is always unique, you can use it to detect and prevent duplicate rows.
A foreign key is a column or set of columns that is common to the dependent and parent tables in a table relationship. The parent table must have a matching column or set of columns that is defined as the primary key. Foreign keys reference primary keys in a parent table. It is this relationship of a column in one table to a column in another table that provides the MicroKernel Engine with its ability to enforce referential constraints.
Primary Keys
A good primary key has these characteristics:
• It is mandatory; it must store nonnull values.
• It is unique. For example, the ID column in a Student or Faculty table is a good key because it uniquely identifies each individual. It is less practical to use a person's name because more than one person might have the same name. Also, databases do not detect variations in names as duplicates (for example, Andy for Andrew or Jen for Jennifer).
• It is stable. The ID of a student is a good key not only because it uniquely identifies each individual, but it is also unlikely to change, while a person's name might change.
• It is short; it has few characters. Smaller columns occupy less storage space, database searches are faster, and entries are less prone to mistakes. For example, an ID column of 9 digits is easier to access than a name column of 30 characters.
Creating Primary Keys
You create a referential constraint by creating a foreign key on a table. However, before creating the foreign key, you must create a primary key on the parent table to which the foreign key refers.
A table can have only one primary key. You can create a primary key using either of the following:
• A PRIMARY KEY clause in a CREATE TABLE statement.
• An ADD PRIMARY KEY clause in an ALTER TABLE statement.
The following example creates the primary key ID on the Person table in the sample database:
ALTER TABLE Person
ADD PRIMARY KEY (ID);
ADD PRIMARY KEY (ID);
When creating a primary key, remember that Zen implements the primary key on the table using a unique, nonnull, nonmodifiable index. If one does not exist for the specified columns, then Zen adds a nonnamed index with these attributes containing the columns specified in the primary key definition.
Dropping Primary Keys
You can delete a primary key only after you have dropped all foreign keys that depend on it. To drop a primary key from a table, use a DROP PRIMARY KEY clause in an ALTER TABLE statement. Since a table can have only one primary key, you do not have to specify the column name when you drop the primary key, as the following example illustrates:
ALTER TABLE Person
DROP PRIMARY KEY;
DROP PRIMARY KEY;
Changing Primary Keys
To change a table's primary key, follow these steps:
1. Drop the existing primary key using a DROP PRIMARY KEY clause in an ALTER TABLE statement.
Note: Doing so does not remove the column, or the index used by the primary key; it only removes the primary key definition. To remove the primary key, there must be no foreign key referencing the primary key.
2. Create a new primary key using an ADD PRIMARY KEY clause in an ALTER TABLE statement.
Foreign Keys
A foreign key is a column or set of columns that is common to the dependent and parent tables in a table relationship. The parent table must have a matching column or set of columns that is defined as the primary key. When you create a foreign key, you are creating a referential constraint, or a data link, between a dependent table and its parent table. This referential constraint can include rules for deleting or updating dependent rows in the parent table.
The foreign key name is optional. If you do not specify a foreign key name, Zen tries to create a foreign key using the name of the first column in the foreign key definition. For more information about naming conventions for foreign keys and other database elements, see Naming Conventions.
Because Zen keywords are reserved words, you cannot use them in naming database elements. For a list of keywords, see SQL Reserved Words in SQL Engine Reference.
Creating Foreign Keys in Existing Tables
To create a foreign key in an existing table, follow these steps:
1. Ensure that a primary key exists in the parent table you are referencing.
All columns in the primary and foreign key must be of the same data type and length, and the set of columns must be in the same order in both definitions.
2. Zen creates a nonnull index for the column or group of columns specified in the foreign key definition. If the table definition already has such an index, Zen uses that index; otherwise, Zen creates a nonnamed index with the nonnull, non-unique, and modifiable index attributes.
3. Create the foreign key using an ADD CONSTRAINT clause in an ALTER TABLE statement.
For example, the following statement creates a foreign key called Faculty_Dept on the column Dept_Name in the Faculty table of the sample database. The foreign key references the primary key created in the Department table and specifies the delete restrict rule.
ALTER TABLE Faculty
ADD CONSTRAINT Faculty_Dept FOREIGN KEY (Dept_Name)
REFERENCES Department
ON DELETE RESTRICT;
ADD CONSTRAINT Faculty_Dept FOREIGN KEY (Dept_Name)
REFERENCES Department
ON DELETE RESTRICT;
Creating Foreign Keys When Creating a Table
To create a foreign key when creating the table, follow these steps:
1. Ensure that a primary key exists in the parent table you are referencing.
All columns in the primary and foreign key must be of the same data type and length, and the set of columns must be in the same order in both definitions.
2. Zen creates a nonnull index for the column or group of columns specified in the foreign key definition. If the table definition already has such an index, Zen uses that index; otherwise, Zen creates a nonnamed index with the nonnull, non-unique, and modifiable index attributes.
3. Create the table using a CREATE TABLE statement and include a FOREIGN KEY clause.
For example, the following statement creates a foreign key called Course_in_Dept on the column Dept_Name in a table called Course.
CREATE TABLE Course
(Name CHAR(7) CASE,
Description CHAR(50) CASE,
Credit_Hours USMALLINT,
Dept_Name CHAR(20) CASE)#
(Name CHAR(7) CASE,
Description CHAR(50) CASE,
Credit_Hours USMALLINT,
Dept_Name CHAR(20) CASE)#
ALTER TABLE Course
ADD CONSTRAINT Course_in_Dept
FOREIGN KEY (Dept_Name)
REFERENCES DEPARTMENT(Name)
ON DELETE RESTRICT
ADD CONSTRAINT Course_in_Dept
FOREIGN KEY (Dept_Name)
REFERENCES DEPARTMENT(Name)
ON DELETE RESTRICT
Dropping Foreign Keys
To delete a foreign key from a table, use a DROP CONSTRAINT clause in an ALTER TABLE statement. You must specify the foreign key name since a table can have more than one foreign key.
ALTER TABLE Course
DROP CONSTRAINT Course_in_Dept;
DROP CONSTRAINT Course_in_Dept;
Referential Constraints
Databases on which you define referential constraints must meet the following requirements:
• The database must have a database name.
• The database must reside on a single workstation drive or a single mapped network drive.
• The data files must be in 6.x or later MicroKernel Engine format.
For information about converting 5.x or later data files to 6.x or 7.x format, see Advanced Operations Guide.
In order for a database to support referential integrity it must also support the concept of foreign keys. A foreign key is a column or set of columns in one table (called the dependent table) that is used to reference a primary key in another table (called the parent table). The RI rule requires all foreign key values to reference valid primary key values. For example, a student cannot enroll in a nonexistent course.
You can use a CREATE TABLE or ALTER TABLE statement to define keys on a table in a named database. The following sections explain how to create and modify keys. These sections also provide examples of referential constraints.
After you define referential constraints on a database, applications that do not perform data updates according to referential rules may fail. For example, if an application tries to insert a row into a dependent table before inserting the corresponding parent row into the parent table, the insertion fails. See Referential Integrity Rules for more information.
Note: If a file has referential constraints defined, it is a bound data file. If a user tries to access it with Btrieve, then the Btrieve user can access the file, but can only perform actions within RI constraints. For more information about bound data files, see Understanding Database Rights.
Referential Integrity Rules
Certain rules apply to inserting and updating rows in dependent tables and updating and deleting rows in parent tables when you define referential constraints on database tables. Zen supports the restrict and cascade rules as follows:
• Insert into dependent table – The parent table for each foreign key definition must have a corresponding primary key value for the foreign key value being inserted. If any parent table does not have a corresponding value, then the insert operation fails.
• Update in the dependent table – The parent table for each foreign key definition must have a corresponding primary key value for the foreign key value (the new value for the foreign key). If any parent table does not have a corresponding value, then the update operation fails.
• Update in the parent table – This is not allowed. You cannot update primary key values. To perform a similar operation, delete the row you want to update, then insert the same row with the new primary key value.
• Delete in the parent table – You can specify either the cascade or restrict rule for this operation. Cascade means that if a dependent table contains a foreign key value that matches the primary key value being deleted, then all rows containing that matching value are deleted from the dependent table also.
Restrict means that if a dependent table contains a foreign key value that matches the primary key value being deleted, then the Delete operation on the parent table fails. The cascade operation is recursive; if the dependent table has a primary key that is the parent table of a cascade foreign key, then the process is repeated for that set of data.
Insert Rule
The insert rule is a restrict rule. For each foreign key in the row being inserted, the foreign key value must be equivalent to a primary key value in the parent table. The parent table must contain a parent row for the foreign key in the row you are inserting; otherwise, the insertion fails. Zen causes the MicroKernel Engine to automatically enforce the insert rule on dependent tables.
Update Rule
The update rule is also a restrict rule. A foreign key value must be updated to an equivalent primary key value in the parent table. If the parent table does not contain a parent row for the foreign key value, the update fails.
You can explicitly specify the update rule as restrict when you define a foreign key on a table; however, Zen causes the MicroKernel Engine to enforce the rule by default if you do not specify it.
Delete Rule
You can explicitly specify the delete rule as either restrict or cascade when you define a foreign key. If you do not specify the delete rule explicitly, Zen assumes a default of restrict for the delete rule.
• If you specify restrict as the delete rule, Zen causes the MicroKernel Engine to check each row you attempt to delete from a parent table to see if that row is a parent row for a foreign key in another table. If it is a parent row, Zen returns a status code and does not delete the row. You must first delete all corresponding rows in the referenced table or tables before you can delete the parent row.
• If you specify cascade as the delete rule, Zen causes the MicroKernel Engine to check each row you attempt to delete from a parent table to see if that row is a parent row for a foreign key in another table. The MicroKernel Engine then checks the delete rule for each descendant of that table. If any descendant has restrict as the delete rule, the attempted deletion fails. If all descendants have cascade as the delete rule, Zen deletes all dependent rows on the reference path to the original parent table.
The following guidelines govern the delete rule for foreign keys:
• A cycle with two or more tables cannot be delete-connected to itself. Consequently, the delete rule for at least two of the dependent tables in the cycle must not be cascade.
• The last delete rule in all paths from one table to another must be the same.
• If the delete rule for the foreign key is cascade, then the table containing the foreign key may not have a delete trigger defined on it.
• If the table containing the foreign key has a delete trigger defined on it, then the delete rule must be restrict.
Zen enforces these guidelines on databases that have referential constraints defined. If you attempt to declare delete rules that violate these guidelines, Zen returns a status code to indicate an error occurred.
Zen enforces the delete rule guidelines to avoid certain anomalies that might otherwise occur when you delete dependent rows from tables. Following are examples of anomalies that might occur without these guidelines.
Anomaly on Delete-Connected Cycles
A cycle with two or more tables cannot be delete-connected to itself. Consequently, the delete rule for at least two of the dependent tables in the cycle must be restrict.
Assume you want to execute the following statement.
DELETE FROM Faculty
Because of the relationships between the Faculty and Department tables, deleting a row from Faculty first deletes a row from Faculty, then from Department, where the cascaded delete stops because of the restrict rule on the name of the department.
The results could be inconsistent, depending on the order in which Zen deletes rows from the Faculty table. If it attempts to delete the row in which the ID is 181831941, the delete operation fails. The restrict rule on the Department name prevents Zen from deleting the first row in the department table in which the primary key value equals Mathematics, since the second row in Faculty continues to reference this row's primary key.
If instead, Zen deletes the Faculty rows in which the primary keys equal 179321805 and 310082269 first (in either order), all the rows in Faculty and Department are deleted.
Since the result of the example DELETE statement is consistent, no rows are deleted.
Anomaly on Multiple Paths
Delete rules from multiple delete-connected paths must be the same. The following figure shows an example of an anomaly that might occur without this guideline. In the figure, the arrows point to the dependent tables. 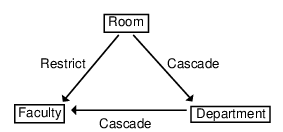
Faculty is delete-connected to Room through multiple delete-connected paths with different delete rules. Assume you want to execute the following statement.
DELETE FROM Room
WHERE Building_Name = 'Bhargava Building'
AND Number = 302;
WHERE Building_Name = 'Bhargava Building'
AND Number = 302;
The success of the operation depends on the order in which Zen accesses Faculty and Department to enforce their delete rules.
• If it accesses Faculty first, the delete operation fails because the delete rule for the relationship between Room and Faculty is restrict.
• If it accesses Department first, the delete operation succeeds, cascading to both Department and Faculty.
To avoid problems, Zen insures that the delete rules for both paths that lead to Faculty are the same.
Referential Integrity in the Sample Database
This section demonstrates the table and referential constraint definitions on the sample database.
Creating the Course Table
The following statement creates the Course table.
CREATE TABLE Course
(Name CHAR(7) CASE,
Description CHAR(50) CASE,
Credit_Hours USMALLINT,
Dept_Name CHAR(20))
(Name CHAR(7) CASE,
Description CHAR(50) CASE,
Credit_Hours USMALLINT,
Dept_Name CHAR(20))
Adding a Primary Key to Course
The following statement adds a primary key (Name) to the Course table.
ALTER TABLE Course
ADD PRIMARY KEY (Name);
ADD PRIMARY KEY (Name);
Creating the Student Table with Referential Constraints
The following statement creates the Student table and defines its referential constraints.
CREATE TABLE Student
(ID UBIGINT,
PRIMARY KEY (ID),
Cumulative_GPA NUMERICSTS(5,3),
Tuition_ID INTEGER,
Transfer_Credits NUMERICSA(4,0),
Major CHAR(20) CASE,
Minor CHAR(20) CASE,
Scholarship_Amount DECIMAL(10,2),
Cumulative_Hours INTEGER)
(ID UBIGINT,
PRIMARY KEY (ID),
Cumulative_GPA NUMERICSTS(5,3),
Tuition_ID INTEGER,
Transfer_Credits NUMERICSA(4,0),
Major CHAR(20) CASE,
Minor CHAR(20) CASE,
Scholarship_Amount DECIMAL(10,2),
Cumulative_Hours INTEGER)
CREATE UNIQUE INDEX Tuition_ID ON Student(ID)
ALTER TABLE Student ADD CONSTRAINT
S_Tuition
FOREIGN KEY (Tuition_ID)
REFERENCES Tuition
ON DELETE RESTRICT
S_Tuition
FOREIGN KEY (Tuition_ID)
REFERENCES Tuition
ON DELETE RESTRICT
Administering Database Security
Zen security capabilities allow you to protect data by limiting operations on data columns to particular users. These limits may range from allowing a user to see only certain columns in a table, to allowing them to see all the columns in a table, but not update them. Zen makes no assumptions about database authorization based on operating system rights and permissions. By default, all users accessing a database through Zen have complete read-write access to the data. You must enable and define database security to limit this access and protect the database from unauthorized update or access through Zen.
Zen security statements allow you to perform the following actions to limit access to your database:
• Enable security for the database.
• Identify users and groups of users and assign passwords to them.
• Grant rights to users and user groups.
• Revoke rights from users and user groups.
• Disable security for the database.
• Retrieve information about security defined for a database.
Understanding Database Rights
The following table shows the rights you can grant to users and user groups.
Right | Description |
|---|---|
Login | Allows a user to log in to a database. You assign this right when you create a user and a password. The Login right does not give users access to data, however. You must assign other rights to users before they can access data. You cannot assign the Login right to a user group. |
Create Table | Enables a user to create new table definitions. The user automatically has full access rights to the tables he or she creates at the time of creation, but the Master User can later revoke read, write, and alter rights for the table. The Create Table right is also referred to as a global right, because it applies to the entire data dictionary. |
Select | Allows a user to query tables for information. You can grant the Select right for specific columns or for a whole table. |
Update | Gives a user the right to update information in specified columns or tables. You can grant the Update right for specific columns or for a whole table. |
Insert | Allows a user to add new rows to tables. You can grant the Insert right only at the table level. |
Delete | Allows a user to delete information from tables. You can grant the Delete right only at the table level. |
Alter | Allows a user to change the definition of a table. You can grant the Alter right only at the table level. |
References | Allows a user to create foreign key references that refer to a table. The References right is necessary for defining referential constraints. |
All | Includes Select, Update, Insert, Delete, Alter, and References rights. |
You can assign certain types of rights over the whole database or for a particular database element. For example, when you assign the Update right to a user or user group, you can limit it to certain tables or to certain columns in tables. In contrast, when you assign the Create Table right to a user or user group, that user or user group has the Create Table right for the entire database. You cannot apply the Create Table right to a single table or column.
While the Create Table and Login rights apply to the entire database, all other rights apply to tables. In addition, you can apply Select and Update rights to individual columns in tables.
Establishing Database Security
The following nine steps describe the general procedure for establishing security for a database.
1. Log in to the database for which you want to establish security.
For more information about logging in to a database, see Zen User’s Guide.
2. Enable security for the database by creating the master user and specifying the master password with the SET SECURITY statement.
After you have enabled security as Master, the name of the master user is Master (case-sensitive), the password you specified when you enabled security becomes the master password (also case-sensitive). For more information, see Enabling Security.
3. Optional: Define a minimal set of rights for the PUBLIC group.
All users automatically belong to the PUBLIC group. For more information, see Granting Rights to the PUBLIC Group.
4. Optional: Create user groups with the CREATE GROUP statement.
You can create as many groups as you need for your system. However, a user can belong to only one group other than PUBLIC. For more information, see Creating User Groups.
5. Optional: Grant rights to each user group with the GRANT CREATETAB and GRANT (access rights) statements. For more information, see Granting Rights to User Groups.
6. Grant login privileges to users by specifying their user names and passwords with the GRANT LOGIN statement, and if you choose, assign each user to a user group. For more information, see Creating Users.
7. Grant rights to the users you have created who are not members of a user group using the GRANT CREATETAB and GRANT (access rights) statements. For more information, see Granting Rights to Users.
8. Optional: To protect your files from unauthorized Btrieve access, make the database a bound database. For more information about bound databases, see Understanding Database Rights.
Enabling Security
You can use a SET SECURITY statement to enable security. In response, Zen creates the master user, who has complete read-write access to the database. The password you specify with a SET SECURITY statement becomes the master password for the database.
The following example enables security for a database and specifies the password for the master user as Secure:
SET SECURITY = Secure;
Passwords are case-sensitive.
When you enable security, Zen creates the system tables X$User and X$Rights. Enabling security excludes all users except the master user from accessing the database until you explicitly create other users and grant them login rights.
Creating User Groups and Users
After you enable security, your database has one user (Master) and one user group (PUBLIC). To provide other users access to the database, log in to the database as the master user and create users by name and password. You can also organize the users in user groups.
User names are case-sensitive in Zen. Therefore, when you log in as the master user, you must specify the user name as Master.
Creating User Groups
To simplify security administration, you can organize users in user groups. You can create as many groups as you need, each with different rights and permissions, but each user in the database can belong to only one group. Once the user is in a group, that login inherits only the rights of that group plus the rights in the PUBLIC group, and any individual rights granted to that user are ignored. The rights of all users in a group are the same. To give a user unique rights, create a special group just for that user.
To create a user group, use a CREATE GROUP statement.
CREATE GROUP Accounting;
You can also create multiple user groups at once.
CREATE GROUP Accounting, Registrar, Payroll;
User group names are case-sensitive, cannot exceed 30 characters, and must be unique to the database. For more information about rules for naming user groups, see Advanced Operations Guide.
Creating Users
When you create a user for a database, Zen enters the corresponding user name and password into the database security tables. To create a user, use a GRANT LOGIN TO statement. The following example creates the user Cathy and assigns Passwd as her password.
GRANT LOGIN TO Cathy:Passwd;
Note: Zen stores passwords in encrypted form. Therefore, you cannot query the X$User table to view user passwords.
You can also assign a user to a user group when you create the user. For example, to assign the user Cathy to the Accounting group, use the following statement:
GRANT LOGIN TO Cathy : Passwd
IN GROUP Accounting;
IN GROUP Accounting;
User names and passwords are case-sensitive. See Identifier Restrictions in Advanced Operations Guide for permissible user name and password lengths and characters.
Granting Rights
This topic explains how to grant rights to user groups and individual users.
Granting Rights to the PUBLIC Group
All users automatically belong to the PUBLIC group, a special user group used to define the minimum set of rights for all users of a particular database. No user can have fewer rights than those assigned to the PUBLIC group. You cannot drop a user from the PUBLIC group, and you cannot revoke rights from a user if those rights are granted to the PUBLIC group.
By default, the PUBLIC group has no rights. To change the rights of the PUBLIC group, use a GRANT (access rights) statement. For example, the following statement allows all users of the sample database to query the Department, Course, and Class tables in the database:
GRANT SELECT ON Department, Course, Class
TO PUBLIC;
TO PUBLIC;
After granting rights to the PUBLIC group, you can create other groups to define higher levels of access. You can also give individual users additional rights that differ from any other user or group, provided the user is not part of a group.
Granting Rights to User Groups
You can assign rights to a user group and add user names and passwords to the group. Doing so eliminates assigning rights for each user individually. Also, security is easier to maintain if you assign security rights to groups, since you can change the rights of many users by granting new rights or revoking existing rights for an entire group at once.
To grant rights to a user group, use a GRANT (access rights) statement. For example, the following statement allows all users in the Accounting group to alter the Billing table definition in the sample database.
GRANT ALTER ON Billing TO Accounting;
Note: Remember that granting the Alter right implicitly grants the rights Select, Update, Insert, and Delete.
Granting Rights to Users
After you create a user, that user can log in to the database. However, the user cannot access data until you either place the user in a user group with rights or grant rights to the user.
To grant rights to a user, use a GRANT (access rights) statement. The following example allows the user John to insert rows into the billing table in the sample database.
GRANT INSERT ON Billing
TO John;
TO John;
Note: Granting the Insert right implicitly grants the rights Select, Update, and Delete.
Dropping Users and User Groups
To drop (delete) a user, use a REVOKE LOGIN statement.
REVOKE LOGIN FROM Bill;
This statement removes the user Bill from the data dictionary. After you drop a user, the user cannot access any tables in the database unless you disable security for the database.
You can also drop multiple users at once, as in the following example.
REVOKE LOGIN FROM Bill, Cathy, Susan;
To drop a user group, follow these steps:
1. Drop all users from the group, as in the following example:
REVOKE LOGIN FROM Cathy, John, Susan;
2. Use a DROP GROUP statement to drop the group. The following example drops the Accounting group:
DROP GROUP Accounting;
Revoking Rights
To revoke user rights, use the REVOKE statement. The following example revokes SELECT rights for user Ron from the Billing table of the sample database.
REVOKE SELECT
ON Billing
FROM Ron;
ON Billing
FROM Ron;
Disabling Security
To disable security for a database, follow these steps:
1. Log in to the database as the master user.
2. Issue a SET SECURITY statement, specifying the NULL keyword, as follows:
SET SECURITY = NULL;
When you disable security for a database, Zen removes the X$User and X$Rights system tables from the database and deletes the associated DDF files.
Note: You cannot disable security simply by deleting the USER.DDF and RIGHTS.DDF data dictionary files. If you delete these and try to access the database, Zen returns an error and denies access to the database.
Retrieving Information about Database Security
When you set up database security, Zen creates the system tables X$User and X$Rights. Because the system tables are part of the database, you can query them if you have the appropriate rights.
For a reference to the contents of each system table, see System Tables in SQL Engine Reference.
Concurrency Controls
The MicroKernel Engine and its automatic recovery functions handle the physical integrity of your database. Zen provides logical data integrity using the transaction and record-locking capabilities of the MicroKernel Engine. Zen, in conjunction with the MicroKernel Engine, provides the following types of concurrency controls:
• Isolation levels for transactions
• Explicit locks
• Passive control
Transaction Processing
Transaction processing lets you identify a set of logically related database modifications, either within a single table or across multiple tables, and require them to be completed as a unit. Transaction processing involves two important concepts:
• A logical unit of work, or transaction, is a set of discrete operations that must be treated as a single operation to ensure database integrity. If you make a mistake or encounter a problem during a transaction, you can issue a ROLLBACK WORK statement to undo the changes you have already made.
For example, the Registrar might credit a student account with an amount paid in one operation, then update the amount owed in a second operation. By grouping these operations together you ensure the student's finances are accurate.
• A locking unit is the amount of data from which other tasks are blocked until your transaction is complete. (A task is a Zen session.) Locking prevents other tasks from changing the data you are trying to change. If other tasks can also change the data, Zen cannot roll back work to a previously consistent state. Thus, within a transaction, only one task may access a given locking unit at a time. However, multiple cursors that belong to the same task can access the locking unit at the same time.
The START TRANSACTION statement begins a transaction. When you have issued all the statements you want to complete during the transaction, issue a COMMIT WORK statement to end the transaction. The COMMIT WORK statement saves all your changes, making them permanent.
Note: START TRANSACTION and COMMIT WORK are only supported in stored procedures. For more information on these two SQL statements, see SQL Engine Reference.
If an error occurs in one of the operations, you can roll back the transaction and then retry it again after correcting the error. For example, if you need to make related updates to several tables, but one of the updates is unsuccessful, you can roll back the updates you have already made so the data is not inconsistent.
Zen automatically performs the rollback operation if two tasks are sharing a login session and the task that originated the session logs out before the second task completes its transition.
Starting and Ending Transactions
To begin a transaction, issue a START TRANSACTION statement in a stored procedure. After issuing all the statements you want to complete during the transaction, issue a COMMIT WORK statement to save all your changes and end the transaction.
START TRANSACTION;
UPDATE Billing B
SET Amount_Owed = Amount_Owed - Amount_Paid
WHERE Student_ID IN
(SELECT DISTINCT E.Student_ID
FROM Enrolls E, Billing B
WHERE E.Student_ID = B.Student_ID);
COMMIT WORK;
For more information about the START TRANSACTION statement, see SQL Engine Reference.
Using Savepoints to Nest Transactions
In a SQL transaction, you can define additional markers called savepoints. Using savepoints, you can undo changes after a savepoint in a transaction and continue with additional changes before requesting the final commit or abort of the entire transaction.
To begin a transaction, use the START TRANSACTION statement. The transaction remains active until you issue a ROLLBACK or COMMIT WORK statement.
To establish a savepoint, use the SAVEPOINT statement.
SAVEPOINT SP1;
To rollback to a savepoint, use the ROLLBACK TO SAVEPOINT statement.
ROLLBACK TO SAVEPOINT SP1;
The savepoint name must specify a currently active savepoint in the current SQL transaction. Any changes made after establishing this savepoint are cancelled.
To delete a savepoint, use the RELEASE SAVEPOINT statement.
RELEASE SAVEPOINT SP1;
You can only use this statement if a SQL transaction is active.
If you issue a COMMIT WORK statement, all savepoints defined by the current SQL transaction are destroyed, and your transaction is committed.
Note: Do not confuse ROLLBACK TO SAVEPOINT with ROLLBACK WORK. The former cancels work only to the indicated savepoint, while the latter cancels the entire outermost transaction and all savepoints established within it.
Savepoints provide a way to nest your transactions, thereby allowing the application to preserve the previous work in the transaction while it waits for a sequence of statements to complete successfully. As an example, you can use a WHILE loop for this purpose. You can set a savepoint before beginning a sequence of statements that may fail on the first attempt. Before your transaction can proceed, this sub-transaction must complete successfully. If it fails, the sub-transaction rolls back to the savepoint, where it can start again. When the sub-transaction succeeds, the rest of the transaction can continue.
A SQL transaction must be active when you issue a SAVEPOINT statement.
Note: The MicroKernel allows each transaction a total of 255 internal nesting levels. However, Zen uses some of these levels internally to enforce atomicity on INSERT, UPDATE, and DELETE statements. Therefore, a session can effectively define no more than 253 savepoints to be active at one time. This limit may be further reduced by triggers that contain additional INSERT, UPDATE, or DELETE statements. If your operation reaches this limit, you must reduce the number of savepoints or the number of atomic statements contained within it.
Work that is rolled back within a savepoint cannot be committed even if the outer transaction(s) completes successfully. However, work that is completed within a savepoint must be committed by the outermost transaction before it is physically committed to the database.
For example, in the sample database you might start a transaction to register a student for several classes. You may successfully enroll the student in the first two classes, but this may fail on the third class because it is full or it conflicts with another class for which the student has enrolled. Even though you failed to enroll the student in this class, you don’t want to undo the student's enrollment for the previous two classes.
The following stored procedure enrolls a student into a class by first establishing a savepoint, SP1, then inserting a record into the Enrolls table. It then determines the current enrollment for the class and compares this to the maximum size for the class. If the comparison fails, it rolls back to SP1; if it succeeds, it releases savepoint SP1.
CREATE PROCEDURE Enroll_student( IN :student ubigint, IN :classnum integer);
BEGIN
DECLARE :CurrentEnrollment INTEGER;
DECLARE :MaxEnrollment INTEGER;
SAVEPOINT SP1;
INSERT INTO Enrolls VALUES (:student, :classnum, 0.0);
SELECT COUNT(*) INTO :CurrentEnrollment FROM Enrolls WHERE class_id = :classnum;
SELECT Max_size INTO :MaxEnrollment FROM Class WHERE ID = :classnum;
IF :CurrentEnrollment >= :MaxEnrollment
THEN
ROLLBACK to SAVEPOINT SP1;
ELSE
RELEASE SAVEPOINT SP1;
END IF;
END;
Note: When working at the SQL level, transactions are controlled in different ways depending on the interface. For ODBC, transactions are controlled through the use of SQL_AUTOCOMMIT option of the SQLSetConnectOption API, in conjunction with the SQLTransact API.
For more information about the syntax of any of these statements, see the topics for these statements in SQL Engine Reference.
Special Considerations
Transactions do not affect the following operations:
• Operations that create or change dictionary definitions. Therefore, you cannot roll back the results of the following statements: ALTER TABLE, CREATE GROUP, CREATE INDEX, CREATE PROCEDURE, CREATE TABLE, CREATE TRIGGER, and CREATE VIEW.
• Operations that remove dictionary definitions. Therefore, you cannot roll back the results of the following statements: DROP DICTIONARY, DROP GROUP, DROP INDEX, DROP PROCEDURE, DROP TABLE, DROP TRIGGER, and DROP VIEW.
• Operations that grant or revoke security rights. Therefore, you cannot roll back the results of the following statements: CREATE GROUP, DROP GROUP, GRANT (access rights), GRANT CREATETAB, GRANT LOGIN, REVOKE (access rights), REVOKE CREATETAB, and REVOKE LOGIN.
If you attempt any of these operations within a transaction and Zen completes the statement, then you cannot roll back the results.
You cannot alter or drop a table (in other words, change its dictionary definition) during a transaction if you have previously referred to that table during the transaction. For example, if you start a transaction, insert a record into the Student table, and then try to alter the Student table, the ALTER statement fails. You must commit the work from this transaction, and then alter the table.
Isolation Levels
An isolation level determines the scope of a transaction locking unit by allowing you to define the extent to which a transaction is isolated from other users, who may also be in a transaction. When you use isolation levels, Zen automatically locks pages or tables according to the isolation level you specify. These automatic locks, which Zen controls internally, are called implicit locks, or transaction locks. Locks that an application specifies explicitly are called explicit locks, formerly record locks.
Zen offers two isolation levels for your transactions :
• Exclusive (locks the entire data file you are accessing). Corresponds to the ODBC isolation level SQL_TXN_SERIALIZABLE
• Cursor stability (locks either the row or page you are accessing). Corresponds to the ODBC isolation level SQL_TXN_READ_COMMITTED
You set the isolation level using the ODBC API SQLSetConnectOption.
Exclusive Isolation Level (SQL_TXN_SERIALIZABLE)
When you use the exclusive isolation level, the locking unit is an entire data file. Once you access a file or files within an exclusive transaction, those files are locked from any similar access by any other user in a transaction. This type of locking is most effective when few applications attempt to access the same tables at the same time, or when large parts of the file must be locked in the course of a transaction.
Zen releases the lock on the file or files when you end the transaction. When you access a table during an exclusive transaction, the following conditions take effect:
• Other tasks that are in a transaction cannot read, update, delete, or insert rows in that table until you end the transaction.
• Other tasks that are not in a transaction can read rows in the table, but they cannot update, delete, or insert rows.
• Multiple cursors within the same task can read any row in the table. However, when you perform an update, delete, or insert operation with a particular cursor, Zen locks the entire data file for that cursor.
When you access tables through a joined view using the exclusive isolation level, Zen locks all the accessed data files in the view.
Cursor Stability Isolation Level (SQL_TXN_READ_COMMITTED)
The MicroKernel Engine maintains data files as a set of data pages and index pages. When you use the cursor stability isolation level, the locking unit is a data page or index page instead of a data file. When you read records within a cursor stability transaction, Zen locks the data pages that contain those records for possible update, but allows concurrent access to a table by multiple tasks within transactions. These read locks are released only when you read another set of records. Zen supports set level cursor stability since it allows an application to fetch multiple records at a time.
In addition, any data modifications you make to the data or index pages cause those records to remain locked for the duration of the transaction, even if you issue subsequent reads. Other users in a transaction cannot access these locked records until you commit or roll back your work. However, other applications can lock other pages from the same files within their own transactions.
When you access a file during a cursor stability transaction, Zen locks data and index pages as follows:
• You read a row, but you do not update it or delete it. Zen locks the data page for that row until your next read operation or until you end the transaction.
• You update a non-index column in a row, delete a row from a table that does not contain indexes, or insert a new row into a table that does not contain indexes. Zen locks the data page for that row for the remainder of the transaction, regardless of subsequent read operations.
• You update an indexed column in a row, delete a row from a table that contains indexes, or insert a new row into a table that contains indexes. Zen locks the affected index page(s), as well as the data page, for the remainder of the transaction, regardless of subsequent read operations.
Cursor stability ensures that the data you read remains stable, while still allowing other users access to other data pages within the same data files. Within the cursor stability isolation level, you can generally achieve greater concurrency for all tasks by limiting the number of rows you read at one time, thereby locking fewer data pages at a time. This allows other network users access to more pages of the data file, since you do not have them locked.
However, if your application is scanning or updating large numbers of rows, you increase the possibility of completely locking other users out of the affected tables. Therefore, it is best to use cursor stability for reading, writing, and committing small transactions.
Cursor stability does not lock records within a subquery. Cursor stability does not guarantee that the conditions under which a row is returned do not change, only that the actual row returned does not change.
Transactions and Isolation Levels
Whenever you access data within a transaction, Zen locks the accessed pages or files for that application. No other application can write to the locked data pages or files until the locks are released.
Using the cursor stability isolation level, when you access tables through a joined view, Zen locks all the accessed pages for all the tables in the view. Using the exclusive isolation level, when you access tables through a joined view, Zen locks all the accessed tables in the view.
Zen performs no-wait transactions. If you try to access a record that another task has locked within a transaction, Zen informs you that the page or table is locked or that a deadlock has been detected. In either case, roll back your transaction and begin again. Zen allows multiple cursors in the same application to access the same data file.
The following steps illustrate how two applications interact while accessing the same tables within a transaction. The steps are numbered to indicate the order in which they occur.
Task 1 | Task 2 |
1. Activate the view. | |
2. Activate the view. | |
3. Begin a transaction. | |
4. Begin a transaction. | |
5. Fetch records. | |
6. Attempt to fetch records from the same data files. | |
7. Receive status code 84 (Record or Page Locked) if both tasks are using cursor stability and Task 2 attempts to fetch the same records that Task 1 has already locked, or receive 85 (File Locked) if one of the tasks is using an exclusive transaction. | |
8. Retry the fetch if needed. | |
9. Update the records. | |
10. End the transaction. | |
11. The fetch is successful. | |
12. Update the records. | |
13. End the transaction. |
Since a transaction temporarily locks records, pages, or tables against updates by other applications, an application should not pause for operator input during a transaction. This is because no other application can update the records, pages, or tables accessed in the transaction until the operator responds and the transaction is terminated.
Note: Reading records within a cursor stability transaction does not guarantee that a subsequent update succeeds without conflict. This is because another application may have already locked the index page that Zen needs to complete the update.
Avoiding Deadlock Conditions
A deadlock condition occurs when two applications are retrying operations on tables, data pages, index pages, or records that the other one has already locked. To minimize the occurrence of deadlock situations, have your application commit its transactions frequently. Do not attempt to retry the operation from your application; Zen attempts a reasonable number of retries before returning an error.
Deadlock Conditions under Exclusive Isolation Level
When you use the exclusive isolation level, Zen locks the entire data file against updates by other applications; thus, it is possible for a deadlock to occur if your applications do not access data files in the same order, as shown in the following table.
Task 1 | Task 2 |
1. Begin a transaction. | |
2. Begin a transaction. | |
3. Fetch from File 1. | |
4. Fetch from File 2. | |
5. Fetch from File 2. | |
6. Receive lock status. | |
7. Retry Step 5. | |
8. Fetch from File 1. | |
9. Receive lock status. | |
10. Retry Step 8. |
Deadlock Conditions under Cursor Stability Isolation Level
When you use the cursor stability isolation level, other applications can read and update records or pages in the file you are accessing (records or pages that your application has not locked).
Passive Control
If your application performs single record fetch and update sequences that are not logically connected, you can use the Zen passive method of concurrency. Using this method, you can fetch and update (or delete) records without performing transactions or record locks. These operations are referred to as optimistic updates and deletes.
By default, if your task does not use transactions or explicit record locks to complete update and delete operations, your task cannot overwrite another task's changes. The feature that ensures this data integrity is passive control, sometimes referred to as optimistic concurrency control. With passive control, your task does not perform any type of locking. If another task modifies a record after you originally fetched it, you must fetch the record again before you can perform an update or delete operation.
Under passive control, if another application updates or deletes a record between the time you fetch it and the time you issue an update or remove operation, your application receives a conflict status. This indicates that another application has modified the data since you originally fetched it. When you receive a conflict status, you must fetch the record again before you can perform the update or remove operation.
Passive control allows an application that was designed for a single-user system to run on a network without implementing lock calls. However, passive control is effective only when an application is operating in a lightly used network environment or on files in which the data is fairly static. In a heavily used environment or on files that contain volatile data, passive control may be ineffective.
Atomicity in Zen Databases
The principle of atomicity states that if a given statement does not execute to completion, then it should not leave partial or ambiguous effects in the database. For example, if a statement fails after it has inserted three out of five records but does not undo that insert, then the database is not in a consistent state when you retry the operation. If the statement is atomic and it fails to complete execution, then all changes are rolled back, so that the database is in a consistent state. In this example, if all five records are not successfully inserted, then none of them are inserted.
The atomicity rule is especially significant for statements that modify multiple records or tables. It also makes retrying failed operations simpler, because any previous attempt is guaranteed not to have left any partial effects.
Zen enforces atomicity in two ways:
1. Any UPDATE, INSERT, or DELETE statement is defined to be atomic. Zen guarantees that, if a multirecord or multitable modification operation fails, none of the effects of that modification remain in the database.
This is true for update, insert, or delete operations whether or not they are performed inside or outside of procedures.
2. You may specify stored procedures as ATOMIC when you create them. Such procedures apply the rule of atomicity to their entire execution. Therefore, not only do UPDATE, INSERT, or DELETE statements within an ATOMIC procedure execute atomically, but if any other statements within that procedure fail, all effects of the procedure's execution thus far are rolled back.
Transaction Control in Procedures
Because triggers are always initiated by an external data change statement (INSERT, DELETE, or UPDATE), and all data change statements are defined to be atomic, the following statement are not allowed in triggers or in any procedures invoked by triggers:
• START TRANSACTION
• COMMIT WORK
• ROLLBACK WORK (including RELEASE SAVEPOINT and ROLLBACK TO SAVEPOINT)
In other words, triggers follow the same rules as ATOMIC compound statements.
No user-initiated COMMIT WORK, ROLLBACK WORK, RELEASE SAVEPOINT, or ROLLBACK TO SAVEPOINT statement can cause a system-begun transaction (for purposes of atomicity) to end.
Last modified date: 10/31/2023