SQL Syntax Reference
This section covers SQL syntax supported by Zen.
The following topics cover the SQL grammar supported by Zen:
Literal Values
Zen supports the standard literal formats. This topic provides some of the most common examples.
String Values
String constants may be expressed in SQL statements by surrounding the given string of characters with single quotes. If the string itself contains a single-quote or apostrophe, the character must be preceded by another single-quote.
String literals have type VARCHAR. Characters are encoded using the database code page. If the literal is preceded by the letter N, the literal has type NVARCHAR and characters are encoded using UCS-2. A literal embedded in a SQL query string may go through additional encoding conversions in the SQL access methods before final conversion in the SQL engine. In particular, if the SQL text is converted to an encoding that does not support all Unicode characters, characters in the SQL text may be lost before the engine converts the string literal to NVARCHAR.
Examples
In the first example, the apostrophe or single quotation mark contained within the string must be escaped by another single quotation mark.
SELECT * FROM t1 WHERE c1 = 'Roberta''s Restaurant'
SELECT STREET FROM address WHERE city LIKE 'san%'
Number Values
Date Values
Date constants may be expressed in SQL statements as a character string or embedded in a vendor string. The first case is treated as data type CHAR and the vendor string representation is treated as a value of type DATE. This distinction becomes important when conversions are attempted.
Zen partially supports extended SQL grammar as outlined in this function.
Zen supports the date literal format 'YYYY-MM-DD'.
Dates may be in the range of year 0 to 9999.
Examples
The next two statements return all the classes whose start date is after 1995-06-05.
SELECT * FROM Class WHERE Start_Date > '1995-06-05'
SELECT * FROM Class WHERE Start_Date > {d '1995-06-05'}
Time Values
Zen supports the time literal format 'HH:MM:SS'.
Time constants may be expressed in SQL statements as a character string or embedded in a vendor string. Character string representation is treated as a string of type CHAR and the vendor string representation as a value of type TIME.
Zen partially supports extended SQL grammar as outlined in this function.
Examples
The following two statements retrieve records from the Class table where the class start time is 14:00:00:
SELECT * FROM Class WHERE Start_time = '14:00:00'
SELECT * FROM Class WHERE Start_time = {t '14:00:00'}
Time Stamp Values
Time stamp constants may be expressed in SQL statements as a character string or embedded in a vendor string. Zen treats the character string representation as a string of type CHAR and the vendor string representation as a value of type SQL_TIMESTAMP.
Zen supports the time stamp literal format 'YYYY-MM-DD HH:MM:SS.MMM'
Examples
The next two statements retrieve records from the Billing table where the start day and time for the log is 1996-03-28 at 17:40:49.
SELECT * FROM Billing WHERE log = '1996-03-28 17:40:49'
SELECT * FROM Billing WHERE log = {ts '1996-03-28 17:40:49'}
SQL Grammar in Zen
The following topics cover the SQL grammar supported by Zen. Statements and keywords are listed in alphabetical order.
Note: You can use the SQL Editor in with Zen Control Center to test most of the SQL examples. Exceptions are noted in the discussion of the grammar elements. For more information, see SQL Editor in Zen User’s Guide.
Note: Most popular SQL editors do not use statement delimiters to execute multiple statements. However, SQL Editor in ZenCC requires them. If you wish to execute the examples in other environments, you may need to remove the pound sign or semicolon separators.
ADD
Remarks
Use the ADD clause within the ALTER TABLE statement to specify one or more column definitions, column constraints, or table constraints to be added.
See Also
ALL
Remarks
When you specify the ALL keyword before a subquery, Zen performs the subquery and uses the result to evaluate the condition in the outer query. If all the rows returned by the subquery meet the outer query condition for a particular row, then Zen includes that row in the final result table generated by the statement.
Generally, you can use the EXISTS or NOT EXISTS keyword instead of ALL.
Examples
The following SELECT statement compares the ID column from the Person table to the ID columns in the result table of the subquery:
SELECT p.ID, p.Last_Name
FROM Person p
WHERE p.ID <> ALL
(SELECT f.ID FROM Faculty f WHERE f.Dept_Name = 'Chemistry')
If the ID value from Person does not equal any of the ID values in the subquery result table, Zen includes the row from Person in the final result table of the statement.
See Also
ALTER (rename)
The ALTER (rename) statement allows you to change the name of indexes, user-defined functions, stored procedures, tables, triggers, or views.
Syntax
ALTER object-type RENAME qualified-object-name TO new-object-name
object-type ::= INDEX
| FUNCTION
| PROCEDURE
| TABLE
| TRIGGER
| VIEW
qualified-object-name ::= database-name.table-name.object-name
| database-name.object-name
| table-name.object-name
| object-name
database-name, table-name, object-name, new-object-name ::= user-defined name
Remarks
You cannot rename the following objects if they were created with Zen versions before PSQL v9:
• Stored procedures
• Triggers
• Views
In these earlier releases, the system table index on the name of these objects was created as not modifiable. The indexes for these objects became modifiable in PSQL v9.
You can use database-name to qualify any object-type. However, if it is used to qualify an INDEX or TRIGGER object, you must also include table-name. You can use table-name to qualify only the objects INDEX and TRIGGER.
The ALTER statement can rename an object in a database. You must use database-name to qualify object-type if the object resides in a database to which your session is not currently connected. The renamed object occurs in the same database as database-name.
If you omit database-name as a qualifier, the database to which your session is currently connected is used to identify and rename the objects.
Note that new-object-name never uses a database name as a qualifier. The context of the new name always matches the context of the original name.
Note: The database engine does not check dependencies for renamed objects. Be sure that all objects with a dependency on the previous name are revised as needed. For example, if a trigger refers to a table named t1 and you rename table t1 to t5, the trigger now contains invalid SQL that will fail.
You can also use the psp_rename system stored procedure to rename objects.
Examples
The following statement alters the name of index suplid to vendor_id in the database to which your session is currently connected. The index applies to table region5.
ALTER INDEX RENAME region5.suplid TO vendor_id
The following statement alters the name of the user-defined function calbrned to caloriesburned in database foodforlife.
ALTER FUNCTION RENAME foodforlife.calbrned TO caloriesburned
The following statement alters the name of stored procedure checkstatus to isEligible in database international.
ALTER PROCEDURE RENAME international.checkstatus TO isEligible
The following statement alters the name of table payouts to accts_payable in the database to which your session is currently connected.
ALTER TABLE RENAME payouts TO accts_payable
The following statement alters the name of trigger testtrig3 to new_customer in table domestic and database electronics.
ALTER TRIGGER RENAME electronics.domestic.testtrig3 TO new_customer
The following statement alters the name of view suplrcds to vendor_codes in the database to which your session is currently connected.
ALTER VIEW RENAME suplrcds TO vendor_codes
See Also
ALTER GROUP
The ALTER GROUP statement adds or removes a user account from a group.
Syntax
ALTER GROUP group-name
<ADD USER user-name [ , user-name ]...
| DROP USER user-name [ , user-name ]...>
Remarks
Only the Master user can execute this statement.
This statement must be used with one of the two available keywords.
A user account cannot be added to a group if the group is not already created in the database. To create users and add them to groups simultaneously, see GRANT.
Dropping a user account from a group does not remove the group from the database.
User accounts cannot belong to multiple groups simultaneously. A user account cannot be added to a group if it is currently a member of another group. Such a user account must first be dropped from its current group and then added to another group.
A user name must be enclosed in double quotes if it contains spaces or other nonalphanumeric characters.
For further general information about users and groups, see Master User and Users and Groups in Advanced Operations Guide, and Assigning Permissions Tasks in Zen User’s Guide.
Examples
The following examples show how to add a user account to a group:
ALTER GROUP developers ADD USER pgranger
The existing user account pgranger is added to the existing group developers.
============
ALTER GROUP developers ADD USER "polly granger"
The user account polly granger (containing nonalphanumeric characters) is added to the group developers.
============
ALTER GROUP developers ADD USER "polly granger", bflat
The user accounts polly granger (containing nonalphanumeric characters) and bflat are added to the group developers.
============
The following examples show how to drop a user account from a group.
ALTER GROUP developers DROP USER pgranger
The user account pgranger is removed from the group developers.
============
ALTER GROUP developers DROP USER "polly granger"
The user account polly granger (with a name containing nonalphanumeric characters) is removed from the group developers.
============
ALTER GROUP developers DROP USER "polly granger", bflat
The user accounts polly granger (containing nonalphanumeric characters) and bflat are removed from the group developers.
See Also
ALTER TABLE
The ALTER TABLE statement modifies a table definition. Note that using ALTER TABLE to modify a column does not add to its existing definition, but rather replaces that definition with a new one.
Syntax
ALTER TABLE table-name [ IN DICTIONARY ]
[ USING 'path_name'] [ WITH REPLACE ] alter-options
table-name ::= user-defined name
path_name ::= a simple file name or relative path and file name
alter-options ::= alter-option-list1 | alter-option-list2
alter-option-list1 ::= alter-option |(alter-option [, alter-option ]...)
| ADD table-constraint-definition
| ALTER [ COLUMN ] column-definition
| DROP [ COLUMN ] column-name
| DROP CONSTRAINT constraint-name
| MODIFY [ COLUMN ] column-definition
alter-option-list2 ::= PSQL_MOVE [ COLUMN ] column-name TO [ [ PSQL_PHYSICAL ] PSQL_POSITION ] new-column-position | RENAME COLUMN column-name TO new-column-name
column-definition ::= column-name data-type [ DEFAULT default-value-expression ] [ column-constraint [ column-constraint ]... [CASE (string) | COLLATE collation-name ]
column-name ::= user-defined name
new-column-position ::= new ordinal position (a positive integer value). The value must be greater than zero and less than or equal to the total number of columns in the table.
new-column-name ::= user-defined name
precision ::= integer
scale ::= integer
default-value-expression ::= default-value-expression + default-value-expression
| default-value-expression - default-value-expression
| default-value-expression * default-value-expression
| default-value-expression / default-value-expression
| default-value-expression & default-value-expression
| default-value-expression | default-value-expression
| default-value-expression ^ default-value-expression
| ( default-value-expression )
| -default-value-expression
| +default-value-expression
| ~default-value-expression
| ?
| literal
| scalar-function
| { fn scalar-function }
| USER
| NULL
default-literal ::= 'string' | N'string'
| number
| { d 'date-literal' }
| { t 'time-literal' }
| { ts 'timestamp-literal' }
default-scalar-function ::= USER()
| NULL()
| NOW()
column-constraint ::= [ CONSTRAINT constraint-name ] col-constraint
constraint-name ::= user-defined-name
col-constraint ::= NOT NULL
| NOT MODIFIABLE
| UNIQUE
| REFERENCES table-name [ ( column-name ) ] [ referential-actions ]
referential-actions ::= referential-update-action [ referential-delete-action ]
| referential-delete-action [ referential-update-action ]
collation-name ::= 'string'
table-constraint-definition ::= [ CONSTRAINT constraint-name ] table-constraint
REFERENCES table-name
[ ( column-name [ , column-name ]... ) ]
[ referential-actions ]
Remarks
See CREATE TABLE for information pertaining to primary and foreign keys and referential integrity.
Conversions between CHAR, VARCHAR, or LONGVARCHAR and NCHAR, NVARCHAR, or NLONGVARCHAR assume that CHAR values are encoded using the database code page. A column of type LONGVARCHAR cannot be altered to type NLONGVARCHAR nor NLONGVARCHAR to LONGVARCHAR.
ALTER TABLE requires an exclusive lock on a table. If the same table is being held open with another statement, ALTER TABLE fails and returns status code 88. Ensure that you execute all data definition statements before executing data manipulation statements. For an example showing this, see PSQL_MOVE.
An ALTER TABLE statement with the SYSDATA_KEY_2 keyword automatically changes the file to version 13.0 if it is not already in that format. It then adds system data v2, which enables the sys$create and sys$update virtual columns for use in queries. For more information, see Accessing System Data v2.
Use of IN DICTIONARY with the SYSDATA_KEY_2 keyword causes the ALTER TABLE statement to ignore SYSDATA_KEY_2, and the sys$create and sys$update virtual columns are not available for the table.
IN DICTIONARY
The purpose of using this keyword is to notify the database engine that you wish to make modifications to the DDFs, while leaving the underlying physical data unchanged. IN DICTIONARY is a powerful feature for advanced users. It should only be used by system administrators, and only when absolutely necessary. Normally, Zen keeps DDFs and data files totally synchronized, but this feature allows users the flexibility to force table dictionary definitions to match an existing data file. This can be useful when you want to create a definition in the dictionary to match an existing data file, or when you want to use a USING clause to change the data file path name for a table.
You cannot use IN DICTIONARY on a bound database.
IN DICTIONARY is allowed on CREATE and DROP TABLE, in addition to ALTER TABLE. IN DICTIONARY affects dictionary entries only, no matter what CREATE/ALTER options are specified. Since Zen allows multiple options (any combination of ADD, DROP, ADD CONSTRAINT, and so on), IN DICTIONARY is honored under all circumstances to guarantee only the DDFs are affected by the schema changes.
The error "Table not found" results if you query a detached table or a table that does not exist. If you determine that a table exists but you receive the "Table not found" error, the error resulted because the data file could not be opened. This indicates a detached table. (Tables that exist in the DDFs only (the data file does not exist) are called detached entries. These tables are inaccessible via queries or other operations that attempt to open the physical underlying file.)
You can verify whether a table really exists by using the catalog functions (see System Catalog Functions) or by directly querying the Xf$Name column of X$File:
SELECT * FROM X$File WHERE Xf$Name = 'table_name'
The SELECT statement returns the Xf$Loc value, which is the name of the physical file for the table. Combine the name with a data path defined for the database to get the complete path to the file.
It is possible for a detached table to cause confusion, so the IN DICTIONARY feature must be used with extreme care. It is crucial that it should be used to force table definitions to match physical files, not to detach them. Consider the following examples, assuming that the file test123.btr does not exist. (USING is explained below, in the next subtopic.)
CREATE TABLE t1 USING 't1.btr' (c1 INT)
ALTER TABLE t1 IN DICTIONARY USING 'test123.btr'
Or, combining both statements:
CREATE TABLE t1 IN DICTIONARY USING 'test123.btr' (c1 INT)
If you then attempt to SELECT from t1, you receive an error that the table was not found. Confusion can arise, because you just created the table – how can it not be found? Likewise, if you attempt to DROP the table without specifying IN DICTIONARY, you receive the same error. These errors are generated because there is no data file associated with the table.
Whenever you create a relational index definition for an existing Btrieve data file (for example, by issuing an ALTER TABLE statement to add a column definition of type IDENTITY), Zen automatically checks the Btrieve indexes defined on the file to determine whether an existing Btrieve index offers the set of parameters requested by the relational index definition. If an existing Btrieve index matches the new definition being created, then an association is created between the relational index definition and the existing Btrieve index. If there is no match, then Zen creates a new index definition and, if IN DICTIONARY is not specified, a new index in the data file.
USING
The USING keyword allows you to associate a CREATE TABLE or ALTER TABLE action with a particular data file.
Because Zen requires a named database to connect, the path name provided must always be a simple file name or relative path and file name. Paths are always relative to the first data path specified for the named database to which you are connected.
The path and file name passed are partially validated when the statement is prepared.
The following rules must be followed when specifying the path name:
• The text must be enclosed in single quotation marks, as shown in the grammar definition.
• Text must be 1 to 64 characters in length for V1 metadata and 1 to 250 characters for V2 metadata, and is stored in Xf$Loc in X$File. The entry is stored exactly as typed (trailing spaces are truncated and ignored).
• The path must be a simple, relative path. Paths that reference a server or volume are not allowed.
• Relative paths are allowed to contain a period ('.' - current directory), double period ('..' - parent directory), slash '\', or any combination of the three. The path must contain a file name representing the SQL table name (path_name cannot end in a slash '\' or a directory name). When you create a file with CREATE or ALTER TABLE, all file names, including those specified with relative paths, are relative to the first Data Path as defined in the Named Database configuration. (If you use IN DICTIONARY, the file name does not have to relative to the first data location.)
• Root-based relative paths are allowed. For example, assuming that the first data path is D:\mydata\demodata, Zen interprets the path name in the following statement as D:\temp\test123.btr.
CREATE TABLE t1 USING '\temp\test123.btr' (c1 int)
• Slash ('\') characters in relative paths may be specified either Linux style ('/') or in the customary backslash notation ('\'), depending on your preference. You may use a mixture of the two types, if desired. This is a convenience feature since you may know the directory structure scheme, but not necessarily know (or care) what type of server you are connected to. The path is stored in X$File exactly as typed. Zen engine converts the slash characters to the appropriate platform type when utilizing the path to open the file. Also, since data files share binary compatibility between all supported platforms, this means that as long as the directory structure is the same between platforms (and path-based file names are specified as relative paths), the database files and DDFs can be moved from one platform to another with no modifications. This makes for a much simpler cross-platform deployment with a standardized database schema.
• If specifying a relative path, the directory structure in the USING clause must first exist. Zen does not create directories to satisfy the path specified in the USING clause.
Include a USING clause to specify the physical location and name of an existing data file to associate with an existing table. A USING clause also allows you to create a new data file at a particular location using an existing dictionary definition. (The string supplied in the USING clause is stored in the Xf$Loc column of the dictionary file X$File.) The original data file must be available when you create the new file since some of the file information must be obtained from the original.
In the Demodata sample database, the Person table is associated with the file PERSON.MKD. If you create a new file named PERSON2.MKD, the statement in the following example changes the dictionary definition of the Person table so that the table is associated with the new file.
ALTER TABLE Person IN DICTIONARY USING 'person2.mkd'
You must use either a simple file name or a relative path in the USING clause. If you specify a relative path, Zen interprets it relative to the first data file path associated with the database name.
The USING clause can be specified in addition to any other standard ALTER TABLE option. This means columns can be manipulated in the same statement that specifies the USING path.
If you specify a data file name that differs from the data file name currently used to store the table data and you do not specify IN DICTIONARY, Zen creates the new file and copies all of the data from the existing file into the new file. For example, suppose person.mkd is the current data file that holds the data for table Person. You then alter table Person using data file person2.mkd, as shown in the statement above. The contents of person.mkd are copied into person2.mkd. Person2.mkd then becomes the data file associated with table Person and database operations affect person2.mkd. Person.mkd is not deleted, but it is not associated with the database any more.
The reason for copying the data is because Zen allows all other ALTER TABLE options at the same time as USING. The new data file created needs to be fully populated with data from the existing table. The file structure is not simply copied, but instead the entire contents are moved over, similar to a Btrieve BUTIL -CREATE and BUTIL -COPY. This can be helpful for rebuilding a SQL table, or compressing a file that once contained a large number of records but now contains only a few.
Note: ALTER TABLE USING copies the contents of the existing data file into the newly specified data file, leaving the old data file intact but unlinked.
WITH REPLACE
Whenever WITH REPLACE is specified with USING, Zen automatically overwrites any existing file name with the specified file name. The file is always overwritten as long as the operating system allows it.
WITH REPLACE affects only the data file and not the DDFs.
The following rules apply when using WITH REPLACE:
• WITH REPLACE can only be used with USING.
• When used with IN DICTIONARY, WITH REPLACE is ignored because IN DICTIONARY specifies that only the DDFs are affected.
Note: No data is lost or discarded if WITH REPLACE is used with ALTER TABLE. The newly created data file, even if overwriting an existing file, still contains all data from the previous file. You cannot lose data by issuing an ALTER TABLE command.
Include WITH REPLACE in a USING clause to instruct Zen to replace an existing file (the file must reside at the location you specified in the USING clause). If you include WITH REPLACE, Zen creates a new file and copies all the data from the existing file into it. If you do not include WITH REPLACE and a file exists at the specified location, Zen returns a status code and does not create the new file. The status code is error -4940.
MODIFY COLUMN and ALTER COLUMN
The ability to modify the nullability or data type of a column is subject to the following restrictions:
• The target column cannot have a PRIMARY/FOREIGN KEY constraint defined on it.
• If converting the old type to the new type causes an overflow (arithmetic or size), the ALTER TABLE operation is aborted.
• If a nullable column contains NULL values, the column cannot be changed to a nonnullable column.
If you must change the data type of a primary or foreign key column, you can do so by dropping the constraint, changing the data type of the column, and adding back the constraint. Keep in mind that you must ensure that all associated key columns remain synchronized. For example, if you have a primary key in table T1 that is referenced by foreign keys in tables T2 and T3, you must first drop the foreign keys. Then you can drop the primary key. Then you need to change all three columns to the same data type. Finally, you must add back the primary key and then the foreign keys.
The ANSI standard includes the ALTER keyword. Zen also supports use of the keyword MODIFY in the ALTER TABLE statement. The keyword COLUMN is optional. For example:
ALTER TABLE t1 MODIFY c1 INTEGER
ALTER TABLE t1 ALTER c1 INTEGER
ALTER TABLE t1 MODIFY COLUMN c1 INTEGER
ALTER TABLE t1 ALTER COLUMN c1 INTEGER
Zen allows altering a column to a smaller length if the actual data does not overflow the new, smaller length of the column. This behavior is similar to that of Microsoft SQL Server.
You can add, drop, or modify multiple columns on a single ALTER TABLE statement. Although it simplifies operations, this behavior is not considered ANSI-compliant. The following is a sample multicolumn ALTER statement.
ALTER TABLE t1 (ALTER c2 INT, ADD D1 CHAR(20), DROP C4, ALTER C5 LONGVARCHAR, ADD D2 LONGVARCHAR NOT NULL)
You can convert legacy data types (Pervasive.SQL v7 or earlier) to data types natively supported by the current Zen release. If you wish to convert new data types backward to legacy data types, contact Zen Support.
To add a LONGVARCHAR/LONGVARBINARY column to a legacy table that contains a NOTE/LVAR column, the NOTE/LVAR column first has to be converted to a LONGVARCHAR or LONGVARBINARY column. After converting the NOTE/LVAR column to LONGVARCHAR/LONGVARBINARY, you can add more LONGVARCHAR/LONGVARBINARY columns to the table. Note that the legacy engine does not work with this new table because the legacy engine can work with only one variable length column per table.
PSQL_MOVE
The PSQL_MOVE syntax allows you to keep the columns of a table at desired ordinal positions. You may change the ordinal position of existing columns or for a new column after adding it. You can move a column logically and physically.
Type of Move | Result |
|---|---|
Logical | Columns are rearranged when listed in a result set, but the physical order of the columns in the table does not change. For example, you can rearrange how the columns are listed in a result set with a query such as SELECT * FROM table-name. A logical move affects only queries that list the columns, such as SELECT * FROM from table-name. |
Physical | A column is physically relocated from its current position to a new position in the file. A physical move affects the data file of the table. To move a column physically, you must specify the PSQL_PHYSICAL keyword. If the PSQL_PHYSICAL keyword is omitted, a logical move occurs by default. Note that only column offsets in the DDFs are changed if IN DICTIONARY is used in the ALTER TABLE statement. Columns in the data file are not physically moved because IN DICTIONARY overrides the MOVE . . . PSQL_PHYSICAL syntax for the data file. |
Note: Once you move columns logically, that order becomes the default order for listing columns in result sets. For instance, if you move columns physically after moving them logically, the logical order is used for queries such as SELECT * FROM from table-name. Logical column changes are stored in X$Attrib.
The PSQL_MOVE keyword must specify a column location greater than zero but less than the total number of columns. For example, assume that table t1 has only two columns, col1 and col2. Both of the following statement return an error:
ALTER TABLE t1 PSQL_MOVE col1 to 0
ALTER TABLE t1 PSQL_MOVE col1 to 3
The first statement attempts to move the column to position zero. The second statements attempts to move the column to position three, which is a number greater than the total number of columns (two).
ALTER TABLE requires an exclusive lock on a table. If the same table is being help open by another statement, ALTER TABLE fails and returns status code 88. Ensure that you execute all data definition statements before executing data manipulation statements.
For example, the following stored procedure fails and returns status code 88 because the INSERT statement has table t1 open, which prevents the ALTER TABLE statement from obtaining an exclusive lock.
CREATE PROCEDURE proc1() AS
BEGIN
CREATE TABLE t1(c1 INT,c2 INT,c3 INT);
INSERT INTO t1 VALUES (123,345,678);
ALTER TABLE t1 PSQL_MOVE c3 to 1;
END;
A way to resolve this is to execute the statements pertaining first to the table creation and data insertion, then call the procedure:
CREATE TABLE t1(c1 INT,c2 INT,c3 INT);
INSERT INTO t1 VALUES (123,345,678);
CALL proc1;
CREATE PROCEDURE proc1() AS
BEGIN
ALTER TABLE t1 PSQL_MOVE c3 to 1;
END;
RENAME COLUMN
Rename column allows you to change the name of a column to a new name. You cannot rename a column to the name of an existing column in the same table.
Renaming a column can invalidate objects that reference the previous name. For example, a trigger might reference column c1 in table t1. Renaming c1 to c5 results in the trigger being unable to execute successfully.
You can also use the psp_rename system stored procedure to rename columns.
Note: The database engine does not check dependencies for renamed columns. If you rename a column, ensure that all objects with a dependency on the previous (changed from) name are revised appropriately.
ON DELETE CASCADE
See Delete Rule for CREATE TABLE.
Examples
This section provides a number of examples of ALTER TABLE.
The following statement adds the Emergency_Phone column to the Person table
ALTER TABLE person ADD Emergency_Phone NUMERIC(10,0)
The following statement adds two integer columns col1 and col2 to the Class table.
ALTER TABLE class(ADD col1 INT, ADD col2 INT)
============
To drop a column from a table definition, specify the name of the column in a DROP clause. The following statement drops the emergency phone column from the Person table.
ALTER TABLE person DROP Emergency_Phone
The following statement drops col1 and col2 from the Class table.
ALTER TABLE class(DROP col1, DROP col2)
The following statement drops the constraint c1 in the Faculty table.
ALTER TABLE Faculty(DROP CONSTRAINT c1)
============
This example adds an integer column col3 and drops column col2 to the Class table
ALTER TABLE class(ADD col3 INT, DROP col2 )
============
The following example creates a primary key named c1 on the ID field in the Faculty table. Note that you cannot create a primary key on a nullable column. Doing so returns an error.
ALTER TABLE Faculty(ADD CONSTRAINT c1 PRIMARY KEY(ID))
The following example creates a primary key using the default key name PK_ID on the Faculty table.
ALTER TABLE Faculty(ADD PRIMARY KEY(ID))
============
The following example adds the constraint UNIQUE to the columns col1 and col2. The combined value of col1 and col2 in any row is unique within the table. Neither column needs to be unique individually.
ALTER TABLE Class(ADD UNIQUE(col1,col2))
============
The following example drops the primary key in the Faculty table. Because a table can have only one primary key, you cannot add a primary key to a table that already has a primary key defined. To change the primary key of a table, delete the existing key then add the new primary key.
ALTER TABLE Faculty(ADD PRIMARY KEY)
Before you can drop a primary key from a parent table, you must drop any corresponding foreign keys from dependent tables.
============
The following example adds a new foreign key to the Class table. The Faculty_ID column is defined as a column that does not include NULL values. You cannot create a foreign key on a nullable column.
ALTER TABLE Class ADD CONSTRAINT Teacher FOREIGN KEY (Faculty_ID) REFERENCES Faculty (ID) ON DELETE RESTRICT
In this example, the restrict rule for deletions prevents someone from removing a faculty member from the database without first either changing or deleting all of that member's classes. Also note that the column listed in the REFERENCES clause (ID) is optional. Columns listed in the REFERENCES clause can be included, if you choose, to improve clarity of the statement. The only columns that can be referenced in the REFERENCES clause are the primary keys of the referenced table.
The following statement shows how to drop the foreign key added in this example. Zen drops the foreign key from the dependent table and eliminates the referential constraints between the dependent table and the parent table.
ALTER TABLE Class DROP CONSTRAINT Teacher
============
The following example adds a foreign key to the Class table without using the CONSTRAINT clause. In this case, a foreign key constraint is generated internally to reference the primary key (ID) of Faculty. The column listed in the REFERENCES clause is optional. Columns listed in the REFERENCES clause can be included, if you choose, to improve clarity of the statement. The only column that can be used in the REFERENCES clause is the primary key of the referenced table.
ALTER TABLE Class ADD FOREIGN KEY (Faculty_ID) REFERENCES Faculty (ID) ON DELETE RESTRICT
This creates foreign key FK_Faculty_ID. To drop the foreign key, specify the CONSTRAINT keyword:
ALTER TABLE Class DROP CONSTRAINT FK_Faculty_ID
============
The following example shows adding and dropping of constraints and columns in a table. This statement drops column salary, adds a column col1 of type integer, and drops constraint c1 in the Faculty table.
ALTER TABLE Faculty(DROP salary, ADD col1 INT, DROP CONSTRAINT c1)
============
The following examples both illustrate altering the data type of multiple columns.
ALTER TABLE t1 (ALTER c2 INT, ADD D1 CHAR(20), DROP C4, ALTER C5 LONGVARCHAR, ADD D2 LONGVARCHAR NOT NULL)
ALTER TABLE t2 (ALTER c1 CHAR(50), DROP CONSTRAINT MY_KEY, DROP PRIMARY KEY, ADD MYCOLUMN INT)
============
The following examples illustrate how the column default and alternate collating sequence can be set or dropped with the ALTER or MODIFY column options.
CREATE TABLE t1 (c1 INT DEFAULT 10, c2 CHAR(10))
ALTER TABLE t1 ALTER c1 INT DEFAULT 20
– resets column c1 default to 20
ALTER TABLE t1 ALTER c1 INT
– drops column c1 default
ALTER TABLE t1 ALTER c2 CHAR(10)
COLLATE 'file_path\upper.alt'
COLLATE 'file_path\upper.alt'
– sets alternate collating sequence on column c2
ALTER TABLE t1 ALTER c2 CHAR(10)
– drops alternate collating sequence on column c2
Upper.alt treats upper and lower case letters the same for sorting. For example, if a database has values abc, ABC, DEF, and Def, inserted in that ordered, the sorting with upper.alt returns as abc, ABC, DEF, and Def. (The values abc and ABC, and the values DEF and Def are considered duplicates and are returned in the order in which they were inserted.) Normal ASCII sorting sequences upper case letters before lower case, such that the sorting would return as ABC, DEF, Def, abc.
============
The following statement logically moves column Registrar_ID from its current position to the second position when the columns are listed in a results set.
ALTER TABLE Billing PSQL_MOVE Registrar_ID TO 2
The following statement moves columns Amount_Owed and Amount_Paid from their current positions to the second and third positions, respectively, when the columns are listed in a result set.
ALTER TABLE Billing ( PSQL_MOVE Amount_Owed TO 2, PSQL_MOVE Amount_Paid TO 3 )
============
The following statement physically moves column Registrar_ID from its current position to the second column in the data file. This causes the data file to be rebuilt to reflect the change.
ALTER TABLE Billing PSQL_MOVE Registrar_ID TO PSQL_PHYSICAL 2
The following statement physically moves columns Amount_Owed and Amount_Paid from their current positions to the second and third column positions, respectively, in the data file.
ALTER TABLE Billing ( PSQL_MOVE Amount_Owed TO PSQL_PHYSICAL 2, PSQL_MOVE Amount_Paid TO PSQL_PHYSICAL 3 )
============
Assume that table t1 contains columns c1 and col2. The following statement renames column c1 to c2.
ALTER TABLE t1 RENAME COLUMN c1 TO c2
============
Assume that table t1 contains columns c1 and col2. The following statement returns an error (duplicate column name) because it attempts to rename a column (col2) to the name of an existing column (c1).
ALTER TABLE t1 (RENAME COLUMN c1 TO c2, RENAME COLUMN col2 TO c1)
Instead, you must issue two separate ALTER statements. The first renames c1 to c2. The second renames col2 to c1.
ALTER TABLE t1 (RENAME COLUMN c1 TO c2)
ALTER TABLE t1 (RENAME COLUMN col2 TO c1)
See Also
ALTER USER
The ALTER USER statement changes the name or password of a user account.
Syntax
ALTER USER user-name < RENAME TO new-user-name | WITH PASSWORD user-password >
Remarks
Only the Master user can rename a user. Other users can change their passwords with the WITH PASSWORD clause or by using SET PASSWORD. See SET PASSWORD.
Security must be turned on to perform this statement.
This statement must be used with either the RENAME TO option or the WITH PASSWORD keywords.
New-user-name must be unique in the database.
User-name and user-password must be enclosed in double quotes if they contain spaces or other nonalphanumeric characters. See Granting Privileges to Users and Groups for more information on created users.
Note: For information on password restrictions, see Identifier Restrictions, and the topic Database Security in Advanced Operations Guide. For further general information about users and groups, see Master User and Users and Groups in Advanced Operations Guide and Assigning Permissions Tasks in Zen User’s Guide.
Examples
The following examples show how to rename a user account.
ALTER USER pgranger RENAME TO grangerp
The name of the account pgranger is changed to pgranger.
ALTER USER pgranger RENAME TO "polly granger"
The name of the account pgranger is changed to polly granger containing nonalphanumeric characters.
============
The following examples show how to change the password for a user account.
ALTER USER pgranger WITH PASSWORD Prvsve1
The password for user account pgranger is changed to Prvsve1 (case-sensitive).
ALTER USER pgranger WITH PASSWORD "Nonalfa$"
The password for user account pgranger is changed to Nonalfa$ (case-sensitive) containing nonalphanumeric characters.
See Also
ANY
Remarks
The ANY keyword works similarly to the ALL keyword except that Zen includes the compared row in the result table if the condition is true for any row in the subquery result table.
Examples
The following statement compares the ID column from Person to the ID columns in the result table of the subquery. If the ID value from Person is equal to any of the ID values in the subquery result table, Zen includes the row from Person in the result table of the SELECT statement.
SELECT p.ID, p.Last_Name
FROM Person p
WHERE p.ID = ANY
(SELECT f.ID FROM Faculty f WHERE f.Dept_Name = 'Chemistry')
See Also
AS
Remarks
Include an AS clause to assign a name to a select term or to a table name. You can use this name elsewhere in the statement to reference the select term. The name is often referred to as an alias.
When you use the AS clause on a nonaggregate column, you can reference the name in WHERE, ORDER BY, GROUP BY, and HAVING clauses. When you use the AS clause on an aggregate column, you can reference the name only in an ORDER BY clause.
The name you define must be unique in the SELECT list.
Column aliases are returned as column names. Computed columns, including group aggregates, with no column alias are assigned a system-generated name, such as EXPR-1, EXPR-2, and so on.
Examples
The AS clause in the following statement instructs Zen to assign the name Total to the select term SUM (Amount_Paid) and order the results by the total for each student:
SELECT Student_ID, SUM (Amount_Paid) AS Total
FROM Billing
GROUP BY Student_ID
ORDER BY Total
The keyword AS is optional when used for table aliases as in this next example. When you use the AS clause on a table name in a FROM clause, you can reference the name in a WHERE, ORDER BY, GROUP BY, and HAVING clause.
SELECT DISTINCT c.Name, p.First_Name, c.Faculty_Id
FROM Person AS p, class AS c
WHERE p.Id = c.Faculty_Id
ORDER BY c.Faculty_Id
You can rewrite this query without using the AS clause in the FROM clause as follows.
SELECT DISTINCT c.Name, p.First_Name, c.Faculty_Id
FROM Person p, class c
WHERE p.Id = c.Faculty_Id
ORDER BY c.Faculty_Id
Once you establish a table alias, do not intermix the table name and its alias in a WHERE clause. The following does not work:
SELECT DISTINCT c.Name, p.First_Name, c.Faculty_Id
FROM Person p, class c
WHERE Person.Id = c.Faculty_Id
ORDER BY c.Faculty_Id
See Also
BEGIN [ATOMIC]
Remarks
The BEGIN and END keywords are used to define the body of a stored procedure, a user-defined function, or a trigger declaration. The keywords create a compound statement within that procedure, function, or trigger.
You can add the ATOMIC keyword to control transactional behavior of the block of statements as if they were a single transaction. ATOMIC specifies that all statements within the block must either succeed or be rolled back.
Example
In this example, a BEGIN and END block is set as ATOMIC. The records will be inserted only if both inserts execute without error. If either statement returns an error (status code 5 for the second insert in this case), then neither record is inserted.
CREATE PROCEDURE Add_Tuition();
BEGIN ATOMIC
INSERT INTO Tuition(ID, Degree, Residency, Cost_Per_Credit, Comments) VALUES (9, 'Test', 0, 100.0, 'Training');
INSERT INTO Tuition(ID, Degree, Residency, Cost_Per_Credit, Comments) VALUES (8, 'Test', 0, 100.0, 'Training');
END
See Also
CALL
Remarks
Use the CALL statement to invoke a stored procedure. The stored procedure may be a user-defined one or a system stored procedure.
Examples
The following example calls a user-defined procedure without parameters:
CALL NoParms() or CALL NoParms
The following examples call a user-defined procedure with parameters:
CALL Parms(vParm1, vParm2)
CALL CheckMax(N.Class_ID)
============
The following statement lists the column information for all columns in the Dept table by calling a system stored procedure.
CALL psp_columns('Demodata','Dept')
See Also
CASCADE
Remarks
If you specify CASCADE when creating a foreign key, Zen uses the DELETE CASCADE rule. When a user deletes a row in the parent table, Zen deletes the corresponding rows in the dependent table.
Use caution with delete cascade. Zen allows a circular delete cascade on a table that references itself. See examples in Delete Cascade in Advanced Operations Guide.
See Also
CASE (expression)
A CASE expression returns a value. CASE expression has two formats:
• Simple When/Then. This format compares a value expression to a set of value expressions to determine a result. The value expressions are evaluated in their order listed. If a value expression evaluates to TRUE, CASE returns the value expression for the THEN clause.
• Searched When/Then. This format evaluates a set of Boolean expressions to determine a result. The Boolean expressions are evaluated in their order listed. If a Boolean expression evaluates to TRUE, CASE returns the expression for the THEN clause.
Both formats support an optional ELSE argument. If no ELSE clause is used, then ELSE NULL is implied.
Syntax
Simple When/Then:
CASE case_value_expression
WHEN when_expression THEN then_expression [...]
[ ELSE else_expression ]
END
Searched When/Then:
CASE
WHEN search_expression THEN then_expression [...]
[ ELSE else_expression ]
END
Arguments
case_value_expression ::= the expression evaluated by the simple When/Then CASE format.
when_expression ::= The expression to which case_value_expression is compared. The data types of case_value_expression and each when_expression must be the same or must be an implicit conversion.
then_expression ::= the expression returned when case_value_expression equals when_expression evaluates to TRUE.
else_expression ::= the expression returned if no comparison operation evaluates to TRUE. If this argument is omitted and no comparison operation evaluates to TRUE, CASE returns NULL.
search_expression ::= the Boolean expression evaluated by the searched CASE format. Search_expression may be any valid Boolean expression.
Remarks
A CASE expression must be used within a SELECT statement. The SELECT statement may be within a stored procedure or within a view.
Examples
The following statement uses the simple When/Then format to report the prerequisites for the art courses listed in the Course table.
SELECT name 'Course ID', description 'Course Title',
CASE name
WHEN 'Art 101' THEN 'None'
WHEN 'Art 102' THEN 'Art 101 or instructor approval'
WHEN 'Art 203' THEN 'Art 102'
WHEN 'Art 204' THEN 'Art 203'
WHEN 'Art 305' THEN 'Art 101'
WHEN 'Art 406' THEN 'None'
WHEN 'Art 407' THEN 'Art 305'
END
AS 'Prerequisites' FROM Course WHERE Dept_Name = 'Art' ORDER BY name
The query returns the following:
Course ID | Course Title | Prerequisites |
Art 101 | Drawing I | None |
Art 102 | Drawing II | Art 101 or instructor approval |
Art 203 | Drawing III | Art 102 |
Art 204 | Drawing IV | Art 203 |
Art 305 | Sculpture | Art 101 |
Art 406 | Modern Art | None |
Art 407 | Baroque Art | Art 305 |
============
The previous statement can be changed to include an ELSE clause:
SELECT name 'Course ID', description 'Course Title',
CASE name
WHEN 'Art 101' THEN 'None'
WHEN 'Art 102' THEN 'Art 101 or instructor approval'
WHEN 'Art 203' THEN 'Art 102'
WHEN 'Art 204' THEN 'Art 203'
WHEN 'Art 305' THEN 'Art 101'
ELSE 'Curriculum plan for Art History majors'
END
AS 'Prerequisites' FROM Course WHERE Dept_Name = 'Art' ORDER BY name
The query now returns the following:
Course ID | Course Title | Prerequisites |
Art 101 | Drawing I | None |
Art 102 | Drawing II | Art 101 or instructor approval |
Art 203 | Drawing III | Art 102 |
Art 204 | Drawing IV | Art 203 |
Art 305 | Sculpture | Art 101 |
Art 406 | Modern Art | Curriculum plan for Art History majors |
Art 407 | Baroque Art | Curriculum plan for Art History majors |
============
The following statement uses the searched When/Then format to report the funding program for which a person may be eligible.
SELECT last_name, first_name,
CASE
WHEN scholarship = 1 THEN 'Scholastic'
WHEN citizenship <> 'United States' THEN 'Foreign Study'
WHEN (date_of_birth >= '1960-01-01' AND date_of_birth <= '1970-01-01') THEN 'AJ-44 Funds'
ELSE 'NONE'
END
AS 'Funding Program' FROM Person ORDER BY last_name
Here is a partial listing of what the query returns:
Last_Name | First_Name | Funding Program |
Abad | Alicia | NONE |
Abaecherli | David | Foreign Study |
Abebe | Marta | Foreign Study |
Abel | James | AJ-44 Funds |
Abgoon | Bahram | Foreign Study |
Abken | Richard | NONE |
Abu | Austin | Foreign Study |
Abuali | Ibrahim | AJ-44 Funds |
Acabbo | Joseph | NONE |
Acar | Dennis | Foreign Study |
============
The following example shows how a CASE expression may be used within a stored procedure.
CREATE PROCEDURE pcasetest() RETURNS (d1 CHAR(10), d2 CHAR(10));
BEGIN
SELECT c1, CASE WHEN c1 = 1 THEN c4
WHEN c1 = 2 THEN c5
ELSE
CASE WHEN c2 = 100.22 THEN c4
WHEN c2 = 101.22 THEN c5 END END
FROM tcasetest;
END
CALL pcasetest
============
The following example shows how a CASE expression may be used within a view.
CREATE VIEW vcasetest (vc1, vc2) AS
SELECT c1, CASE WHEN c1 = 1 THEN c4
WHEN c1 = 2 THEN c5
ELSE
CASE WHEN c2 = 100.22 THEN c4
WHEN c2 = 101.22 THEN c5 END END
FROM TCASEWHEN
SELECT * FROM vcasetest
See Also
CASE (string)
Remarks
The CASE keyword causes Zen to ignore case when evaluating restriction clauses involving a string column. CASE can be specified as a column attribute in a CREATE TABLE or ALTER TABLE statement, or in an ORDER BY clause of a SELECT statement.
For example, suppose you have a column called Name that is defined with the CASE attribute. If you insert two rows with Name = 'Smith' and Name = 'SMITH', then a query with a restriction specifying Name = 'smith' correctly returns both rows.
Note: CASE (string) does not support multiple-byte character strings and NCHAR strings. The keyword assumes that the string data is single-byte ASCII. This means that the CASE attribute is not supported for NVARCHAR and NCHAR data type columns. The string functions do support multiple-byte character strings and NCHAR strings. See String Functions.
Examples
The following example shows how you add a column to the Student table with the CASE keyword.
ALTER TABLE Student ADD Name char(64) CASE
The following example shows how to use CASE in an ORDER BY clause of a SELECT statement.
SELECT Id, Last_Name+', '+First_Name AS Whole_Name, Phone FROM Person ORDER BY Whole_Name CASE
See Also
CLOSE
Syntax
CLOSE cursor-name
cursor-name ::= user-defined-name
Remarks
The CLOSE statement closes an open SQL cursor.
The cursor that the cursor name specifies must be open.
This statement is allowed only inside of a stored procedure, user-defined functions, or a trigger. Cursors and variables are only allowed inside of stored procedures, user-defined functions, and triggers.
Examples
The following example closes the cursor BTUCursor.
CLOSE BTUCursor;
============
CREATE PROCEDURE MyProc(OUT :CourseName CHAR(7)) AS
BEGIN
DECLARE cursor1 CURSOR
FOR SELECT Degree, Residency, Cost_Per_Credit
FROM Tuition ORDER BY ID;
OPEN cursor1;
FETCH NEXT FROM cursor1 INTO :CourseName;
CLOSE cursor1;
END
See Also
COALESCE
The COALESCE scalar function takes two or more arguments and returns the first nonnull argument, starting from the left in the expression list.
Syntax
COALESCE ( expression, expression[,...])
expression ::= any valid expression
Returned Value Types
The COALESCE function returns the value of one of the expressions in the list. For a detailed list of returned data types, see COALESCE Supported Combination Types and Result Data Types.
Restrictions
The function takes a minimum of two arguments.
COALESCE(10, 20)
Invalid:
COALESCE()
Note: An invalid instance results in a parse-time error:
"COALESCE must have at least 2 arguments."
"COALESCE must have at least 2 arguments."
The expression list must contain at least one nonnull argument.
COALESCE (NULL, NULL, 20)
Invalid:
COALESCE (NULL, NULL, NULL)
Note: An invalid instance results in a parse-time error:
"All arguments of COALESCE cannot be the NULL function."
"All arguments of COALESCE cannot be the NULL function."
The function does not support some data type combinations in the expression list. For example, COALESCE cannot have arguments that cannot be implicitly converted to each other, such as BINARY and VARCHAR.
COALESCE Supported Combination Types and Result Data Types
The following figure details the various supported combination types and also helps you identify the resultant data type for various combinations in a COALESCE function. 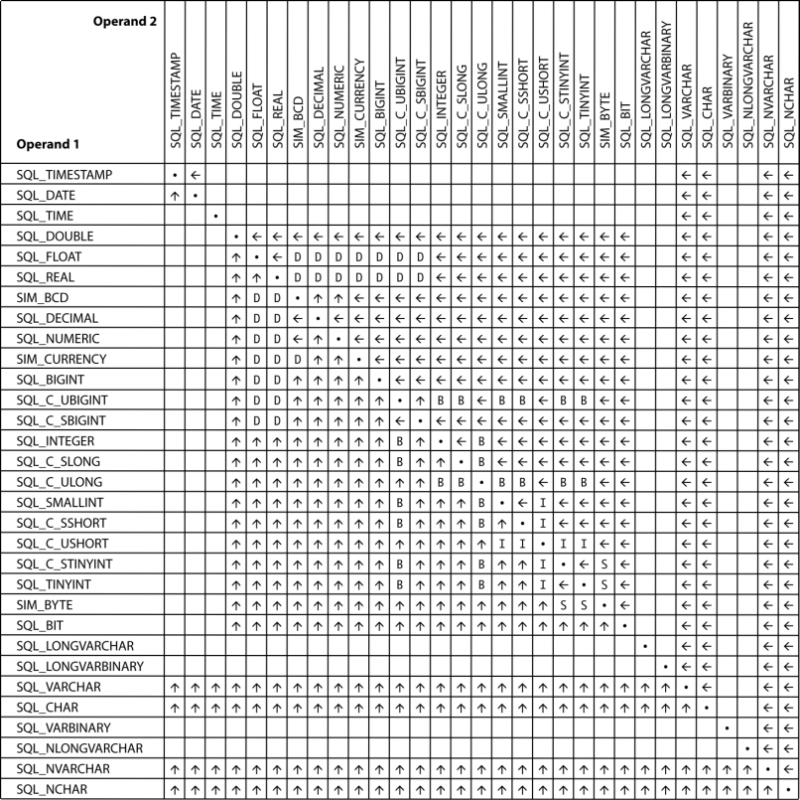
Chart Element | Description |
|---|---|
 | Types can be used directly in COALESCE function. The result type is that of operand 2. |
 | Types can be used directly in COALESCE function. The result type is that of operand 1. |
blank cell | Types are not compatible. The operands cannot be used directly in COALESCE. An explicit CONVERT is required. |
D | Result type is SQL_DOUBLE |
B | Result type is SIM_BCD |
I | Result type is SQL_INTEGER |
S | Result type is SQL_SMALLINT |
Using any of the unsupported type combinations (those left blank in the chart) in COALESCE function results in a parse-time error:
Error in row
Error in assignment
Expression evaluation error
Error in assignment
Expression evaluation error
Examples
In the following example, 10+2 is treated as a SMALLINT and ResultType (SMALLINT, SMALLINT) is SMALLINT. Hence, the result type is SMALLINT.
SELECT COALESCE(NULL,10 + 2,15,NULL)
The first parameter is NULL. The second expression evaluates to 12, which is not NULL and can be converted to result type SMALLINT. Therefore, the return value of this example is 12.
============
In the following example, ten is treated as a SMALLINT and ResultType (SMALLINT, VARCHAR) is SMALLINT. Hence, the result type is SMALLINT.
SELECT COALESCE(10, 'abc' + 'def')
The first parameter is 10, which can be converted to result type SMALLINT. Therefore, the return value of this example is 10.
COMMIT
The COMMIT statement signals the end of a logical transaction and converts temporary data into permanent data.
Syntax
COMMIT [ ]
Examples
The following example, within a stored procedure, begins a transaction which updates the Amount_Owed column in the Billing table. This work is committed. Another transaction updates the Amount_Paid column and sets it to zero. The final COMMIT WORK statement ends the second transaction.
START TRANSACTION;
UPDATE Billing B
SET Amount_Owed = Amount_Owed - Amount_Paid
WHERE Student_ID IN
(SELECT DISTINCT E.Student_ID
FROM Enrolls E, Billing B
WHERE E.Student_ID = B.Student_ID);
COMMIT WORK;
START TRANSACTION;
UPDATE Billing B
SET Amount_Paid = 0
WHERE Student_ID IN
(SELECT DISTINCT E.Student_ID
FROM Enrolls E, Billing B
WHERE E.Student_ID = B.Student_ID);
COMMIT WORK;
============
CREATE PROCEDURE UpdateBilling( ) AS
BEGIN
START TRANSACTION;
UPDATE Billing SET Amount_Owed = Amount_Owed + Amount_Owed;
UPDATE Billing set Amount_Owed = Amount_Owed + 100 WHERE Student_ID = 10;
COMMIT;
END;
See Also
CREATE DATABASE
The CREATE DATABASE statement creates a new database. Any user logged in to a database can issue the statement. The user must also have permission from the operating system to create files in the specified location.
Syntax
CREATE DATABASE [ IF NOT EXISTS ] database-name DICTIONARY_PATH 'dict-path-name' [ DATA_PATH 'data-path-name' ] [ ; 'data-path-name' ]... ] [ NO_REFERENTIAL_INTEGRITY ] [ BOUND ] [ REUSE_DDF ] [ DBSEC_AUTHENTICATION ] [ DBSEC_AUTHORIZATION ] [ V1_METADATA | V2_METADATA ] [ ENCODING < 'codepage-name' | 'CPcodepage-number' | DEFAULT > ]
database-name ::= a user-defined name for the database
dict-path-name ::= a user-defined name for the location of the data dictionary files (DDFs)
data-path-name ::= a user-defined name for the location of the data files
codepage-name ::= the name of a valid code page
CPcodepage-number ::= a number of a valid code page preceded by "CP"
Remarks
If you are using ODBC, keep in mind that CREATE DATABASE creates only a database, not an associated data source name (DSN). You will need to create a DSN separately if you want one. See Setting Up ODBC Database Access in Zen User’s Guide.
The CREATE DATABASE statement cannot be used to create the first database on a server. The reason is that a user must log on to a database before issuing the CREATE DATABASE statement. Therefore, at least one database must already exist.
The CREATE DATABASE statement cannot be used in a stored procedure or in a user-defined function.
Database Name and IF NOT EXISTS Clause
Database-name specifies a name for the new database. The database names must be unique within a server and conform to the rules for identifiers. See Identifier Restrictions in Advanced Operations Guide.
An error occurs if the database exists and you omit the IF NOT EXISTS clause (status code 2303). No error returns if you include the IF NOT EXISTS clause.
Dictionary Path
Dict-path-name specifies where the dictionary files (DDFs) reside on physical storage. The data files are also placed in this same location when you use the CREATE TABLE statement or create tables using Zen Control Center (ZenCC). See Dictionary Location in Zen User’s Guide.
Data Path
Data-path-name specifies a possible location of the data files for the database (see note below). You can specify multiple path names by delimiting them with a semicolon.
Data-path-name can be any path that is valid from the database engine point of view, but not from the calling application perspective. The location specified must already exist. The CREATE DATABASE statement does not create directories.
Omit data-path-name if you want to use the same location for the data files as for the dictionary files. You may also specify the same location by passing an empty string for data-path-name. For example, specifying DATA_PATH '' indicates an empty string for the data path.
Note: If you create tables using the CREATE TABLE statement or with ZenCC, the data files are placed in the first dict-path-name specified. If no dict-path-names are specified, data files are created in the dict-path-name location.
Data-path-name is useful if you are creating tables through the Distributed Tuning Interface (DTI). The DTI function PvAddTable allows you to specify where you want the data files located. See PvAddTable() in Distributed Tuning Interface Guide.
Data-path-name is useful if you are creating tables through the Distributed Tuning Interface (DTI). The DTI function PvAddTable allows you to specify where you want the data files located. See PvAddTable() in Distributed Tuning Interface Guide.
Referential Integrity
By default, the database engine enforces referential integrity. If you specify the NO_REFERENTIAL_INTEGRITY clause, then any triggers and referential integrity defined in the database are not enforced.
BOUND
If BOUND is specified, the DDFs are bound to the database. A bound database associates a database name with a single set of DDFs, which refer to only one set of data files. The DDFs are bound whether they already existed or are created through the execution of the CREATE DATABASE statement.
If DDFs are bound, you cannot use those DDFs for more than one database, nor can you refer to the data files by more than one set of DDFs.
If BOUND is not specified then the DDFs are not bound to a database.
See Bound Database versus Integrity Enforced in Advanced Operations Guide.
Dictionary Files
The REUSE_DDF keyword associates any existing DDFs with the database. The existing DDFs must in the dict-path-name location.
If REUSE_DDF is omitted, new DDFs are created unless DDFs already exists in the dict-path-name location. If DDFs exists in the dict-path-name location, they are associated with the database instead of new DDFs being created.
Security
The database engine supports three security models for the MicroKernel Engine:
• Classic. A user who successfully logs into the computer has access to the database contents at whatever level of file system rights the user has been assigned to the data file. File system rights are assigned through the operating system.
• Database. Database user accounts are unrelated to operating system user accounts. User access rights to the data are governed by user permissions set up in the database.
• Mixed. This policy has aspects of both of the other policies. Users log in using their operating system user names and passwords, but user access rights to the data are governed by user permissions set up in the database.
See Zen Security in Advanced Operations Guide for a complete discussion of security.
The DBSEC_AUTHENTICATION and DBSEC_AUTHORIZATION keywords set the security policy for the database:
Keyword Included or Omitted in Statement | Security Model | |||
|---|---|---|---|---|
DBSEC_AUTHENTICATION | DBSEC_AUTHORIZATION | Classic | Database | Mixed |
omitted | omitted | X | ||
included | included | X | ||
omitted | included | X | ||
Metadata Version
The Relational Engine supports two versions of metadata, referred to as version 1 (V1) and version 2 (V2). Metadata version applies to all data dictionary files (DDFs) within that database. V1 metadata is the default.
Among other features, V2 metadata allows for many identifier names to be up to 128 bytes long and for permissions on views and stored procedures. See Zen Metadata for a complete discussion.
You may include or omit the V1_METADATA keyword to specify V1 metadata. You must include the V2_METADATA keyword to specify V2 metadata.
Encoding
An encoding is a standard for representing character sets. Character data must be put in a standard format, that is, encoded, so that a computer can process it digitally. An encoding must be established between the Zen server engine and a Zen client application. A compatible encoding allows the server and client to interpret data correctly.
Encoding support is divided into database code page and client encoding. The two types of encoding are separate but interrelated. For more information, see Database Code Page and Client Encoding in Advanced Operations Guide.
Database code page and client encoding apply only to the Relational Engine. The MicroKernel Engine is not affected.
You specify a code page by using a name or by using the letters CP followed by a code page number. Both must be quoted with single quotation marks. For example, a valid name is UTF-8 and a valid number is CP1251.
Windows, Linux, and macOS operating systems have a default encoding referred to as the OS encoding. The default OS encoding differs among the operating systems. The keyword DEFAULT allows you to specify the OS encoding on the server.
If the ENCODING keyword is omitted, the database defaults to the server OS encoding.
An invalid code page number or name returns the error "Invalid code page."
Note that, for SQL statement that involve the use of more than one database, you need to ensure that the database code page is the same for all of the databases. Otherwise, string data can be returned incorrectly.
Note: The database engine does not validate the encoding of the data and metadata that an application inserts into a database. The engine assumes that all data was entered using the encoding of the server or the client, as explained in Database Code Page and Client Encoding in Advanced Operations Guide.
For SQL statements that involve the use of more than one database (such as a multidatabase join), ensure that the database code page is the same for all of the databases. Otherwise, string data can be returned incorrectly.
For SQL statements that involve the use of more than one database (such as a multidatabase join), ensure that the database code page is the same for all of the databases. Otherwise, string data can be returned incorrectly.
Valid Code Page Names and Numbers
You can view the list of supported code page names and numbers with ZenCC. Start ZenCC and access the New Database dialog (see To create a new database in Zen User’s Guide). For the Database Code Page option, click Change code page. In the dialog that opens, click Database code page to see a list of available code pages.
On Linux and macOS, see the dbmaint utility man page to display a list of supported code page names and numbers. See the Examples topic for dbmaint in Zen User’s Guide.
Examples
This section provides examples of CREATE DATABASE.
The following example creates a database named inventorydb and specifies its location for DDFs on drive D: in the folder mydbfiles\ddf_location. New DDFs are created because none exist in D:\mydbfiles\ddf_location. The data files are placed in the same location as the DDFs. The database uses V1 metadata.
CREATE DATABASE inventorydb DICTIONARY_PATH 'D:\mydbfiles\ddf_location'
============
The following example creates a database named HRUSBenefits if it does not already exist, and specifies its location for DDFs on drive C: in the folder HRDatabases\US. Possible locations for the data files include the C: drive in a directory called HRDatabases\US\DataFiles and the E: drive in a directory called Backups\HRUSData (see note under Data Path). Existing DDFs are used if they exist in the DICTIONARY_PATH. The database uses V1 metadata.
CREATE DATABASE IF NOT EXISTS HRUSBenefits DICTIONARY_PATH 'C:\HRDatabases\US' DATA_PATH 'C:\HRDatabases\US\DataFiles ; E:\Backups\HRUSData' REUSE_DDF
============
The following example creates a database named EastEurope, specifies its location for DDFs on drive C: in the folder Europe\DbaseFiles, creates new DDFs and binds them to the database, sets the security policy to mixed, and uses V2 metadata.
CREATE DATABASE EastEurope DICTIONARY_PATH 'C:\Europe\DbaseFiles' BOUND DBSEC_AUTHORIZATION V2_METADATA
============
The following example creates a database named Region5Acct, specifies its location for DDFs on drive D: in the folder Canada\Region5\Accounting, and sets the database code page to the default code page used on the server.
CREATE DATABASE Region5Acct DICTIONARY_PATH 'D:\Canada\Region5\Accounting' ENCODING DEFAULT
============
The following example creates a database named Region2Inventory, specifies its location for DDFs on drive G: in the folder Japan\Region2, and sets the database code page to 932.
CREATE DATABASE Region2Inventory DICTIONARY_PATH 'G:\Japan\Region2' ENCODING 'CP932'
============
The following example creates a database named VendorCodes, specifies its location for DDFs on drive C: in the folder Capitol_Equipment\Milling, creates new DDFs and binds them to the database, sets the security policy to mixed, uses V2 metadata, and sets the database code page to 1252.
CREATE DATABASE VendorCodes DICTIONARY_PATH 'C:\Capitol_Equipment\Milling' BOUND DBSEC_AUTHORIZATION V2_METADATA ENCODING 'CP1252'
See Also
CREATE FUNCTION
The CREATE FUNCTION statement creates a scalar user-defined function (UDF) in the database. You can then invoke the user-defined function from a query.
Syntax
CREATE FUNCTION function-name ( [ [ IN ]
{ :parameter_name scalar_parameter_data_type [ DEFAULT value | = value ] } [...] ] )
RETURNS scalar_return_data_type
[AS]
BEGIN
body_of_function
RETURN scalar_expression
END;
function_name ::= name of the scalar UDF. UDF names must conform to the rules for identifiers and must be unique within the database.
parameter_name ::= parameter in the scalar UDF. A maximum of 300 parameters are allowed. If no default is specified, then a value must be supplied when the function is invoked.
scalar_parameter_data_type ::= data type for the specified parameter.
scalar_return_data_type ::= data type of the scalar return value of the UDF. Only scalar types are supported.
value ::= default value to assign to parameter_name, using either the DEFAULT keyword or an equal sign
body_of_function ::= statements that compose the scalar function.
scalar_expression ::= scalar return value of the UDF.
Remarks
Each UDF name (database-name.function-name) must be unique within a database. The UDF name cannot be the same as any of the following in the same database:
• Built-in function names
• Other UDF names
• Stored procedure names
Restrictions
You cannot use the CREATE DATABASE or the DROP DATABASE statement in a user-defined function. The table actions CREATE, ALTER, UPDATE, DELETE, and INSERT are not permitted within a user-defined function.
Only scalar input parameters are supported. No OUTPUT and INOUT parameters are allowed. By default, all parameters are input. You need not specify the IN keyword.
Limits
Observe the following limitations when you create user-defined functions.
Attribute | Limit |
|---|---|
Number of parameters | 300 |
Size of the UDF body | 64 KB |
Maximum length of UDF name | See Identifier Restrictions, in Advanced Operations Guide |
Maximum length of UDF variable name | 128 characters |
Supported Scalar Input Parameters and Returned Data Types
Zen supports the data types shown in the following table for input scalar parameters and returned values. You can specify any data type except TEXT, NTEXT, IMAGE, or CURSOR.
AUTOTIMESTAMP | BIGDENTITY | BIGINT |
BINARY | BIT | BLOB |
CHAR | CHARACTER | CLOB |
CURRENCY | DATE | DATETIME |
DEC | DECIMAL | DOUBLE |
FLOAT | IDENTITY | INT |
INTEGER | LONG | LONGVARBINARY |
LONGVARCHAR | NCHAR | NLONGVARCHAR |
NUMERIC | NVARCHAR | REAL |
SMALLIDENTITY | SMALLINT | TIME |
TIMESTAMP | TIMESTAMP2 | TINYINT |
UBIGINT | UINT | UINTEGER |
UNIQUEIDENTIFIER | USMALLINT | UTINYINT |
VARBINARY | VARCHAR |
Examples
This topic provides a number of examples of CREATE FUNCTION.
The following example creates a function that calculates the area of a rectangular box whose details are stored in the Box table:
CREATE FUNCTION CalculateBoxArea(:boxName CHAR(20))
RETURNS REAL
AS
BEGIN
DECLARE :len REAL;
DECLARE :breadth REAL;
SELECT len, breadth INTO :len, :breadth FROM box
WHERE name = :boxName;
WHERE name = :boxName;
RETURN(:len * :breadth);
END;
============
The following example creates a function that compares two integers and returns the smaller of the two:
CREATE FUNCTION GetSmallest(:A INTEGER, :B INTEGER)
RETURNS INTEGER
AS
BEGIN
DECLARE :smallest INTEGER
IF (:A < :B ) THEN
SET :smallest = :A;
ELSE
SET :smallest = :B;
END IF;
RETURN :smallest;
END;
============
The following example creates a function that calculates simple interest using the formula SI = PTR/100, where P is the Principle, T is the period, and R is the rate of interest.
CREATE FUNCTION CalculateInterest(IN :principle FLOAT, IN :period REAL, IN :rate DOUBLE)
RETURNS DOUBLE
AS
BEGIN
DECLARE :interest DOUBLE;
SET :interest = ((:principle * :period * :rate) / 100);
RETURN (:interest);
END;
Invoking a Scalar User-Defined Function
You can invoke a user-defined function wherever scalar expressions are supported by specifying the function name followed by a comma-separated list of arguments. The list of arguments is enclosed in parentheses.
A UDF can be invoked with or without a database qualifier prefix. When a database qualifier is not prefixed, the UDF is executed from the current database context. If a database qualifier is prefixed, the UDF is executed in the context of the specified database. In the examples below, some use a database qualifier prefix and some do not.
Limits
Parameter names cannot be specified in the arguments when invoking a function.
When you invoke a function, the argument values for all parameters must be in the same sequence in which they are defined in the CREATE FUNCTION statement.
Examples of User-Defined Functions
UDF in procedure
CREATE PROCEDURE procTestUdfInvoke() AS
BEGIN
DECLARE :a INTEGER;
SET :a = 99 + (222 + Demodata.GetSmallest(10, 9)) + 10;
PRINT :a;
END;
CALL procTestUdfInvoke()
============
The following example is similar to the previous one, except that the database qualifier is omitted.
CREATE PROCEDURE procTestUdfInvoke2() AS
BEGIN
DECLARE :a INTEGER;
SET :a = 99 + (222 + GetSmallest(10, 9)) +10;
PRINT :a;
END;
CALL procTestUdfInvoke2
============
UDF in SELECT list
SELECT GetSmallest(100,99)
============
UDF in WHERE clause
SELECT name FROM class WHERE id <= GetSmallest(10,20)
============
UDF within UDF
CREATE FUNCTION funcTestUdfInvoke() RETURNS INTEGER AS
BEGIN
DECLARE :a INTEGER;
SET :a = 99 + (222 - Demodata.GetSmallest(10, 9));
RETURN :a;
END;
============
UDF in INSERT statement
CREATE TABLE t1(col1 INTEGER, col2 INTEGER, col3 FLOAT)
INSERT INTO t1 VALUES (GetSmallest(10,20), 20 , 2.0)
INSERT INTO t1 (SELECT * FROM t1 WHERE col1 = getSmallest(10,20))
============
UDF in UPDATE statement
UPDATE t1 SET col2 = Demodata.GetSmallest(2,10) WHERE col1 = 2
UPDATE t1 SET col1 = 3 WHERE col2 = Demodata.GetSmallest(10, 5)
============
UDF in GROUP BY statement
SELECT col2 FROM t1 GROUP BY getSmallest(10,2), col2
============
UDF in ORDER BY statement
SELECT col2 FROM t1 ORDER BY Demodata.getSmallest(10,2), col2
============
Recursive UDF
CREATE FUNCTION factorial(IN :n INTEGER) RETURNS double AS BEGIN
DECLARE :fact DOUBLE;
IF (:n <= 0) THEN
SET :fact = 1;
ELSE
SET :fact = (:n * Demodata.factorial(:n - 1));
END IF;
RETURN :fact;
END;
SELECT Demodata.factorial(20) can be used to get the factorial value of 20.
============
UDF with default value
CREATE FUNCTION testUdfDefault1(:z INTEGER DEFAULT 10) RETURNS INTEGER AS
BEGIN
RETURN :z-1;
END;
SELECT Demodata.testUdfDefault1(). This function uses the default value specified (10) if a parameter is not provided.
CREATE FUNCTION testUdfDefault2(:a VARCHAR(20) = 'Accounting Report' ) RETURNS VARCHAR(20) as
BEGIN
RETURN :a;
END;
SELECT Demodata.testUdfDefault2(). This function takes the default value specified (Accounting Report) if a parameter is not provided
============
UDF with dynamic parameters
SELECT name FROM class WHERE id <= GetSmallest(?,?)
============
UDF as an expression
SELECT 10 + Demodata.Getsmallest(10,20) + 15
============
UDF used as parameters
SELECT demodata.calculateinterest (10+demodata.getsmallest(3000, 2000), demodata.factorial(2), demodata.testUdfDefault(3))
See Also
CREATE GROUP
The CREATE GROUP statement creates one or more security groups.
Syntax
CREATE GROUP group-name [ , group-name ]...
group-name ::= user-defined-name
Remarks
Only the Master user can perform this statement.
Security must be turned on to perform this statement.
Examples
The following example creates a group named zengroup.
CREATE GROUP zengroup
The next example uses a list to create several groups at once.
CREATE GROUP zen_dev, zen_marketing
See Also
CREATE INDEX
Use the CREATE INDEX statement to create a named index for a specified table.
Syntax
CREATE [ UNIQUE | PARTIAL ] [ NOT MODIFIABLE ] INDEX index-name [ USING index-number ][ IN DICTIONARY ] ON table-name [ index-definition ]
index-name ::= user-defined-name
index-number ::= user-defined-value (an integer between 0 and 118)
table-name ::= user-defined-name
index-definition ::= ( index-segment-definition [ , index-segment-definition ]... )
index-segment-definition ::= column-name [ ASC | DESC ]
Remarks
VARCHAR columns differ from CHAR columns in that either the length byte (Btrieve lstring) or a zero terminating byte (Btrieve zstring) are reserved, increasing the effective storage by 1 byte. In other words, if you create a column that is CHAR (100), it occupies 100 bytes in the records. A VARCHAR (100) occupies 101 bytes. NVARCHAR columns differ from NCHAR columns in that a zero terminating character is reserved, increasing the effective storage by 2 bytes. In other words, if you create a column that is NCHAR(50), it occupies 100 bytes in the records. A NVARCHAR(50) column occupies 102 bytes.
When Zen creates an index, its process varies depending on whether the statement includes IN DICTIONARY, USING, or both. The following table summarizes the results.
Operation | Process and Results | Additional Information |
|---|---|---|
CREATE INDEX | When successful, an index is added to both the data file and X$Index. • If the data file has no defined indexes, the index created is index 0. • If the data file has one or more defined indexes, the index created is the smallest unused index number. In both cases, a new index with the same number is inserted into X$Index also. | |
CREATE INDEX IN DICTIONARY | When successful, an index is added to X$Index only. Nothing is inserted into the data file. The data file is examined to determine what index numbers are available. • If the data file has no defined indexes, the index inserted into X$Index is numbered 0. • If the data file has one or more defined indexes, the database engine checks to see if there is one that is not already defined in X$Index with column and index attributes that match the index to be added. If a match is found, this index number is used when the index is added to X$Index. If no match is found, the index number used is <the largest data file index-number> + 1. An index in X$Index without a matching key in the data file is referred to as a phantom index and is not used by the database engine. | See IN DICTIONARY |
CREATE INDEX USING index-number | When successful, an index with the specified index-number is added to both the data file and X$Index. If the index-number is already in use in either the data file or X$Index, an error is returned. | See USING |
CREATE INDEX USING index-number IN DICTIONARY | When successful, an index with the specified index-number is added to X$Index only. Nothing is inserted into the data file. If the specified index-number exists in the data file and not in X$Index, and the column and index attributes match the index to be added, the index with the specified index-number is added to X$Index. Otherwise, an error is returned. | See IN DICTIONARY |
Index Segments
An index segment corresponds to a column specified in the index definition. A multiple segmented index is one that was created as a combination of multiple columns.
The total number of segments that you may use in all indexes defined on a given file depends on the file page size.
Page Size (bytes) | Maximum Key Segments by File Version | |||
|---|---|---|---|---|
8.x and earlier | 9.0 | 9.5 | 13.0 | |
512 | 8 | 8 | Rounded up2 | Rounded up2 |
1,024 | 23 | 23 | 97 | Rounded up2 |
1,536 | 24 | 24 | Rounded up2 | Rounded up2 |
2,048 | 54 | 54 | 97 | Rounded up2 |
2,560 | 54 | 54 | Rounded up2 | Rounded up2 |
3,072 | 54 | 54 | Rounded up2 | Rounded up2 |
3,584 | 54 | 54 | Rounded up2 | Rounded up2 |
4,096 | 119 | 119 | 2043 | 1833 |
8,192 | N/A1 | 119 | 4203 | 3783 |
16,384 | N/A1 | N/A1 | 4203 | 3783 |
1"N/A" stands for "not applicable" 2"Rounded up" means that the page size is rounded up to the next size supported by the file version. For example, 512 is rounded up to 1024, 2560 is rounded up to 4096, and so forth. 3While a 9.5 format or later file can have more than 119 segments, the number of indexes is limited to 119. | ||||
Note that nullable columns must also be considered. For example, a data file with 4096 byte page size is limited to 119 index segments per file. Because each indexed nullable column with true null support requires an index consisting of 2 segments, you cannot have more than 59 indexed nullable columns in a table (or indexed nullable true null fields in a Btrieve file). This limit is smaller for smaller page sizes.
Files support true nulls if they are created as file version of 7.x or higher and have TRUENULLCREATE set to on. Files created using an earlier file format, with Pervasive.SQL 7, or with TRUENULLCREATE set to off do not have true null support and do not have this limitation.
UNIQUE
A UNIQUE index key guarantees that the combination of the columns defined in the index for a particular row are unique in the file. It does not guarantee or require that each individual column be unique, in the case of a multisegmented index.
Note: All data types can be indexed except for the following:
BIT
BLOB
CLOB
LONGVARBINARY
LONGVARCHAR
NLONGVARCHAR
BIT
BLOB
CLOB
LONGVARBINARY
LONGVARCHAR
NLONGVARCHAR
See also status code 6008: Too Many Segments in Status Codes and Messages.
PARTIAL
Use the PARTIAL keyword with a CREATE INDEX statement to create an index on a column, or group of columns, totalling more than 255 bytes.
Partial indexes are created using a prefix of a wide column, or by combining multiple small columns, so that searches using a prefix of the wide column will execute faster. Therefore, queries using WHERE clause restrictions, for example 'WHERE column_name LIKE 'prefix%' would execute faster using the partial index as opposed to not using any index.
If you include the PARTIAL keyword with a CREATE INDEX statement, and the index column(s) width and overhead do not equal or exceed 255 bytes, the PARTIAL keyword is ignored and a normal index is created instead.
Note: Width refers to the actual size of the column, and overhead refers to NULL indicators, string lengths, and the like.
Limitations of PARTIAL
The following limitations apply when using PARTIAL:
• Partial indexes may only be added to columns with the data type of CHAR or VARCHAR.
• Partial index columns should always be the last segment in the index definition, or should be the only segment in the index definition.
When the partial index column is the only segment in the index, the column size can be up to 8,000 bytes, but the user-data index segment will be of size 255 bytes.
• Partial indexes are not used by the engine while executing queries with strict equality or collation operations, such as ORDER BY, GROUP BY or JOINs involving the partial column.
• Partial indexes are used only while matching WHERE clause restrictions of the following form:
WHERE col = 'literal'
WHERE col LIKE 'literal%'
WHERE col = ?
WHERE col LIKE ?
where the literal or actual parameter value can be of any length. It could be shorter or wider than the number of bytes indexed in the partial index column. Partial indexes won't be used if a LIKE clause is not of the form 'prefix%'.
If the WHERE clauses match the constraints listed previously, partial indexes will be used while creating the execution plan.
Note: If a partially indexed column length is altered using ALTER TABLE such that the new length fits in 255 bytes of the index or when the new length overshoots 255 bytes, it is the responsibility of the user to drop the index and recreate it according to his/her requirements.
Examples
This section provides a number of examples of CREATE PARTIAL INDEX.
The following example creates a table named Part_tbl with columns PartID, PartName, SerialNo and Description, using the specified data types and sizes.
CREATE TABLE part_tbl (partid INT, partname CHAR(50), serialno VARCHAR(200), description CHAR(300));
Next, the example creates a partial index named idx_01 using the Description column.
CREATE PARTIAL INDEX idx_01 on part_tbl (description);
Although the Description column used in the index is 300 bytes, using the PARTIAL keyword enables the index to only use the first 255 bytes (including overhead) as the prefix.
============
The following example creates a partial index named idx_02 for the same table in the previous example. Instead, this example uses the PartId, SerialNo, and Description columns collectively for the index.
CREATE PARTIAL INDEX idx_02 on part_tbl (partid, serialno, description);
The following table details the index columns so that you may understand how the wide column is allocated in the index.
Column Name | Data Type | Size | Overhead | Size in Index |
|---|---|---|---|---|
PartID | Integer | 4 | 4 | |
SerialNo | Varchar | 200 | 1 | 201 |
Description | Char | 300 | 50 | |
Total Index Size | 255 | |||
NOT MODIFIABLE
This attribute prevents the index from being changed. Note that, for a multisegmented index, this attribute applies to all segments. Status code 10: The key field is not modifiable results if you attempt to edit any of the segments.
The following example creates a nonmodifiable segmented index in the Person table.
CREATE NOT MODIFIABLE INDEX X_Person on Person(ID, Last_Name)
USING
Use this keyword to control the index number when you create an index. Controlling the index number is important in cases where the data is being accessed through the Relational Engine as well as directly from the data files through the MicroKernel Engine.
When you create an index, the specified index number is inserted into both the data file and the X$Index.
If the index number you specify is already in use in either file, an error code is returned: status code 5: The record has a key field containing a duplicate key value for the X$Index and status code 6: The key number parameter is invalid for the data file.
CREATE INDEX "citizen-x" USING 3 On Person (citizenship)
IN DICTIONARY
This keyword notifies the database engine that you wish to make modifications to the DDFs while leaving the underlying physical data unchanged. This feature allows you to correct any table dictionary definitions that are not synchronized with their corresponding data files or to create a definition in the dictionary to match an existing data file. This is most often needed when data files are created and used by a Btrieve (transactional) application (which does not use DDFs), but ad-hoc queries or reports need to access the data using the Relational Engine.
Normally, the database engine keeps DDFs and data files perfectly synchronized. When you create an index without the IN DICTIONARY statement, the database engine assigns identical index numbers to the X$Index and the data file. IN DICTIONARY enables you to add an index to the X$Index only.
Caution! IN DICTIONARY is a powerful and advanced feature. It should only be used by system administrators or when absolutely necessary. Modifying a DDF without performing parallel modifications to the underlying data file can cause serious problems, such as incorrect results sets, performance problems, or unexpected results.
If you have created a phantom index, one that exists only in the DDF and not in the data file, and you attempt to drop the index without using IN DICTIONARY, you can encounter status code 6: The key number parameter is invalid. This error occurs because the database engine attempts to delete the index from the data file and cannot do so because no such index exists in the data file.
If you use both IN DICTIONARY and USING in the SQL statement when you create an index, a new index using the number specified by the USING keyword is inserted into the DFF only if the segment at the specified index number matches the SQL column. If the number specified by the USING keyword either does not match the SQL column or does not exist in the data file, the SQL engine returns an error message of "Btrieve key definition does not match the index definition." This ensures that no phantom indexes are created.
Note: You cannot use the keyword IN DICTIONARY on a bound database.
Examples
This section provides a number of examples of IN DICTIONARY
The following example creates a detached table, one with no associated data file, then adds and drops an index from the table definition. This index is a detached index because there is no underlying Btrieve index associated with it.
CREATE TABLE t1 IN DICTIONARY (c1 int, c2 int)
CREATE INDEX idx_1 IN DICTIONARY on t1(c1)
DROP INDEX t1.idx_1 IN DICTIONARY
============
The following example uses a table T1 that already exists. The data file has key1 defined and it is not currently in X$Index.
CREATE INDEX idx_1 USING 1 IN DICTIONARY on T1 (C2)
See Also
CREATE PROCEDURE
The CREATE PROCEDURE statement creates a new stored procedure. Stored procedures are SQL statements that are predefined and saved in the database dictionary.
Syntax
CREATE PROCEDURE procedure-name
( [ parameter [, parameter ]... ] )
( [ parameter [, parameter ]... ] )
[ WITH DEFAULT HANDLER | WITH EXECUTE AS 'MASTER' | WITH DEFAULT HANDLER , EXECUTE AS 'MASTER' | WITH EXECUTE AS 'MASTER', DEFAULT HANDLER]
as-or-semicolon
proc-stmt
procedure-name ::= user-defined-name
parameter-type-name ::= parameter-name
| parameter-type parameter-name
| parameter-name parameter-type
parameter-type ::= IN | OUT | INOUT | IN_OUT
parameter-name ::= :user-defined-name
proc-expr ::= same as normal expression but does not allow IF expression or ODBC-style scalar functions
| CLOSE cursor-name
| DELETE WHERE CURRENT OF cursor-name
| delete-statement
| IF proc-search-condition THEN proc-stmt [ ; proc-stmt ]... [ ELSE proc-stmt [ ; proc-stmt ]... ] END IF
| insert-statement
| LEAVE label-name
| OPEN cursor-name
| RETURN [ proc-expr ]
| transaction-statement
| select-statement-with-into
| select-statement
| SET variable-name = proc-expr
| update-statement
| UPDATE SET column-name = proc-expr [ , column-name = proc-expr ]... WHERE CURRENT OF cursor-name
| [ label-name : ] WHILE proc-search-condition DO [ proc-stmt [ ; proc-stmt ] ]... END WHILE [ label-name ]
| alter-table-statement
| create-index-statement
| create-table-statement
| create-view-statement
| drop-index-statement
| drop-table-statement
| drop-view-statement
| grant-statement
| revoke-statement
| set-statement
transaction-statement ::= commit-statement
| rollback-statement
| release-statement
commit-statement ::= see COMMIT
rollback-statement ::= see ROLLBACK
release-statement ::= see RELEASE SAVEPOINT
create-table-statement ::= see CREATE TABLE
alter-table-statement ::= see ALTER TABLE
drop-table-statement ::= see DROP TABLE
create-index-statement ::= see CREATE INDEX
drop-index-statement ::= see DROP INDEX
create-view-statement ::= see CREATE VIEW
drop-view-statement ::= see DROP VIEW
grant-statement ::= see GRANT
revoke-statement ::= see REVOKE
set-statement ::= see SET DECIMALSEPARATORCOMMA
label-name ::= user-defined-name
cursor-name ::= user-defined-name
variable-name ::= user-defined-name
proc-search-condition ::= same as search-condition but does not allow expressions that include subqueries
fetch-orientation ::= NEXT
sqlstate-value ::= 'string'
Remarks
Note that, in a procedure, the name of a variable and the name of a parameter must begin with a colon (:), both in the definition and use of the variable or parameter.
The RETURNS clause is required if the stored procedure returns a result set or a scalar value.
The RETURNS clause, when present, causes the procedure to continue execution when an error occurs. The default behavior (without this clause) is to abort the procedure with SQLSTATE set to the error state generated by the statement.
The use of a StmtLabel at the beginning (and optionally at the end) of an IF statement is an extension to ANSI SQL 3.
The PRINT statement applies only to Windows-based platforms. It is ignored on other operating system platforms.
In SQL Editor, the only way to test a stored procedure by using variable parameters is to call the stored procedure from another stored procedure. This technique is shown in the example for pdate (CREATE PROCEDURE pdate();).
You may use variables as SELECT items only within stored procedures. This technique is shown in the example for varsub1 (CREATE PROCEDURE varsub1();).
You cannot use the CREATE DATABASE or the DROP DATABASE statement in a stored procedure.
Trusted and Non-Trusted Stored Procedures
A trusted stored procedure includes the WITH EXECUTE AS 'MASTER clause. See Trusted and Non-Trusted Objects.
Memory Caching
By default, the database engine creates a memory cache in which to store multiple stored procedures for the duration of the SQL session. Once a stored procedure is executed, its compiled version is then retained in the memory cache. Typically, caching results in improved performance for each subsequent call to a cached procedure. The cache provides no performance improvement the first time that a stored procedure is executed since the procedure has not yet been loaded into memory.
Two SET statements apply to the memory cache:
• SET CACHED_PROCEDURES – specifies the number of procedures to cache. The default is 50.
• SET PROCEDURES_CACHE – specifies the amount of memory for the cache. The default is 5 MB.
Note that excessive memory swapping, or thrashing, could occur depending on the cache settings and the SQL being executed by your application. Thrashing can cause a decrease in performance.
Caching Exclusions
A stored procedure is not cached, regardless of the cache settings, for any of the following:
• If it references a local or a global temporary table. A local temporary table has a name that begins with the pound sign (#). A global temporary table has a name that begins with two pound signs (##). See CREATE (temporary) TABLE.
• If it contains any data definition language (DDL) statements. See Data Definition Statements.
• If it contains an EXEC[UTE] statement used to execute a character string, or an expression that returns a character string. For example: EXEC ('SELECT Student_ID FROM ' + :myinputvar).
Data Type Restrictions
The following data types cannot be passed as parameters or declared as variables in a stored procedure or trigger:
BFLOAT4 | BFLOAT8 |
MONEY | NUMERICSA |
NUMERICSLB | NUMERICSLS |
NUMERICSTB | NUMERICSTS |
See Examples for how Zen data types that do not have a direct ODBC equivalent can be correctly mapped to be used by a procedure.
Limits
The following limitations must be observed when creating stored procedures.
Attribute | Limit |
|---|---|
Number of columns allowed in a trigger or stored procedure | 300 |
Number of arguments in a parameter list for a stored procedure | 300 |
Size of a stored procedure | 64 KB |
Examples
The following example creates stored procedure Enrollstudent, which inserts a record into the Enrolls table, given the Student ID and the Class ID.
CREATE PROCEDURE Enrollstudent(IN :Stud_id INTEGER, IN :Class_Id INTEGER, IN :GPA REAL);
BEGIN
INSERT INTO Enrolls VALUES(:Stud_id, :Class_id, :GPA);
END;
Use the following statement to call the stored procedure.
CALL Enrollstudent(1023456781, 146, 3.2)
Use the following statement to retrieve the newly inserted record.
SELECT * FROM Enrolls WHERE Student_id = 1023456781
The CALL and SELECT statements, respectively, call the procedure by passing arguments, then display the row that was added.
============
This example shows how to assign a default value to a parameter.
CREATE PROCEDURE ReportTitle1 (:rpttitle1 VARCHAR(20) = 'Finance Department') RETURNS (Title VARCHAR(20));
BEGIN
SELECT :rpttitle1;
END;
CALL ReportTitle1;
CREATE PROCEDURE ReportTitle2 (:rpttitle2 VARCHAR(20) DEFAULT 'Finance Department', :rptdate DATE DEFAULT CURDATE()) RETURNS (Title VARCHAR(20), Date DATE);
BEGIN
SELECT :rpttitle2, :rptdate;
END;
CALL ReportTitle2( , );
These procedures use the default value specified (Finance Department) if a parameter is not provided with the CALL. Note that any parameter can be omitted, but the placeholder must be provided.
============
The following procedure reads the Class table, using the classId parameter passed in by the caller and validates that the course enrollment is not already at its limit.
CREATE PROCEDURE Checkmax(in :classid integer);
BEGIN
DECLARE :numenrolled integer;
DECLARE :maxenrolled integer;
SELECT COUNT(*) INTO :numenrolled FROM Enrolls WHERE class_ID = :classid;
SELECT Max_size INTO :maxenrolled FROM Class WHERE id = :classid;
IF (:numenrolled >= :maxenrolled) THEN
PRINT 'Enrollment Failed. Number of students enrolled reached maximum allowed for this class' ;
ELSE
PRINT 'Enrollment Possible. Number of students enrolled has not reached maximum allowed for this class';
END IF;
END;
CALL Checkmax(101)
Note that COUNT(expression) counts all nonnull values for an expression across a predicate. COUNT(*) counts all values, including null values.
============
The following is an example of using the OUT parameter when creating stored procedures. Calling this procedure returns the number of students into the variable :outval that satisfies the WHERE clause.
CREATE PROCEDURE ProcOUT (out :outval INTEGER)
AS BEGIN
SELECT COUNT(*) INTO :outval FROM Enrolls WHERE Class_Id = 101;
END;
============
The following is an example of using the INOUT parameter when creating stored procedures. Calling this procedure requires an INPUT parameter :IOVAL and returns the value of the output in the variable :IOVAL. The procedure sets the value of this variable based on the input and the IF condition.
CREATE PROCEDURE ProcIODATE (INOUT :IOVAL DATE)
AS BEGIN
IF :IOVAL = '1982-03-03' THEN
SET :IOVAL ='1982-05-05';
ELSE
SET :IOVAL = '1982-03-03';
END IF;
END;
You cannot call the above procedure using a literal value (as in call prociodate('1982-03-03')), because it requires an output parameter. You must first bind the parameter using ODBC calls, or you can test the procedure by creating another procedure to call it, as shown here:
CREATE PROCEDURE pdate();
BEGIN
DECLARE :a DATE;
CALL prociodate(:a);
PRINT :a;
END
CALL pdate
============
The following example illustrates using the RETURNS clause in a procedure. This sample returns all of the data from the Class table where the Start Date is equal to the date passed in on the CALL statement.
CREATE PROCEDURE DateReturnProc(IN :PDATE DATE)
RETURNS(
DateProc_ID INTEGER,
DateProc_Name CHAR(7),
DateProc_Section CHAR(3),
DateProc_Max_Size USMALLINT,
DateProc_Start_Date DATE,
DateProc_Start_Time TIME,
DateProc_Finish_Time TIME,
DateProc_Building_Name CHAR(25),
DateProc_Room_Number UINTEGER,
DateProc_Faculty_ID UBIGINT
);
BEGIN
SELECT ID, Name, Section, Max_Size, Start_Date, Start_Time, Finish_Time, Building_Name, Room_Number, Faculty_ID FROM Class WHERE Start_Date = :PDATE;
END;
CALL DateReturnProc('1995-06-05')
Note that the user-defined names in the RETURNS clause do not have to be named identically to the column names that appear in the selection list, as this example shows.
============
The following example shows the use of the WHERE CURRENT OF clause, which applies to positioned deletes.
CREATE PROCEDURE MyProc(IN :CourseName CHAR(7)) AS
BEGIN
DECLARE c1 CURSOR FOR SELECT name FROM course WHERE name = :CourseName FOR UPDATE;
OPEN c1;
FETCH NEXT FROM c1 INTO :CourseName;
DELETE WHERE CURRENT OF c1;
CLOSE c1;
END;
CALL MyProc('HIS 305')
(Note that if you use a SELECT inside of a WHERE clause of a DELETE, it is a searched DELETE not a positioned DELETE.)
============
The following example shows the use of a variable (:i) as a SELECT item. The example assumes that table1 does not already exist. All records in the person table with an ID greater than 950000000 are selected, then inserted into col2 of table1. Col1 contains the value 0, 1, 2, 3, or 4 as defined by the WHILE loop.
CREATE TABLE table1 (col1 CHAR(10), col2 BIGINT);
CREATE PROCEDURE varsub1();
BEGIN
DECLARE :i INT;
SET :i = 0;
WHILE :i < 5 DO
INSERT INTO table1 (col1, col2) SELECT :i , A.ID FROM PERSON A WHERE A.ID > 950000000;
SET :i = :i + 1;
END WHILE;
END
CALL varsub1
SELECT * FROM table1
-- returns 110 rows
============
The following is an example of the use of ATOMIC, which groups a set of statements so that either all succeed or all fail. ATOMIC can be used only within the body of a stored procedure, user-defined function, or trigger.
The first procedure does not specify ATOMIC, while the second does.
CREATE TABLE t1 (c1 INTEGER)
CREATE UNIQUE INDEX t1i1 ON t1 (c1)
CREATE PROCEDURE p1();
BEGIN
INSERT INTO t1 VALUES (1);
INSERT INTO t1 VALUES (1);
END;
CREATE PROCEDURE p2();
BEGIN ATOMIC
INSERT INTO t1 VALUES (2);
INSERT INTO t1 VALUES (2);
END;
CALL p1()
CALL p2()
SELECT * FROM t1
Both procedures return an error because they attempt to insert duplicate values into a unique index.
The result is that t1 contains only one record because the first INSERT statement in procedure p1 succeeds even though the second fails. Likewise, the first INSERT statement in procedure p2 succeeds but the second fails. However, since ATOMIC is used in procedure p2, all of the execution in procedure p2 is rolled back when the error is encountered.
============
This example uses a stored procedure to create two tables and insert one row of default values into each. It then turns on security and grants privileges to user1.
CREATE PROCEDURE p1();
BEGIN
CREATE TABLE t1 (c1 INT DEFAULT 10, c2 INT DEFAULT 100);
CREATE TABLE t2 (c1 INT DEFAULT 1 , c2 INT DEFAULT 2);
INSERT INTO t1 DEFAULT VALUES;
INSERT INTO t2 DEFAULT VALUES;
SET SECURITY = larry;
GRANT LOGIN TO user1 u1pword;
GRANT ALL ON * TO user1;
END;
CALL p1
SELECT * FROM t1
-- returns 10, 100
SELECT * FROM t2
-- returns 1, 2
Note: When you use the GRANT LOGIN statement in a stored procedure, you must separate the user name and password with a space character rather than a colon character. The colon character is reserved to identify local variables in a stored procedure.
============
This example uses a stored procedure to revoke privileges from user1, drop the two tables created in Example A, and turn off database security.
CREATE PROCEDURE p3();
BEGIN
REVOKE ALL ON t1 FROM user1;
REVOKE ALL ON t2 FROM user1;
DROP TABLE t1;
DROP TABLE t2;
SET SECURITY = NULL;
END;
CALL p3
SELECT * FROM t1 -- returns an error, table not found
SELECT * FROM t2 -- returns an error, table not found
============
The following example shows how to loop through a cursor.
CREATE TABLE atable (c1 INT, c2 INT)
INSERT INTO atable VALUES (1,1)
INSERT INTO atable VALUES (1,2)
INSERT INTO atable VALUES (2,2)
INSERT INTO atable VALUES (2,3)
INSERT INTO atable VALUES (3,3)
INSERT INTO atable VALUES (3,4)
CREATE PROCEDURE pp();
BEGIN
DECLARE :i INTEGER;
DECLARE c1Bulk CURSOR FOR SELECT c1 FROM atable ORDER BY c1 FOR UPDATE;
OPEN c1Bulk;
BulkLinesLoop:
LOOP
FETCH NEXT FROM c1Bulk INTO :i;
IF SQLSTATE = '02000' THEN
LEAVE BulkLinesLoop;
END IF;
UPDATE SET c1 = 10 WHERE CURRENT OF c1Bulk;
END LOOP;
CLOSE c1Bulk;
END
CALL pp
-- Succeeds
SELECT * FROM atable
-- Returns 6 rows
============
This example creates a trusted stored procedure named InParam. User Master then grants User1 EXECUTE and ALTER permissions on InParam. This example assumes that table t99 exists and contains two columns of type INTEGER.
CREATE PROCEDURE InParam(IN :inparam1 INTEGER, IN :inparam2 INTEGER) WITH DEFAULT HANDLER, EXECUTE AS 'Master' AS
BEGIN
INSERT INTO t99 VALUES(:inparam1 , :inparam2);
END;
GRANT ALL ON PROCEDURE InParam TO User1
Master and User1 can now call this procedure (for example, CALL InParam(2,4)).
============
This example shows how Zen data types that do not have a direct ODBC equivalent can be correctly mapped to be used by a procedure. The data types NUMERICSA and NUMERICSTS are the ones without direct equivalents so they are mapped to NUMERIC instead.
CREATE TABLE test1 (id identity, amount1 numeric(5,2), amount2 numericsa(5,2), amount3 numericsts(5,2))
CREATE PROCEDURE ptest2 (IN :numval1 numeric(5,2), IN :numval2 numeric(5,2), IN :numval3 numeric(5,2))
AS
BEGIN
Insert into test1 values(0, :numval1, :numval2, :numval3);
END;
CALL ptest2(100.10, 200.20, 300.30)
SELECT * FROM test1
The procedure correctly formats all the amount values according to the Zen data types defined in the CREATE TABLE statement, despite the fact that they are all passed to the procedure as NUMERIC. See also Zen Supported Data Types for the mappings of data types.
Using Stored Procedures
As an example, CALL foo(a, b, c) executes the stored procedure foo with parameters a, b, and c. Any of the parameters may be a dynamic parameter ('?'), which is necessary for retrieving the values of output and inout parameters. For example: {CALL foo (?, ?, 'TX')}. The curly braces are optional in your source code.
This is how stored procedures work in the current version of Zen.
• Triggers (CREATE TRIGGER, DROP TRIGGER) are supported as a form of stored procedure. This support includes tracking dependencies that the trigger has on tables, and procedures, in the database. You cannot use CREATE PROCEDURE or CREATE TRIGGER in the body of a stored procedure or a trigger.
• CONTAINS, NOT CONTAINS, BEGINS WITH are not supported.
• LOOP: post conditional loops are not supported (REPEAT...UNTIL).
• ELSEIF: The conditional format uses IF ... THEN ... ELSE. There is no ELSEIF support.
General Stored Procedure Engine Limitations
You should be aware of the following limitations before using stored procedures.
• There is no qualifier support in CREATE PROCEDURE or CREATE TRIGGER.
• Maximum length of a stored procedure variable name is 128 characters.
• See Identifier Restrictions in Advanced Operations Guide for the maximum length of a stored procedure name.
• Only partial syntactical validation occurs at CREATE PROCEDURE or CREATE TRIGGER time. Column names are not validated until run time.
• There is currently no support for using subqueries everywhere expressions are used. For example an UPDATE statement with set :arg = SELECT MIN(sal) FROM emp is not supported. However, you could rewrite the subquery as SELECT min(sal) INTO :arg FROM emp.
• Only the default error handler is supported.
Limits to SQL Variables and Parameters
• Variable names must be preceded with a colon (:) or at sign (@). This allows the stored procedure parser to differentiate between variables and column names.
• Variable names are case insensitive.
• No session variables are supported. Variables are local to the procedure.
Limits to Cursors
• Positioned UPDATE does not accept a table name.
• Global cursors are not supported.
Limits when using Long Data
• When you pass long data as arguments to an embedded procedure, (that is, a procedure calling another procedure), the data is truncated to 65500 bytes.
• Long data arguments to and from procedures are limited to a total of 2 MB.
Internally long data may be copied between cursors with no limit on data length. If a long data column is fetched from one statement and inserted into another, no limit is imposed. If, however, more than one destination is required for a single long data variable, only the first destination table receives multiple calls to PutData. The remaining columns are truncated to the first 65500 bytes. This is a limitation of the ODBC GetData mechanism.
See Also
CREATE TABLE
The CREATE TABLE statement creates a new table in a database.
CREATE TABLE contains functionality that goes beyond minimal or core SQL conformance. CREATE TABLE supports Referential Integrity features. Zen conforms closely to SQL 92 with the exception of ColIDList support.
You can also create temporary tables with the CREATE TABLE statement. See CREATE (temporary) TABLE.
Caution! In the same directory, no two files should share the same file name and differ only in their file name extension. For example, do not create a table (data file) Invoice.btr and another one Invoice.mkd in the same directory. This restriction applies because the database engine uses the file name for various areas of functionality while ignoring the file name extension. Since only the file name is used to differentiate files, files that differ only in their file name extension look identical to the database engine.
Syntax
( table-element [ , table-element ]... )
table-name ::= user-defined-name
number ::= user-defined value (sets the number of pointers to reserve for the addition of linked duplicates index keys)
table-element ::= column-definition | table-constraint-definition
column-definition ::= column-name data-type [ DEFAULT default-value-expression ] [ column-constraint [ column-constraint ]... [CASE (string) | COLLATE collation-name ]
column-name ::= user-defined-name
precision ::= integer
scale ::= integer
default-value-expression ::= default-value-expression + default-value-expression
| default-value-expression - default-value-expression
| default-value-expression * default-value-expression
| default-value-expression / default-value-expression
| default-value-expression & default-value-expression
| default-value-expression | default-value-expression
| default-value-expression ^ default-value-expression
| ( default-value-expression )
| -default-value-expression
| +default-value-expression
| ~default-value-expression
| ?
| literal
| scalar-function
| { fn scalar-function }
| USER
| NULL
literal ::= 'string' | N'string'
| number
| { d 'date-literal' }
| { t 'time-literal' }
| { ts 'timestamp-literal' }
scalar-function ::= see Scalar Functions
column-constraint ::= [ CONSTRAINT constraint-name ] col-constraint
constraint-name ::= user-defined-name
col-constraint ::= NOT NULL
| NOT MODIFIABLE
| UNIQUE
| REFERENCES table-name [ ( column-name ) ] [ referential-actions ]
table-constraint-definition ::= [ CONSTRAINT constraint-name ] table-constraint
REFERENCES table-name [ ( column-name [ , column-name ]... ) ] [ referential-actions ]
referential-actions ::= referential-update-action [ referential-delete-action ]
| referential-delete-action [ referential-update-action ]
collation-name ::= 'string'
Remarks
The only indexes that can be created with the CREATE TABLE statement are IDENTITY, SMALLIDENTITY, or BIGIDENTITY, primary keys, and foreign keys. All other indexes must be created with the CREATE INDEX statement.
Foreign key constraint names must be unique in the dictionary. All other constraint names must be unique within the table in which they reside and must not have the same name as a column.
If the primary key name is omitted, the name of the first column in the key prefixed by "PK_" is used as the name of the constraint.
If a reference column is not listed, the reference becomes, by default, the primary key of the table referenced. If a primary key is unavailable, a "Key not found" error returns. You can avoid this situation by enumerating the target column.
If the foreign key name is omitted, the name of the first column in the key prefixed by "FK_" is used as the name of the constraint.
If the UNIQUE constraint is omitted, the name of the first column in the key prefixed by "UK_" is used as the name of the constraint.
If the NOT MODIFIABLE constraint is omitted, the name of the first column in the key prefixed by "NM_" is used as the name of the constraint. (If NOT MODIFIABLE is used, a not-unique, not-modifiable index is created on the column. The index is named NM_column_name.)
If the NOT NULL constraint is omitted, the name of the first column in the key prefixed by "NN_" is used as the name of the constraint.
A foreign key may reference the primary key of the same table (known as a self-referencing key).
If CREATE TABLE succeeds and a USING clause was not specified, the data file name for the created table is xxx.mkd, where xxx is the specified table name. If the physical file, xxx.mkd, already exists, a new file names xxxnnn.mkd is created, where nnn is a unique number. If the table already exists, it is not replaced, and error -1303, "Table already exists" is returned. You must drop the table before replacing it.
A CREATE TABLE statement with the SYSDATA_KEY_2 keyword automatically creates the file in the 13.0 file format. The new file uses system data v2, which enables the sys$create and sys$update virtual columns for use in queries. For more information, see Accessing System Data v2.
Use of IN DICTIONARY with the SYSDATA_KEY_2 keyword causes the CREATE TABLE statement to ignore SYSDATA_KEY_2, and the sys$create and sys$update virtual columns are not available for the new table.
Limitations on Record Size
The total size of the fixed-length portion of any data record may not exceed 65535 bytes. The fixed-length portion of any data record is made up of the following:
• all the columns that have a fixed sized (all columns except for LONGVARCHAR, LONGVARBINARY and NLONGVARCHAR)
• one byte for each column that allows null values
• 8 bytes for each variable-length column (column of type LONGVARCHAR, LONGVARBINARY or NLONGVARCHAR).
If you attempt to create a table that exceeds this limit, or if you attempt modifications that would cause a table to exceed the limit, Zen returns status code -3016, "The maximum fixed-length rowsize for the table has been exceeded."
To determine the size in bytes of the fixed-length portion of a record before you attempt to create a new table, you can use the following calculation:
(sum of the storage sizes in bytes for the fixed-length column ) + (number of nullable columns) + ( 8 * number of variable-length columns) = record size in bytes
If you want to determine the size of the fixed-length portion of the record for an existing data file, you can use the BUTIL -STAT command to display a report that includes this information.
Example of Limitation on Record Size
Assume you have a table with the following columns defined:
Type | Number of Columns of This Type | Nullable? |
|---|---|---|
VARCHAR(216) | 1 | Yes |
VARCHAR(213) | 5 | All columns |
CHAR(42) | 1494 | All columns |
Each VARCHAR has two extra bytes reserved for it. One bite for the preceding NULL indicator and one trailing byte because VARCHAR is implemented as a ZSTRING. Each CHAR has a preceding byte reserved for the NULL indicator.
Therefore, the record size is 1 x 218 + 5 x 215 + 1494 x 43 = 65535 bytes
In this example, you could not add another column of any length without exceeding the fixed-length limit.
Delete Rule
You can include an ON DELETE clause with a foreign key constraint to define the delete rule Zen enforces for an attempt to delete the parent row to which a foreign key value refers. The delete rules you can choose are as follows:
• If you specify CASCADE, Zen uses the delete cascade rule. When a user deletes a row in the parent table, the database engine deletes the corresponding rows in the dependent table.
• If you specify RESTRICT, Zen enforces the delete restrict rule. A user cannot delete a row in the parent table if a foreign key value refers to it.
If you do not specify a delete rule, Zen applies the restrict rule by default.
Use caution with delete cascade. Zen allows a circular delete cascade on a table that references itself. See examples in Delete Cascade in Advanced Operations Guide.
Update Rule
Zen enforces the update restrict rule. This rule prevents the addition of a row containing a foreign key value if the parent table does not contain the corresponding primary key value. This rule is enforced whether or not you use the optional ON UPDATE clause, which allows you to specify the update rule explicitly.
IN DICTIONARY
See the discussion of IN DICTIONARY forALTER TABLE.
USING
The USING keyword allows you to associate a CREATE TABLE or ALTER TABLE action with a particular data file.
Because Zen requires a Named Database to connect, the path_name provided must always be a simple file name or relative path and file name. Paths are always relative to the first Data Path specified for the Named Database to which you are connected.
The path/file name passed is partially validated when the statement is prepared.
You must follow these rules when specifying the path name:
• The text must be enclosed in single quotes, as shown in the grammar definition.
• Text must not exceed the length limit for the version of metadata being used. The entry is stored in Xf$Loc in exactly as typed (trailing spaces are truncated and ignored). See Xf$Loc (for V1 metadata) and Xf$Loc (for V2 metadata).
• The path must be a simple relative path. Paths that reference a server or volume are not allowed.
• Relative paths are allowed to include a period for current directory, a double-period for parent directory, a slash, or any combination of the three. However, the path must contain a file name representing the SQL table name, meaning path_name cannot end in a slash or a directory name. All file names, including those specified with relative paths, are relative to the first Data Path as defined in the Named Database configuration.
The following features provide convenience and ease of use:
• Root-based relative paths are allowed. For example, assuming that the first data path is D:\mydata\demodata, Zen interprets the path name in the following statement as D:\temp\test123.btr.
CREATE TABLE t1 USING '\temp\test123.btr' (c1 int)
• Slash characters in relative paths may be either Unix style (/) or Windows backslash (\). You may use a mixture of the two types, if desired. This is a convenience feature, since you may know the directory structure scheme but not necessarily know (or care) what type of server you are connected to. The path is stored in X$File exactly as typed. The Zen engine converts the slash characters to the appropriate platform type when utilizing the path to open the file. Also, since data files share binary compatibility between all supported platforms, this means that as long as the directory structure is the same between platforms (and path-based file names are specified as relative paths), then database files and DDFs can be moved from one platform to another without modification. This enables cross-platform deployment using a standardized database schema.
• When you specify a relative path, the directory structure in the USING clause does not need to already exist. When needed, Zen creates directories for the path in the USING clause.
Include a USING clause to specify the physical location of the data file associated with the table. This is necessary when you are creating a table definition for an existing data file, or when you want to specify explicitly the name or physical location of a new data file.
If you do not include a USING clause, Zen generates a unique file name from the table name with an .mkd extension and creates the file in the first directory specified in the data file path for the database.
If the USING clause points to an existing data file, Zen creates the table in the DDFs and returns SQL_SUCCESS_WITH_INFO. The informational message returned indicates that the dictionary entry now points to an existing data file. If you want CREATE TABLE to return only SQL_SUCCESS, specify IN DICTIONARY on the CREATE statement. If WITH REPLACE is specified (see below), then any existing data file with the same name is destroyed and overwritten with a newly created file.
???Per Chris’ comments, need to re-visit SUCCESS_WITH_INFO.
Note: Zen returns a successful status code if you specify an existing data file.
Whenever you create a relational index definition for an existing data file (for example, CREATE TABLE USING with a column definition of type IDENTITY), Zen automatically checks the Btrieve indexes defined on the file to determine whether an existing Btrieve index offers the set of parameters in the relational index definition. If an existing Btrieve index matches the new definition, then an association is created between the relational index definition and the existing Btrieve index. If there is no match, then Zen creates a new index definition and, if IN DICTIONARY is not used, a new index in the file.
WITH REPLACE
Whenever WITH REPLACE is specified with the USING keyword, Zen automatically overwrites any existing file name with the specified file name. The file is always overwritten if the operating system allows it. WITH REPLACE affects only the data file. It does not affect the DDFs.
The following rules apply when using WITH REPLACE:
• WITH REPLACE can only be used with USING.
• When used with IN DICTIONARY, WITH REPLACE is ignored because IN DICTIONARY specifies that only the DDFs are affected.
If you include WITH REPLACE in your CREATE TABLE statement, Zen creates a new data file to replace the existing file (if the file exists at the location you specified in the USING clause). Zen discards any data stored in the original file with the same name. If you do not include WITH REPLACE and a file exists at the specified location, Zen returns a status code and does not create a new file. The table definition is added to the DDFs, however.
WITH REPLACE affects only the data file. It does not affect the table definition in the dictionary.
DCOMPRESS
The DCOMPRESS option specifies that the data file for a table use record compression to reduce the file size on disk. The following example creates a table with record compression and page size 1024 bytes:
CREATE TABLE t1 DCOMPRESS PAGESIZE=1024 (c1 INT DEFAULT 10, c2 CHAR(10) DEFAULT 'abc')
For details, see Record and Page Compression in Advanced Operations Guide.
PCOMPRESS
The PCOMPRESS option specifies that the data file for the specified table should use page compression. The following example creates a table with page compression and page size 1024 bytes:
CREATE TABLE t1 PCOMPRESS PAGESIZE=1024 (c1 INT DEFAULT 10, c2 CHAR(10) DEFAULT 'abc')
For details, see Record and Page Compression in Advanced Operations Guide.
PAGESIZE
The PAGESIZE option specifies that the data file for the specified table should use pages of size bytes. The value of size can be any of the following depending on file version:
• 512–4096 for file versions prior to 9.0 (a multiple of 512 bytes up to 4096)
• 512, 1024, 1536, 2048, 2560, 3072, 3584, 4096, or 8192 for file version 9.0
• 1024, 2048, 4096, 8192, or 16384 for file version 9.5
• 4096, 8192, or 16384 for file version 13.0
The following example creates a table with file compression and page size 8192 bytes, specifying creation of the particular data file identified by the relative path, ..\data1.mkd:
CREATE TABLE t1 DCOMPRESS PAGESIZE=8192 USING '..\data1.mkd' (c1 INT DEFAULT 10, c2 CHAR(10) DEFAULT 'abc')
LINKDUP
Multiple records may carry the same duplicated value for index keys. The two methods to keep track of the records with duplicate key values are called linked duplicates (linkdup) and repeating duplicates. For a detailed discussion of linked duplicates and repeating duplicates, see Methods for Handling Duplicate Keys in Advanced Operations Guide.
If the LINKDUP keyword is not specified, a CREATE INDEX statement uses the repeating duplicates method.
Each linked duplicate index requires 8 extra bytes in the physical record. The LINKDUP keyword allows you to reserve these extra bytes for use in linked duplicated indexes that are subsequently created.
Thus, if the LINKDUP keyword is specified, the following applies:
• A CREATE INDEX statement uses the linked duplicates method up to the value specified for the number of pointers
• Once the value specified for the number of pointers is reached, a CREATE INDEX statement uses the repeating duplicates method
• If the value specified for the number of pointers has been reached and a linked-duplicate index is dropped, a CREATE INDEX statement uses the linked duplicates method for the next key
• A CREATE INDEX statement cannot create a repeating-duplicate key if pointers are still reserved for linked-duplicate keys.
Examples
The following examples demonstrate various uses of CREATE TABLE.
Syntax like the following creates a table named Billing with columns Student_ID, Transaction_Number, Log, Amount_Owed, Amount_Paid, Registrar_ID and Comments, using the specified data types.
CREATE TABLE Billing
(Student_ID UBIGINT,
Transaction_Number USMALLINT,
Log TIMESTAMP,
Amount_Owed DECIMAL(6,2),
Amount_Paid DECIMAL(6,2),
Registrar_ID DECIMAL(10,0),
Comments LONGVARCHAR)
============
This example creates a table named Faculty in the database with columns ID, Dept_Name, Designation, Salary, Building_Name, Room_Number, Rsch_Grant_Amount, and a primary key based on column ID.
CREATE TABLE Faculty
(ID UBIGINT,
Dept_Name CHAR(20) CASE,
Designation CHAR(10) CASE,
Salary CURRENCY,
Building_Name CHAR(25) CASE,
Room_Number UINTEGER,
Rsch_Grant_Amount DOUBLE,
PRIMARY KEY (ID))
The following example creates an index on the Name column and designates that index as not modifiable. Data in the Name column cannot be changed.
CREATE TABLE organizations
(Name LONGVARCHAR NOT MODIFIABLE,
Advisor CHAR(30),
Number_of_people INTEGER,
Date_started DATE,
Time_started TIME,
Date_modified TIMESTAMP,
Total_funds DOUBLE,
Budget DECIMAL(2,2),
Avg_funds REAL,
President VARCHAR(20) CASE,
Number_of_executives SMALLINT,
Number_of_meetings TINYINT,
Office UTINYINT,
Active BIT,)
============
In the next example, assume that you need a table called StudentAddress to contain student addresses. You need to alter the Student table id column to be a primary key and then create a StudentAddress table that references Student as the primary table. (The Student table is part of the Demodata sample database.) Four ways are shown to create the StudentAddress table.
First, make the id column of table Student a primary key.
ALTER TABLE Student ADD PRIMARY KEY (id)
This next statement creates a StudentAddress table to have a foreign key referencing the id column of table Student with the DELETE CASCADE rule. This means that whenever a row is deleted from the Student table (Student is the parent table in this case), all rows in the StudentAddress table with that same id are also deleted.
CREATE TABLE StudentAddress (id UBIGINT REFERENCES Student (id) ON DELETE CASCADE, addr CHAR(128))
This next statement creates a StudentAddress table to have a foreign key referencing the id column of table Student with the DELETE RESTRICT rule. This means that whenever a row is deleted from the Student table and there are rows in the StudentAddress table with that same id, an error occurs. You need to explicitly delete all the rows in StudentAddress with that id before the row in the Student table, the parent table, can be deleted.
CREATE TABLE StudentAddress (id UBIGINT REFERENCES Student (id) ON DELETE RESTRICT, addr CHAR(128))
This next statement creates a StudentAddress table to have a foreign key referencing the id column of table Student with the UPDATE RESTRICT rule. This means that an error occurs if a row is added to the StudentAddress table with an ID that does not occur in the Student table. In other words, you must have a parent row before you can have foreign keys refer to that row. This is the default behavior of Zen.
Moreover, Zen does not support any other UPDATE rules. Thus, whether this rule is stated explicitly makes no difference. Also, since a DELETE rule is not explicitly stated, DELETE RESTRICT is assumed.
CREATE TABLE StudentAddress (id UBIGINT REFERENCES Student (id) ON UPDATE RESTRICT, addr CHAR(128))
============
This example shows how to use an alternate collating sequence (ACS) when you create a table. The ACS file used is the sample one provided with Zen.
CREATE TABLE t5 (c1 CHAR(20) COLLATE 'file_path\upper.alt')
Upper.alt treats upper and lower case letters the same for sorting. For example, if a database has values abc, ABC, DEF, and Def, inserted in that order, then the sorting with upper.alt returns as abc, ABC, DEF, and Def.
The values abc and ABC, and the values DEF and Def are considered duplicates and are returned in the order in which they were inserted. Normal ASCII sorting sequences upper case letters before lower case, such that the sorting would return as ABC, DEF, Def, abc. Also, the statement SELECT c1 FROM t5 WHERE c1 = 'Abc' returns both abc and ABC.
============
The following example creates a table, t1, and reserves the number of pointers to use for linked duplicate keys to four. The CREATE INDEX statements create index keys for the table.
DROP table t1
CREATE table t1 LINKDUP=4 (c1 int, c2 int, c3 int)
CREATE INDEX link_1 on t1(c1,c2)
CREATE INDEX link_2 on t1(c1,c3)
CREATE UNIQUE INDEX link_3 on t1(c3)
CREATE INDEX link_4 on t1(c1)
CREATE INDEX link_5 on t1(c2)
CREATE INDEX link_6 on t1(c2,c3)
The results of the CREATE INDEX statements are the following:
• Linked duplicate keys: link_1, link_2, link_4, link_5
• Repeating duplicate keys: link_6 (because the number of pointers to use for linked duplicate keys reached the specified value, four)
DROP INDEX link_2
CREATE INDEX link_7 on t1(c3,c1)
These two statements result in the following:
• Linked duplicate keys: link_1, link_4, link_5, link_7 (because the DROP INDEX statement reduced the number of pointers to use for linked duplicate keys to three, which allowed link_7 to become the fourth linked duplicates index key)
• Repeating duplicate keys: link_6
============
The following statement creates a table and specifies that the columns should not allow NULL values (that is, null indicator bytes are not added).
CREATE TABLE NoNulls
(ID UBIGINT NOT NULL,
Name CHAR(20) NOT NULL CASE,
Amount DOUBLE NOT NULL)
============
If you need to create all columns as NOT NULL, you can first use the SET TRUENULLCREATE statement to disable the creation of true nulls, then create the table. This allows you to avoid specifying the NOT NULL attribute on each column. (See SET TRUENULLCREATE.) Note, however, that the resulting legacy table does not enforce a NOT NULL attribute on any columns. NULL is allowed even if NOT NULL is explicitly specified for the column. The following statements create the same table as in the previous example.
SET TRUENULLCREATE=OFF
CREATE TABLE NoNulls2
(ID BIGINT,
Name CHAR(20) CASE,
Amount DOUBLE)
SET TRUENULLCREATE=ON
============
CREATE TABLE supports the specification of a DEFAULT value for columns. This is used when rows are inserted without an explicitly specified value for that column. The next statement creates a table with defaults matching the column data types. Note that IDENTITY columns have an implied default of zero, which automatically generates the next highest value.
CREATE TABLE Defaults
(ID IDENTITY,
Name CHAR(20) DEFAULT 'none',
Amount DOUBLE DEFAULT 0.00,
EntryDay DATE DEFAULT CURDATE(),
EntryTime TIME DEFAULT CURTIME())
The next statements insert two rows using the defaults.
INSERT INTO Defaults (ID) VALUES (0)
INSERT INTO Defaults (ID, Name, Amount) VALUES (0, 'Joquin', '100')
A SELECT statement returns the results, containing default values.
SELECT * FROM Defaults
ID Name Amount EntryDay EntryTime
=== ======== ======== ========= ===========
1 none 0.0 curdate curtime
2 Joquin 100.0 curdate curtime
============
The following example assumes that you have a table Legacydata that contains columns with legacy data types in data file olddata.dat. New databases cannot create tables with the legacy data types. You could, however, create a DDF definition in a new database for Legacydata with the IN DICTIONARY clause.
CREATE TABLE "Legacydata" IN DICTIONARY USING 'olddata.dat' (
"col1" LSTRING(10) NOT NULL,
"col2" VARCHAR(9) NOT NULL,
"col3" LOGICAL NOT NULL,
"col4" LOGICAL2 NOT NULL,
"col5" NOTE(100) NOT NULL);
============
This example demonstrates the default creation of a Btrieve data file if a table is created without specifying either a USING clause or REPLACE. The default name of the file is the table name with the extension .mkd. If that file name already exists, a different name is generated using the table name followed by a number and then the .mkd extension.
To create the table xyz, which generates the data file xyz.mkd:
CREATE TABLE xyz (c1 int, c2 char(5))
Now, delete the table using IN DICTIONARY, so the data file is not deleted:
DROP TABLE xyz in dictionary
Finally, if you create table xyz again:
CREATE TABLE xyz (c1 int, c2 char(5))
It creates the table xyz and the data file xyz000.mkd.
See Also
CREATE (temporary) TABLE
You can also use the CREATE TABLE statement to create a temporary table. The CREATE TABLE syntax for temporary tables is more restrictive than for permanent tables. For this reason, and because of other characteristics, temporary tables are discussed separately. See Other Characteristics.
Syntax
CREATE TABLE <# | ##>table-name (table-element [ , table-element ]... )
table-name ::= user-defined-name
table-element ::= column-definition | table-constraint-definition
column-definition ::= column-name data-type [ DEFAULT default-value-expression ] [ column-constraint [ column-constraint ]... [CASE (string) | COLLATE collation-name ]
column-name ::= user-defined-name
precision ::= integer
scale ::= integer
default-value-expression ::= default-value-expression + default-value-expression
| default-value-expression - default-value-expression
| default-value-expression * default-value-expression
| default-value-expression / default-value-expression
| default-value-expression & default-value-expression
| default-value-expression | default-value-expression
| default-value-expression ^ default-value-expression
| ( default-value-expression )
| -default-value-expression
| +default-value-expression
| ~default-value-expression
| ?
| literal
| scalar-function
| { fn scalar-function }
| USER
| NULL
literal ::= 'string' | N'string'
| number
| { d 'date-literal' }
| { t 'time-literal' }
| { ts 'timestamp-literal' }
column-constraint ::= [ CONSTRAINT constraint-name ] col-constraint
constraint-name ::= user-defined-name
col-constraint ::= NOT NULL
| NOT MODIFIABLE
| UNIQUE
| REFERENCES table-name [ ( column-name ) ] [ referential-actions ]
table-constraint-definition ::= [ CONSTRAINT constraint-name ] table-constraint
REFERENCES table-name [ ( column-name [ , column-name ]... ) ] [ referential-actions ]
referential-actions ::= referential-update-action [ referential-delete-action ]
| referential-delete-action [ referential-update-action ]
collation-name ::= 'string'
Remarks
A temporary table is used for intermediate results or working storage. Unlike in permanent tables, data in a temporary table is destroyed at some point during the SQL session or at the end of the SQL session. The data is not saved in the database.
Temporary tables are useful to narrow down intermediate results by continuing to operate on intermediate tables. Complex data operations are often easier if split into a sequence of simpler steps, which each step operating on the table result of a previous step. A temporary table is a base table. That is, the data it contains is its own. Contrast this with a view, which is an indirect representation of data in other tables.
Zen supports two types of temporary tables:
• Local
• Global
Both types can be used within a stored procedure.
The following table summarizes characteristics of temporary tables contrasted with where the table is created or used. Characteristics can vary depending on whether the table is created or used within or outside of a stored procedure. Additional remarks are discussed as footnotes at the end of the table.
Except for permissible length of the temporary table name, the characteristics are the same for both V1 and V2 metadata.
Table Characteristic | Local Temporary Table | Global Temporary Table | ||
|---|---|---|---|---|
Outside of SP1 | Within SP | Outside of SP | Within SP | |
First character of table name must be # (see also Compatibility with Previous Releases below) | yes | yes | no | no |
First character of table name must be ## (see also Compatibility with Previous Releases below) | no | no | yes | yes |
Context of table same as database in which table is created | yes | yes | yes | yes |
Two or more sessions can create table with same name2 | yes | yes | no | no |
For V1 metadata, see Identifier Restrictions in Advanced Operations Guide for the maximum length of a table name (the length includes #, ##, underscores, and ID). | yes3 | yes4 | yes3 | yes4 |
For V2 metadata, see Identifier Restrictions in Advanced Operations Guide for the maximum length of a table name (the length includes #, ##, underscores, and ID). | yes3 | yes4 | yes3 | yes4 |
Table in another database can be accessed by qualifying table name with other database name | no | no | yes | yes |
SELECT, INSERT, UPDATE, and DELETE statements permitted on table | yes | yes | yes | yes |
ALTER TABLE and DROP TABLE statements permitted on table | yes | yes | yes | yes |
Can create view on table | no | no | no | no |
Can create user-defined function on table | no | no | no | no |
Can create trigger on table | no | no | no | no |
Can grant or revoke permissions on table | no | no | no | no |
FOREIGN KEY constraint allowed with CREATE TABLE statement5 | no | no | no | no |
SELECT INTO statement can populate table with data | yes | yes | yes | yes |
SELECT INTO statement can create table6 | yes | yes | yes | yes |
Table created in one SQL session can be accessed by other SQL sessions | no | no | yes | yes |
Table created in procedure can be accessed outside of that procedure | N/A9 | no | N/A9 | yes |
Table created in topmost procedure can be accessed by nested procedures | N/A9 | no | N/A9 | no |
CREATE TABLE statement in a recursive stored procedure returns table name error on recursive call | N/A9 | yes7 | N/A9 | yes9 |
Table dropped when explicitly dropped | yes | yes | yes | yes |
Table dropped at end of session in which table created | yes | yes8 | yes | yes |
Table dropped at end of procedure in which table created | N/A9 | yes | N/A9 | no |
Table dropped at end of transaction in another session | N/A9 | N/A9 | yes | yes |
1SP stands for stored procedure 2The database engine automatically appends the name of the stored procedure and a session-specific ID to the user-defined name to ensure a unique table name. This functionality is transparent to the user. 3The total length of the table name includes # or ##, plus an underscore, plus a session ID. The session ID can be 8, 9, or 10 bytes depending on the operating system. See Identifier Restrictions in Advanced Operations Guide. 4The total length of the table name includes # or ##, plus an underscore, plus the name of the stored procedure, plus an underscore, plus a session ID. The session ID can be 8, 9, or 10 bytes depending on the operating system. See Identifier Restrictions in Advanced Operations Guide. 5Constraint returns a warning but table is created. 6A table can be created and populated with data with a single SELECT INTO statement. 7The table name already exists from the first execution of the stored procedure. 8If end of session occurs before the execution of the procedure ends. 9N/A means “not applicable.” | ||||
Compatibility with Previous Releases
Releases of Zen before PSQL v9 Service Pack 2 permitted the naming of permanent tables starting with # or ##. Permanent tables starting with # or ## cannot be used with PSQL v9 Service Pack 2 or later releases. Tables starting with # or ## are temporary tables and are created in the TEMPDB database.
A "table not found" error is returned if you attempt to access a permanent table starting with # or ## that was created with a version of Zen earlier than the version you are using.
See also Statement Separators in Zen User’s Guide.
TEMPDB Database
The installation of Zen creates a system database named TEMPDB. TEMPDB holds all temporary tables. Never delete the TEMPDB database. If you remove it, you will be unable to create temporary tables.
TEMPDB is created in the install directory of the Zen product. See Where are the files installed? in Getting Started with Zen.
If you prefer, after installation, you may change the location of the dictionary files and data files for TEMPDB. See Database Properties in Zen User’s Guide.
Caution! TEMPDB is a system database for exclusive use by the database engine. Do not use TEMPDB as a repository of your permanent tables, views, stored procedures, and so forth.
Table Names of Local Temporary Tables
The database engine automatically appends information to the names of local temporary tables to differentiate between temporary tables created across multiple sessions. The length of the appended information varies depending on the operating system.
The name of a local temporary table can be at least 10 bytes provided the number of stored procedures that create local temporary tables does not exceed 1296. The 10 bytes include the # character. The 1296 limit applies to stored procedures within the same session.
The maximum name length is 20 bytes, including the # character, the table name, and the appended information.
Transactions
A global temporary table can be explicitly dropped or is automatically dropped when the session in which the table was created ends. If a session other than the one that created the table uses the table in a transaction, the table is dropped when the transaction completes.
SELECT INTO
You can create a temporary table and populate it with data by using a single SELECT INTO statement. For example, SELECT * INTO #mytmptbl FROM Billing creates a local temporary table named #mytmptbl (provided #mytmptbl does not already exist). The temporary table contains the same data as the Billing table in the Demodata sample database.
If the SELECT INTO statement is executed a second time with the same temporary table name, an error returns because the temporary table already exists.
The SELECT INTO statement can create a temporary table from two or more tables. However, the column names must be unique in each of the tables from which the temporary table is created or an error returns.
The error can be avoided if you qualify the column names with the table names and provide an alias for each column. For example, suppose that table t1 and t2 both contain columns col1 and col2. The following statement returns an error: SELECT t1.co1, t1.col2, t2.col1, t2.col2 INTO #mytmptbl FROM t1, t2. Instead, use a statement such as this: SELECT t1.co1 c1, t1.col2 c2, t2.col1 c3, t2.col2 c4 INTO #mytmptbl FROM t1, t2.
Restrictions on SELECT INTO
• A local temporary table created within a stored procedure is inside the scope of the stored procedure. The local temporary table is destroyed after the stored procedure executes.
• The UNION and UNION ALL keywords are not permitted with a SELECT INTO statement.
• Only one temporary table can receive the results of the SELECT INTO statement. You cannot SELECT data into multiple temporary table with a single SELECT INTO statement.
Caching of Stored Procedures
Any stored procedure that references a local or a global temporary table is not cached, regardless of the cache settings. See SET CACHED_PROCEDURES and SET PROCEDURES_CACHE.
Examples of Temporary Tables
The following example creates a local temporary table named #b_temp and populates it with the data from the Billing table in the Demodata sample database.
SELECT * INTO "#b_temp" FROM Billing
============
The following example creates a global temporary table named ##tenurefac with columns ID, Dept_Name, Building_Name, Room_Number, and a primary key based on column ID.
CREATE TABLE ##tenurefac
(ID UBIGINT,
Dept_Name CHAR(20) CASE,
Building_Name CHAR(25) CASE,
Room_Number UINTEGER,
PRIMARY KEY (ID))
============
The following example alters temporary table ##tenurefac and adds the column Research_Grant_Amt.
ALTER TABLE ##tenurefac ADD Research_Grant_Amt DOUBLE
============
The following example drops temporary table ##tenurefac.
DROP TABLE ##tenurefac
============
The following example creates two temporary tables within a stored procedure, populates them with data, then assigns values to variables. The values are selected from the temporary tables.
Note: SELECT INTO is permitted within a stored procedure if used to assigned values to variables.
CREATE PROCEDURE "p11"()
AS BEGIN
DECLARE :val1_int INTEGER;
DECLARE :val2_char VARCHAR(20);
CREATE TABLE #t11 (col1 INT, col2 VARCHAR(20));
CREATE TABLE #t12 (col1 INT, col2 VARCHAR(20));
INSERT INTO #t11 VALUES (1,'t1 col2 text');
INSERT INTO #t12 VALUES (2,'t2 col2 text');
SELECT col1 INTO :val1_int FROM #t11 WHERE col1 = 1;
SELECT col2 INTO :val2_char FROM #t12 WHERE col1 = 2;
PRINT :val1_int;
PRINT :val2_char;
COMMIT;
END;
CALL P11()
============
The following example creates global temporary table ##enroll_student_global_temp_tbl and then creates stored procedure Enrollstudent. When called, the procedure inserts a record into ##enroll_student_global_temp_tbl, given the Student ID, Class ID, and a grade point average (GPA). A SELECT selects all records in the temporary table and displays the result. The length of the name for the global temporary table is permissible only for V2 metadata.
CREATE TABLE ##enroll_student_global_temp_tbl (student_id INTEGER, class_id INTEGER, GPA REAL);
CREATE PROCEDURE Enrollstudent(in :Stud_id integer, in :Class_Id integer, IN :GPA REAL);
BEGIN
INSERT INTO ##enroll_student_global_temp_tbl VALUES(:Stud_id, :Class_id, :GPA);
END;
CALL Enrollstudent(1023456781, 146, 3.2)
SELECT * FROM ##enroll_student_global_temp_tbl
============
The following example creates two temporary tables within a stored procedure, populates them with data, then assigns values to variables. The values are selected from the temporary tables.
CREATE PROCEDURE "p11"()
AS BEGIN
DECLARE :val1_int INTEGER;
DECLARE :val2_char VARCHAR(20);
CREATE TABLE #t11 (col1 INT, col2 VARCHAR(20));
CREATE TABLE #t12 (col1 INT, col2 VARCHAR(20));
INSERT INTO #t11 VALUES (1,'t1 col2 text');
INSERT INTO #t12 VALUES (2,'t2 col2 text');
SELECT col1 INTO :val1_int FROM #t11 WHERE col1 = 1;
SELECT col2 INTO :val2_char FROM #t12 WHERE col1 = 2;
PRINT :val1_int;
PRINT :val2_char;
COMMIT;
END;
CALL P11()
See Also
CREATE TRIGGER
The CREATE TRIGGER statement creates a new trigger in a database. Triggers are a type of stored procedure that is automatically executed when table data is modified with an INSERT, UPDATE, or DELETE.
Unlike a regular stored procedure, a trigger cannot be executed directly, nor can it have parameters. Triggers do not return a result set, nor can they be defined on views.
Syntax
CREATE TRIGGER trigger-name before-or-after ins-upd-del ON table-name
[ ORDER number ]
[ REFERENCING referencing-alias ] FOR EACH ROW
[ WHEN proc-search-condition ] proc-stmt
trigger-name ::= user-defined-name
before-or-after ::= BEFORE | AFTER
ins-upd-del ::= INSERT | UPDATE | DELETE
correlation-name ::= user-defined-name
Remarks
Note: In a trigger, the name of a variable must begin with a colon (:).
OLD (OLD correlation-name) and NEW (NEW correlation-name) can be used inside triggers, not in a regular stored procedure.
OLD (OLD correlation-name) and NEW (NEW correlation-name) can be used inside triggers, not in a regular stored procedure.
In a DELETE or UPDATE trigger, the letters "OLD" or an OLD correlation-name must be prepended to a column name to reference a column in the row of data prior to the update or delete operation.
In an INSERT or UPDATE trigger, the letters "NEW" or a NEW correlation-name must be prepended to a column name to reference a column in the row about to be inserted or updated.
Trigger names must be unique in the dictionary.
Triggers are executed either before or after an UPDATE, INSERT, or DELETE statement is executed, depending on the type of trigger.
Note: CREATE TRIGGER statements are subject to the same length and other limitations as CREATE PROCEDURE. For more information, see Limits and Data Type Restrictions.
Examples
The following example creates a trigger that records any new values inserted into the Tuition table into TuitionIDTable.
CREATE TABLE Tuitionidtable (PRIMARY KEY(id), id UBIGINT);
CREATE TRIGGER InsTrig
BEFORE INSERT ON Tuition
REFERENCING NEW AS Indata
FOR EACH ROW
INSERT INTO Tuitionidtable VALUES(Indata.ID);
An INSERT on Tuition calls the trigger.
============
The following example shows how to keep two tables, A and B, synchronized with triggers. Both tables have the same structure.
CREATE TABLE A (col1 INTEGER, col2 CHAR(10));
CREATE TABLE B (col1 INTEGER, col2 CHAR(10));
CREATE TRIGGER MyInsert
AFTER INSERT ON A FOR EACH ROW
INSERT INTO B VALUES (NEW.col1, NEW.col2);
CREATE TRIGGER MyDelete
AFTER DELETE ON A FOR EACH ROW
DELETE FROM B WHERE B.col1 = OLD.col1 AND B.col2 = OLD.col2;
CREATE TRIGGER MyUpdate
AFTER UPDATE ON A FOR EACH ROW
UPDATE B SET col1 = NEW.col1, col2 = NEW.col2 WHERE B.col1 = OLD.col1 AND B.col2 = OLD.col2;
Note that OLD and NEW in the example keep the tables synchronized only if table A is altered with nonpositional SQL statements. If the SQLSetPOS API or a positioned update or delete is used, then the tables stay synchronized only if table A does not contain any duplicate records. A SQL statement cannot be constructed to alter one record but leave another duplicate record unaltered.
???see note on the Cursors section to discuss SQLSetPos. Need non-ODBC term from Cursors overview>
See Also
CREATE USER
The CREATE USER statement creates a new user account in a database.
This function can be used to create a user account in a database with a password, without a password, or as member of a group.
Syntax
CREATE USER user-name [ WITH PASSWORD user-password ][ IN GROUP referencing-alias ]
Remarks
Note: This statement creates a user with the same rights as those of a user created using the Zen Control Center (ZenCC). For example, the created user is not restricted by default from creating a database even if the user is not logged in as Master.
Only the Master user can execute this statement.
Security must be turned on to perform this statement.
User-name and user-password here only refer to Zen databases and are not related to user names and passwords set at the operating system level. Zen user names, groups, and passwords can also be configured through the Zen Control Center (ZenCC).
User name must be unique in the dictionary.
The user name and password must be enclosed in double quotes if they contain spaces or other nonalphanumeric characters.
If you create a user as the member of a group, you must set up the group before creating the user.
For further general information about users and groups, see Master User and Users and Groups in Advanced Operations Guide, and Assigning Permissions Tasks in Zen User’s Guide.
Examples
The following examples show how to create a new user account without any login privileges and without a membership in any group.
CREATE USER pgranger
The new user name is pgranger. The user password is NULL and the user account is not a member of any group.
CREATE USER "polly granger"
The new user name is polly granger with nonalphanumeric characters. The user password is NULL and the user account is not a member of any group.
============
The following examples show how to create a new user account with login privileges that is not a member of any group.
CREATE USER pgranger WITH PASSWORD Prvsve1
The new user name is pgranger. The user password is Prsve1 (case-sensitive).
CREATE USER pgranger WITH PASSWORD "Nonalfa$"
The new user name is pgranger. The user password is Nonalfa$ (case-sensitive) with nonalphanumeric characters.
============
The following example shows how create a new user as a member of a group without login privileges.
CREATE USER pgranger IN GROUP developers
The new user name is pgranger. The new user account is a assigned to the group developers.
============
The following example shows how create a new user as a member of a group with login privileges.
CREATE USER pgranger WITH PASSWORD Prvsve1 IN GROUP developers
The new user name is pgranger. The new user account is assigned to the group developers and has the case-sensitive password Prvsve1. The order of this syntax (CREATE USER..WITH PASSWORD...IN GROUP) is absolutely necessary.
See Also
CREATE VIEW
The CREATE VIEW statement defines a stored view or virtual table.
Syntax
CREATE VIEW view-name [ ( column-name [ , column-name ]...) ]
[ ORDER BY order-by-expression [ , order-by-expression ]... ]
view-name ::= user-defined-name
column-name ::= user-defined-name
order-by-expression ::= expression [ CASE (string) | COLLATE collation-name ] [ ASC | DESC ] (see SELECT syntax)
Remarks
A view is a database object that stores a query and behaves like a table. Data returned by a view is stored in one or more tables, referenced by SELECT statements. Rows and columns in the view are refreshed each time it is referenced.
See Identifier Restrictions in Advanced Operations Guide for the maximum length of a view name. The maximum number of columns in a view is 256. View definitions have a 64 KB limit.
Zen supports grouped views, defined as views using any of the following in the SELECT statement:
• DISTINCT
• GROUP BY
• ORDER BY
• UNION
Grouped views may be used in a subquery provided that the subquery is an expression. A subquery is not considered an expression if it is connected with the operators IN, EXISTS, ALL, or ANY.
View definitions cannot contain procedures.
ORDER BY
ORDER BY in a view works the same way as in a SELECT statement. Note especially the following:
• You may use aliases in an ORDER BY clause.
• You may use scalar subqueries in an ORDER BY clause.
• The use of TOP or LIMIT is recommended in views that use ORDER BY.
• If the engine uses a temporary table to return the ordered result of ORDER BY and the query uses a dynamic cursor, then the cursor is converted to static. For example, temporary tables are always required when ORDER BY is used on an unindexed column. Forward-only and static cursors are not affected.
Trusted and Non-Trusted Views
A trusted view includes WITH EXECUTE AS 'MASTER'. See Trusted and Non-Trusted Objects.
Examples of Trusted and Non-Trusted Views
The following statement creates a non-trusted view named vw_Person, which creates a phone list of all the people enrolled in a university. This view lists the last names, first names and telephone numbers with a heading for each column. The Person table is part of the Demodata sample database.
CREATE VIEW vw_Person (lastn,firstn,phone) AS SELECT Last_Name, First_Name,Phone FROM Person
In a subsequent query on the view, you may use the column headings in your SELECT statement:
SELECT lastn, firstn FROM vw_Person
The user executing the view must have SELECT permissions on the Person table.
============
The following example creates a similar view, but a trusted one.
CREATE VIEW vw_trusted_Person (lastn,firstn,phone) WITH EXECUTE AS 'MASTER' AS SELECT Last_Name, First_Name,Phone FROM Person
Now assume that to user1 you grant SELECT permissions on vw_Person. User1 can use the column headings in a SELECT statement:
SELECT lastn, firstn FROM vw_trusted_Person
User1 is not required to have SELECT permissions on the Person table because the permissions were granted to the trusted view.
============
The following statement creates a view named vw_Person, which creates a phone list of all the people enrolled in a university. This view lists the last names, first names and telephone numbers with a heading for each column. The Person table is part of the Demodata sample database.
CREATE VIEW vw_Person (lastn, firstn, telphone) AS SELECT Last_Name, First_Name, Phone FROM Person
In a subsequent query on the view, you may use the column headings in your SELECT statement, as shown in the next example.
SELECT lastn, firstn FROM vw_Person
============
The example above can be changed to include an ORDER BY clause.
CREATE VIEW vw_Person_ordby (lastn, firstn, telphone) AS SELECT Last_Name, First_Name, Phone FROM Person ORDER BY phone
The view returns the following (for brevity, not all records are shown).
Last_Name First_Name Phone
========= ========== ==========
Vqyles Rex 2105551871
Qulizada Ahmad 2105552233
Ragadio Ernest 2105554654
Luckey Anthony 2105557628
============
The following example creates a view that returns the grade point average (GPA) of students in descending order, and, for each GPA ordering, lists the students by last name descending.
CREATE VIEW vw_gpa AS SELECT Last_Name,Left(First_Name,1) AS First_Initial,Cumulative_GPA AS GPA FROM Person LEFT OUTER JOIN Student ON Person.ID=Student.ID ORDER BY Cumulative_GPA DESC, Last_Name
The view returns the following (for brevity, not all records are shown).
Last_Name First_Initial GPA
========================= =============== ======
Abuali I 4.000
Adachi K 4.000
Badia S 4.000
Rowan A 4.000
Ujazdowski T 4.000
Wotanowski H 4.000
Gnat M 3.998
Titus A 3.998
Mugaas M 3.995
============
This example creates a view that returns the top 10 records from the Person table, ordered by ID.
CREATE VIEW vw_top10 AS SELECT TOP 10 * FROM person ORDER BY id;
The view returns the following (for brevity, not all columns are shown).
ID First_Name Last_Name
========= ========== ==========
100062607 Janis Nipart
100285859 Lisa Tumbleson
100371731 Robert Mazza
100592056 Andrew Sugar
100647633 Robert Reagen
100822381 Roosevelt Bora
101042707 Avram Japadjief
10 rows were affected.
============
The following example creates a view to demonstrate that ORDER BY can be used with UNION.
CREATE VIEW vw_union_ordby_desc AS SELECT first_name FROM person UNION SELECT last_name FROM PERSON ORDER BY first_name DESC
The view returns the following (for brevity, not all records are shown).
First_Name
===========
Zyrowski
Zynda
Zydanowicz
Yzaguirre
Yyounce
Xystros
Xyois
Xu
Wyont
Wynalda
Wykes
See Also
DECLARE
Remarks
Use the DECLARE statement to define a SQL variable.
This statement is allowed only inside of a stored procedure, a user-defined function, or a trigger.
The name of a variable must begin with a colon (:) or an at sign (@), both in the definition and use of the variable or parameter. A variable must be declared before it can be set to a value with SET.
Use a separate DECLARE statement for each variable (you cannot declare multiple variables with a single statement). Specify a value or values for data types that require a size, precision, or scale, such as CHAR, DECIMAL, NUMERIC, and VARCHAR.
Examples
The following examples show how to declare variables, including ones that require a value for size, precision, or scale.
DECLARE :SaleItem CHAR(15);
DECLARE :CruiseLine CHAR(25) DEFAULT 'Open Seas Tours'
DECLARE :UnitWeight DECIMAL(10,3);
DECLARE :Titration NUMERIC(12,3);
DECLARE :ReasonForReturn VARCHAR(200);
DECLARE :Counter INTEGER = 0;
DECLARE :CurrentCapacity INTEGER = 9;
DECLARE :Cust_ID UNIQUEIDENTIFIER = NEWID()
DECLARE :ISO_ID UNIQUEIDENTIFIER = '1129619D-772C-AAAB-B221-00FF00FF0099'
See Also
DECLARE CURSOR
The DECLARE CURSOR statement defines a SQL cursor.
Syntax
DECLARE cursor-name CURSOR FOR select-statement [ FOR UPDATE | FOR READ ONLY ]
cursor-name ::= user-defined-name
Remarks
The DECLARE statement is only allowed inside of a stored procedure or a trigger, since cursors and variables are only allowed inside of stored procedures and triggers.
The default behavior for cursors is read-only. Therefore, you must use FOR UPDATE to explicitly designate an update (write or delete).
Examples
The following example creates a cursor that selects values from the Degree, Residency, and Cost_Per_Credit columns in the Tuition table and orders them by ID number.
DECLARE BTUCursor CURSOR
FOR SELECT Degree, Residency, Cost_Per_Credit
FROM Tuition
ORDER BY ID;
============
The following example uses FOR UPDATE to ensure a delete.
CREATE PROCEDURE MyProc(IN :CourseName CHAR(7)) AS
BEGIN
DECLARE c1 CURSOR FOR SELECT name FROM course WHERE name = :CourseName FOR UPDATE;
OPEN c1;
FETCH NEXT FROM c1 INTO :CourseName;
DELETE WHERE CURRENT OF c1;
CLOSE c1;
END;
CALL MyProc('HIS 305')
============
DECLARE cursor1 CURSOR
FOR SELECT Degree, Residency, Cost_Per_Credit
FROM Tuition ORDER BY ID
FOR UPDATE;
See Also
DEFAULT
A table may have one or more columns that do not allow a null value. To avoid errors, it can be useful to define the default contents for those columns so that in new records they always have valid values. To do this, use the DEFAULT keyword in CREATE or ALTER column definitions to set the column value to be used with INSERT and UPDATE statements when one or both of the following apply:
• No explicit column value is provided.
• A column does not allow a binary zero and requires a valid value other than a null.
Once a default column value is defined, then when you insert or update a row, you can use the DEFAULT keyword to provide its value in a VALUES clause.
To summarize, the DEFAULT keyword can be used in the following instances:
• Column definition of CREATE TABLE
• Column definition of ALTER TABLE
• VALUES clause of INSERT
• VALUES clause of UPDATE
The default value is a literal or an expression. In a CREATE TABLE or ALTER TABLE statement it must:
• Match the data type of the column
• Conform to any other constraint imposed on the column, such as range or length
In INSERT and UPDATE statements, for columns with a DEFAULT expression defined, Zen evaluates the expression and writes the result while inserting or updating. Note that for INSERT, the columns in existing records are unchanged.
Syntax
See the syntax for the following statements for use of the DEFAULT keyword:
• INSERT
• UPDATE
Remarks
You can specify a literal value or expression as DEFAULT for any column as explained in the following topics:
Restrictions on Identity Data Types
For an IDENTITY, SMALLIDENTITY, or BIGIDENTITY data type column in a CREATE TABLE or ALTER TABLE statement, you may set a default value of zero (DEFAULT 0 or DEFAULT '0'). No other default value is permissible for these data types.
Scalar Functions and Simple Expressions as Default Column Values
In addition to literals and NULL values, Zen also allows you to define DEFAULT values using scalar functions and simple expressions so long as they return a value with the same data type as the column. For example, USER() can be used for string columns CHAR and VARCHAR. The returned value is evaluated at the time of its use in new INSERT and UPDATE statements.
The following example shows the use of DEFAULT with a simple expression and a variety of scalar functions:
CREATE TABLE DEFAULTSAMPLE (
a INT DEFAULT 100,
b DOUBLE DEFAULT PI(),
c DATETIME DEFAULT NOW(),
d CHAR(20) DEFAULT USER(),
e VARCHAR(10) DEFAULT UPPER(DAYNAME(CURDATE())),
f VARCHAR(40) DEFAULT '{'+CONVERT(NEWID(),SQL_VARCHAR)+'}',
g INTEGER DEFAULT DAYOFYEAR(NOW())
);
INSERT INTO DEFAULTSAMPLE DEFAULT VALUES;
SELECT * FROM TX;
a b c d
=========== ======================= ============================== ===================
100 3.141592653589793 2021-11-12 17:25:59.288 Master
e f g
========= ======================================= ==========
FRIDAY {EF66F711-36D2-40FA-B928-BAFCC486DA6B} 316
Using DEFAULT with ALTER TABLE
If you are using ALTER TABLE to modify a column definition in order to add a DEFAULT attribute, you need to include any attributes already defined on the column, since using ALTER TABLE to modify a column does not add to its existing definition, but instead replaces it. Also, as shown in the following example, altering a column to change its DEFAULT value has no effect on any existing value:
CREATE TABLE Tab10 (a INT, b CHAR(20) CASE); --column b is case-insensitive
ALTER TABLE Tab10 ALTER COLUMN b CHAR(20) DEFAULT 'xyz'; --column b has a default but is no longer case-insensitive
INSERT INTO Tab10 DEFAULT VALUES;
SELECT * FROM Tab10;
a b
=========== ====================
(Null) xyz
1 row was affected.
SELECT * FROM Tab10 WHERE b = 'XYZ'; --case doesn't match so no row returned
a b
=========== ====================
0 rows were affected.
ALTER TABLE Tab10 ALTER COLUMN b CHAR(20) CASE DEFAULT 'xyz'; --column b is now case-insensitive *and* has a default
SELECT * FROM Tab10 WHERE b = 'XYZ'; --case doesn't need to match
a b
=========== ====================
(Null) xyz
1 row was affected.
Examples
The following statement creates table Tab5. The default value of the col5 column is 200.
CREATE TABLE Tab5
(col5 INT DEFAULT 200)
============
This statement creates table Tab1 where column col1 is the DATE part of the result returned by NOW().
CREATE TABLE Tab1
(col1 DATE DEFAULT NOW())
============
This statement creates table Tab8 where column col8 is the time of the INSERT or UPDATE.
CREATE TABLE Tab8
(col8 TIMESTAMP DEFAULT CURRENT_TIMESTAMP())
============
The following statement creates table Tab6 where column col6 is the user name after an INSERT or UPDATE. DEFAULT USER is practical only with security enabled. Otherwise USER is always NULL. The keyword USER gives the same result as the USER() function.
CREATE TABLE Tab6
(col6 VARCHAR(20) DEFAULT USER)
============
The following statement shows an invalid example. It results in a parse-time error because TIME is not an allowed data type for a DATE column.
CREATE TABLE Tab
(col DATE DEFAULT CURTIME())
============
The following statement shows an invalid example. It results in a parse-time error because although '3.1' is convertible to a number, it is not a valid integer.
CREATE TABLE Tab
(col SMALLINT DEFAULT '3.1')
============
The following statement shows an invalid example. The CREATE TABLE statement succeeds, but the INSERT statement fails because -60000 is outside of the range supported by SMALLINT.
CREATE TABLE Tab
(col SMALLINT DEFAULT 3 * -20000)
INSERT INTO Tab values(DEFAULT)
============
The following statements show valid examples of setting a default value of zero for an IDENTITY and a SMALLIDENTITY data type.
CREATE TABLE t1 ( c1 IDENTITY DEFAULT '0' )
ALTER TABLE t1 ALTER c1 SMALLIDENTITY DEFAULT 0
============
The following statements show invalid examples of setting a default value for an IDENTITY and a SMALLIDENTITY data type.
CREATE TABLE t1 ( c1 IDENTITY DEFAULT 3 )
ALTER TABLE t1 ALTER c1 SMALLIDENTITY DEFAULT 1
See Also
DELETE (positioned)
Use the positioned DELETE statement to remove the current row of a view associated with a SQL cursor.
Syntax
DELETE WHERE CURRENT OF cursor-name
cursor-name ::= user-defined-name
Remarks
This statement is allowed in stored procedures, triggers, and at the session level.
Note: Even though positioned DELETE is allowed at the session level, the DECLARE CURSOR statement is not. The method to obtain the cursor name of the active result set depends on the Zen access method your application uses. See the Zen documentation for that access method.
Examples
The following sequence of statements provide the setting for the positioned DELETE statement. The required statements for the positioned DELETE statement are DECLARE CURSOR, OPEN CURSOR, and FETCH FROM cursorname.
The Modern European History class has been dropped from the schedule, so this example deletes the row for Modern European History (HIS 305) from the Course table in the sample database:
CREATE PROCEDURE DropClass();
DECLARE :CourseName CHAR(7);
DECLARE c1 CURSOR
FOR SELECT name FROM COURSE WHERE name = :CourseName;
BEGIN
SET :CourseName = 'HIS 305';
OPEN c1;
FETCH NEXT FROM c1 INTO :CourseName;
DELETE WHERE CURRENT OF c1;
END;
See Also
DELETE
This statement deletes specified rows from a database table or view.
Syntax
DELETE [ FROM ] < table-name | view-name > [ alias-name ]
[ FROM table-reference [, table-reference ] ...
[ WHERE search-condition ]
[ FROM table-reference [, table-reference ] ...
[ WHERE search-condition ]
table-name ::= user-defined-name
view-name ::= user-defined-name
alias-name ::= user-defined-name (Alias-name is not allowed if a second FROM clause is used. See FROM Clause.)
table-reference ::= { OJ outer-join-definition }
| join-definition
| ( join-definition )
outer-join-definition ::= table-reference outer-join-type JOIN table-reference ON search-condition
outer-join-type ::= LEFT [ OUTER ] | RIGHT [ OUTER ] | FULL [ OUTER ]
search-condition ::= search-condition AND search-condition
| search-condition OR search-condition
| NOT search-condition
| ( search-condition )
| predicate
db-name ::= user-defined-name
view-name ::= user-defined-name
join-definition ::= table-reference [ join-type ] JOIN table-reference ON search-condition
| table-reference CROSS JOIN table-reference
| outer-join-definition
join-type ::= INNER | LEFT [ OUTER ] | RIGHT [ OUTER ] | FULL [ OUTER ]
Remarks
DELETE statements, as with INSERT and UPDATE, behave in an atomic manner. That is, if a deletion of more than one row fails, then all deletions of previous rows by the same statement are rolled back.
FROM Clause
Some confusion may arise pertaining to the second optional FROM clause and references to the table whose rows are being deleted (referred to as the "delete table"). If the delete table occurs in the second FROM clause, then one of the occurrences is the same instance of the table whose rows are being deleted.
For example, in the statement DELETE t1 FROM t1, t2 WHERE t1.c1 = t2.c1, the t1 immediately after DELETE is the same instance of table t1 as the t1 after FROM. Therefore, the statement is identical to DELETE t1 FROM t2 WHERE t1.c1 = t2.c1.
If the delete table occurs in the second FROM clause multiple times, one occurrence must be identified as the same instance as the delete table. The second FROM clause reference that is identified as the same instance as the delete table is the one that does not have a specified alias.
Therefore, the statement DELETE t1 FROM t1 a, t1 b WHERE a.c1 = b.c1 is invalid because both instances of t1 in the second FROM clause contain an alias. The following version is valid: DELETE t1 FROM t1, t1 b WHERE t1.c1 = b.c1.
The following conditions apply to the second FROM clause:
• If the DELETE statement contains an optional second FROM clause, the table reference prior to the FROM clause cannot have an alias specified. For example, DELETE t1 a FROM t2 WHERE a.c1 = t2.c1 returns the following error:
SQL_ERROR (-1)
SQLSTATE of "37000"
"Table alias not allowed in UPDATE/DELETE statement with optional FROM."
A valid version of the statement is DELETE t1 FROM t2 WHERE t1.c1 = t2.c1 or DELETE t1 FROM t1 a, t2 WHERE a.c1 = t2.c1.
• If more than one reference to the delete table appears in the second FROM clause, then only one of the references can have a specified alias. For example, DELETE t1 FROM t1 a, t1 b WHERE a.c1 = b.c1 returns the following error:
SQL_ERROR (-1)
SQLSTATE of "37000"
"The table t1 is ambiguous."
In the erroneous statement, assume that you want table t1 with alias "a" to be the same instance of the delete table. A valid version of the statement is DELETE t1 FROM t1, t1 b WHERE t1.c1 = b.c1.
• The second FROM clause is supported in a DELETE statement only at the session level. The FROM clause is not supported if the DELETE statement occurs within a stored procedure.
Examples
The following statement deletes the row for first name Ellen from the person table in the sample database.
DELETE FROM person WHERE First_Name = 'Ellen'
The following statement deletes the row for Modern European History (HIS 305) from the course table in the sample database:
DELETE FROM Course WHERE Name = 'HIS 305'
DISTINCT
Include the DISTINCT keyword in your SELECT statement to remove duplicate values from the result. By using DISTINCT, you can retrieve all unique rows that match the selection.
The following rules apply:
• Zen supports DISTINCT in subqueries.
• DISTINCT is ignored if the selection list contains an aggregate. Aggregation already guarantees no duplicate result rows.
Examples
The following statements retrieve all courses taught by faculty ID 111191115. The second statement uses DISTINCT to eliminate rows with duplicate column values.
SELECT c.Name, c.Description
FROM Course c, class cl
WHERE c.name = cl.name AND cl.faculty_id = '111191115';
Name Description
======= ==================================================
CHE 203 Chemical Concepts and Properties I
CHE 203 Chemical Concepts and Properties I
CHE 205 Chemical Concepts and Properties II
CHE 205 Chemical Concepts and Properties II
SELECT DISTINCT c.Name, c.Description
FROM Course c, class cl
WHERE c.name = cl.name AND cl.faculty_id = '111191115';
Name Description
======= ==================================================
CHE 203 Chemical Concepts and Properties I
CHE 205 Chemical Concepts and Properties II
Note: The following use of DISTINCT is not allowed:
SELECT DISTINCT column1, DISTINCT column2
SELECT DISTINCT column1, DISTINCT column2
See Also
For other uses of DISTINCT, see DISTINCT in Aggregate Functions.
DROP DATABASE
The DROP DATABASE statement deletes a database. Only the Master user can issue this statement.
Syntax
DROP DATABASE [ IF EXISTS ] database-name [ DELETE FILES ]
database-name ::= user-defined-name
Remarks
As Master user, you must be logged on to a database to issue the statement. The DROP DATABASE statement can be used to drop any database, including the one to which you are currently logged on, provided the security setting permits deletion. See Secured Databases below.
DROP DATABASE cannot be used to delete system databases such as defaultdb and tempdb. The statement can be used to delete the last remaining user-defined database if you choose, security permitting.
The DROP DATABASE statement cannot be used in a stored procedure or in a user-defined function.
The expression IF EXISTS causes the statement to return success instead of an error if a database does not exist. IF EXISTS does not suppress other errors.
Secured Databases
You cannot delete a database secured with the Database security model. You can delete a database secured with any of the following ways:
• Classic security
• Mixed security
• Relational security (Master password) in combination with Classic or Mixed security
For more information, see Zen Security in Advanced Operations Guide.
DELETE FILES
The DELETE FILES clause is for deleting data dictionary files (DDFs). Data files are not deleted.
If DELETE FILES is omitted, the DDFs remain on physical storage, but the database name is deleted from dbnames.cfg. Once the name is removed from dbnames.cfg, the database no longer exists to the database engine. Retaining the DDFs allows you to recreate the database should you so choose.
Note that the DDFs must not be in use to delete them. If you have Zen Control Center open, for example, a "file is locked" error returns if you use the DELETE FILES clause. While ZenCC is open, the DDFs are considered to be in use, which prevents their deletion.
Examples
The following example deletes a database named inventorydb from dbnames.cfg, but it retains the database DDFs (and data files) in physical storage.
DROP DATABASE inventorydb
============
The following example deletes a database named HRUSBenefits and its DDFs. Data files are retained for HRUSBenefits.
DROP DATABASE HRUSBenefits DELETE FILES
See Also
DROP FUNCTION
The DROP FUNCTION statement removes an existing user-defined function (UDF) from the database.
Note: An error message appears if you attempt to delete a UDF that does not exist.
Syntax
DROP FUNCTION [ IF EXISTS ] { function_name }
function_name ::= Name of the user-defined function to be removed.
Remarks
The expression IF EXISTS causes the statement to return success instead of an error if a function does not exist. IF EXISTS does not suppress other errors.
Examples
The following statement drops UDF fn_MyFunc from the database.
DROP FUNCTION fn_MyFunc
See Also
DROP GROUP
This statement removes one or more groups in a secured database.
Syntax
DROP GROUP [ IF EXISTS ] group-name [ , group-name ]...
Remarks
Only the Master user can perform this statement. Separate multiple group names with a comma. A group must be empty to be dropped.
Security must be turned on to perform this statement.
The expression IF EXISTS causes the statement to return success instead of an error if a group does not exist. IF EXISTS does not suppress other errors.
Examples
The following example drops the group zengroup.
DROP GROUP zengroup
The following example uses a list to drop groups.
DROP GROUP zen_dev, zen_marketing
See Also
DROP INDEX
This statement drops a specific index from a designated table.
Syntax
DROP INDEX [ IF EXISTS ] [ table-name.]index-name [ IN DICTIONARY ]
table-name ::= user-defined-name
index-name ::= user-defined-name
Remarks
IN DICTIONARY is an advanced feature that should be used only by system administrators and when absolutely necessary. The IN DICTIONARY keyword allows you to drop an index from a DDF without removing the index from the underlying data file. Normally, Zen keeps DDFs and data files tightly synchronized, but this feature allows users the flexibility to force out-of-sync table dictionary definitions to match an existing data file. This can be useful when you want to create a new definition in the dictionary to match an existing data file.
Caution! Modifying a DDF without performing corresponding modifications to the underlying data file can cause serious problems.
The expression IF EXISTS causes the statement to return success instead of an error if an index does not exist. IF EXISTS does not suppress other errors.
For more information on this feature, see the discussion under IN DICTIONARY.
Partial Indexes
When dropping partial indexes, the PARTIAL modifier is not required.
Examples
The following statement drops the named index from the Faculty table.
DROP INDEX Faculty.Dept
============
The following examples create a detached table, one with no associated data file, then add and drop an index from the table definition. The index is a detached index because there is no underlying Btrieve index associated with it.
CREATE TABLE t1 IN DICTIONARY (c1 int, c2 int)
CREATE INDEX idx_1 IN DICTIONARY on t1(c1)
DROP INDEX t1.idx_1 IN DICTIONARY
See Also
DROP PROCEDURE
This statement removes one or more stored procedures from the current database.
Syntax
DROP PROCEDURE [ IF EXISTS ] procedure-name
Remarks
The expression IF EXISTS causes the statement to return success instead of an error if a procedure does not exist. IF EXISTS does not suppress other errors.
Examples
The following statement drops the stored procedure myproc from the dictionary:
DROP PROCEDURE myproc
See Also
DROP TABLE
This statement removes a table from a designated database.
Syntax
DROP TABLE [ IF EXISTS ] table-name [ IN DICTIONARY ]
table-name ::= user-defined-name for the table to be removed
IN DICTIONARY
See the discussion of IN DICTIONARY for ALTER TABLE.
Remarks
If any triggers depend on the table, the table is not dropped.
If a transaction is in progress and refers to the table, then an error is signaled and the table is not dropped.
The drop of table fails if other tables depend on the table to be dropped.
If a primary key exists, it is dropped. The user need not drop the primary key before dropping the table. If the primary key of the table is referenced by a constraint belonging to another table, then the table is not dropped and an error is signaled.
If the table has any foreign keys, then those foreign keys are dropped.
If the table has any other constraints (for example, NOT NULL, CHECK, UNIQUE, or NOT MODIFIABLE), then those constraints are dropped when the table is dropped.
The expression IF EXISTS causes the statement to return success instead of an error if a table does not exist. IF EXISTS does not suppress other errors.
Examples
The following statement drops the class table definition from the dictionary.
DROP TABLE Class
See Also
DROP TRIGGER
This statement removes a trigger from the current database.
Syntax
DROP TRIGGER [ IF EXISTS ] trigger-name
Remarks
The expression IF EXISTS causes the statement to return success instead of an error if a trigger does not exist. IF EXISTS does not suppress other errors.
Examples
The following example drops the trigger named InsTrig.
DROP TRIGGER InsTrig
See Also
DROP USER
The DROP USER statement removes user accounts from a database.
Syntax
DROP USER [ IF EXISTS ] user-name [ , user-name ]...
Remarks
Only the Master user can execute this statement.
Security must be turned on to perform this statement.
Separate multiple user names with a comma.
If the user name contains spaces or other nonalphanumeric characters, it must be enclosed in double quotation marks.
Dropping a user account does not delete the tables, views, or other database objects created by the user.
The expression IF EXISTS causes the statement to return success instead of an error if a user does not exist. IF EXISTS does not suppress other errors.
For further general information about users and groups, see Master User and Users and Groups in Advanced Operations Guide, and Assigning Permissions Tasks in Zen User’s Guide.
Examples
The following example removes the user account pgranger.
DROP USER pgranger
============
The following example removes multiple user accounts.
DROP USER pgranger, "lester pelling"
See Also
DROP VIEW
This statement removes a specified view from the database.
Syntax
DROP VIEW [ IF EXISTS ] view-name
view-name ::= user-defined name
Remarks
The expression IF EXISTS causes the statement to return success instead of an error if a view does not exist. IF EXISTS does not suppress other errors.
Examples
The following statement drops the vw_person view definition from the dictionary.
DROP VIEW vw_person
See Also
END
Remarks
See the discussion for BEGIN [ATOMIC].
EXECUTE
The EXECUTE statement has two uses:
• To invoke a user-defined procedure or a system stored procedure. You may use EXECUTE in place of the CALL statement
• To execute a character string, or an expression that returns a character string, within a stored procedure.
Syntax
To invoke a stored procedure:
EXEC[UTE] stored-procedure [ ( [ procedure-parameter [ , procedure-parameter ]... ] ) ]
stored-procedure ::= the name of a stored procedure
procedure-parameter ::= the input parameters required by the stored procedure
Within a user-defined stored procedure:
EXEC[UTE] ( string [ + string ]... )
string ::= a string, string variable, or an expression that returns a character string
Remarks
The stored procedure syntax EXEC[UTE] (string...) does not support NCHAR values for literals and variables. Values used in constructing the string are converted to CHAR values before execution.
Examples
The following example executes a procedure without parameters:
EXEC NoParms() or CALL NoParms
The following examples execute a procedure with parameters:
EXEC Parms(vParm1, vParm2)
EXECUTE CheckMax(N.Class_ID)
============
The following procedure selects the student ID from the Billing table.
CREATE PROCEDURE tmpProc(IN :vTable CHAR(25)) RETURNS (sID INTEGER) AS
BEGIN
EXEC ('SELECT Student_ID FROM ' + :vtable);
END;
EXECUTE tmpProc('Billing')
See Also
EXISTS
The EXISTS keyword tests whether rows exist in the result of a subquery. True is returned if the subquery contains any rows.
Syntax
EXISTS ( subquery )
Remarks
For every row the outer query evaluates, Zen tests for the existence of a related row from the subquery. Zen includes in the statement's result table each row from the outer query that corresponds to a related row from the subquery.
You may use EXISTS for a subquery within a stored procedure. However, the subquery SELECT statement within the stored procedure may not contain a COMPUTE clause or the INTO keyword.
In most cases, a subquery with EXISTS can be rewritten to use IN. Zen can process the query more efficiently if the query uses IN.
Examples
The following statement returns a list containing only persons who have a 4.0 grade point average:
SELECT * FROM Person p WHERE EXISTS
(SELECT * FROM Enrolls e WHERE e.Student_ID = p.id
AND Grade = 4.0)
This statement can be rewritten to use IN:
SELECT * FROM Person p WHERE p.id IN
(SELECT e.Student_ID FROM Enrolls WHERE Grade = 4.0)
============
The following procedure selects the ID from the Person table using a value as an input parameter. The first EXEC of the procedure returns "Exists returned true." The second EXEC returns "Exists returned false."
CREATE PROCEDURE ex1(IN :vID INTEGER) RETURNS ( d1 VARCHAR(30) ) AS
BEGIN
IF EXISTS (SELECT id FROM person WHERE id < :vID)
THEN PRINT 'Exists returned true';
ELSE PRINT 'Exists returned false';
END IF;
END;
EXEC ex1(222222222);
EXEC ex1(1);
See Also
FETCH
Syntax
FETCH [ [NEXT] FROM ] cursor-name INTO variable-name
cursor-name ::= user-defined-name
Remarks
A FETCH statement positions a SQL cursor on a specified row of a table and retrieves values from that row by placing them into the variables in a target list.
You may choose to omit the NEXT and FROM keywords while fetching data from any cursor.
Note: Zen supports only the forward-only cursor. So, you will not be able to control the flow of the cursor records even by omitting NEXT FROM.
Examples
The FETCH statement in this example retrieves values from cursor c1 into the CourseName variable. The Positioned UPDATE statement in this example updates the row for Modern European History (HIS 305) in the Course table in the Demodata sample database:
CREATE PROCEDURE UpdateClass();
BEGIN
DECLARE :CourseName CHAR(7);
DECLARE :OldName CHAR(7);
DECLARE c1 CURSOR FOR SELECT name FROM course WHERE name = :CourseName;
OPEN c1;
SET :CourseName = 'HIS 305';
FETCH NEXT FROM c1 INTO :OldName;
UPDATE SET name = 'HIS 306' WHERE CURRENT OF c1;
END;
============
CREATE PROCEDURE MyProc(OUT :CourseName CHAR(7)) AS
BEGIN
DECLARE cursor1 CURSOR
FOR SELECT Degree, Residency, Cost_Per_Credit FROM Tuition ORDER BY ID;
OPEN cursor1;
FETCH NEXT FROM cursor1 INTO :CourseName;
CLOSE cursor1;
END
See Also
FOREIGN KEY
Remarks
Include the FOREIGN KEY keywords in the ADD clause to add a foreign key to a table definition.
Note: You must be logged in to the database using a database name before you can add a foreign key or conduct any other referential integrity (RI) operation. Also, when security is enabled, you must have the Reference right on the table to which the foreign key refers before you can add the key.
Include a FOREIGN KEY clause in your CREATE TABLE statement to define a foreign key on a dependent table. In addition to specifying a list of columns for the key, you can define a name for the key.
The columns in the foreign key column may be nullable. However, ensure that pseudo-null columns do not exist in an index that does not index pseudo-null values.
The foreign key name must be unique in the dictionary. If you omit the foreign key name, Zen uses the name of the first column in the key as the foreign key name. This can cause a duplicate foreign key name error if your dictionary already contains a foreign key with that name.
When you specify a foreign key, Zen creates an index on the columns that make up the key. This index has the same attributes as the index on the corresponding primary key except that it allows duplicate values. To assign other attributes to the index, create it explicitly using a CREATE INDEX statement. Then, define the foreign key with an ALTER TABLE statement. When you create the index, ensure that it does not allow null values and that its case and collating sequence attributes match those of the index on the corresponding primary key column.
The columns in a foreign key must be the same data types and lengths and in the same order as the referenced columns in the primary key. The only exception is that you can use an integer column in the foreign key to refer to an IDENTITY, SMALLIDENTITY, or BIGIDENTITY column in the primary key. In this case, the two columns must be the same length.
Zen checks for anomalies in the foreign keys before it creates the table. If it finds conditions that violate previously defined referential integrity (RI) constraints, it generates a status code and does not create the table.
Note: When you create a foreign key on a table that already contains data, Zen does not validate the data values already present in the foreign key columns and those in the primary key columns. This constraint applies to an INSERT, UPDATE, or DELETE action made after the foreign key is created.
When you define a foreign key, you must include a REFERENCES clause indicating the name of the table that contains the corresponding primary key. The primary key in the parent table must already be defined. In addition, if security is enabled on the database, you must have the Reference right on the table that contains the primary key.
You cannot create a self-referencing foreign key with the CREATE TABLE statement. Use an ALTER TABLE statement to create a foreign key that references the primary key in the same table.
Also, you cannot create a primary key and a foreign key on the same set of columns in a single statement. Therefore, if the primary key of the table you are creating is also a foreign key on another table, you must use an ALTER TABLE statement to create the foreign key.
Examples
The following statement adds a new foreign key to the Class table. (The Faculty column is defined as an index that does not include null values.)
ALTER TABLE Class ADD CONSTRAINT Teacher FOREIGN KEY (Faculty_ID) REFERENCES Faculty (ID) ON DELETE RESTRICT
In this example, the restrict rule for deletions prevents someone from removing a faculty member from the database without first either changing or deleting all of that faculty's classes.
See Also
GRANT
In a secured database, use the GRANT statement to manage access permissions for tables, views, and stored procedures. GRANT can give users rights to these permissions, can create new users, and can assign the users to existing user groups. If needed, use CREATE GROUP to create a new group before using GRANT.
The following topics cover use of GRANT statements:
Syntax
GRANT CREATETAB | CREATEVIEW | CREATESP TO public-or-user-or-group-name [ , user-or-group-name ]...
GRANT LOGIN TO user_and_password [ , user_and_password ]... [ IN GROUP group-name ]
GRANT permission ON < * | [ TABLE ] table-name [ owner-name ] | VIEW view-name | PROCEDURE stored_procedure-name >
TO user-or-group-name [ , user-or-group-name ]...
* ::= all of the objects (that is, all tables, views, and stored procedures)
permission ::= ALL
| ALTER
| DELETE
| INSERT [ ( table-column-name [ , table-column-name ]... ) ]
| REFERENCES
| SELECT [ ( table-column-name [ , table-column-name ]... ) ]
| UPDATE [ ( table-column-name [ , table-column-name ]... ) ]
| EXECUTE
table-name ::= user-defined table-name
owner-name ::= user-defined owner name
view-name ::= user-defined view-name
stored-procedure-name ::= user-defined stored_procedure-name
user_and_password ::= user-name [ : ] password
public-or-user-or-group-name ::= PUBLIC | user-or-group-name
user-or-group-name ::= user-name | group-name
user-name ::= user-defined user name
table-column-name ::= user-defined column name (tables only)
Remarks
CREATETAB, CREATESP, CREATEVIEW, and LOGIN TO keywords are extensions to the SQL grammar. You can use the GRANT statement to grant privileges for CREATE TABLE, CREATE VIEW, and CREATE PROCEDURE. The following table lists the syntax for a given action.
To GRANT Privileges for This Action | Use This Keyword with GRANT |
|---|---|
CREATE TABLE | CREATETAB |
CREATE VIEW | CREATEVIEW |
CREATE PROCEDURE | CREATESP |
LOGIN AS GROUP MEMBER | LOGIN TO |
CREATETAB, CREATEVIEW, and CREATESP must be explicitly granted. These privileges are not included as part of a GRANT ALL statement.
GRANT LOGIN TO
GRANT LOGIN TO creates a user and allows that user to access the secured database. You must specify a user name and password to create a user. Optionally, you can use an existing group for the user, or use CREATE GROUP to create a new group, before using GRANT LOGIN TO.
Constraints on Permissions
The following constraints apply to permissions on objects:
By Object Type
The following table shows permissions applicable to object type.
Permission | Table1 | View1 | Stored Procedure |
|---|---|---|---|
CREATETAB | X | ||
CREATEVIEW | X | ||
CREATESP | X | ||
ALTER2 | X | X | X |
DELETE | X | X | |
INSERT | X | X | |
REFERENCES | X | ||
SELECT | X | X | |
UPDATE | X | X | |
EXECUTE3 | X | ||
1 Columns can be specified only for tables. Permissions for a view can be granted only to the entire view, not to single columns. 2 To drop a table, view, or stored procedure, a user must have ALTER permission on that object. Trusted views and stored procedures can be dropped only by the Master user. 3 EXECUTE applies only to stored procedures. A stored procedure can be executed with either a CALL or an EXECUTE statement. The procedure can be trusted or non-trusted. See Trusted and Non-Trusted Objects. | |||
ALL Keyword
The following table presents permissions granted by ALL with Object Type.
Permission Included by ALL | Table | View | Stored Procedure |
|---|---|---|---|
ALTER1 | X | X | X |
DELETE | X | X | |
INSERT | X | X | |
REFERENCES | X | ||
SELECT | X | X | |
UPDATE | X | X | |
EXECUTE | X | ||
1To drop a table, view, or stored procedure, a user must have ALTER permission on that object. Trusted views and stored procedures can be dropped only by the Master user. | |||
For example, if you issue GRANT ALL ON * to User1, then User1 has all permissions listed in the table.
If you issue GRANT ALL ON VIEW myview1 TO User2, then User2 has ALTER, DELETE, INSERT, UPDATE, and SELECT permissions on myview1.
GRANT and Data Security
The following topics provide cover particular uses of GRANT to manage data security:
Granting Privileges to Users and Groups
Relational security is based on the existence of a default user named Master who has full access to the database when security is turned on. When you turn security on, you will be required to specify a password for the Master user.
Security must be turned on to perform this statement.
The Master user can create groups and other users using the GRANT LOGIN TO, CREATE USER, or CREATE GROUP commands and manage data access for these groups and users.
If you want to grant the same privileges to all users, you can grant them to the PUBLIC group. All users inherit the default privileges assigned to the PUBLIC group.
Note: If you wish to use groups, you must set up the groups before creating users.
User name and password must be enclosed in double quotes if they contain spaces or other nonalphanumeric characters.
For further general information about users and groups, see Master User and Users and Groups in Advanced Operations Guide, and Assigning Permissions Tasks in Zen User’s Guide.
Granting Access Using Owner Names
An owner name is a string of bytes that unlocks access to a Btrieve file. Btrieve owner names have no connection with any operating system or database user name but rather serve as a file access password. For more information, see Owner Names.
If a Btrieve file that serves as a table in a secure SQL database has an owner name, the database Master user must provide that owner name in a GRANT statement to authorize access to the table, including for the Master user itself.
After the Master user has executed a GRANT statement for a user, that user can access the table, without having to give the owner name, simply by logging into the database. This authorization lasts for the duration of the current database connection. Also note that the SET OWNER statement allows you to specify one or more owner names for the connection session. See SET OWNER.
If a user tries to run SQL commands on a table that has an owner name, access is refused unless the Master user has granted rights to the table for that user by using the owner name in a GRANT statement.
If a table has an owner name with the read-only setting chosen, all users have SELECT rights on the table.
Permissions on Views and Stored Procedures
Views and stored procedures can be trusted or non-trusted, depending on how you want to handle the permissions for the objects referenced by the view or stored procedure.
Trusted and Non-Trusted Objects
Views and stored procedures reference objects, such as tables, other views or other stored procedures. Granting permissions on every referenced object could become highly time consuming depending on the number of objects and users. A simpler approach for many situations is the concept of a trusted view or stored procedure.
A trusted view or stored procedure is one that can be executed without having to explicitly set permissions for each referenced object. For example, if trusted view myview1 references tables t1 and t2, the Master user can grant permissions for myview1 without having to grant them for t1 and t2.
A non-trusted view or stored procedure is one that cannot be executed without having to explicitly set permissions for each referenced object.
The following table compares characteristics of trusted and non-trusted objects.
Object | Characteristic | Notes |
|---|---|---|
Trusted view or trusted stored procedure | Requires V2 metadata | See Zen Metadata. |
Requires WITH EXECUTE AS 'MASTER' clause in CREATE statement | See CREATE VIEW and CREATE PROCEDURE. | |
Only Master user can create the object | See Master User in Advanced Operations Guide. | |
Only Master user can delete the object | See DROP VIEW and DROP PROCEDURE | |
Master user must grant object permissions to other users | By default, only the Master user can access trusted views or stored procedures and must grant permissions to them. | |
GRANT and REVOKE statements applicable to object | See also REVOKE. | |
Object can exist in a secured or in an unsecured database | See Zen Security in Advanced Operations Guide. | |
Changing a trusted object to a non-trusted one (or vice versa) requires deletion then recreation of object | The ALTER statement for a view or stored procedure cannot be used to add or remove the trusted characteristic of the object. If you need to change a trusted object to a non-trusted one, you must first delete the object then recreate it without the WITH EXECUTE AS 'MASTER' clause. Similarly, if you need to change a non-trusted object to a trusted one, you must first delete the object then recreate it with the WITH EXECUTE AS 'MASTER' clause. | |
Non-trusted view or non-trusted stored procedures | Any user can create the object | User must be granted CREATEVIEW or CREATESP privilege. See Remarks. |
Any user can delete the object | User must be granted ALTER permission on the view or stored procedure. See GRANT. | |
ALTER permission required to delete the object | ALTER permission is also required to delete a table. Note that, by default, only the Master user can delete trusted objects. Users (other than Master) who did not create the view or stored procedure must be granted ALTER permissions to delete the view or stored procedure. | |
All users, by default, have all permissions for the object | For V2 metadata, if an unsecured database contains non-trusted objects, all permissions for the non-trusted objects are automatically granted to PUBLIC if security is enabled on the database. | |
User executing the view or stored procedure needs permissions for the objects referenced by the view or stored procedure | The user must also have permissions on the top-most object. That is, on the view or stored procedure that references the other objects. | |
GRANT and REVOKE statements applicable to object | ||
Object can exist in a secured or in an unsecured database | See Zen Security in Advanced Operations Guide. | |
Changing a trusted object to a non-trusted one (or vice versa) requires deletion then recreation of object | Same as above for trusted view or trusted stored procedure. |
Examples
This section provides a number of examples of GRANT.
A GRANT ALL statement grants the INSERT, UPDATE, ALTER, SELECT, DELETE and REFERENCES privileges to the specified user or group. In addition, the user or group is granted the CREATE TABLE right for the dictionary. The following statement grants all of these permissions to user dannyd for table Class.
GRANT ALL ON Class TO dannyd
============
The following statement grants ALTER permission to user debieq for table Class.
GRANT ALTER ON Class TO debieq
============
The following statement gives INSERT permission to keithv and miked for table Class. The table has an owner name of winsvr644AdminGrp.
GRANT INSERT ON Class winsvr644AdminGrp TO keithv, miked
============
The following statement gives INSERT permission to keithv and miked for table Class.
GRANT INSERT ON Class TO keithv, miked
============
The following statement grants INSERT permission on two columns, First_name and Last_name, in the Person table to users keithv and brendanb
GRANT INSERT(First_name,last_name) ON Person to keithv,brendanb
============
The following statement grants CREATE TABLE rights to users aideenw and punitas
GRANT CREATETAB TO aideenw, punitas
============
The following GRANT LOGIN TO statement grants login rights to a user named ravi and specifies his password as password.
GRANT LOGIN TO ravi:password
Note: If the a user account that is granted login rights using the GRANT LOGIN TO statement does not currently exist, then it is created.
If GRANT LOGIN is used in a stored procedure, you must separate the user name and password with a space character and not with the colon character. The colon character is used to identify local variables in a stored procedure.
If GRANT LOGIN is used in a stored procedure, you must separate the user name and password with a space character and not with the colon character. The colon character is used to identify local variables in a stored procedure.
The user name and password here refer only to Zen databases and are not related to user names and passwords used for operating system or network authentication. Zen user names, groups, and passwords can also be set through Zen Control Center (ZenCC).
The following example grants login rights to users named dannyd and rgarcia and specifies their passwords as password and 1234567 respectively.
GRANT LOGIN TO dannyd:password,rgarcia:1234567
If there are spaces in a name you may use double quotes as in the following example. This statement grants login rights to user named Jerry Gentry and Punita and specifies their password as sun and moon respectively
GRANT LOGIN TO "Jerry Gentry":sun, Punita:moon
The following example grants the login rights to a user named Jerry Gentry with password 123456 and a user named rgarcia with password abcdef. It also adds them to the group zen_dev
GRANT LOGIN TO "Jerry Gentry":123456, rgarcia:abcdef IN GROUP zen_dev
============
The Master user has all rights on a table that does not have an owner name. To grant permissions on a table that has a Btrieve owner name, the Master user must supply the correct owner name in the GRANT statement.
The following example grants the SELECT right to the user Master on table t1 that has a Btrieve owner name of abcd.
GRANT SELECT ON t1 'abcd' TO Master
You can set an owner name on a table using Function Executor or the Maintenance utility under the Tools menu in ZenCC. For more information, see Owner Names in Advanced Operations Guide.
============
After the Master user performs the following set of SQL statements, the user jsmith has SELECT access to all tables in the current database. The user also has DELETE access to tab1 and UPDATE access to tab2.
GRANT DELETE ON tab1 TO jsmith
GRANT SELECT ON * TO jsmith
GRANT UPDATE ON tab2 TO jsmith
If the following statement is performed later by any user with CREATE TABLE privileges, the user jsmith will have SELECT access to the newly created table.
CREATE TABLE tab3 (col1 INT)
============
GRANT CREATETAB TO user1
============
GRANT CREATESP TO user1
============
The following example grants EXECUTE permissions on stored procedure cal_rtrn_rate to all users.
GRANT EXECUTE ON PROCEDURE cal_rtrn_rate TO PUBLIC
============
The following example shows how members of the group Accounting can update only the salary column in the employee table (employee is part of the Demodata sample database).
Assume that the following stored procedure exists:
CREATE PROCEDURE employee_proc_upd(in :EmpID integer, in :Salary money) WITH EXECUTE AS 'Master';
BEGIN
UPDATE employee SET Salary = :Salary WHERE EmployeeID = :Empid;
END
GRANT EXECUTE ON PROCEDURE employee_proc_upd TO Accounting
Note that users belonging to group Accounting cannot update other columns in the Employee table because permissions were granted only for the stored procedure and the stored procedure updates only the salary column.
============
The following example assumes that you have enabled security on the Demodata sample database and added a user named USAcctsMgr. You now want to grant SELECT rights to the ID column in table Person to that user. Use the following statement.
GRANT SELECT ( ID ) ON Person TO 'USAcctsMgr'
See Also
GROUP BY
In addition to the GROUP BY syntax in a SELECT statement, Zen supports an extended GROUP BY syntax that can include vendor strings.
A GROUP BY query returns a result set which contains one row of the select list for every group encountered. (See SELECT for the syntax of a select list.)
The following example shows an extended GROUP BY that includes vendor strings in an escape sequence.
create table at1 (col1 integer, col2 char(10));
insert into at1 values (1, 'abc');
insert into at1 values (2, 'def');
insert into at1 values (3, 'aaa');
SELECT (--(*vendor(Microsoft), product(ODBC) fn left(at1.col2, 1) *)--) atv, count(*) Total FROM at1
GROUP BY atv
ORDER BY atv DESC
Returns:
atv Total
====== ===========
d 1
a 2
See Also
HAVING
Use a HAVING clause in conjunction with a GROUP BY keyword within SELECT statements to limit a view to groups whose aggregate values meet specific criteria.
The expressions in a HAVING clause may contain constants, set functions, or an exact replica of one of the expressions in the GROUP BY expression list.
The Zen database engine does not support the HAVING keyword without GROUP BY.
The HAVING keyword supports the use of aliases. The aliases must differ from any column names within the table.
Examples
The following example returns department names where the count of course names is greater than 5.
SELECT Dept_Name, COUNT(*) FROM Course GROUP BY Dept_Name HAVING COUNT(*) > 5
This same example could use aliases, in this case dn and ct, to produce the same result:
SELECT Dept_Name dn, COUNT(*) ct FROM Course GROUP BY dn HAVING ct > 5
Note that COUNT(expression) counts all nonnull values for an expression across a predicate. COUNT(*) counts all values, including NULL values.
============
The next example returns department name that matches Accounting and has a number of courses greater than 5.
SELECT Dept_Name, COUNT(*) FROM Course GROUP BY Dept_Name HAVING COUNT(*) > 5 AND Dept_Name = 'Accounting'
See Also
IF
Syntax
IF ( Boolean_condition )
BEGIN
Sql-statements
END
ELSE
BEGIN
Sql-statements
END
Remarks
IF statements provide conditional execution based on the value of a condition. The IF . . . THEN . . . ELSE . . . END IF construct controls flow based on which of two statement blocks will be executed. You may also use the IF . . . ELSE syntax.
You may use IF statements in the body of both stored procedures and triggers.
There is no limit to the number of nested IF statements allowed, although the query remains subject to the usual total length limitation and other applicable limitations.
Note: You cannot use a mixed syntax containing Zen and T.SQL. You may use either the IF...THEN...ELSE...END IF syntax or the IF…ELSE syntax. If you are using multiple statements with IF or ELSE conditions, you must use BEGIN and END to indicate the beginning and ending of the statement blocks.
Examples
The following example uses the IF statement to set the variable Negative to either 1 or 0, depending on whether the value of vInteger is positive or negative.
IF (:vInteger < 0) THEN
SET :Negative = '1';
ELSE
SET :Negative = '0';
END IF;
============
The following example uses the IF statement to test the loop for a defined condition (SQLSTATE = '02000'). If it meets this condition, then the WHILE loop is terminated.
FETCH_LOOP:
WHILE (:counter < :NumRooms) DO
FETCH NEXT FROM cRooms INTO :CurrentCapacity;
IF (SQLSTATE = '02000') THEN
LEAVE FETCH_LOOP;
END IF;
SET :counter = :counter + 1;
SET :TotalCapacity = :TotalCapacity +
:CurrentCapacity;
END WHILE;
============
IF(:vInteger >50)
BEGIN
SET :vInteger = :vInteger + 1;
INSERT INTO test VALUES('Test');
END;
ELSE
SET :vInteger = :vInteger - 1;
See Also
IN
Remarks
Use the IN operator to test whether the result of the outer query is included in the result of the subquery. The result table for the statement includes only rows the outer query returns that have a related row from the subquery.
Examples
The following example lists the names of all students who have taken Chemistry 408:
SELECT p.First_Name + ' ' + p.Last_Name FROM Person p, Enrolls e WHERE (p.id = e.student_id) AND (e.class_id IN
(SELECT c.ID FROM Class c WHERE c.Name = 'CHE 408'))
Zen first evaluates the subquery to retrieve the ID for Chemistry 408 from the Class table. It then performs the outer query, restricting the results to only those students who have an entry in the Enrolls table for that course.
Often, you can perform IN queries more efficiently using either the EXISTS keyword or a simple join condition with a restriction clause. Unless the purpose of the query is to determine the existence of a value in a subset of the database, it is more efficient to use the simple join condition because Zen optimizes joins more efficiently than it does subqueries.
See Also
INSERT
This statement inserts column values into one table.
Syntax
INSERT INTO table-name
[ ( column-name [ , column-name ]...) ] insert-values
[ ON DUPLICATE KEY UPDATE column-name = < NULL | DEFAULT | expression | subquery-expression [ , column-name = ... ] >
[ ORDER BY order-by-expression [ , order-by-expression ]... ]
table-name ::= user-defined name
column-name ::= user-defined name
insert-values ::= values-clause | query-specification
values-clause ::= VALUES ( expression [ , expression ]... ) | DEFAULT VALUES
expression ::= expression - expression | expression + expression
subquery-expression ::= ( query-specification ) [ ORDER BY order-by-expression
[ , order-by-expression ]... ] [ limit-clause ]
[ , order-by-expression ]... ] [ limit-clause ]
query-specification ::= ( query-specification )
FROM table-reference [ , table-reference ]...
[ WHERE search-condition ]
[ HAVING search-condition ] ]
Remarks
INSERT statements, as with DELETE and UPDATE, behave in an atomic manner. That is, if an insert of more than one row fails, then all insertions of previous rows by the same statement are rolled back.
INSERT ON DUPLICATE KEY UPDATE
Zen v13 R2 extends INSERT with INSERT ON DUPLICATE KEY UPDATE. This insert capability automatically compares unique keys for values to be inserted or updated with those in the target table. If either a duplicate primary or an index key is found, then for those rows the values are updated. If no duplicate primary or index key is found, then new rows are inserted. In popular jargon, this behavior is called an "upsert."
The INSERT can use either a values list or a SELECT query. As with all INSERT commands, the behavior is atomic.
For illustrations of this feature, see Examples for INSERT ON DUPLICATE KEY UPDATE.
Inserting Data Longer Than the Maximum Literal String
The maximum literal string supported by Zen is 15,000 bytes. You can handle data longer than this using direct SQL statements, breaking the insert into multiple calls. Start with a statement like this:
INSERT INTO table1 SET longfield = '15000 bytes of text' WHERE restriction
Then issue the following statement to add more data:
INSERT INTO table1 SET longfield = notefield + '15000 more bytes of text' WHERE restriction
Examples
Examples for INSERT
This topic illustrates simple INSERT. For the use of duplicate unique keys to update instead of insert, see Examples for INSERT ON DUPLICATE KEY UPDATE.
The following statement uses expressions in the VALUES clause to add data to a table:
CREATE TABLE t1 (c1 INT, c2 CHAR(20))
INSERT INTO t1 VALUES ((78 + 12)/3, 'This is' + CHAR(32) + 'a string')
SELECT * FROM t1
c1 c2
---------- ----------------
30 This is a string
============
The following statement directly adds data to the Course table using three VALUES clauses:
INSERT INTO Course(Name, Description, Credit_Hours, Dept_Name)
VALUES ('CHE 308', 'Organic Chemistry II', 4, 'Chemistry')
INSERT INTO Course(Name, Description, Credit_Hours, Dept_Name)
VALUES ('ENG 409', 'Creative Writing II', 3, 'English')
INSERT INTO Course(Name, Description, Credit_Hours, Dept_Name)
VALUES ('MAT 307', 'Probability II', 4, 'Mathematics')
============
The following INSERT statement uses a SELECT clause to retrieve from the Student table the ID numbers of students who have taken classes.
The statement then inserts the ID numbers into the Billing table.
INSERT INTO Billing (Student_ID)
SELECT ID FROM Student WHERE Cumulative_Hours > 0
============
The following example illustrates the use of the CURTIME(), CURDATE() and NOW() variables to insert the current local time, date, and time stamp values inside an INSERT statement.
CREATE TABLE Timetbl (c1 TIME, c2 DATE, c3 TIMESTAMP)
INSERT INTO Timetbl(c1, c2, c3) VALUES(CURTIME(), CURDATE(), NOW())
============
The following example demonstrates basic usage of default values with INSERT and UPDATE statements.
CREATE TABLE t1 (c1 INT DEFAULT 10, c2 CHAR(10) DEFAULT 'abc')
INSERT INTO t1 DEFAULT VALUES
INSERT INTO t1 (c2) VALUES (DEFAULT)
INSERT INTO t1 VALUES (100, DEFAULT)
INSERT INTO t1 VALUES (DEFAULT, 'bcd')
INSERT INTO t1 VALUES (DEFAULT, DEFAULT)
SELECT * FROM t1
c1 c2
---------- ----------
10 abc
10 abc
100 abc
10 bcd
10 abc
UPDATE t1 SET c1 = DEFAULT WHERE c1 = 100
UPDATE t1 SET c2 = DEFAULT WHERE c2 = 'bcd'
UPDATE t1 SET c1 = DEFAULT, c2 = DEFAULT
SELECT * FROM t1
c1 c2
---------- ----------
10 abc
10 abc
10 abc
10 abc
10 abc
============
Based on the CREATE TABLE statement immediately above, the following two INSERT statements are equivalent.
INSERT INTO t1 (c1,c2) VALUES (20,DEFAULT)
INSERT INTO t1 (c1) VALUES (20)
============
The following SQL code shows the use of DEFAULT with multiple UPDATE values.
CREATE TABLE t2 (c1 INT DEFAULT 10,
c2 INT DEFAULT 20 NOT NULL,
c3 INT DEFAULT 100 NOT NULL)
INSERT INTO t2 VALUES (1, 1, 1)
INSERT INTO t2 VALUES (2, 2, 2)
SELECT * FROM t2
c1 c2 c3
---------- ---------- ----------
1 1 1
2 2 2
UPDATE t2 SET c1 = DEFAULT, c2 = DEFAULT, c3 = DEFAULT
WHERE c2 = 2
SELECT * FROM t2
c1 c2 c3
---------- ---------- ----------
1 1 1
10 20 100
Examples for INSERT ON DUPLICATE KEY UPDATE
This topic illustrates INSERT ON DUPLICATE KEY UPDATE. For simple INSERT, see Examples for INSERT.
For clarity, the query results in these examples show inserted values in black and updated values in red. Each example builds on the previous one, so you can execute them in series to see the behavior.
============
INSERT INTO with VALUES clause and without a column list. Unique index segment column values are available.
CREATE TABLE t1 (
a INT NOT NULL DEFAULT 10,
b INT,
c INT NOT NULL,
d INT DEFAULT 20,
e INT NOT NULL DEFAULT 1,
f INT NOT NULL DEFAULT 2,
g INT,
h INT,
PRIMARY KEY(e, f) );
CREATE UNIQUE INDEX t1_ab ON t1 ( a, b, c, d );
INSERT INTO t1 VALUES ( 1, 2, 3, 4, 5, 6, 7, 8 )
ON DUPLICATE KEY UPDATE t1.a = 10, t1.b = 20, t1.c = 30, t1.d = 40;
SELECT * FROM t1;
a b c d e f g h
======== ======== ======== ======== ======== ======== ======== ========
1 2 3 4 5 6 7 8
============
INSERT INTO with VALUES clause and a complete column list. The row is updated.
INSERT INTO t1 ( a, b, c, d, e, f, g , h ) VALUES ( 1, 2, 3, 4, 5, 6, 7, 8 )
ON DUPLICATE KEY UPDATE t1.a = 10, t1.b = 20, t1.c = 30, t1.d = 40;
SELECT * FROM t1;
a b c d e f g h
======== ======== ======== ======== ======== ======== ======== ========
10 20 30 40 5 6 7 8
============
INSERT INTO with VALUES clause and a partial column list. A new row is inserted, and then the row is updated.
INSERT INTO t1 ( a, b, c, d ) VALUES ( 1, 2, 3, 4 )
ON DUPLICATE KEY UPDATE t1.a = 11, t1.b = 12, t1.c = 13, t1.d = 14;
SELECT * FROM t1;
a b c d e f g h
======== ======== ======== ======== ======== ======== ======== ========
10 20 30 40 5 6 7 8
1 2 3 4 1 2 (Null) (Null)
INSERT INTO t1 ( a, b, c ) VALUES ( -1, -2, -3 )
ON DUPLICATE KEY UPDATE t1.a = 11, t1.b = 12, t1.c = 13, t1.d = 14;
SELECT * FROM t1;
a b c d e f g h
======== ======== ======== ======== ======== ======== ======== ========
10 20 30 40 5 6 7 8
11 12 13 14 1 2 (Null) (Null)
============
INSERT INTO with VALUES clause and DEFAULT. A row is updated to return it to an earlier state, and then it is updated based on duplicate keys.
UPDATE t1 SET a = 1, b = 2, c = 3, d = 4, e = 11, f = 12 WHERE a = 11;
SELECT * FROM t1;
a b c d e f g h
======== ======== ======== ======== ======== ======== ======== ========
10 20 30 40 5 6 7 8
1 2 3 4 11 12 (Null) (Null)
INSERT INTO t1 ( a, b, c, d, e, f ) VALUES ( 1, 2, 3, 4, DEFAULT, DEFAULT )
ON DUPLICATE KEY UPDATE g = VALUES ( a ) + VALUES ( b ) + VALUES ( c ), h = VALUES ( e ) + VALUES ( f );
SELECT * FROM t1;
a b c d e f g h
======== ======== ======== ======== ======== ======== ======== ========
10 20 30 40 5 6 7 8
1 2 3 4 11 12 6 3
============
Subquery expression in UPDATE SET clause to update using values from the Person table in the Demodata sample database.
INSERT INTO t1 VALUES ( 1, 2, 3, 4, 5, 6, 7, 8 )
ON DUPLICATE KEY UPDATE t1.a = 10, t1.b = 20, t1.c = ( SELECT TOP 1 id FROM demodata.person ORDER BY id ), t1.d = ( SELECT TOP 1 id FROM demodata.person ORDER BY id DESC, last_name );
SELECT * FROM t1;
a b c d e f g h
======== ======== ======== ======== ======== ======== ======== ========
10 20 100062607 998332124 5 6 7 8
1 2 3 4 11 12 6 3
Errors When Using DEFAULT
The following example shows possible error conditions because a column is defined as NOT NULL with no default value defined:
CREATE TABLE t1 (c1 INT DEFAULT 10, c2 INT NOT NULL, c3 INT DEFAULT 100 NOT NULL)
INSERT INTO t1 DEFAULT VALUES -- Error: No default value assigned for column <c2>.
INSERT INTO t1 VALUES (DEFAULT, DEFAULT, 10) -- Error: No default value assigned for column <c2>.
INSERT INTO t1 (c1,c2,c3) VALUES (1, DEFAULT, DEFAULT) -- Error: No default value assigned for column <c2>.
INSERT INTO t1 (c1,c3) VALUES (1, 10) -- Error: Column <c2> not nullable.
============
The following example shows what occurs when you use INSERT for IDENTITY columns and columns with default values.
CREATE TABLE t (id IDENTITY, c1 INTEGER DEFAULT 100)
INSERT INTO t (id) VALUES (0)
INSERT INTO t VALUES (0,1)
INSERT INTO t VALUES (10,10)
INSERT INTO t VALUES (0,2)
INSERT INTO t (c1) VALUES (3)
SELECT * FROM t
The SELECT shows the table contains the following rows:
1, 100
2, 1
10, 10
11, 2
12, 3
The first row illustrates that if zero is specified in the VALUES clause for an IDENTITY column, then the value inserted is 1 if the table is empty.
The first row also illustrates that if no value is specified in the VALUES clause for a column with a default value, then the specified default value is inserted.
The second row illustrates that if zero is specified in the VALUES clause for an IDENTITY column, then the value inserted is one greater than the largest value in the IDENTITY column.
The second row also illustrates that if a value is specified in the VALUES clause for a column with a default value, then the specified value overrides the default value.
The third row illustrates that if a value other than zero is specified in the VALUES clause for an IDENTITY column, then that value is inserted. If a row already exists that contains the specified value for the IDENTITY column, then the message "The record has a key field containing a duplicate value(Btrieve Error 5)" is returned and the INSERT fails.
The fourth rows shows again that if zero is specified in the VALUES clause for an IDENTITY column, then the value inserted is one greater than the largest value in the IDENTITY column. This is true even if gaps exist between the values (that is, the absence of one or more rows with IDENTITY column values less than the largest value).
The fifth row illustrates that if no value is specified in the VALUES clause for an IDENTITY column, then the value inserted is one greater than the largest value in the IDENTITY column.
See Also
JOIN
You can specify a single table or view, multiple tables, or a single view and multiple tables. When you specify more than one table, the tables are said to be joined.
Syntax
join-definition ::= table-reference [ join-type ] JOIN table-reference ON search-condition
| table-reference CROSS JOIN table-reference
| outer-join-definition
join-type ::= INNER | LEFT [ OUTER ] | RIGHT [ OUTER ] | FULL [ OUTER ]
outer-join-definition ::= table-reference outer-join-type JOIN table-reference
ON search-condition
outer-join-type ::= LEFT [ OUTER ] | RIGHT [ OUTER ] | FULL [ OUTER ]
The following example illustrates a two-table outer join:
SELECT * FROM Person LEFT OUTER JOIN Faculty ON Person.ID = Faculty.ID
The following example shows an outer join embedded in a vendor string. The letters "OJ" can be either upper or lower case.
SELECT t1.deptno, ename FROM {OJ emp t2 LEFT OUTER JOIN dept t1 ON t2.deptno=t1.deptno}
Zen supports two-table outer joins as specified in the Microsoft ODBC documentation. In addition to simple two-table outer joins, Zen supports n-way nested outer joins.
The outer join may or may not be embedded in a vendor string. If a vendor string is used, Zen strips it off and parses the actual outer join text.
LEFT OUTER
Zen databases use the SQL92 (SQL2) model for LEFT OUTER JOIN. The syntax is a subset of the entire SQL92 syntax which includes cross joins, right outer joins, full outer joins, and inner joins. The TableRefList below occurs after the FROM keyword in a SELECT statement and before any subsequent WHERE, HAVING, and other clauses. Note the recursive nature of TableRef and LeftOuterJoin – a TableRef can be a left outer join that can include TableRefs which, in turn, can be left outer joins and so forth.
TableRefList :
TableRef [, TableRefList]
| TableRef
| OuterJoinVendorString [, TableRefList]
TableRef :
TableName [CorrelationName]
| LeftOuterJoin
| ( LeftOuterJoin )
LeftOuterJoin :
TableRef LEFT OUTER JOIN TableRef ON SearchCond
The search condition (SearchCond) contains join conditions which in their usual form are LT.ColumnName = RT.ColumnName, where LT is left table, RT is right table, and ColumnName represents some column within a given domain. Each predicate in the search condition must contain some nonliteral expression.
The implementation of left outer join goes beyond the syntax in the Microsoft ODBC documentation.
Vendor Strings
The syntax in the previous section includes but goes beyond the ODBC syntax in the Microsoft ODBC documenation. Furthermore, the vendor string escape sequence at the beginning and end of the left outer join does not change the core syntax of the outer join.
Zen databases accept outer join syntax without the vendor strings. However, for applications that want to comply with ODBC across multiple databases, the vendor string construction should be used. Because ODBC vendor string outer joins do not support more than two tables, it may be necessary to use the syntax shown in the examples.
Examples
The following four tables are used in these examples.
Emp Table
FirstName | LastName | DeptID | EmpID |
|---|---|---|---|
Franky | Avalon | D103 | E1 |
Gordon | Lightfoot | D102 | E2 |
Lawrence | Welk | D101 | E3 |
Bruce | Cockburn | D102 | E4 |
Dept Table
DeptID | LocID | Name |
|---|---|---|
D101 | L1 | TV |
D102 | L2 | Folk |
Addr Table
EmpID | Street |
|---|---|
E1 | 101 Mem Lane |
E2 | 14 Young St. |
Loc Table
LocID | Name |
|---|---|
L1 | PlanetX |
L2 | PlanetY |
The following example shows a simple two-way Left Outer Join:
SELECT * FROM Emp LEFT OUTER JOIN Dept ON Emp.DeptID = Dept.DeptID
This two-way outer join produces the following result set:
Emp | Dept | |||||
|---|---|---|---|---|---|---|
FirstName | LastName | DeptID | EmpID | DeptID | LocID | Name |
Franky | Avalon | D103 | E1 | NULL | NULL | NULL |
Gordon | Lightfoot | D102 | E2 | D102 | L2 | Folk |
Lawrence | Welk | D101 | E3 | D101 | L1 | TV |
Bruce | Cockburn | D102 | E4 | D102 | L2 | Folk |
Notice the NULL entry for Franky Avalon in the table. That is because no DeptID of D103 was found in the Dept table. In a standard (INNER) join, Franky Avalon would have been dropped from the result set altogether.
Algorithm
The Zen database engine uses the following algorithm for the previous example: Take the left table, traverse the right table, and for every case where the ON condition is TRUE for the current right table row, return a result set row composed of the appropriate right table row appended to the current left-table row.
If there is no right table row where the ON condition is TRUE, (it is FALSE for all right table rows given the current left table row), create a row instance of the right table with all column values NULL.
That result set, combined with the current left-table row for each row, is indexed in the returned result set. The algorithm is repeated for every left table row to build the complete result set. In the simple two-way left outer join shown previously, Emp is the left table and Dept is the right table.
Note: Although irrelevant to the algorithm, the appending of the left table to the right table assumes proper projection as specified in the select list of the query. This projection ranges from all columns (for example, SELECT * FROM . . .) to only one column in the result set (for example, SELECT FirstName FROM . . .).
============
With radiating left outer joins, all other tables are joined onto one central table. In the following example of a three-way radiating left outer join, Emp is the central table and all joins radiate from that table.
SELECT * FROM (Emp LEFT OUTER JOIN Dept ON Emp.DeptID = Dept.DeptID) LEFT OUTER JOIN Addr ON Emp.EmpID = Addr.EmpID
Emp | Dept | Addr | ||||||
|---|---|---|---|---|---|---|---|---|
First Name | Last Name | Dept ID | Emp ID | Dept ID | Loc ID | Name | Emp ID | Street |
Franky | Avalon | D103 | E1 | NULL | NULL | NULL | E1 | 101 Mem Lane |
Gordon | Lightfoot | D102 | E2 | D102 | L2 | Folk | E2 | 14 Young St |
Lawrence | Welk | D101 | E3 | D101 | L1 | TV | NULL | NULL |
Bruce | Cockburn | D102 | E4 | D101 | L1 | TV | NULL | NULL |
============
In a chaining left outer join, one table is joined to another, and that table, in turn, is joined to another. The following example illustrates a three-way chaining left outer join:
SELECT * FROM (Emp LEFT OUTER JOIN Dept ON Emp.DeptID = Dept.DeptID) LEFT OUTER JOIN Loc ON Dept.LocID = Loc.LocID
Emp | Dept | Loc | ||||||
|---|---|---|---|---|---|---|---|---|
First Name | Last Name | Dept ID | Emp ID | Dept ID | Loc ID | Name | Loc ID | Name |
Franky | Avalon | D103 | E1 | NULL | NULL | NULL | NULL | NULL |
Gordon | Lightfoot | D102 | E2 | D102 | L2 | Folk | L2 | PlanetY |
Lawrence | Welk | D101 | E3 | D101 | L1 | TV | L1 | PlanetX |
Bruce | Cockburn | D102 | E4 | D101 | L1 | TV | L1 | PlanetX |
This join could also be expressed as:
SELECT * FROM Emp LEFT OUTER JOIN (Dept LEFT OUTER JOIN Loc ON Dept.LocID = Loc.LocID) ON Emp.DeptID = Dept.DeptID
We recommend the first syntax because it lends itself to both the radiating and chaining joins. This second syntax cannot be used for radiating joins because nested left outer join ON conditions cannot reference columns in tables outside their nesting. In other words, in the following query, the reference to Emp.EmpID is illegal:
SELECT * FROM Emp LEFT OUTER JOIN (Dept LEFT OUTER JOIN Addr ON Emp.EmpID = Addr.EmpID) ON Emp.DeptID = Dept.DeptID
============
The following example shows a three-way radiating left outer join, less optimized:
SELECT * FROM Emp E1 LEFT OUTER JOIN Dept ON E1.DeptID = Dept.DeptID, Emp E2 LEFT OUTER JOIN Addr ON E2.EmpID = Addr.EmpID WHERE E1.EmpID = E2.EmpID
Emp | Dept | Addr | ||||||
|---|---|---|---|---|---|---|---|---|
First Name | Last Name | Dept ID | Emp ID | Dept ID | Loc ID | Name | Emp ID | Street |
Franky | Avalon | D103 | E1 | NULL | NULL | NULL | E1 | 101 Mem Lane |
Gordon | Lightfoot | D102 | E2 | D102 | L2 | Folk | E2 | 14 Young St |
Lawrence | Welk | D101 | E3 | D101 | L1 | TV | NULL | NULL |
Bruce | Cockburn | D102 | E4 | D101 | L1 | TV | NULL | NULL |
This query returns the same results as shown in the Loc Table, assuming there are no NULL values for EmpID in Emp and EmpID is a unique valued column. This query, however, is not optimized as well as the one shown for the Loc Table and can be much slower.
See Also
LAG
LAG is a set function that can be used only as a windowing function. LAG is used to retrieve values from previous rows in the current partition of the result set. It cannot be used as a GROUP BY aggregate.
Syntax
LAG ( expression[, lag-offset-expression[, lag-default-expression ] ] over-clause )
where:
• expression is a column or expression from a row in the result set.
• lag-offset-expression is an integer expression indicating the number of previous rows before the current row in the result set from which to draw values.
• lag-default-expression is the value to return if lag-offset-expression rows in the current partition have not yet accumulated in the result set.
Examples
To exercise the following LAG examples, first do these steps:
1. In ZenCC in Zen Explorer, right-click Databases and select New > Database to create a temporary database, in this case named SAMPLEDB.
2. Right-click SAMPLEDB and select SQL Document.
3. In SQL Editor, run the following SQL script to create a table in SAMPLEDB called checkout0:
create table checkout0 (StartTime TIMESTAMP, LaneNo INTEGER, Items INTEGER, Total MONEY(6,2), Duration INTEGER);
insert into checkout0 values('2021-01-07 22:20:37.852', 1, 7, 18.72, 87);
insert into checkout0 values('2021-01-07 22:22:47.852', 1, 9, 23.45, 107);
insert into checkout0 values('2021-01-07 22:24:57.852', 1, 17, 68.22, 183);
insert into checkout0 values('2021-01-07 22:31:07.852', 1, 12, 48.17, 99);
insert into checkout0 values('2021-01-07 22:33:27.852', 1, 11, 37.77, 77);
insert into checkout0 values('2021-01-07 22:34:39.852', 1, 7, 23.32, 94);
insert into checkout0 values('2021-01-07 22:36:41.852', 1, 14, 56.61, 112);
insert into checkout0 values('2021-01-07 22:19:37.852', 2, 6, 16.72, 80);
insert into checkout0 values('2021-01-07 22:23:47.852', 2, 10, 25.45, 117);
insert into checkout0 values('2021-01-07 22:26:57.852', 2, 18, 72.22, 196);
insert into checkout0 values('2021-01-07 22:31:07.852', 2, 11, 58.17, 109);
insert into checkout0 values('2021-01-07 22:33:47.852', 2, 14, 47.77, 87);
insert into checkout0 values('2021-01-07 22:35:49.852', 2, 9, 27.32, 84);
insert into checkout0 values('2021-01-07 22:37:41.852', 2, 15, 46.16, 122 );
insert into checkout0 values('2021-01-07 22:20:07.852', 3, 8, 18.82, 64);
insert into checkout0 values('2021-01-07 22:24:17.852', 3, 8, 19.54, 74);
insert into checkout0 values('2021-01-07 22:27:37.852', 3, 16, 62.44, 131);
insert into checkout0 values('2021-01-07 22:31:37.852', 3, 13, 51.87, 119);
insert into checkout0 values('2021-01-07 22:34:17.852', 3, 12, 37.65, 89);
insert into checkout0 values('2021-01-07 22:36:19.852', 3, 11, 28.23, 86);
insert into checkout0 values('2021-01-07 22:38:11.852', 3, 18, 65.26, 128 );
4. You are now ready to run the following examples, which use data from a cashier checkout system.
Note that as in all windowing functions, the default order for the result is <partition columns>, <order columns> as specified by the OVER clause. This order can be modified by using an outer ORDER BY.
The following query shows that each LaneNo has 7 rows, which can be numbered 1 to 7 using COUNT(*):
SELECT LaneNo, StartTime, RowNumInPart FROM (select LaneNo, StartTime, COUNT(*) OVER (PARTITION BY LaneNo ORDER BY StartTime) FROM checkout0) AS T(LaneNo, StartTime, RowNumInPart);
============
The following query shows how the LAG function can be used to retrieve the third row before the current row, as indicated by the RowNumInPart column. Note how 0 is returned until each partition has at least 3 rows:
SELECT LaneNo, StartTime, RowNumInPart, LAG(RowNumInPart, 3, 0) OVER (PARTITION BY LaneNo ORDER BY StartTime) FROM (select LaneNo, StartTime, COUNT(*) OVER (PARTITION BY LaneNo ORDER BY StartTime) FROM checkout0) AS T(LaneNo, StartTime, RowNumInPart);
============
The following query shows the time difference in seconds between each two consecutive rows in each partition, using the default LAG offset of 1 row:
SELECT LaneNo, StartTime, DATEDIFF (SECOND, LAG(StartTime) OVER (PARTITION BY LaneNo ORDER BY StartTime), StartTime) AS Diff_in_secs FROM checkout0;
============
The following query shows how the number of items for each checkout in Lane 1 vary over time, compared to the previous checkout:
SELECT StartTime, LaneNo, Items, Items-LAG(Items) OVER (PARTITION BY LaneNo ORDER BY StartTime) AS delta_items FROM checkout0 WHERE LaneNo = 1;
LEAVE
Remarks
A LEAVE statement continues execution by leaving a block or loop statement. You can use LEAVE statements in the body of a stored procedure or a trigger.
Examples
The following example increments the variable vInteger by 1 until it reaches a value of 11, when the loop is ended with a LEAVE statement.
TestLoop:
LOOP
IF (:vInteger > 10) THEN
LEAVE TestLoop;
END IF;
SET :vInteger = :vInteger + 1;
END LOOP;
See Also
LIKE and ILIKE
LIKE and ILIKE allow pattern matching within character-based column data. Their syntax is identical, but LIKE is case-sensitive, while ILIKE is case-insensitive.
Support for ILIKE was introduced in Zen v15 SP1. Under certain conditions it can provide better query performance than LIKE.
Syntax
WHERE expr [ NOT ] < LIKE | ILIKE > value
Remarks
The pattern value on the right side of a LIKE or ILIKE expression must be a simple string constant, the USER keyword, or (outside a stored procedure) a dynamic parameter supplied at run time, indicated by a question mark. Dynamic parameters are not supported within SQL Editor, but rather only in application code.
Use the percent sign wildcard in the pattern to match zero or more characters in the column values. Use the underscore wildcard to match a single character. Both wildcards can be used more than once in the pattern. To match either of these wildcard symbols as a literal character, use a backslash before the symbol. The following table provides more information on use of special characters.
Character | Purpose |
|---|---|
Percent sign "%" | Wildcard: Matches zero or more characters. |
Underscore "_" | Wildcard: Matches a single character. |
Backslash "\" | An escape character to flag a following wildcard character as a literal character, in order to match the actual wildcard character itself. To match a backslash, enter two backslashes. For example, to match the "%" character in a column value, use "\%". |
Two single quotation marks "''" | Two single quotation marks with no space between them must be used to match a single quotation mark in the result string. For example, if a row in the database contains the value "Jim's house," you can match this pattern by specifying LIKE 'Jim''s house' in the WHERE clause. A double-quotation mark in the pattern string is not a special character and can be used like any letter or digit. |
Examples of LIKE
This section demonstrates use of LIKE. For comparison with ILIKE, see Examples of ILIKE.
This example matches all column values that are five characters long and have abc as the middle three characters:
SELECT Building_Name FROM Room WHERE Building_Name LIKE '_abc_'
============
This example matches all column values that contain a backslash:
SELECT Building_Name FROM Room where Building_Name LIKE '%\\%'
============
This example matches all column values except those that begin with a percent sign:
SELECT Building_Name FROM Room where Building_Name NOT LIKE '\%%'
============
This example matches all column values that contain one or more single-quotes:
SELECT Building_Name FROM Room where Building_Name LIKE '%''%'
============
This example matches all column values where the second character is a double-quote:
SELECT Building_Name FROM Room where Building_Name LIKE '_"%'
============
This example creates a stored procedure that returns any rows where the Building_Name column contains the characters stored in the input variable :rname and where the Type column contains the characters stored in the input variable :rtype.
CREATE PROCEDURE room_test(IN :rname CHAR(20), IN :rtype CHAR(20))
RETURNS(Building_Name CHAR(25), "Type" CHAR(20));
BEGIN
DECLARE :like1 CHAR(25);
DECLARE :like2 CHAR(25);
SET :like1 = '%' + :rname + '%';
SET :like2 = '%' + :rtype + '%';
SELECT Building_Name, "Type" FROM Room WHERE Building_Name LIKE :like1 AND "Type" LIKE :like2;
END;
Note that the following statement, if placed in the stored procedure above, generates a syntax error because of the expression on the right side of the LIKE operator. The right side must be a simple constant.
The following syntax is incorrect and will fail:
SELECT Building_Name, "Type" from Room WHERE Building_Name LIKE '%' + :rname + '%';
Examples of ILIKE
The following two examples of LIKE and ILIKE return the same results from the Demodata sample database. The ILIKE statement does not need to use the UPPER string function.
SELECT First_Name, Last_Name, Email_Address from Person
WHERE UPPER(Email_Address) LIKE '%@BTU.EDU%';
WHERE UPPER(Email_Address) LIKE '%@BTU.EDU%';
SELECT First_Name, Last_Name, Email_Address from Person
WHERE Email_Address ILIKE '%@btu.edu%';
WHERE Email_Address ILIKE '%@btu.edu%';
Note: ILIKE cannot use the index created on a case-sensitive column for optimization.
See Also
LOOP
Remarks
A LOOP statement repeats the execution of a block of statements.
It is allowed only in stored procedures and triggers.
Zen does not support the postconditional loop REPEAT... UNTIL.
Examples
The following example increments the variable vInteger by 1 until it reaches a value of 11 and the loop ends.
TestLoop:
LOOP
IF (:vInteger > 10) THEN
LEAVE TestLoop;
END IF;
SET :vInteger = :vInteger + 1;
END LOOP;
See Also
NOT
Remarks
Using the NOT keyword with the EXISTS keyword allows you to test whether rows do not exist in the result of the subquery. For every row the outer query evaluates, Zen tests for the existence of a related row from the subquery. Zen excludes from the statement result table each row from the outer query that corresponds to a related row from the subquery.
By combining NOT with the IN operator, you can test whether the result of the outer query is not included in the result of the subquery. The result table includes only rows the outer query returns that do not have a related row from the subquery.
Examples
The following statement returns a list of students who are not enrolled in any classes:
SELECT * FROM Person p WHERE NOT EXISTS
(SELECT * FROM Student s WHERE s.id = p.id
AND Cumulative_Hours = 0)
This statement can be rewritten to use IN:
SELECT * FROM Person p WHERE p.id NOT IN
(SELECT s.id FROM Student s WHERE Cumulative_Hours = 0)
See Also
OPEN
Syntax
OPEN cursor-name
cursor-name ::= user-defined-name
Remarks
The OPEN statement opens a cursor. A cursor must be defined before it can be opened.
This statement is allowed only inside of a stored procedure or a trigger, since cursors and variables are only allowed inside of stored procedures and triggers.
Examples
The following example opens the declared cursor BTUCursor.
DECLARE BTUCursor CURSOR
FOR SELECT Degree, Residency, Cost_Per_Credit FROM Tuition ORDER BY ID;
OPEN BTUCursor;
============
CREATE PROCEDURE MyProc(IN :CourseName CHAR(7)) AS
BEGIN
DECLARE cursor1 CURSOR
FOR SELECT Degree, Residency, Cost_Per_Credit FROM Tuition ORDER BY ID;
(additional code would go here)
OPEN cursor1;
FETCH cursor1 INTO :CourseName;
(additional code would go here)
CLOSE cursor1;
(additional code would go here)
END
See Also
PARTIAL
Remarks
To allow indexing on CHAR and VARCHAR columns wider than 255 bytes, include the PARTIAL keyword in the CREATE INDEX statement. If the columns that make up the partial index, including overhead, contain less than 255 bytes, PARTIAL is ignored.
Note: The DROP INDEX statement does not require PARTIAL to remove a partial index.
UNIQUE and PARTIAL are mutually exclusive and cannot be used in the same CREATE INDEX statement.
See Also
PRIMARY KEY
Remarks
Include PRIMARY KEY in the ADD clause to add a primary key to a table definition. The primary key is a unique index that does not include null values. When you specify a primary key, Zen creates a unique index with the specified attributes on the defined group of columns.
Because a table can have only one primary key, you cannot add a primary key to a table that already has a primary key defined. To change the primary key of a table, delete the existing key using a DROP clause in an ALTER TABLE statement and add the new primary key.
Note: You must be logged in to the database using a database name before you can add a primary key or conduct any other referential integrity (RI) operation.
Include PRIMARY KEY in the ADD clause with the ALTER TABLE statement to add a primary key to a table definition.
Before adding the primary key, you must ensure that the columns in the primary key column list are defined as NOT NULL. A primary key is a unique index and can be created only on not nullable columns.
If a unique index on not nullable columns already exists, the ADD PRIMARY KEY does not create another unique index. Instead, the existing unique index is promoted to a primary key. For example, the following statements would promote the named index T1_C1C2 to be a primary key.
CREATE TABLE t1 (c1 INT NOT NULL, c2 CHAR(10) NOT NULL)
CREATE UNIQUE INDEX t1_c1c2 ON t1(c1,c2)
ALTER TABLE t1 ADD PRIMARY KEY(c1, c2)
If such a primary key is dropped, the primary key would be switched to a unique index.
ALTER TABLE t1 DROP PRIMARY KEY
If no unique index on not nullable columns exists in the table, ADD PRIMARY KEY creates a unique index on not nullable columns. DROP PRIMARY KEY completely deletes the unique index.
Include a PRIMARY KEY clause with the CREATE TABLE statement to add a primary key to a table definition.
To define referential constraints on your database, you must include a PRIMARY KEY clause to specify the primary key on the parent table. The primary key can consist of one column or multiple columns but can only be defined on columns that are not null. The columns you specify must also appear in the column Definitions list of the CREATE TABLE statement.
When you specify a primary key, Zen creates an index with the specified attributes on the defined group of columns. If the columns are not specifically defined as NOT NULL in the CREATE TABLE statement, Zen forces the columns to be not nullable. Zen also creates a unique index on the columns.
For example, the following two statements yield the same results:
CREATE TABLE t1 (c1 INT, c2 CHAR(10), PRIMARY KEY(c1,c2))
CREATE TABLE t1 (c1 INT NOT NULL, c2 CHAR(10) NOT NULL, PRIMARY KEY(c1,c2))
Examples
The following statement defines a primary key on a table called Faculty.
ALTER TABLE Faculty ADD PRIMARY KEY (ID)
The ID column is defined as a unique index that does not include null values.
See Also
PRINT
Remarks
Use PRINT to print variable values or constants. The PRINT statement applies only to Windows-based platforms. It is ignored on other operating system platforms.
You can use PRINT only within stored procedures.
Examples
The following example prints the value of the variable :myvar.
PRINT( :myvar );
PRINT 'MYVAR = ' + :myvar;
============
The following example prints a text string followed by a numeric value. You must convert a number value to a text string to print the value.
PRINT 'Students enrolled in History 101: ' + convert(:int_val, SQL_CHAR);
============
Before the Windows Vista release, it was possible to use PRINT in a stored procedure to send output to a dialog box if Zen was running as a service using the local system account with the setting Allow service to interact with desktop. In Windows Vista and later releases, the operating system no longer allows this output. As shown in the following workaround, you can convert the value to a character string and return it in a SELECT statement.
DROP PROCEDURE varsub2;
CREATE PROCEDURE varsub2 ()
RETURNS (TestString CHAR(25));
DECLARE :vInteger INT;
DECLARE :tstring CHAR(25);
SET :vInteger = 0;
BEGIN
WHILE (:vInteger < 10) DO
SET :vInteger = :vInteger + 1;
END WHILE;
SET :tstring = 'The counter value is = ' + convert(:vInteger, SQL_CHAR);
SELECT :tstring;
END;
Call varsub2;
See Also
PUBLIC
Remarks
You can include the PUBLIC keyword in the FROM clause to revoke the Create Table right from all the users to whom the right was not explicitly assigned.
Include a FROM clause to specify the group or user from whom you are revoking rights. You can specify a single name or a list of names, or you can include the PUBLIC keyword to revoke access rights from all users whose rights are not explicitly assigned.
Examples
To assign access rights to all users in the dictionary, include the PUBLIC keyword to grant the rights to the PUBLIC group, as in the following example:
GRANT SELECT ON Course TO PUBLIC
This statement assigns the Select right on the Course table to all users defined in the dictionary. If you later revoke the Select right from the PUBLIC group, only users who are granted the Select right explicitly can access the table.
The following statement includes the PUBLIC keyword to grant the Create Table right to all the users defined in the dictionary:
GRANT CREATETAB TO PUBLIC
See Also
RELEASE SAVEPOINT
Use the RELEASE SAVEPOINT statement to delete a savepoint.
Syntax
RELEASE SAVEPOINT savepoint-name
savepoint-name ::= user-defined-name
Remarks
RELEASE, ROLLBACK, and SAVEPOINT and are supported at the session level (outside of stored procedures) only if AUTOCOMMIT is off. Otherwise, RELEASE, ROLLBACK, and SAVEPOINT must be used within a stored procedure.
Any committed statements within a stored procedure are controlled by the outermost transaction of the calling SQL application.
Examples
The following example sets a SAVEPOINT then checks a condition to determine whether to ROLLBACK or to RELEASE the SAVEPOINT.
CREATE PROCEDURE Enroll_student( IN :student ubigint, IN :classnum INTEGER);
BEGIN
DECLARE :CurrentEnrollment INTEGER;
DECLARE :MaxEnrollment INTEGER;
SAVEPOINT SP1;
INSERT INTO Enrolls VALUES (:student,:classnum, 0.0);
SELECT COUNT(*) INTO :CurrentEnrollment FROM Enrolls WHERE class_id = :classnum;
SELECT Max_size INTO :MaxEnrollment FROM Class WHERE ID = :classnum;
IF :CurrentEnrollment >= :MaxEnrollment THEN
ROLLBACK TO SAVEPOINT SP1;
ELSE
RELEASE SAVEPOINT SP1;
END IF;
END;
Note that COUNT(expression) counts all nonnull values for an expression across a predicate. COUNT(*) counts all values, including null values.
See Also
RESTRICT
Remarks
If you specify RESTRICT, Zen enforces the DELETE RESTRICT rule. A user cannot delete a row in the parent table if a foreign key value refers to it.
If you do not specify a delete rule, Zen applies the RESTRICT rule by default.
See Also
REVOKE
REVOKE deletes user IDs and removes privileges for specific users in a secured database. You can use the REVOKE statement to revoke CREATE TABLE, CREATE VIEW, and CREATE PROCEDURE privileges.
Syntax
REVOKE CREATETAB | CREATEVIEW | CREATESP FROM public-or-user-group-name [ , public-or-user-group-name ]...
REVOKE LOGIN FROM user-name [ , user-name ]...
REVOKE permission ON < * | [ TABLE ] table-name [ owner-name ]> | VIEW view-name | PROCEDURE stored_procedure-name > FROM user-or-group-name [ , user-or-group-name ]...
* ::= all of the objects (that is, all tables, views and stored procedures)
permission ::= ALL
| SELECT [ ( column-name [ , column-name ]... ) ]
| UPDATE [ ( column-name [ , column-name ]... ) ]
| INSERT [ ( column-name [ , column-name ]... ) ]
| DELETE
| ALTER
| REFERENCES
| EXECUTE
table-name ::= user-defined table-name
view-name ::= user-defined view-name
stored-procedure-name ::= user-defined stored_procedure-name
public-or-user-group-name ::= PUBLIC | user-group-name
user-group-name ::= user-name | group-name
user-name ::= user-defined user-name
group-name ::= user-defined group-name
The following table shows the syntax for a given action.
To REVOKE Permissions For This Action | Use This Keyword with REVOKE |
|---|---|
CREATE TABLE | CREATETAB |
CREATE VIEW | CREATEVIEW |
CREATE PROCEDURE | CREATESP |
The following table shows which permissions are removed if you use the ALL keyword.
Permission Removed by ALL | Table | View | Stored Procedure |
|---|---|---|---|
ALTER | X | X | X |
DELETE | X | X | |
INSERT | X | X | |
REFERENCES | X | ||
SELECT | X | X | |
UPDATE | X | X | |
EXECUTE | X |
Examples
The following statement revokes all of these permissions from dannyd for table Class.
REVOKE ALL ON Class FROM 'dannyd'
The following statement revokes all permissions from dannyd and rgarcia for table Class.
REVOKE ALL ON Class FROM dannyd, rgarcia
============
The following statement revokes DELETE permission from dannyd and rgarcia for table Class.
REVOKE DELETE ON Class FROM dannyd, rgarcia
============
The following example revokes INSERT rights from keithv and miked for table Class.
REVOKE INSERT ON Class FROM keithv, miked
The following example revokes INSERT rights from keithv and brendanb for table Person and columns First_name and Last_name.
REVOKE INSERT(First_name,Last_name) ON Person FROM keithv, brendanb
============
The following statement revokes ALTER rights from dannyd from table Class.
REVOKE ALTER ON Class FROM dannyd
============
The following example revokes SELECT rights from dannyd and rgarcia on table Class.
REVOKE SELECT ON Class FROM dannyd, rgarcia
The following statement revokes SELECT rights from dannyd and rgarcia in table Person for columns First_name and Last_name.
REVOKE SELECT(First_name, Last_name) ON Person FROM dannyd, rgarcia
============
The following example revokes UPDATE rights from dannyd and rgarcia for table Person.
REVOKE UPDATE ON Person ON dannyd, rgarcia
============
The following example revokes CREATE VIEW privilege from user1.
REVOKE CREATEVIEW FROM user1;
============
The following example revokes EXECUTE privilege for user1 for stored procedure MyProc1.
REVOKE EXECUTE ON PROCEDURE MyProc1 FROM user1;
============
The following example assumes that security was enabled on the Demodata sample database and a user named USAcctsMgr was granted SELECT rights to the ID column in table Person. You now want to revoke selection rights to that column for that user. Use the following statement.
REVOKE SELECT ( ID ) ON Person FROM 'USAcctsMgr'
See Also
ROLLBACK
ROLLBACK returns the database to the state it was in before the current transaction began. This statement releases the locks acquired since the last SAVEPOINT or START TRANSACTION.
The ROLLBACK TO SAVEPOINT statement rolls back the transaction to the specified savepoint.
Syntax
savepoint-name ::= user-defined-name
Remarks
ROLLBACK, SAVEPOINT, and RELEASE are supported at the session level (outside of stored procedures) only if AUTOCOMMIT is off. Otherwise, ROLLBACK, SAVEPOINT, and RELEASE must be used within a stored procedure.
Any committed statements within a stored procedure are controlled by the outermost transaction of the calling SQL application.
In the case of nested transactions, ROLLBACK rolls back to the nearest START TRANSACTION. For example, if transactions are nested five levels, then five ROLLBACK statements are needed to undo all of the transactions. A transaction is either committed or rolled back, but not both. That is, you cannot roll back a committed transaction.
Examples
The following statement undoes the changes made to the database since the beginning of a transaction.
ROLLBACK WORK;
The following statement undoes the changes made to the database since the last savepoint, named Svpt1.
ROLLBACK TO SAVEPOINT Svpt1;
See Also
SAVEPOINT
SAVEPOINT defines a point in a transaction to which you can roll back.
Syntax
SAVEPOINT savepoint-name
savepoint-name ::= user-defined-name
Remarks
ROLLBACK, SAVEPOINT, and RELEASE are supported at the session level (outside of stored procedures) only if AUTOCOMMIT is off. Otherwise, ROLLBACK, SAVEPOINT, and RELEASE must be used within a stored procedure.
Any committed statements within a stored procedure are controlled by the outermost transaction of the calling SQL application.
A SAVEPOINT applies only to the procedure in which it is defined. That is, you cannot reference a SAVEPOINT defined in another procedure.
Examples
The following example sets a SAVEPOINT then checks a condition to determine whether to ROLLBACK or to RELEASE the SAVEPOINT.
CREATE PROCEDURE Enroll_student( IN :student ubigint, IN :classnum INTEGER);
BEGIN
DECLARE :CurrentEnrollment INTEGER;
DECLARE :MaxEnrollment INTEGER;
SAVEPOINT SP1;
INSERT INTO Enrolls VALUES (:student, :classnum, 0.0);
SELECT COUNT(*) INTO :CurrentEnrollment FROM Enrolls WHERE class_id = :classnum;
SELECT Max_size INTO :MaxEnrollment FROM Class WHERE ID = :classnum;
IF :CurrentEnrollment >= :MaxEnrollment THEN
ROLLBACK TO SAVEPOINT SP1;
ELSE
RELEASE SAVEPOINT SP1;
END IF;
END;
Note that COUNT(expression) counts all nonnull values for an expression across a predicate. COUNT(*) counts all values, including null values.
See Also
SELECT
Retrieves specified information from a database. A SELECT statement creates a temporary view.
Syntax
query-specification ::= ( query-specification )
FROM table-reference [, table-reference ]...
[ WHERE search-condition ]
[ HAVING search-condition ] ]
expression-or-subquery ::= expression | ( query-specification ) [ ORDER BY order-by-expression
[ , order-by-expression ]... ] [ limit-clause ]
[ , order-by-expression ]... ] [ limit-clause ]
subquery-expression ::= ( query-specification ) [ ORDER BY order-by-expression
[ , order-by-expression ]... ] [ limit-clause ]
[ , order-by-expression ]... ] [ limit-clause ]
limit-clause ::= [ LIMIT [offset,] row_count | row_count OFFSET offset | ALL [OFFSET offset] ]
offset ::= number | ?
row_count ::= number | ?
select-list ::= * | select-item [, select-item ]...
table-reference ::= { OJ outer-join-definition }
| join-definition
| ( join-definition )
outer-join-definition ::= table-reference outer-join-type JOIN table-reference
ON search-condition
outer-join-type ::= LEFT [ OUTER ] | RIGHT [ OUTER ] | FULL [ OUTER ]
table-hint ::= INDEX ( index-value [, index-value ]... )
index-value ::= 0 | index-name
index-name ::= user-defined-name
join-definition ::= table-reference [ join-type ] JOIN table-reference ON search-condition
| table-reference CROSS JOIN table-reference
| outer-join-definition
join-type ::= INNER | LEFT [ OUTER ] | RIGHT [ OUTER ] | FULL [ OUTER ]
table-subquery ::= query-specification [ [ UNION [ ALL ]
query-specification ]... ][ ORDER BY order-by-expression [, order-by-expression ]... ]
query-specification ]... ][ ORDER BY order-by-expression [, order-by-expression ]... ]
search-condition ::= search-condition AND search-condition
| search-condition OR search-condition
| NOT search-condition
| ( search-condition )
| predicate
| expression-or-subquery comparison-operator expression-or-subquery
comparison-operator ::= < | > | <= | >= | = | <> | !=
expression-or-subquery ::= expression | ( query-specification )
expression ::= expression - expression
| expression + expression
| expression * expression
| expression / expression
| expression & expression
| expression | expression
| expression ^ expression
| ( expression )
| -expression
| +expression
| column-name
| ?
| literal
| set-function
| scalar-function
| { fn scalar-function }
| window-function
| CASE case_value_expression WHEN when_expression THEN then_expression [...] [ ELSE else_expression ] END
| COALESCE (expression, expression [ ,...] )
| SQLSTATE
| subquery-expression
| NULL
| : user-defined-name
| USER
| global-variable
| virtual-column
subquery-expression ::= ( query-specification )
| LAG ( expression[, expression[, expression ] ] over-clause )
global-variable ::= @:IDENTITY
| @:ROWCOUNT
| @@BIGIDENTITY
| @@IDENTITY
| @@ROWCOUNT
| @@SPID
| @@VERSION
virtual-column ::= SYS$CREATE
| SYS$UPDATE
window-function ::= set-function over-clause
over-clause ::= OVER ( [ partition-by-clause ] order-by-in-over-clause [ row-clause ] )
partition-by-clause ::= PARTITION BY expression [, expression ] ...
order-by-in-over-clause ::= ORDER BY expression [ ASC | DESC ] [, expression [ ASC | DESC ]] ...
row-clause ::= ROWS window-frame-extent
window-frame-extent ::= { UNBOUNDED PRECEDING
| unsigned-integer-literal PRECEDING
| CURRENT ROW }
Note: Usage of ORDER BY in OVER clauses differs from ORDER BY elsewhere in Zen SQL. For details and related information applicable to the current release, see SQL Windowing Functions.
Remarks
These remarks cover the following topics related to use of SELECT:
FOR UPDATE
SELECT FOR UPDATE locks the row or rows within the table that is selected by the query. The record locks are released when the next COMMIT or ROLLBACK statement is issued.
To avoid contention, SELECT FOR UPDATE locks the rows as they are retrieved.
SELECT FOR UPDATE takes precedence within a transactions if statement level SQL_ATTR_CONCURRENCY is set to SQL_CONCUR_LOCK. If SQL_ATTR_CONCURRENCY is set to SQL_CONCUR_READ_ONLY, the database engine does not return an error.
SELECT FOR UPDATE does not support a WAIT or NOWAIT keyword. SELECT FOR UPDATE returns status code 84: The record or page is locked if it cannot lock the rows within a brief period (20 retries).
???Need to re-visit return codes throughout chapter/book per Chris’ comments.
Constraints
The SELECT FOR UPDATE statement has the following constraints:
• Is valid only within a transaction. The statement is ignored if used outside of a transaction.
• Is supported only for a single table. You cannot use SELECT FOR UPDATE with JOIN, nonsimple views, or the GROUP BY, DISTINCT, or UNION keywords.
• Is not supported within a CREATE VIEW statement.
GROUP BY
In addition to supporting a GROUP BY on a column list, Zen supports a GROUP BY on an expression list or on any expression in a GROUP BY expression list. See GROUP BY for more information on GROUP BY extensions. HAVING is not supported without GROUP BY.
Result sets and stored views generated by executing SELECT statements with any of the following characteristics are read-only (they cannot be updated). That is, using a positioned UPDATE or a positioned DELETE and a SQLSetPos call to add, alter or delete data is not allowed on the result set or stored view if:
???see note on the Cursors section to discuss SQLSetPos. Need non-ODBC term from Cursors overview>
• The selection list contains an aggregate:
SELECT SUM(c1) FROM t1
SELECT SUM(c1) FROM t1
• The selection list specifies DISTINCT:
SELECT DISTINCT c1 FROM t1
SELECT DISTINCT c1 FROM t1
• The view uses GROUP BY:
SELECT SUM(c1), c2 FROM t1 GROUP BY c2
SELECT SUM(c1), c2 FROM t1 GROUP BY c2
• The view is a join (references multiple tables):
SELECT * FROM t1, t2
SELECT * FROM t1, t2
• The view uses the UNION operator and UNION ALL is not specified or all SELECT statements do not reference the same table:
SELECT c1 FROM t1 UNION SELECT c1 FROM t1
SELECT c1 FROM t1 UNION ALL SELECT c1 FROM t2
SELECT c1 FROM t1 UNION SELECT c1 FROM t1
SELECT c1 FROM t1 UNION ALL SELECT c1 FROM t2
Note that stored views do not allow the UNION operator.
• The view contains a subquery that references a table other than the table in the outer query:
SELECT c1 FROM t1 WHERE c1 IN (SELECT c1 FROM t2)
SELECT c1 FROM t1 WHERE c1 IN (SELECT c1 FROM t2)
SQL Windowing Functions
Zen provides a subset of ANSI standard SQL windowing usage. In the current release, this initial introduction has certain limitations and considerations.
Limitations
OVER clauses have the following limitations:
• All OVER clauses in a SELECT statement must match in their PARTITION BY, ORDER BY, and ROWS clauses. PARTITION BY expressions must be the same and in the same order, ORDER BY expressions must be the same and in the same order, and ROWS clauses must be identical. If any of these clauses is absent from an OVER clause, it must be absent from the others.
• An OVER clause must include an ORDER BY clause. A PARTITION BY clause is optional. If PARTITION BY is present, it must not use any of the same columns as the ORDER BY clause. If PARTITION BY is absent, the entire result set is treated as a single partition.
• In a PARTITION BY clause, the use of ROWS supports the following keywords:
• UNBOUNDED
• n PRECEDING
• CURRENT ROW
• In a PARTITION BY clause, the use of ROWS does not support the following keywords:
• BETWEEN
• FOLLOWING
• The RANGE keyword is not supported.
• The DISTINCT keyword is not supported in set functions.
• In an OVER clause the ORDER BY clause does not support a COLLATE specification.
• Window functions can be used only with a forward-only cursor.
Considerations
Under the ANSI SQL standard, certain syntax combinations imply default RANGE semantics, which are not supported in the current Zen release. Accordingly, in the current Zen release, in cases where the default RANGE specification is RANGE UNBOUNDED PRECEDING, this default is implemented as ROWS UNBOUNDED PRECEDING.
In general, the difference between these two defaults affects a result set only if the combination of column values returned by the PARTITION BY and ORDER BY clauses is not unique for each row. Therefore, in the current Zen release, if the combination of those column values is not unique for each row, we recommend explicitly specifying ROWS UNBOUNDED PRECEDING, since that will return the expected result.
Dynamic Parameters
Dynamic parameters, represented by a question mark (?), are not supported as SELECT items. You may use dynamic parameters in any SELECT statement if the dynamic parameter is part of the predicate. For example, SELECT * FROM faculty WHERE id = ? is valid because the dynamic parameter is part of the predicate.
Note that you cannot use SQL Editor in Zen Control Center to execute a SQL statement with a dynamic parameter in the predicate.
You may use variables as SELECT items only within stored procedures. See CREATE PROCEDURE.
Aliases
Aliases may appear in a WHERE, HAVING, ORDER BY, or GROUP BY clause. Alias names must differ from any column names within the table. The following statement shows the use of aliases, a and b, in a WHERE clause and in a GROUP BY clause.
SELECT Student_ID a, Transaction_Number b, SUM (Amount_Owed) FROM Billing WHERE a < 120492810 GROUP BY a, b UNION SELECT Student_ID a, Transaction_Number b, SUM (Amount_Paid) FROM Billing WHERE a > 888888888 GROUP BY a, b
SUM and DECIMAL Precision
When using the SUM aggregate function on a field that is of type DECIMAL, the following rules apply:
• The precision of the result is 74, while the scale is dependent on the column definition.
• The result may cause an overflow error if a number with precision greater than 74 is calculated (a very large number indeed). If an overflow occurs, no value is returned, and SQLSTATE is set to 22003, indicating a numeric value is out of range.
Subqueries
A subquery is a SELECT statement with one or more SELECT statements within it. A subquery produces values for further processing within the statement. The maximum number of nested subqueries allowed within the topmost SELECT statement is 16.
The following types of subqueries are supported:
• comparison
• quantified
• in
• exists
• correlated
• expression
• table
Correlated subquery predicates are not supported in a HAVING clause that references grouped columns.
Expression subqueries allow the subquery within the SELECT list. For example, SELECT (SELECT SUM(c1) FROM t1 WHERE t1.c2 = t1.(c2) FROM t2. Only one item is allowed in the subquery SELECT list. For example, the following statement returns an error because the subquery SELECT list contains more than one item: SELECT p.id, (SELECT SUM(b.amount_owed), SUM(b.amount_paid) FROM billing b) FROM person p.
A subquery as an expression may be correlated or noncorrelated. A correlated subquery references one or more columns in any of the tables in the topmost statement. A noncorrelated subquery references no columns in any of the tables in the topmost statement. The following example illustrates a correlated subquery in a WHERE clause:
SELECT * FROM student s WHERE s.Tuition_id IN
(SELECT t.ID FROM tuition t WHERE t.ID = s.Tuition_ID);
Note: Table subqueries support noncorrelated subqueries but not correlated subqueries.
Both correlated and noncorrelated subqueries can return only a single value. For this reason, both correlated and noncorrelated subqueries are also referred to as scalar subqueries.
Scalar subqueries may appear in the DISTINCT, GROUP BY, and ORDER BY clause.
You may use a subquery on the left-hand side of an expression:
Expr-or-SubQuery CompareOp Expr-or-SubQuery
where Expr is an expression, and CompareOp is one of:
< (less than) | > (greater than) | <= (less than or equal to) | >= (greater than or equal to) | = (equals) |
<> (not equal) | != (not equal) | LIKE | IN | NOT IN |
The rest of this section covers the following topics:
Subquery Optimization
Left-hand subquery behavior has been optimized for IN, NOT IN, and =ANY in cases where the subquery is not correlated and any join condition is an outer join. Other conditions may not be optimized. Here is an example of a query that meets these conditions:
SELECT count(*) FROM person WHERE id IN (SELECT faculty_id FROM class)
Performance improves if you use an index in the subquery because Zen optimizes a subquery based on the index. For example, the subquery in the following statement is optimized on student_id because it is an index in the Billing table:
SELECT (SELECT SUM(b.amount_owed) FROM billing b WHERE b.student_id = p.id) FROM person p
UNION in Subquery
Parentheses on different UNION groups within a subquery are not allowed. Parentheses are allowed within each SELECT statement.
For example, the parenthesis following IN and the last parenthesis are not allowed the following statement:
SELECT c1 FROM t5 WHERE c1 IN ( (SELECT c1 FROM t1 UNION SELECT c1 FROM t2) UNION ALL (SELECT c1 FROM t3 UNION SELECT c1 from t4) )
Table Subqueries
Table subqueries can be used to combine multiple queries into one detailed query. A table subquery is a dynamic view, which is not persisted in the database. When the topmost SELECT query finishes, all resources associated with table subqueries are released.
Note: Only noncorrelated subqueries are allowed in table subqueries. Correlated subqueries are not allowed.
The following examples of pagination (1500 rows with 100 rows per page) show the use of table subqueries with the ORDER BY keyword:
The first 100 rows
SELECT * FROM ( SELECT TOP 100 * FROM ( SELECT TOP 100 * FROM person ORDER BY last_name asc ) AS foo ORDER BY last_name desc ) AS bar ORDER BY last_name ASC
The second 100 rows
SELECT * FROM ( SELECT TOP 100 * FROM ( SELECT TOP 200 * FROM person ORDER BY last_name asc ) AS foo ORDER BY last_name DESC ) AS bar ORDER BY last_name ASC
…
The fifteenth 100 rows
SELECT * FROM ( SELECT TOP 100 * FROM ( SELECT TOP 1500 * FROM person ORDER BY last_name ASC ) AS foo ORDER BY last_name DESC ) AS bar ORDER BY last_name ASC
Using Table Hints
The table hint functionality allows you to specify which index, or indexes, to use for query optimization. A table hint overrides the default query optimizer used by the database engine.
If the table hint specifies INDEX(0), the engine performs a table scan of the associated table. (A table scan reads each row in the table rather than using an index to locate a specific data element.)
If the table hint specifies INDEX(index-name), the engine uses index-name to optimize the table based on restrictions of any JOIN conditions, or based on the use of DISTINCT, GROUP BY, or ORDER BY. If the table cannot be optimized on the specified index, the engine attempts to optimize the table based on any existing index.
If you specify multiple index names, the engine chooses the index that provides optimal performance or uses the multiple indexes for OR optimization. An example helps clarify this. Suppose that you have the following:
CREATE INDEX ndx1 on t1(c1)
CREATE INDEX ndx2 on t1(c2)
CREATE INDEX ndx3 on t1(c3)
SELECT * FROM t1 WITH (INDEX (ndx1, ndx2)) WHERE c1 = 1 AND c2 > 1 AND c3 = 1
The database engine uses ndx1 to optimize on c1 = 1 rather than using ndx2 for optimization. Ndx3 is not considered because the table hint does not include ndx3.
Now consider the following:
SELECT * FROM t1 WITH (INDEX (ndx1, ndx2)) WHERE (c1 = 1 OR c2 > 1) AND c3 = 1
The engine uses both ndx1 and ndx2 to optimize on (c1 = 1 OR c2 > 1).
The order in which the multiple index names appear in the table hint does not matter. The database engine chooses from the specified indexes the one(s) that provides for the best optimization.
Duplicate index names within the table hint are ignored.
For a joined view, specify the table hint after the appropriate table name, not at the end of the FROM clause. For example, the following statement is correct:
SELECT * FROM person WITH (INDEX(Names)), student WHERE student.id = person.id AND last_name LIKE 'S%'
Contrast this with the following statement, which is incorrect:
SELECT * FROM person, student WITH (INDEX(Names)) WHERE student.id = person.id AND last_name LIKE 'S%'
Note: The table hint functionality is intended for advanced users. Typically, table hints are not required because the database query optimizer usually picks the best optimization method.
Table Hint Restrictions
• The maximum number of index names that can be used in a table hint is limited only by the maximum length of a SQL statement (64 KB).
• The index name within a table hint must not be fully qualified with the table name.
Incorrect SQL: | SELECT * FROM t1 WITH (INDEX(t1.ndx1)) WHERE t1.c1 = 1 |
Returns: | SQL_ERROR |
szSqlState: | 37000 |
Message: | Syntax Error: SELECT * FROM t1 WITH (INDEX(t1.<< ??? >>ndx1)) WHERE t1.c1 = 1 |
• Table hints are ignored if they are used in a SELECT statement with a view.
Incorrect SQL: | SELECT * FROM myt1view WITH (INDEX(ndx1)) |
Returns: | SQL_SUCCESS_WITH_INFO |
szSqlState: | 01000 |
Message: | Index hints supplied with views will be ignored |
• Zero is the only valid hint that is not an index name.
Incorrect SQL: | SELECT * FROM t1 WITH (INDEX(85)) |
Returns: | SQL_ERROR |
szSqlState: | S1000 |
Message: | Invalid index hint |
• The index name in a table hint must specify an existing index.
Incorrect SQL: | SELECT * FROM t1 WITH (INDEX(ndx4)) |
Returns: | SQL_ERROR |
szSqlState: | S0012 |
Message: | Invalid index name; index not found |
• A table hint cannot be specified on a subquery AS table.
Incorrect SQL: | SELECT * FROM (SELECT c1, c2 FROM t1 WHERE c1 = 1) AS a WITH (INDEX(ndx2)) WHERE a.c2 = 10 |
Returns: | SQL_ERROR |
szSqlState: | 37000 |
Message: | syntax Error: SELECT * FROM (SELECT c1, c2 FROM t1 WHERE c1 = 1) AS a WITH<< ??? >>(INDEX(ndx2)) WHERE a.c2 = 10 |
Accessing System Data v2
In data files using the 13.0 format, system data v2 enables Btrieve keys based on time stamps for record creation and record update. These create and update keys have the following properties:
• The creation key replaces the existing Btrieve system key 125 for use in transactional logging.
• The update key allows identifying of rows that have changed since a specific point in time, such as the creation time stamp in key 125. The update key is Btrieve system key 124.
• Both keys have a TIMESTAMP(7) format, YYYY-MM-DD HH:MM:SS.sssssss, with septasecond precision.
• In SQL queries, you can access the time stamps using the column names sys$create and sys$update. For a working example, see Queries with Sys$create and Sys$update.
Examples
This simple SELECT statement retrieves all the data from the Faculty table.
SELECT * FROM Faculty
This statement retrieves the data from the person and the faculty table where the id column in the person table is the same as the id column in the faculty table.
SELECT Person.id, Faculty.salary FROM Person, Faculty WHERE Person.id = Faculty.id
The rest of this section provides examples of variations on SELECT statements. Some of these headings are based on the variable given in the syntax definition for SELECT.
• IF |
FOR UPDATE
The following example uses table t1 to demonstrate the use of FOR UPDATE. Assume that t1 is part of the Demodata sample database. The stored procedure creates a cursor for the SELECT FOR UPDATE statement. A loop fetches each record from t1 and, for those rows where c1=2, sets the value of c1 to four.
The procedure is called by passing the value 2 as the IN parameter.
The example assumes two users, A and B, logged in to Demodata. User A performs the following:
DROP TABLE t1
CREATE TABLE t1 (c1 INTEGER, c2 INTEGER)
INSERT INTO t1 VALUES (1,1)
INSERT INTO t1 VALUES (2,1)
INSERT INTO t1 VALUES (1,1)
INSERT INTO t1 VALUES (2,1)
CREATE PROCEDURE p1 (IN :a INTEGER)
AS
BEGIN
DECLARE :b INTEGER;
DECLARE :i INTEGER;
DECLARE c1Bulk CURSOR FOR SELECT * FROM t1 WHERE c1 = :a FOR UPDATE;
START TRANSACTION;
OPEN c1Bulk;
BulkLinesLoop:
LOOP
FETCH NEXT FROM c1Bulk INTO :i;
IF SQLSTATE = '02000' THEN
LEAVE BulkLinesLoop;
END IF;
UPDATE SET c1 = 4 WHERE CURRENT OF c1Bulk;
END LOOP;
CLOSE c1Bulk;
SET :b = 0;
WHILE (:b < 100000) DO
BEGIN
SET :b = :b + 1;
END;
END WHILE;
COMMIT WORK;
END;
CALL p1(2)
Notice that a WHILE loop delays the COMMIT of the transaction. During that delay, assume that User B attempts to update t1. Status code 84 is returned to User B because those rows are locked by the SELECT FOR UPDATE statement from User A.
============
The following example uses table t1 to demonstrate how SELECT FOR UPDATE locks records when the statement is used outside of a stored procedure. Assume that t1 is part of the Demodata sample database.
The example assumes that two users, A and B, are logged in to Demodata. User A performs the following:
DROP TABLE t1
CREATE TABLE t1 (c1 INTEGER, c2 INTEGER)
INSERT INTO t1 VALUES (1,1)
INSERT INTO t1 VALUES (2,1)
INSERT INTO t1 VALUES (1,1)
INSERT INTO t1 VALUES (2,1)
(turn off AUTOCOMMIT)
(execute and fetch): "SELECT * FROM t1 WHERE c1 = 2 FOR UPDATE"
The two records where c1 = 2 are locked until User A issues a COMMIT WORK or ROLLBACK WORK statement.
(User B attempts to update t1): "UPDATE t1 SET c1=3 WHERE c1=2" A status code 84 is returned to User B because those rows are locked by the SELECT FOR UPDATE statement from User A.
<??? determine SQL error code>
(Now assume that User A commits the transaction.) The two records where c1 = 2 are unlocked.
User B could now execute "UPDATE t1 SET c1=3 WHERE c1=2" and change the values for c1.
Approximate Numeric Literal
SELECT * FROM results WHERE quotient =-4.5E-2
INSERT INTO results (quotient) VALUES (+5E7)
Between Predicate
The syntax expression1 BETWEEN expression2 and expression3 returns TRUE if expression1 >= expression2 and expression1<= expression3. FALSE is returned if expression1 >= expression3, or is expression1 <= expression2.
Expression2 and expression3 may be dynamic parameters (for example, SELECT * FROM emp WHERE emp_id BETWEEN ? AND ?).
The next example retrieves the first names from the Person table whose ID falls between 10000 and 20000.
SELECT First_name FROM Person WHERE ID BETWEEN 10000 AND 20000
Correlation Name
Both table and column correlation names are supported.
The following example selects data from both the person table and the faculty table using the aliases T1 and T2 to differentiate between the two tables.
SELECT * FROM Person t1, Faculty t2 WHERE t1.id = t2.id
The correlation name for a table name can also be specified in using the FROM clause, as seen in the following example:
SELECT a.Name, b.Capacity FROM Class a, Room b
WHERE a.Room_Number = b.Number
Exact Numeric Literal
SELECT car_num, price FROM cars WHERE car_num =49042 AND price=49999.99
In Predicate
This selects the records from table Person table where the first names are Bill and Roosevelt.
SELECT * FROM Person WHERE First_name IN ('Roosevelt', 'Bill')
Set Functions
Zen supports the set functions AVG, COUNT, COUNT_BIG, LAG, MAX, MIN, STDEV, STDEVP, SUM, VAR, and VARP, which are illustrated in the following examples.
LAG is valid only as a windowing function. For details and examples, see the LAG keyword.
AVG, MAX, MIN, and SUM
The aggregate functions for AVG, MAX, MIN, and SUM operate as commonly expected. The following examples use these functions with the Salary field in the Faculty sample table.
SELECT AVG(Salary) FROM Faculty
SELECT MAX(Salary) FROM Faculty
SELECT MIN(Salary) FROM Faculty
SELECT SUM(Salary) FROM Faculty
Most often, these functions are used with GROUP BY to apply them to sets of rows with a common column, as shown in this example:
SELECT AVG(Salary) FROM Faculty GROUP BY Dept_Name
The following example retrieves student_id and sum of the amount_paid where it is greater than or equal to 100 from the billing table. It then groups the records by student_id.
SELECT Student_ID, SUM(Amount_Paid)
FROM Billing
GROUP BY Student_ID
HAVING SUM(Amount_Paid) >=100.00
If the expression is a positive integer literal, then that literal is interpreted as the number of the column in the result set and ordering is done on that column. No ordering is allowed on set functions or an expression that contains a set function.
COUNT and COUNT_BIG
COUNT(expression) and COUNT_BIG(expression) count all nonnull values for an expression across a predicate. COUNT(*) and COUNT_BIG(*) count all values, including NULL values. COUNT() returns an INTEGER data type with a maximum value of 2,147,483,647. COUNT_BIG() returns a BIGINT data type with a maximum value of 9,223,372,036,854,775,807.
The following example returns a count of chemistry majors who have a grade point average of 3.5 or greater (and the result does not equal null).
SELECT COUNT(*) FROM student WHERE (CUMULATIVE_GPA > 3.4 and MAJOR='Chemistry')
STDEV and STDEVP
The STDEV function returns the standard deviation of all values based on a sample of the data. The STDEVP function returns the standard deviation for the population for all values in the specified expression. Here are the equations for each function: 
The following returns the standard deviation of the grade point average by major from the Student sample table.
SELECT STDEV(Cumulative_GPA), Major FROM Student GROUP BY Major
The following returns the standard deviation for the population of the grade point average by major from the Student sample table.
SELECT STDEVP(Cumulative_GPA), Major FROM Student GROUP BY Major
VAR and VARP
The VAR function returns the statistical variance for all values on a sample of the data. The VARP function returns the statistical variance for the population for all values in the specified expression. Here are the equations for each function: 
The following returns the statistical variance of the grade point average by major from the Student sample table.
SELECT VAR(Cumulative_GPA), Major FROM Student GROUP BY Major
The following returns the statistical variance for the population of the grade point average by major from the Student sample table.
SELECT VARP(Cumulative_GPA), Major FROM Student GROUP BY Major
Note that for STDEV, STDEVP, VAR, and VARP, the expression must be a numeric data type and an eight-byte DOUBLE is returned. A floating-point overflow error results if the difference between the minimum and maximum values of the expression is out of range. Expression cannot contain aggregate functions. There must be at least two rows with a value in the expression field or a result is not calculated and returns a NULL.
Date Literal
See Date Values.
Time Literal
See Time Values.
Time Stamp Literal
See Time Stamp Values.
String Literal
See String Values.
Date Arithmetic
See Date Arithmetic.
IF
The IF system scalar function provides conditional execution based on the truth value of a condition
This expression prints the column header as Prime1 and amount owed as 2000 where the value of the column amount_owed is 2000 or it prints a 0 if the value of the amount_owed column is not equal to 2000.
SELECT Student_ID, Amount_Owed,
IF (Amount_Owed = 2000, Amount_Owed, Convert(0, SQL_DECIMAL)) "Prime1"
FROM Billing
From table Class, the following example prints the value in the Section column if the section is equal to 001, else it prints "xxx" under column header Prime1.
Under column header Prime2, it prints the value in the Section column if the value of the section column is equal to 002, or else it prints "yyy."
SELECT ID, Name, Section,
IF (Section = '001', Section, 'xxx') "Prime1",
IF (Section = '002', Section, 'yyy') "Prime2"
FROM Class
You can combine header Prime1 and header Prime2 by using nested IF functions. Under column header Prime, the following query prints the value of the Section column if the value of the Section column is equal to 001 or 002. Otherwise, it print "xxx."
SELECT ID, Name, Section,
IF (Section = '001', Section, IF(Section = '002', Section, 'xxx')) Prime
FROM Class
Multidatabase Join
When needed, a database name may be prepended to an aliased table name in the FROM clause, to distinguish among tables from two or more different databases that are used in a join.
All of the specified databases must be serviced by the same database engine and have the same database code page settings. The databases do not need to reside on the same physical volume. The current database may be secure or unsecure, but all other databases in the join must be unsecure. With regard to Referential Integrity, all RI keys must exist within the same database. (See also Encoding.)
Literal database names are not permitted in the select-list or in the WHERE clause. If you wish to refer to specific columns in the select-list or in the WHERE clause, you must use an alias for each specified table. See examples.
Assume two separate databases, named accounting and customers, exist on the same server. You can join tables from the two databases using table aliases and SQL syntax similar to the following example:
SELECT ord.account, inf.account, ord.balance, inf.address
FROM accounting.orders ord, customers.info inf
WHERE ord.account = inf.account
============
In this example, the two separate databases are acctdb and loandb. The table aliases are a and b, respectively.
SELECT a.loan_number_a, b.account_no, a.current_bal, b.balance
FROM acctdb.ds500_acct_master b LEFT OUTER JOIN loandb.ml502_loan_master a ON (a.loan_number_a = b.loan_number)
WHERE a.current_bal <> (b.balance * -1)
ORDER BY a.loan_number_a
Left Outer Join
The following example shows how to access the Person and Student tables from the Demodata database to obtain the Last Name, First Initial of the First Name and GPA of students. With the LEFT OUTER JOIN, all rows in the Person table are fetched (the table to the left of LEFT OUTER JOIN). Since not all people have GPAs, some of the columns have NULL values for the results. This is how outer join works, returning nonmatching rows from either table.
SELECT Last_Name,Left(First_Name,1) AS First_Initial,Cumulative_GPA AS GPA FROM "Person"
LEFT OUTER JOIN "Student" ON Person.ID=Student.ID
ORDER BY Cumulative_GPA DESC, Last_Name
Assume that you want to know everyone with perfectly rounded GPAs and have them all ordered by the length of their last name. Using the MOD statement and the LENGTH scalar function, you can achieve this by adding the following to the query:
WHERE MOD(Cumulative_GPA,1)=0 ORDER BY LENGTH(Last_Name)
Right Outer Join
The difference between LEFT and RIGHT OUTER JOIN is that all non matching rows show up for the table defined to the right of RIGHT OUTER JOIN. Change the query for LEFT OUTER JOIN to include a RIGHT OUTER JOIN instead. The difference is that the all nonmatching rows from the right table, in this case Student, show up even if no GPA is present. However, since all rows in the Student table have GPAs, all rows are fetched.
SELECT Last_Name,Left(First_Name,1) AS First_Initial,Cumulative_GPA AS GPA FROM "Person"
RIGHT OUTER JOIN "Student" ON Person.ID=Student.ID
ORDER BY Cumulative_GPA DESC, Last_Name
Cartesian Join
A Cartesian join is the matrix of all possible combinations of the rows from each of the tables. The number of rows in the Cartesian product equals the number of rows in the first table times the number of rows in the second table.
Assume you have the following tables in your database.
Addr Table
EmpID | Street |
|---|---|
E1 | 101 Mem Lane |
E2 | 14 Young St. |
Loc Table
LocID | Name |
|---|---|
L1 | PlanetX |
L2 | PlanetY |
The following performs a Cartesian JOIN on these tables:
SELECT * FROM Addr,Loc
This results in the following data set:
EmpID | Street | LocID | Name |
E1 | 101 Mem Lane | L1 | PlanetX |
E1 | 101 Mem Lane | L2 | PlanetY |
E2 | 14 Young St | L1 | PlanetX |
E2 | 14 Young St | L2 | PlanetY |
Queries with Sys$create and Sys$update
The following example provides a simple instance of finding a record that has been updated since it was created.
create table sensorData SYSDATA_KEY_2 (location varchar(20), temp real);
insert into sensorData values('Machine1', 77.3);
insert into sensorData values('Machine2', 79.8);
insert into sensorData values('Machine3', 65.4);
insert into sensorData values('Machine4', 90.0);
select "sys$create", "sys$update", sensorData.* from sensorData;
--update a row:
update sensorData set temp = 90.1 where location = 'Machine1';
--find the row that has been updated:
select "sys$create", "sys$update", sensorData.* from sensorData where sys$update > sys$create;
DISTINCT in Aggregate Functions
DISTINCT is useful in aggregate functions. When used with SUM, AVG, and COUNT, it eliminates duplicate values before calculating the sum, average or count. With MIN, and MAX, however, it is allowed but does not change the result of the returned minimum or maximum.
For example, assume you want to know the salaries for different departments, including the minimum, maximum and salary, and you want to remove duplicate salaries. The following statement does this, excluding the computer science department:
SELECT dept_name, MIN(salary), MAX(salary), AVG(DISTINCT salary) FROM faculty WHERE dept_name<>'computer science' GROUP BY dept_name
On the other hand, to include duplicate salaries, drop DISTINCT:
SELECT dept_name, MIN(salary), MAX(salary), AVG(salary) FROM faculty WHERE dept_name<>'computer science' GROUP BY dept_name
For the use of DISTINCT in SELECT statements, see DISTINCT.
TOP or LIMIT
You can set the maximum number of rows returned by a SELECT statement by using the keywords TOP or LIMIT. The number must be a literal positive value. It is defined as a 32-bit unsigned integer. For example:
SELECT TOP 10 * FROM Person
returns the first 10 rows of the Person table in Demodata.
LIMIT is identical to TOP except that it provides the OFFSET keyword to enable you to "scroll" through the result set by choosing the first row in the returned records. For example, if the offset is 5, then the first row returned is row 6. LIMIT has two ways to specify the offset, both with and without the OFFSET keyword, as shown in the following examples, which return identical results:
SELECT * FROM Person LIMIT 10 OFFSET 5
SELECT * FROM Person LIMIT 5,10
Note that when you do not use the OFFSET keyword, you must put the offset value before the row count, separated by a comma.
You can use TOP or LIMIT with ORDER BY. If so, then the database engine generates a temporary table and populates it with the entire query result set if no index can be used for ORDER BY. The rows in the temporary table are arranged as specified by ORDER BY in the result set, but only the number of rows determined by TOP or LIMIT are returned by the query.
Views that use TOP or LIMIT may be joined with other tables or views.
The main difference between TOP or LIMIT and SET ROWCOUNT is that TOP or LIMIT affect only the current statement, while SET ROWCOUNT affects all subsequent statements issued during the current database session.
If SET ROWCOUNT and TOP or LIMIT are both used in a query, the query returns a number of rows equal to the lowest of the two values.
Either TOP or LIMIT is allowed within a single query or subquery, but not both.
Cursor Types and TOP or LIMIT
A SELECT query with a TOP or LIMIT clause that uses a dynamic cursor converts the cursor type to static. Forward-only and static cursors are not affected.
TOP or LIMIT Examples
The following examples use both TOP and LIMIT clauses, which are interchangeable as keywords and give the same results, although LIMIT offers more control of which rows are returned.
SELECT TOP 10 * FROM person; -- returns 10 rows
SELECT * FROM person LIMIT 10; -- returns 10 rows
SELECT * FROM person LIMIT 10 OFFSET 5; -- returns 10 rows starting with row 6
SELECT * FROM person LIMIT 5,10; -- returns 10 rows starting with row 6
SET ROWCOUNT = 5;
SELECT TOP 10 * FROM person; -- returns 5 rows
SELECT * FROM person LIMIT 10; -- returns 5 rows
SET ROWCOUNT = 12;
SELECT TOP 10 * FROM person ORDER BY id; -- returns the first 10 rows of the full list ordered by column id
SELECT * FROM person LIMIT 20 ORDER BY id; -- returns the first 12 rows of the full list ordered by column id
============
The following examples show a variety of behaviors when TOP or LIMIT is used in views, unions, or subqueries.
CREATE VIEW v1 (c1) AS SELECT TOP 10 id FROM person;
CREATE VIEW v2 (d1) AS SELECT TOP 5 c1 FROM v1;
SELECT * FROM v2 -- returns 5 rows
SELECT TOP 10 * FROM v2 -- returns 5 rows
SELECT TOP 2 * FROM v2 -- returns 2 rows
SELECT * FROM v2 LIMIT 10 -- returns 5 rows
SELECT * FROM v2 LIMIT 10 OFFSET 3 -- returns 2 rows starting with row 4
SELECT * FROM v2 LIMIT 3,10 -- returns 2 rows starting with row 4
SELECT TOP 10 id FROM person UNION SELECT TOP 13 faculty_id FROM class -- returns 17 rows
SELECT TOP 10 id FROM person UNION ALL SELECT TOP 13 faculty_id FROM class -- returns 23 rows
SELECT id FROM person WHERE id IN (SELECT TOP 10 faculty_id from class) -- returns 5 rows
SELECT id FROM person WHERE id >= any (SELECT TOP 10 faculty_id from class) -- returns 1040 rows
============
The following example returns last name and amount owed for students above a certain ID number.
SELECT p_last_name, b_owed FROM
(SELECT TOP 10 id, last_name FROM person ORDER BY id DESC) p (p_id, p_last_name),
(SELECT TOP 10 student_id, SUM (amount_owed) FROM billing GROUP BY student_id ORDER BY student_id DESC) b (b_id, b_owed)
WHERE p.p_id = b.b_id AND p.p_id > 714662900
ORDER BY p_last_name ASC
Table Hint Examples
This topic provides working examples for table hints. Use the SQL statements to create them in Zen.
DROP TABLE t1
CREATE TABLE t1 (c1 INTEGER, c2 INTEGER)
INSERT INTO t1 VALUES (1,10)
INSERT INTO t1 VALUES (1,10)
INSERT INTO t1 VALUES (2,20)
INSERT INTO t1 VALUES (2,20)
INSERT INTO t1 VALUES (3,30)
INSERT INTO t1 VALUES (3,30)
CREATE INDEX it1c1 ON t1 (c1)
CREATE INDEX it1c1c2 ON t1 (c1, c2)
CREATE INDEX it1c2 ON t1 (c2)
CREATE INDEX it1c2c1 ON t1 (c2, c1)
DROP TABLE t2
CREATE TABLE t2 (c1 INTEGER, c2 INTEGER)
INSERT INTO t2 VALUES (1,10)
INSERT INTO t2 VALUES (1,10)
INSERT INTO t2 VALUES (2,20)
INSERT INTO t2 VALUES (2,20)
INSERT INTO t2 VALUES (3,30)
INSERT INTO t2 VALUES (3,30)
Certain restrictions apply to the use of table hints. See Table Hint Restrictions for examples.
============
The following example optimizes on index it1c1c2.
SELECT * FROM t1 WITH (INDEX(it1c1c2)) WHERE c1 = 1
Contrast this with the following example, which optimizes on index it1c1 instead of on it1c2 because the restriction consists of only c1 = 1. If a query specifies an index that cannot be used to optimize the query, the hint is ignored.
SELECT * FROM t1 WITH (INDEX(it1c2)) WHERE c1 = 1
============
The following example performs a table scan of table t1.
SELECT * FROM t1 WITH (INDEX(0)) WHERE c1 = 1
============
The following example optimizes on indexes it1c1c2 and it1c2c1.
SELECT * FROM t1 WITH (INDEX(it1c1c2, it1c2c1)) WHERE c1 = 1 OR c2 = 10
============
The following example using a table hint in the creation of a view. When all records are selected from the view, the SELECT statement optimizes on index it1c1c2.
DROP VIEW v2
CREATE VIEW v2 as SELECT * FROM t1 WITH (INDEX(it1c1c2)) WHERE c1 = 1
SELECT * FROM v2
============
The following example uses a table hint in a subquery and optimizes on index it1c1c2.
SELECT * FROM (SELECT c1, c2 FROM t1 WITH (INDEX(it1c1c2)) WHERE c1 = 1) AS a WHERE a.c2 = 10
============
The following example uses a table hint in a subquery and an alias name "a." The alias name is required.
SELECT * FROM (SELECT Last_Name FROM Person AS P with (Index(Names)) ) a
============
The following example optimizes the query based on the c1 = 1 restriction and optimizes the GROUP BY clause based on index it1c1c2.
SELECT c1, c2, count(*) FROM t1 WHERE c1 = 1 GROUP BY c1, c2
============
The following example optimizes on index it1c1 and, unlike the previous example, optimizes only on the restriction and not on the GROUP BY clause.
SELECT c1, c2, count(*) FROM t1 WITH (INDEX(it1c1)) WHERE c1 = 1 GROUP BY c1, c2
Since the GROUP BY clause cannot be optimized using the specified index, it1c1, the database engine uses a temporary table to process the GROUP BY.
============
The following example uses a table hint in a JOIN clause and optimizes on index it1c1c2.
SELECT * FROM t2 INNER JOIN t1 WITH (INDEX(it1c1c2)) ON t1.c1 = t2.c1
Contrast this with the following statement, which does not use a table hint and optimizes on index it1c1.
SELECT * FROM t2 INNER JOIN t1 ON t1.c1 = t2.c1
============
The following example uses a table hint in a JOIN clause to perform a table scan of table t1.
SELECT * FROM t2 INNER JOIN t1 WITH (INDEX(0)) ON t1.c1 = t2.c1
Contrast this with the following example which also performs a table scan of table t1. However, because no JOIN clause is used, the statement uses a temporary table join.
SELECT * FROM t2, t1 WITH (INDEX(0)) WHERE t1.c1 = t2.c1
See Also
SELECT (with INTO)
The SELECT (with INTO) statement allows you to select column values from a specified table to insert into variables or to populate a table with data.
Syntax
SELECT [ ALL | DISTINCT ] [ top-clause ] select-list INTO variable | table-name | temp-table-name [ , variable ]...
FROM table-reference [ , table-reference ]... [ WHERE search-condition ]
[ GROUP BY expression [ , expression ]...[ HAVING search-condition ] ] [ UNION [ALL ] query-specification ] [ ORDER BY order-by-expression [ , order-by-expression ]... ]
query-specification ::= ( query-specification )
FROM table-reference [ , table-reference ]...
[ WHERE search-condition ]
[ HAVING search-condition ] ]
variable ::= user-defined-name
table-name ::= user-defined-name of a table
temp-table-name ::= user-defined-name of a temporary table
For the remaining syntax definitions, see SELECT.
Remarks
The variables must occur within a stored procedure, a trigger, or a user-defined function.
You can populate a table by using SELECT INTO only if the SELECT INTO statement occurs outside of a user-defined function or trigger. Populating or creating a table with SELECT INTO is not permitted within a user-defined function or trigger.
SELECT INTO is permitted within a stored procedure.
Only a single table can be created and populated with a SELECT INTO statement. A single SELECT INTO statement cannot create and populate multiple tables.
New tables created by SELECT INTO only maintain CASE and NOT NULL constraints from the source tables. Other constraints such as DEFAULT and COLLATE are not maintained. In addition, no indexes are created on the new table.
Examples
See the examples for CREATE (temporary) TABLE for how to use SELECT INTO to populate temporary tables.
The following example assigns into variables :x, :y the values of first_name and last_name in the Person table where first name is Bill.
SELECT first_name, last_name INTO :x, :y FROM person WHERE first_name = 'Bill'
See Also
SET
The SET statement assigns a value to a declared variable.
Syntax
SET variable-name = proc-expr
Remarks
You must declare variables before you can set them. SET is allowed only in stored procedures and triggers.
Examples
The following examples assigns a value of 10 to var1.
SET :var1 = 10;
See Also
SET ANSI_PADDING
The SET ANSI_PADDING statement allows the Relational Engine to handle CHAR data types padded with NULLs (binary zeros). CHAR is defined as a character data type of fixed length.
Zen supports two interfaces: transactional and relational. The MicroKernel Engine allows a CHAR to be padded with NULLs. The Relational Engine conforms to the ANSI standard for padding, which specifies that a CHAR be padded with spaces. For example, by default, a CHAR column created with a CREATE TABLE statement is always padded with spaces.
An application that uses both interfaces may need to process strings padded with NULLs.
Syntax
SET ANSI_PADDING=< ON | OFF >
Remarks
The default value is ON, meaning that strings padded with spaces are inserted into CHARs. Trailing spaces are considered as insignificant in logical expression comparisons. Trailing NULLs are considered as significant in comparisons.
If set to OFF, the statement means that strings padded with NULLs are inserted into CHARs. Both trailing NULLs and trailing spaces are considered as insignificant in logical expression comparisons.
On Windows, ANSI padding can be set to on or off for a DSN through a registry setting. See the Zen Knowledge Base on the Actian website and search for "ansipadding."
The following string functions support NULL padding:
CHAR_LENGTH | CONCAT | LCASE or LOWER |
LEFT | LENGTH | LOCATE |
LTRIM | POSITION | REPLACE |
REPLICATE | RIGHT | RTRIM |
STUFF | SUBSTRING | UCASE or UPPER |
For information on how ANSI_PADDING affects each function, see its scalar function documentation.
Restrictions
The following restrictions apply to SET ANSI_PADDING:
• The statement applies only to the fixed length character data type CHAR, not to NCHAR, VARCHAR, NVARCHAR, LONGVARCHAR or NLONGVARCHAR.
• The statement applies to the session level.
Examples
The following example shows the results of string padding using the INSERT statement with SET ANSI_PADDING set to ON and to OFF.
DROP TABLE t1
CREATE TABLE t1 (c1 CHAR(4))
SET ANSI_PADDING = ON
INSERT INTO t1 VALUES ('a') -- string a = a\0x20\0x20\0x20
INSERT INTO t1 VALUES ('a' + CHAR(0) + CHAR(0) + CHAR(0)) -- string a = a\0x00\0x00\0x00
DROP TABLE t1
CREATE TABLE t1 (c1 CHAR(4))
SET ANSI_PADDING = OFF
INSERT INTO t1 VALUES ('a') -- string a = a\0x00\0x00\0x00
INSERT INTO t1 VALUES ('a' + CHAR(32) + CHAR(32) + CHAR(32)) -- string a = a\0x20\0x20\0x20
============
The following example shows the results of string padding using the UPDATE statement with SET ANSI_PADDING set to ON and to OFF.
DROP TABLE t1
CREATE TABLE t1 (c1 CHAR(4))
SET ANSI_PADDING = ON
UPDATE t1 SET c1 = 'a' -- all rows for c1 = a\0x20\0x20\0x20
UPDATE t1 SET c1 = 'a' + CHAR(0) + CHAR(0) + CHAR(0) -- all rows for c1 = a\0x00\0x00\0x00
DROP TABLE t1
CREATE TABLE t1 (c1 CHAR(4))
SET ANSI_PADDING = OFF
UPDATE t1 SET c1 = 'a' -- all rows for c1 = a\0x00\0x00\0x00
UPDATE t1 SET c1 = 'a' + CHAR(32) + CHAR(32) + CHAR(32) -- all rows for c1 = a\0x20\0x20\0x20
============
The following example shows how a character column, c1, can be cast to a BINARY data type so that you can display the contents of c1 in BINARY format. Assume that table t1 has the following six rows of data:
a\x00\x00\x00\x00
a\x00\x00\x00\x00
a\x00\x20\x00\x00
a\x00\x20\x00\x00
a\x20\x20\x20\x20
a\x20\x20\x20\x20
The following statement casts c1 as a BINARY data type:
SELECT CAST(c1 AS BINARY(4)) FROM t1
The SELECT statement returns the following:
0x61000000
0x61000000
0x61002000
0x61002000
0x61202020
0x61202020
See Also
SET CACHED_PROCEDURES
The SET CACHED_PROCEDURES statement specifies the number of stored procedures that the database engine caches in memory for a SQL session.
Syntax
SET CACHED_PROCEDURES = number
Remarks
The value of number can be any whole number in the range zero through approximately two billion. The database engine automatically defaults to 50. Each session can change its number of cached procedures by issuing the SET statement.
The companion statement to SET CACHED_PROCEDURES is SET PROCEDURES_CACHE.
• If you set both SET statements to zero, the database engine does not cache stored procedures. In addition, the engine removes any existing cache used for stored procedures. That is, the engine flushes from cache all stored procedures that were cached before you set both statements to zero.
• If you set only one of the statements to a value, either zero or a nonzero value, the other statement is implicitly set to zero. The statement implicitly set to zero is ignored. For example, if you are only interested in caching 70 procedures and are not concerned with the amount of memory, set CACHED_PROCEDURES to 70. The database engine implicitly sets PROCEDURES_CACHE to zero, which ignores the setting.
The following condition applies if you set CACHED_PROCEDURES to a nonzero value. The database engine removes the least-recently-used procedures from the cache if the execution of a procedure causes the number of cached procedures to exceed the CACHED_PROCEDURES value.
If a memory cache is used, it retains a compiled version of a stored procedure after the procedure executes. Typically, caching results in improved performance for each subsequent call to a cached procedure. Note that excessive memory swapping, or thrashing, could occur depending on the cache settings and the SQL being executed by your application. Thrashing can cause a decrease in performance.
Registry Setting
In addition to the SET statement, the number of cached procedures can be specified with a registry setting. The registry settings apply to all sessions and provides a convenient way to set an initial value. Each session can override the registry setting for that particular session by using the SET statement.
The registry setting applies to all server platforms where Zen Enterprise Server or Cloud Server is supported. You must manually modify the registry setting. On Windows, use the registry editor provided with the operating system. On Linux and macOS, you can use the psregedit utility.
If the registry setting is not specified, the database engine automatically defaults to 50.
To specify cached procedures registry setting on Windows
1. Locate the following key:
HKEY_LOCAL_MACHINE\SOFTWARE\Actian\Zen\SQL Relational Engine
Note that in most Windows operating systems, the key is under HKEY_LOCAL_MACHINE\SOFTWARE\Actian\Zen. However, its location below HKEY_LOCAL_MACHINE\SOFTWARE can vary depending on the operating system.
2. For this key, create a new string valued named CachedProcedures.
3. Set CachedProcedures to the desired number of procedures that you want to cache.
To set the cached procedures registry key in the Zen Registry on Linux and macOS
1. Locate the following key:
PS_HKEY_CONFIG\SOFTWARE\Actian\Zen\SQL Relational Engine
2. For this key, create a new string valued named CachedProcedures.
3. Set CachedProcedures to the desired number of procedures that you want to cache.
Caching Exclusions
A stored procedure is not cached, regardless of the cache settings, for any of the following:
• The stored procedure references a local or a global temporary table. A local temporary table has a name that begins with the pound sign (#). A global temporary table has a name that begins with two pound signs (##). See CREATE (temporary) TABLE.
• The stored procedure contains any data definition language (DDL) statements. See Data Definition Statements.
• The stored procedure contains an EXEC[UTE] statement used to execute a character string, or an expression that returns a character string. For example: EXEC ('SELECT Student_ID FROM ' + :myinputvar).
Examples
The following example sets a cache memory of 2 MB that stores up to 20 stored procedures.
SET CACHED_PROCEDURES = 20
SET PROCEDURES_CACHE = 2
============
The following example sets a cache memory of 1,000 MB that stores up to 500 stored procedures.
SET CACHED_PROCEDURES = 500
SET PROCEDURES_CACHE = 1000
============
The following example specifies that you do not want to cache stored procedures and that any existing procedures cache will be removed.
SET CACHED_PROCEDURES = 0
SET PROCEDURES_CACHE = 0
============
The following example specifies that you want to cache 120 stored procedures and ignore the amount of memory used for the cache.
SET CACHED_PROCEDURES = 120
(The database engine implicitly sets PROCEDURES_CACHE to zero.)
See Also
SET DECIMALSEPARATORCOMMA
The Zen database engine by default displays decimal data using a period (.) as the separator between ones and tenths (for example, 100.95). The SET DECIMALSEPARATORCOMMA statement allows you to specify that results should be displayed using a comma to separate ones and tenths (for example, 100,95).
As with all SET statements, the effects of this statement apply to the remainder of the current database session, or until another SET DECIMALSEPARATORCOMMA statement is issued.
Syntax
SET DECIMALSEPARATORCOMMA=<ON|OFF>
Remarks
The default value is OFF, meaning that the period is used as the default decimal separator.
In locales where the comma is used as the decimal separator, decimal data can be entered using a comma or a period as the separator (literal values that use the comma as the separator must be enclosed in single quotes, for example: '123,43'). When the data is returned, however (as in the results of a SELECT statement), it is always displayed using a period unless SET DECIMALSEPARATORCOMMA=ON has been specified.
Likewise, if your database contains data that was entered using the period as the decimal separator, you can choose to specify the comma as the separator for output and display by using this statement.
This command affects output and display only. It has no effect on values being inserted, updated, or used in a comparison.
Examples
The following example shows how to insert period-delimited data and the effects of the SET DECIMALSEPARATORCOMMA statement on the SELECT results.
CREATE TABLE t1 (c1 real, c2 real)
INSERT INTO t1 VALUES (102.34, 95.234)
SELECT * FROM t1
Results:
c1 c2
------- -------
102.34 95.234
SET DECIMALSEPARATORCOMMA=ON
SELECT * FROM t1
Results:
c1 c2
------- -------
102,34 95,234
============
The following example shows how to insert comma-delimited data, and the effects of the SET DECIMALSEPARATORCOMMA statement on the SELECT results.
Note: The comma can only be used as the separator character if the client and/or server operating system locale settings are set to a locale that uses the comma as the separator. For example, if you have U.S. locale settings on both your client and server, you will receive an error if you attempt to run this example.
CREATE TABLE t1 (c1 real, c2 real)
INSERT INTO t1 VALUES ('102,34', '95,234')
SELECT * FROM t1
Results:
c1 c2
------- -------
102.34 95.234
SET DECIMALSEPARATORCOMMA=ON
SELECT * FROM t1
Results:
c1 c2
------- -------
102,34 95,234
See Also
SET DEFAULTCOLLATE
The SET DEFAULTCOLLATE statement specifies the collating sequence to use for all columns of data type CHAR, VARCHAR, LONGVARCHAR, NCHAR, NVARCHAR, or NLONGVARCHAR. The statement offers the following options:
• A null value to default to the numerical order of the current code page
• A path to a file containing alternate collating sequence (ACS) rules
• An International Sorting Rules (ISR) table name
• An International Components for Unicode (ICU) collation name
Syntax
SET DEFAULTCOLLATE = < NULL | 'sort-order' >
sort-order ::= path name to an ACS file or the name of an ISR table or a supported ICU collation name
Remarks
The SET DEFAULTCOLLATE statement offers the convenience of a global session setting. However, an individual column definition can use the COLLATE keyword to set its particular collating sequence. If so, then SET DEFAULTCOLLATE has no effect on that column.
The default setting for DEFAULTCOLLATE is null.
Using ACS Files
When you provide an ACS file for the sort-order parameter, the following statements apply:
• You must specify a path accessible to the database engine rather than to the calling application.
• The path must be enclosed in single quotation marks.
• The path must be at least 1 character but no more than 255 characters long.
• The path must already exist and must include the name of an ACS file. An ACS file is a 265-byte image of the format used by the MicroKernel Engine. By default, Zen installs the commonly used ACS file upper.alt in C:\ProgramData\Actian\Zen\samples. You can also use a custom file. For information on custom files, see User-Defined ACS in Zen Programmer’s Guide.
• Relative paths are allowed and are relative to the DDF directory. Relative paths can contain a period (current directory), double period (parent directory), slash, or any combination of the three. Slash characters in relative paths may be either forward (/) or backslash (\). You may mix the types of slash characters in the same path.
• Universal naming convention (UNC) path names are permitted.
Using ISR Table Names
When you provide an ISR table name for the sort-order parameter, the following statements apply:
• Zen supports the table names listed in this documentation under International Sort Rules.
• The ISR table name is not the name of a file, but rather a string recognized by Zen as one of the ISRs that it supports.
• Zen supports selected Unicode collations based on International Components for Unicode (ICU). Simply use the ICU collation name in place of the ISR table name. The available collations are described under Collation Support Using an ICU Unicode Collation.
ACS, ISR, and ICU Examples
This ACS example sets a collating sequence using the upper.alt file supplied with Zen. The table t1 is created with three text columns and three columns not text. A SELECT statement executes against Zen system tables to return the ID, type, size, and attributes of the columns in t1. The result shows that the three text columns have an attribute of UPPER.
SET DEFAULTCOLLATE = 'C:\ProgramData\Actian\Zen\samples\upper.alt'
DROP TABLE t1
CREATE TABLE t1 (c1 INT, c2 CHAR(10), c3 BINARY(10), c4 VARCHAR(10), c5 LONGVARBINARY, c6 LONGVARCHAR)
SELECT * FROM x$attrib WHERE xa$id in (SELECT xe$id FROM x$field WHERE xe$file = (SELECT xf$id FROM x$file WHERE xf$name = 't1'))
Xa$Id Xa$Type Xa$ASize Xa$Attrs
===== ======= ======== ========
327 O 265 UPPER
329 O 265 UPPER
331 O 265 UPPER
3 rows were affected.
============
The following ACS example continues with the use of table t1. An ALTER TABLE statement changes the text column c2 from a CHAR to an INTEGER. The result of the SELECT statement shows that now only two columns are affected by the default collating.
ALTER TABLE t1 ALTER c2 INT
SELECT * FROM x$attrib WHERE xa$id in (SELECT xe$id FROM x$field WHERE xe$file = (SELECT xf$id FROM x$file WHERE xf$name = 't1'))
Xa$Id Xa$Type Xa$ASize Xa$Attrs
===== ======= ======== ========
329 O 265 UPPER
331 O 265 UPPER
2 rows were affected.
============
The following ACS example uses an ALTER TABLE statement to change column c1 in table t1 from an INTEGER to a CHAR. The result of the SELECT statement shows that three columns are affected by the default collating.
ALTER TABLE t1 ALTER c1 CHAR(10)
SELECT * FROM x$attrib WHERE xa$id in (SELECT xe$id FROM x$field WHERE xe$file = (SELECT xf$id FROM x$file WHERE xf$name = 't1'))
Xa$Id Xa$Type Xa$ASize Xa$Attrs
===== ======= ======== ========
326 O 265 UPPER
329 O 265 UPPER
331 O 265 UPPER
3 rows were affected.
============
The following ISR example creates a table with a VARCHAR column, assumes the default Windows encoding CP1252, and uses the ISR collation MSFT_ENUS01252_0.
CREATE TABLE isrtest (ord INT, value VARCHAR(19) COLLATE 'MSFT_ENUS01252_0' NOT NULL, PRIMARY KEY(value));
The following ICU example creates a table with a VARCHAR column, assumes the default Linux encoding UTF-8, and uses the ICU collation u54-msft_enus_0.
CREATE TABLE isrtest (ord INT, value VARCHAR(19) COLLATE 'u54-msft_enus_0' NOT NULL, PRIMARY KEY(value));
The following ICU example creates a table with an NVARCHAR column using the ICU collation u54-msft_enus_0.
CREATE TABLE isrtest (ord INT, value NVARCHAR(19) COLLATE 'u54-msft_enus_0' NOT NULL, PRIMARY KEY(value));
See Also
Support for Collation and Sorting in Advanced Operations Guide
SET LEGACYTYPESALLOWED
The SET LEGACYTYPESALLOWED statement enables backward compatibility with data types no longer supported in the current release of Zen.
Syntax
SET LEGACYTYPESALLOWED = < ON | OFF >
Remarks
A SET LEGACYTYPESALLOWED statement is executed in a SQL session before CREATE TABLE or ALTER TABLE statements to enable their use of legacy data types supported in earlier releases of Zen.
The default value is OFF, meaning that these data types are not supported.
For more information, see Legacy Data Types.
Example
In this example, turning on LEGACYTYPESALLOWED before a CREATE TABLE statement enables the legacy data type to work, then is turned off again after the table is created:
SET LEGACYTYPESALLOWED=ON;
CREATE TABLE notes (c1 INTEGER, c2 NOTE(20));
SET LEGACYTYPESALLOWED=OFF;
Note: If you do not turn off the setting, like all SET commands, it ends with the SQL session.
SET OWNER
The SET OWNER statement lists owner names for files to be accessed by SQL commands in the current database session. For more information about this file-level security feature, see Owner Names.
Syntax
SET OWNER = [']ownername['] [,[']ownername[']] ...
Remarks
In SET OWNER statements, owner names that begin with a nonalphabetic character and ASCII owner names that contain spaces must be enclosed in single quotation marks. A long owner name in hexadecimal begins with 0x or 0X, so it always requires single quotation marks.
A SET OWNER statement can list all owner names needed for data files in a session. The Relational Engine caches the owner names to use as needed in requesting file access from the MicroKernel Engine.
A SET OWNER statement is effective only for the current connection session. If a user logs out after issuing SET OWNER, the command must be reissued the next time the user logs in.
Each SET OWNER statement resets the current owner name list for the session. You cannot add owner names to the list with more statements.
In a database with security turned off, the SET OWNER statement allows full access to any data file that has an owner name matching an owner name supplied in the statement.
In a database with security turned on, the SET OWNER statement has no effect for users other than the Master user. If the Master user has not granted itself rights, executing SET OWNER gives the Master user full access to any data file with one of the owner names provided. For other users, the Master user can authorize access in either of the following two ways:
• Execute SET OWNER with owner names, followed by GRANT with no owner name.
• Execute GRANT with an owner name.
These two options are illustrated in the following examples.
Examples
In this example, the owner name begins with a numeral, so it has single quotation marks.
SET OWNER = '1@lphaOm3gA'
============
This example provides a list of owner names used by files to be accessed in the current session.
SET OWNER = 'serverl7 region5', '0x7374726f6e672050617373776f7264212425fe'
Single quotation marks are used for the ASCII string because it includes a space and for the hexadecimal string because its prefix 0x starts with a numeral.
============
During a a database session, each SET OWNER statement overrides the previous one. In this example, after the second command runs, the first three owner names are no longer available to use for file access.
SET OWNER = judyann, krishna1, maxima
SET OWNER = d3ltagamm@, V3rs10nXIII, m@X1mumSp33d
============
This example demonstrates the use of SET OWNER by the Master user in a secure database where security has been turned on, but no permissions have been granted to users. The data file named inventory1 has the owner name admin.
To grant itself permissions, the Master user has two options. For the first, you can issue a SET OWNER followed by a GRANT without an owner name:
SET OWNER = admin
GRANT ALL ON inventory1 TO MASTER
For the second option, the Master user can omit the SET OWNER statement and issue a GRANT that includes the owner name:
GRANT ALL ON inventory1 admin TO MASTER
Both methods achieve the same result.
See Also
SET PASSWORD
The SET PASSWORD statement provides the following functionality for a secured database:
• The Master user can change the password for the Master user or for another user.
• A normal user (non-Master user) can change his or her logon password to the database.
Syntax
SET PASSWORD [ FOR 'user-name'] = password
user-name ::= name of user logged on the database or authorized to log on the database
password ::= password string
Remarks
SET PASSWORD requires that the database have relational security enabled and may be issued at any time. In contrast, SET SECURITY is issued only when the Master user session is the only current database connection. See SET SECURITY.
SET PASSWORD may be issued by the Master user or by a normal, non-Master user. The Master user can change the password for any user authorized to log in to the database. Normal users can change only their own password. A password change takes effect the next time the user logs.
User Issuing SET PASSWORD statement | with FOR clause | without FOR clause |
|---|---|---|
Master | Master can specify a user name of Master or of any user authorized to log on the database.1 Password changed for user name. | Password changed for entire database (that is, changed for the Master user, which affects the entire database). |
Normal | Normal user can specify a user name. The user must be logged in to the database. Password changed only for that user. | Password changed only for the user issuing the SET PASSWORD statement. The user must be logged on the database. |
1User-name is a user who can log on to a Zen database. It can differ from operating system user names. For example, the user name Yogine can log on to the operating system. Security is enabled on database Demodata, where Yogine is added as user name DeptMgr, which is the user name to log on to Demodata. | ||
Password Characteristics
• See Identifier Restrictions in Advanced Operations Guide for the maximum length of a password and the characters allowed.
• Passwords are case sensitive. If the password begins with a nonalphabetic character, the password must be enclosed in single quotes.
• The space character may be used in a password provided it is not the first character. If a password contains a space character, the password must be enclosed by single quotes. As a general rule, avoid using the space character in a password.
• "Password" is not a reserved word. It may be used as a name for a table or column. However, if used for a table or column name in a SQL statement, "password" must be enclosed by double quotation marks because it is a keyword.
• If you want to use the literal "null" as a password, you must enclose the word with single quotes ('null'). The quoted string prevents confusion with the statement SET SECURITY = NULL, which disables security on the database.
Examples
The following example shows the Master user enabling security on the database with the password bluesky. The Master user then grants login privilege to user user45 with the password tmppword and grants that user SELECT permission to the table person. The Master user then changes the Master password to reddawn, which changes it for the entire database. Finally, it changes the user45 password to newuser.
SET SECURITY = bluesky
GRANT LOGIN TO user45:tmppword
GRANT SELECT ON person TO user45
SET PASSWORD = reddawn
SET PASSWORD FOR user45 = newuser
The following example assumes that user45 has logged on to the database with a password newuser. User45 changes its own password to tomato. User45 then selects all records in the table person.
SET PASSWORD FOR user45 = tomato
SELECT * FROM person
See Also
SET PROCEDURES_CACHE
The SET PROCEDURES_CACHE statement specifies the amount of memory for a SQL session that the database engine reserves as a cache for stored procedures.
Syntax
SET PROCEDURES_CACHE = megabytes
Remarks
The value of megabytes can be any whole number in the range zero to approximately two billion. The database engine defaults to 5 MB. Each session can change its amount of cache memory by issuing this SET statement.
The companion statement to SET PROCEDURES_CACHE is SET CACHED_PROCEDURES.
• If you set both of these SET statements to zero, the database engine does not cache stored procedures. In addition, the engine removes any existing cache used for stored procedures. That is, the engine flushes from cache all stored procedures that were cached before you set both statements to zero.
• If you set only one of the statements to either a zero or a nonzero value, the other statement is implicitly set to zero. The statement implicitly set to zero is ignored. For example, if you are interested only in 30 MB as the amount of memory cached and are not concerned with the number of procedures cached, set PROCEDURES_CACHE to 30. The database engine implicitly sets CACHED_PROCEDURES to zero, which causes that setting to be ignored.
The following condition applies if you set PROCEDURES_CACHE to a nonzero value. The database engine removes the least recently used procedures from the cache if the execution of a procedure allocates memory that exceeds the PROCEDURES_CACHE value.
If a memory cache is used, it retains a compiled version of a stored procedure after the procedure executes. Typically, caching results in improved performance for subsequent calls to a cached procedure. Note that excessive memory swapping, or thrashing, can occur depending on the cache settings and the SQL statements executed by your application. Thrashing can lessen performance.
Registry Setting
In addition to the SET statement, the amount of memory reserved for the cache can be specified with a registry setting. The registry settings apply to all sessions and provides a convenient way to set an initial value. Each session can override the registry setting for that particular session by using the SET statement.
The registry setting applies to all server platforms where Zen Enterprise Server or Cloud Server is supported. You must manually modify the registry setting. On Windows, use the registry editor provided with the operating system. On Linux and macOS, you can use the psregedit utility.
If the registry setting is not specified, the database engine automatically defaults to 5 MB.
To specify the amount of cache memory in a registry setting on Windows
1. Locate the following key:
HKEY_LOCAL_MACHINE\SOFTWARE\Actian\Zen\SQL Relational Engine
Note that in most Windows operating systems, the key is under HKEY_LOCAL_MACHINE\SOFTWARE\Actian\Zen. However, its location below HKEY_LOCAL_MACHINE\SOFTWARE can vary depending on the operating system.
2. For this key, create a new string valued named ProceduresCache.
3. Set ProceduresCache to the desired amount of memory that you want to cache.
To set the amount of cache memory in the Zen Registry on Linux and macOS
1. Locate the following key:
PS_HKEY_CONFIG\SOFTWARE\Actian\Zen\SQL Relational Engine
2. For this key, create a new string valued named ProceduresCache.
3. Set ProceduresCache to the desired amount of memory that you want to cache.
Caching Exclusions
A stored procedure is not cached, regardless of the cache setting(s), for any of the following:
• The stored procedure references a local or a global temporary table. A local temporary table has a name that begins with the pound sign (#). A global temporary table has a name that begins with two pound signs (##). See CREATE (temporary) TABLE.
• The stored procedure contains any data definition language (DDL) statements. See Data Definition Statements.
• The stored procedure contains an EXEC[UTE] statement used to execute a character string, or an expression that returns a character string. For example: EXEC ('SELECT Student_ID FROM ' + :myinputvar).
Examples
The following example sets a cache memory of 2 MB that stores up to 20 stored procedures.
SET CACHED_PROCEDURES = 20
SET PROCEDURES_CACHE = 2
============
The following example sets a cache memory of 1,000 MB that stores up to 500 stored procedures.
SET CACHED_PROCEDURES = 500
SET PROCEDURES_CACHE = 1000
============
The following example specifies that you do not want to cache stored procedures and that any existing procedures cache will be removed.
SET CACHED_PROCEDURES = 0
SET PROCEDURES_CACHE = 0
============
The following example specifies that you want to set the amount of cache memory to 80 MB and ignore the number of procedures that may be cached.
SET PROCEDURES_CACHE = 80
(The database engine implicitly sets CACHED_PROCEDURES to zero.)
See Also
SET ROWCOUNT
You may limit the number of rows returned by all subsequent SELECT statements within the current session by using the keyword SET ROWCOUNT.
The main difference between SET ROWCOUNT and TOP or LIMIT is that TOP affects only the current statement, while SET ROWCOUNT affects all statements issued during the current database session, until the next SET ROWCOUNT or until the session is terminated.
Syntax
SET ROWCOUNT = number
Remarks
If a SELECT statement subject to a SET ROWCOUNT condition contains an ORDER BY keyword and an index cannot be used to optimize on the ORDER BY clause, Zen generates a temporary table. The temporary table is populated with the entire query result set. The rows in the temporary table are ordered as specified by the ORDER BY value and return the ROWCOUNT number of rows in the ordered result set.
You may turn off the ROWCOUNT feature by setting ROWCOUNT to zero:
SET ROWCOUNT = 0
SET ROWCOUNT is ignored when dynamic cursors are used.
If both SET ROWCOUNT and TOP are applied to a given query, the number of rows returned is the lower of the two values.
Examples
Also see the examples for TOP or LIMIT.
SET ROWCOUNT = 10;
SELECT * FROM person;
-- returns 10 rows
See Also
SET SECURITY
The SET SECURITY statement allows the Master user to enable or disable security for the database to which Master is logged on.
Syntax
SET SECURITY [USING authentication_type] = < 'password' | NULL >
Remarks
You must be logged on as Master to set security. You can then assign a password by using the SET SECURITY statement. No password is required for Master to log on to an unsecured database, but to set security for the database, that Master user must have a password assigned.
SET SECURITY can be issued only when the session for the Master user is the only current database connection. You can also set security from the Zen Control Center (ZenCC). See To turn on security using Zen Explorer in Zen User’s Guide.
The authentication type string is either local_db or domain. If the USING clause is not included, the authentication type is set to local_db.
When the authentication type is domain, execution of SQL scripts related to users returns an error message that the statement is not supported under domain authentication. Examples of the unsupported statements include ALTER USER, CREATE USER, DROP USER, GRANT in relation to users, SET PASSWORD (for non-Master user), and REVOKE.
For password requirements, see Password Characteristics.
User Permissions
Permissions on objects such as tables, views, and stored procedures are retained in the system tables after SET SECURITY is set to NULL. Consider the following scenario:
• Security for database mydbase is enabled and user Master is logged in.
• Master creates users user1 and user2, and table t1 for database mydbase.
• Master grants User2 SELECT permission on t1.
• Security for mydbase is disabled.
• Table t1 is dropped.
Even though table t1 no longer exists, permissions for t1 are still retained in the system tables (the ID for t1 is still in X$Rights). Now consider the following:
• Security for database mydbase is enabled again.
• User1 logs in to the database.
• User1 creates a new table tbl1 for mydbase. It is possible for tbl1 to be assigned the same object ID that had been assigned to t1. In this particular scenario, the object IDs assigned to t1 and tbl1 are the same.
• The previous permissions for t1 are reinstated for tbl1. That is, user1 has SELECT permissions on tbl1 even though no permissions to the new table have been explicitly granted.
Note: If you want to delete permissions for an object, you must explicitly revoke them. This applies to tables, views, and stored procedures because permissions are associated with object IDs and the database reuses object IDs of deleted objects for new objects.
Examples
The following example enables security for the database and sets the Master password to "mypasswd".
SET SECURITY = 'mypasswd'
The following example enables domain authentication for the database and sets the Master password to 123456.
SET SECURITY USING domain = '123456'
============
The following example disables security.
SET SECURITY = NULL
See Also
SET TIME ZONE
The SET TIME ZONE keyword allows you to specify a current time offset from Coordinated Universal Time (UTC) for your locale, overriding the operating system time zone setting where the database engine is located.
Any SET TIME ZONE statement remains in effect until the end of the current database session, or until another SET TIME ZONE statement is executed.
Caution! You should always use the default behavior unless you have a specific need to override the time zone setting in your operating system. If you are using DataExchange replication or your application has dependencies on the sequential time order of records inserted, use of SET TIME ZONE to modify your time zone offset is not recommended.
Syntax
SET TIME ZONE < offset | LOCAL >
offset ::= <+|->hh:mm
Valid range of hh is 00–12.
Valid range of mm is 00–59.
Either a plus (+) or a minus (-) sign is required as part of the offset value.
Remarks
Default Behavior – SET TIME ZONE LOCAL is the default behavior, which is the same as not using the SET TIME ZONE command at all. Under the default behavior, the database engine establishes its time zone based on the operating system where it is running. For example, SELECT CURTIME() returns the current local time, while SELECT CURRENT_TIME() returns the current UTC time, both based on local system time and the time zone setting in the operating system.
The LOCAL keyword allows you to restore default behavior after specifying a offset value, without having to terminate and reopen the database session.
Under default behavior, literal time and date values, such as 1996-03-28 and 17:40:46, are interpreted as current local time and date. In addition, during inserts, time stamp literal values are interpreted as current local time. Time stamp values are always adjusted and stored internally using UTC time, and converted to local time upon retrieval. For more information, see Time Stamp Values.
If no time zone is specified, or TIME ZONE LOCAL is specified... | |
|---|---|
CURDATE(), CURTIME(), NOW(), SYSDATETIME() | Return current local time and date based on system clock. |
CURRENT_DATE(), CURRENT_TIME(), CURRENT_TIMESTAMP(), SYSUTCDATETIME() | Return current UTC time and date based on system clock and operating system locale setting. |
Behavior When Offset is Specified – If a valid offset value is specified, then that value is used instead of the operating system time zone offset to generate values for CURDATE(), CURTIME(), NOW(), or SYSDATETIME(). For example, if a offset of -02:00 is specified, then the local time value of CURDATE() is calculated by adding -02:00 to the UTC time returned from the operating system.
Under this behavior, time and date literals are interpreted as local time, at their face values. Time stamp literals are interpreted as specifying a time such that if the offset value is subtracted from it, the result is UTC. Daylight savings is not a consideration, since the offset explicitly takes it into account. Time stamp values are always stored internally using UTC time.
If a valid offset value is specified... | |
|---|---|
CURDATE(), CURTIME(), NOW(), SYSDATETIME() | These functions return current local time and date values by adding offset to the current UTC time/date values. |
CURRENT_DATE(), CURRENT_TIME(), CURRENT_TIMESTAMP(), SYSUTCDATETIME() | These functions always return current UTC time and date based on system clock and operating system locale setting. |
To convert a given local time value to UTC, you must subtract your time zone offset value from the local time value. In other words,
UTC time = local time – time zone offset
This table gives example conversions.
Local Time | Offset | UTC |
|---|---|---|
10:10:15 Austin | US Central Standard Time -06:00 | 10:10:15-(-06:00)=16:10:15 UTC |
16:10:15 London | Greenwich Mean Time +00:00 | 16:10:15-(+00:00)=16:10:15 UTC |
22:10:15 Dhaka | +06:00 | 22:10:15-(+06:00)=16:10:15 UTC |
A Note about Time Stamp Data Types
Because time stamp data is always stored as UTC, and literal time stamp values (including values stored on disk) are always converted to local time when retrieved, the behavior of NOW() and CURRENT_TIMESTAMP() values can be confusing. For example, consider the following table, assuming the database engine is located in Central Standard Time, U.S.
Statement | Value |
|---|---|
SELECT NOW() | 2001-10-01 12:05:00.123 displayed. |
INSERT INTO t1 (c1) SELECT NOW() | 2001-10-01 18:05:00.1234567 stored on disk. |
SELECT * from t1 | 2001-10-01 12:05:00.123 displayed. |
SELECT CURRENT_TIMESTAMP() | 2001-10-01 18:05:00.123 displayed. |
INSERT INTO t2 (c1) SELECT CURRENT_TIMESTAMP() | 2001-10-01 18:05:00.1234567 stored on disk. |
SELECT * from t2 | 2001-10-01 12:05:00.123 displayed. |
It is important to note that the value displayed by a direct SELECT NOW() is not the same as the value stored on disk by the syntax INSERT SELECT NOW(). Likewise, note that the display value of SELECT CURRENT_TIMESTAMP() is not the same value that you will see if you INSERT the value of CURRENT_TIMESTAMP() then SELECT it, because the literal value stored in the data file is adjusted when it is retrieved.
Examples
In this example, no SET TIME ZONE statement has been issued yet, and the computer on which the database engine is running has its clock set to January 9, 2002, 16:35:03 CST (U.S.). Recall that CURRENT_TIMESTAMP() and the other CURRENT_ functions always return UTC time and/or date based on the system clock and locale settings of the computer where the database engine is running.
SELECT CURRENT_TIMESTAMP(), NOW(),
CURRENT_TIME(), CURTIME(),
CURRENT_DATE(), CURDATE()
CURRENT_TIME(), CURTIME(),
CURRENT_DATE(), CURDATE()
Results:
2002-01-09 22:35:03.000 2002-01-09 16:35:03.000
22:35:03 16:35:03
01/09/2002 01/09/2002
Note that CST is 6 hours ahead of UTC.
SET TIME ZONE -10:00
Now the same SELECT statement above returns the following:
2002-01-09 22:35:03.000 2002-01-09 12:35:03.000
22:35:03 12:35:03
2002-01-09 2002-01-09
Note that the value of NOW() changed after the SET TIME ZONE statement, but the value of CURRENT_TIMESTAMP() did not.
============
The following example demonstrates the difference between time stamp values that are stored as UTC values then converted to local values upon retrieval, and TIME or DATE values that are stored and retrieved at their face value. Assume that the system clock currently shows January 9, 2002, 16:35:03 CST (U.S.). Also assume that no SET TIME ZONE statement has been issued.
CREATE TABLE t1 (c1 TIMESTAMP, c2 TIMESTAMP, c3 TIME, c4 TIME, c5 DATE, c6 DATE)
INSERT INTO t1 SELECT CURRENT_TIMESTAMP(), NOW(), CURRENT_TIME(), CURTIME(), CURRENT_DATE(), CURDATE()
SELECT * FROM t1
Results:
c1 c2
----------------------- -----------------------
2002-01-09 16:35:03.000 2002-01-09 16:35:03.000
c3 c4 c5 c6
-------- -------- ---------- ----------
22:35:03 16:35:03 01/09/2002 01/09/2002
Observe that NOW() and CURRENT_TIMESTAMP() have different values when displayed to the screen with SELECT NOW(), CURRENT_TIMESTAMP(), but once the literal values are saved to disk, UTC time is stored for both values. Upon retrieval, both values are converted to local time.
By setting the time zone offset to zero, we can view the actual data stored in the file, because it is adjusted by +00:00 upon retrieval:
SET TIME ZONE +00:00
SELECT * FROM t1
Results:
c1 c2
----------------------- -----------------------
2002-01-09 22:35:03.000 2002-01-09 22:35:03.000
c3 c4 c5 c6
-------- -------- ---------- ----------
22:35:03 16:35:03 01/09/2002 01/09/2002
============
The following example demonstrates the expected behavior when the local date is different than the UTC date (for example, UTC is past midnight, but local time is not, or the reverse). Assume that the system clock currently shows January 9, 2002, 16:35:03 CST (U.S.).
SET TIME ZONE +10:00
SELECT CURRENT_TIMESTAMP(), NOW(),
CURRENT_TIME(), CURTIME(),
CURRENT_DATE(), CURDATE()
Results:
2002-01-09 22:35:03.000 2002-01-10 08:35:03.000
22:35:03 08:35:03
01/09/2002 01/10/2002
INSERT INTO t1 SELECT CURRENT_TIMESTAMP(), NOW(), CURRENT_TIME(), CURTIME(), CURRENT_DATE(), CURDATE()
SELECT * FROM t1
Results:
c1 c2
----------------------- -----------------------
2002-01-10 08:35:03.000 2002-01-10 08:35:03.000
c3 c4 c5 c6
-------- -------- ---------- ----------
22:59:55 08:59:55 01/09/2002 01/10/2002
As you can see, the UTC time and date returned by CURRENT_DATE() and CURRENT_TIME() are stored as literal values. Since they are not time stamp values, no adjustment is made to them when they are retrieved from the database.
See Also
TIMESTAMP data type
SET TRUEBITCREATE
The SET TRUEBITCREATE statement allows you to specify whether the BIT data type can be indexed and can map to the LOGICAL transactional data type.
Syntax
SET TRUEBITCREATE = < ON | OFF >
Remarks
The default is on. This means that the BIT data type is 1 bit, cannot be indexed and is assigned a Zen type code of 16. When of type code 16, BIT has no equivalent transactional data type to which it maps.
For certain situations, such as compatibility with other DBMS applications, you may want to map BIT to the LOGICAL data type and be able to index the BIT data type. To do so, set TRUEBITCREATE to off. This maps BIT to LOGICAL, which is a 1-byte data type of type code 7.
The creation mode remains in effect until it is changed by issuing the statement again, or until the database connection is disconnected. Because this setting is maintained on a per-connection basis, separate database connections can maintain different creation modes, even within the same application. Every connection starts with the setting in default mode, where BITs are created with a Zen type code of 16.
This feature does not affect existing BITs, only ones created after the set statement is applied.
This setting can be toggled only in a SQL statement. It cannot be set in Zen Control Center. Note that Table Editor displays the relational data types for columns (so the type is displayed as "BIT"). If TRUEBITCREATE is turned off, then Table Editor allows you to index the BIT column.
Example
The following statement toggles the setting and specifies that new BITs should be created to allow indexing, map to the LOGICAL transactional data type, and have a type code of 7:
SET TRUEBITCREATE=OFF
SET TRUENULLCREATE
The SET TRUENULLCREATE statement turns on or off true nulls when you create new tables.
Syntax
SET TRUENULLCREATE = < ON | OFF >
Remarks
This setting first appeared in Pervasive.SQL 2000 (7.5). On is the default, causing tables to be created with a NULL indicator byte at the beginning of each empty field. If it is set to off by a SQL statement, tables are created from then on using the legacy NULL from Pervasive.SQL 7 and earlier releases. The legacy null behavior persists until the session is disconnected. In a new session, the setting is on again.
Since each connection has a TRUENULLCREATE setting, it can differ from others in an application.
Even though they are not true nulls, legacy nulls behave as nullable, and you can INSERT NULL into any column type. When you query the value, however, one of the following nonnull binary equivalents is returned:
• 0 for Binary types
• Empty string for STRING and BLOB types, including legacy types such as LVAR and LSTRING
Accordingly, you must use these equivalents in WHERE clauses to retrieve specific values.
The following table describes the interaction between default values and nullable columns.
Column Type | Default value used if no literal default value is defined for the column | Default value if literal value is defined |
|---|---|---|
Nullable | NULL | As defined |
Not NULL | Error – "No default value assigned for column" | As defined |
Pre-v7.5 nullable | The legacy null for the column | As defined |
If a statement attempts to insert an explicit NULL into a NOT NULL column that has a default value defined, the statement fails with an error. The default value is not used in place of the attempt.
For any column with a default value defined, that value may be invoked in an INSERT statement by omitting the column from the insert column list or using the keyword DEFAULT for the insert value.
If all columns in a table are either nullable or have default values defined, you can insert a record with all default values by using DEFAULT VALUES as the values clause. If any column is not nullable and no default is defined, or if you want to specify a column list, you cannot use this type of clause.
Using DEFAULT VALUES for BLOB, CLOB, or BINARY data types is not currently supported.
Examples
To toggle the setting and create new tables with legacy null support in the current session, use:
SET TRUENULLCREATE=OFF
To return the engine to the default and create tables with true null support in the current session, use:
SET TRUENULLCREATE=ON
SIGNAL
Remarks
The SIGNAL statement allows you to signal an exception condition or a completion condition other than successful completion.
Signalling a SQLSTATE value causes SQLSTATE to be set to a specific value. This value is then returned to the user, or made available to the calling procedure (through the SQLSTATE value). This value is available to the application calling the procedure.
You can also specify an error message with the SQLSTATE value.
Note: SIGNAL is available only inside a stored procedure or user-defined function.
Syntax
SIGNAL SQLSTATE_value [, error_message ]
SQLSTATE_value ::= user-defined value
error_message ::= user-defined message
Examples
The following example prints the initial SQLSTATE value 00000, then prints "SQLSTATE exception found" after the signal is raised. The final SQLSTATE value printed is W9001.
CREATE PROCEDURE GenerateSignal();
BEGIN
SIGNAL 'W9001';
END;
CREATE PROCEDURE TestSignal() WITH DEFAULT HANDLER;
BEGIN
PRINT SQLSTATE;
CALL GenerateSignal();
IF SQLSTATE <> '00000' THEN
PRINT 'SQLSTATE exception found';
END IF;
PRINT SQLSTATE;
END;
============
CREATE PROCEDURE GenerateSignalWithErrorMsg();
BEGIN
SIGNAL 'W9001', 'Invalid Syntax';
END;
CALL GenerateSignalWithErrorMsg()
See Also
SQLSTATE
Remarks
The SQLSTATE value corresponds to a success, warning, or exception condition. The complete list of SQLSTATE values defined by ODBC can be found in the Microsoft ODBC documentation.
When a handler executes, the statements within it affect the SQLSTATE value in the same way as statements in the main body of the compound statement. However, a handler that is intended to take specific action for a specific condition can optionally leave that condition unaffected, by reassigning that condition at its conclusion. This does not cause the handler to be invoked again; that would cause a loop. Instead, Zen treats the exception condition as an unhandled exception condition, and execution stops.
See Also
START TRANSACTION
START TRANSACTION signals the start of a logical transaction and must always be paired with a COMMIT or a ROLLBACK.
Syntax
START TRANSACTION
Sql-statements
COMMIT | ROLLBACK [WORK]
Remarks
START TRANSACTION is supported only within stored procedures. You cannot use START TRANSACTION within SQL Editor. SQL Editor sets AUTOCOMMIT to on.
Examples
The following example, within a stored procedure, begins a transaction which updates the Amount_Owed column in the Billing table. This work is committed, while another transaction updates the Amount_Paid column and sets it to zero. The final COMMIT WORK statement ends the second transaction.
START TRANSACTION;
UPDATE Billing B
SET Amount_Owed = Amount_Owed - Amount_Paid
WHERE Student_ID IN (SELECT DISTINCT E.Student_ID
FROM Enrolls E, Billing B WHERE E.Student_ID = B.Student_ID);
COMMIT WORK;
START TRANSACTION;
UPDATE Billing B
SET Amount_Paid = 0
WHERE Student_ID IN (SELECT DISTINCT E.Student_ID
FROM Enrolls E, Billing B WHERE E.Student_ID = B.Student_ID);
COMMIT WORK;
See Also
UNION
Remarks
SELECT statements that use UNION or UNION ALL allow you to obtain a single result table from multiple SELECT queries. UNION queries are suitable for combining similar information contained in more than one data source.
UNION eliminates duplicate rows. UNION ALL preserves duplicate rows. Using the UNION ALL option is recommended unless you require duplicate rows to be removed.
With UNION, the Zen database engine orders the entire result set which, for large tables, can take several minutes. UNION ALL eliminates the need for the sort.
Zen databases do not support LONGVARBINARY columns in UNION statements. LONGVARCHAR and NLONGVARCHAR are limited to 65500 bytes in UNION statements. The operator UNION cannot be applied to any SQL statement that references one or more views.
The two query specifications involved in a union must be compatible. Each query must have the same number of columns and the columns must be of compatible data types.
You may use column names from the first SELECT list in the ORDER BY clause of the SELECT statement that follows the UNION keyword. Ordinal numbers are also allowed to indicate the desired columns. For example, the following statements are valid:
SELECT c1, c2, c3 FROM t1 UNION SELECT c4, c5, c6 FROM t2 ORDER BY t1.c1, t1.c2, t1.c3
SELECT c1, c2, c3 FROM t1 UNION SELECT c4, c5, c6 FROM t2 ORDER BY 1, 2, 3
You may also use aliases for the column names:
SELECT c1 x, c2 y, c3 z FROM t1 UNION SELECT c1, c2, c3 FROM t2 ORDER BY x, y, z
SELECT c1 x, c2 y, c3 z FROM t1 a UNION SELECT c1, c2, c3 FROM t1 b ORDER BY a.x, a.y, a.z
Aliases must differ from any table names and column names in the query.
Examples
The following example lists the ID numbers of each student whose last name begins with 'M' or who has a 4.0 grade point average. The result table does not include duplicate rows.
SELECT Person.ID FROM Person WHERE Last_name LIKE 'M%' UNION SELECT Student.ID FROM Student WHERE Cumulative_GPA = 4.0
The next example lists the column id in the person table and the faculty table including duplicate rows.
SELECT person.id FROM person UNION ALL SELECT faculty.id from faculty
The next example lists the ID numbers of each student whose last name begins with 'M' or who has a 4.0 grade point average. The result table does not include duplicate rows and orders the result set by the first column
SELECT Person.ID FROM Person WHERE Last_name LIKE 'M%' UNION SELECT Student.ID FROM Student WHERE Cumulative_GPA = 4.0 ORDER BY 1
It is common to use the NULL scalar function to allow a UNION select list to have a different number of entries than the parent select list. To do this, you must use the CONVERT function to force the NULL to the correct type.
CREATE TABLE t1 (c1 INTEGER, c2 INTEGER)
INSERT INTO t1 VALUES (1,1)
CREATE TABLE t2 (c1 INTEGER)
INSERT INTO t2 VALUES (2)
SELECT c1, c2 FROM t1
UNION SELECT c1, CONVERT(NULL(),sql_integer)FROM t2
UNION SELECT c1, CONVERT(NULL(),sql_integer)FROM t2
See Also
UNIQUE
Remarks
To specify that the index not allow duplicate values, include the UNIQUE keyword. If the column or columns that make up the index contains duplicate values when you execute the CREATE INDEX statement with the UNIQUE keyword, Zen returns status code 5 and does not create the index.
Note: You should not include the UNIQUE keyword in the list of index attributes following the column name you specify; the preferred syntax is CREATE UNIQUE INDEX.
See Also
UPDATE
The UPDATE statement allows you to modify column values in a database.
Syntax
UPDATE < table-name | view-name > [ alias-name ]
SET column-name = < NULL | DEFAULT | expression | subquery-expression > [ , column-name = ... ]
[ FROM table-reference [, table-reference ] ...
[ WHERE search-condition ]
table-name ::= user-defined-name
view-name ::= user-defined-name
table-reference ::= { OJ outer-join-definition }
| join-definition
| ( join-definition )
outer-join-definition ::= table-reference outer-join-type JOIN table-reference ON search-condition
outer-join-type ::= LEFT [ OUTER ] | RIGHT [ OUTER ] | FULL [ OUTER ]
search-condition ::= search-condition AND search-condition
| search-condition OR search-condition
| NOT search-condition
| ( search-condition )
| predicate
db-name ::= user-defined-name
view-name ::= user-defined-name
join-definition ::= table-reference [ join-type ] JOIN table-reference ON search-condition
| table-reference CROSS JOIN table-reference
| outer-join-definition
join-type ::= INNER | LEFT [ OUTER ] | RIGHT [ OUTER ] | FULL [ OUTER ]
subquery-expression ::= ( query-specification )
Remarks
UPDATE statements, as with DELETE and INSERT, behave in an atomic manner. That is, if an update of more than one row fails, then all updates of previous rows by the same statement are rolled back.
In the SET clause of an UPDATE statement, you may specify a subquery. This feature allows you to update information in a table based on data in another table or another part of the same table.
You may use the keyword DEFAULT to set the value to the default value defined for the given column. If no default value is defined, NULL is used if the column is nullable, and if not, an error is returned. For information about default values and true nulls and legacy nulls from older releases, see SET TRUENULLCREATE.
The UPDATE statement can update only a single table at a time. UPDATE can relate to other tables through a subquery in the SET clause. This can be a correlated subquery that depends in part on the contents of the table being updated, or it can be a noncorrelated subquery that depends only on another table.
For example, here is a correlated subquery:
UPDATE t1 SET t1.c2 = (SELECT t2.c2 FROM t2 WHERE t2.c1 = t1.c1)
Compared to a noncorrelated subquery:
UPDATE t1 SET t1.c2 = (SELECT SUM(t2.c2) FROM t2 WHERE t2.c1 = 10)
The same logic is used to process pure SELECT statements and subqueries, so the subquery can consist of any valid SELECT statement. Subqueries follow no special rules.
If SELECT within an UPDATE returns no rows, then the UPDATE inserts NULL. If the given columns are not nullable, then the UPDATE fails. If SELECT returns more than one row, then UPDATE fails.
An UPDATE statement does not allow the use of join tables in the statement. Instead, use a correlated subquery in the SET clause like the one shown in the example above.
For information about true nulls and legacy nulls, see SET TRUENULLCREATE.
Updating Data Longer Than the Maximum Literal String
The maximum literal string supported by Zen is 15,000 bytes. You can handle data longer than this using direct SQL statements, breaking the update into multiple calls. Start with a statement like this:
UPDATE table1 SET longfield = '15000 bytes of text' WHERE restriction
Then issue the following statement to add more data:
UPDATE table1 SET longfield = notefield + '15000 more bytes of text' WHERE restriction
FROM Clause
Some confusion may arise pertaining to the optional FROM clause and references to the table being updated (referred to as the "update table"). If the update table occurs in the FROM clause, then one of the occurrences is the same instance of the table being updated.
For example, in the statement UPDATE t1 SET c1 = 1 FROM t1, t2 WHERE t1.c2 = t2.c2, the t1 immediately after UPDATE is the same instance of table t1 as the t1 after FROM. Therefore, the statement is identical to UPDATE t1 SET c1 = 1 FROM t2 WHERE t1.c2 = t2.c2.
If the update table occurs in the FROM clause multiple times, one occurrence must be identified as the same instance as the update table. The FROM clause reference that is identified as the same instance as the update table is the one that does not have a specified alias.
Therefore, the statement UPDATE t1 SET t1.c1 = 1 FROM t1 a, t1 b WHERE a.c2 = b.c2 is invalid because both instances of t1 in the FROM clause contain an alias. The following version is valid: UPDATE t1 SET t1.c1 = 1 FROM t1, t1 b WHERE t1.c2 = b.c2.
The following conditions apply to the FROM clause:
• If the UPDATE statement contains an optional FROM clause, the table reference prior to the FROM clause cannot have an alias specified. For example, UPDATE t1 a SET a.c1 = 1 FROM t2 WHERE a.c2 = t2.c2 returns the following error:
SQL_ERROR (-1)
SQLSTATE of "37000"
"Table alias not allowed in UPDATE/DELETE statement with optional FROM."
A valid version of the statement is UPDATE t1 SET t1.c1 = 1 FROM t2 WHERE t1.c2 = t2.c2 or UPDATE t1 SET t1.c1 = 1 FROM t1 a, t2 WHERE a.c2 = t2.c2.
• If more than one reference to the update table appears in the FROM clause, then only one of the references can have a specified alias. For example, UPDATE t1 SET t1.c1 = 1 FROM t1 a, t1 b WHERE a.c2 = b.c2 returns the following error:
SQL_ERROR (-1)
SQLSTATE of "37000" and
"The table t1 is ambiguous."
In the erroneous statement, assume that you want table t1 with alias "a" to be the same instance of the update table. A valid version of the statement would then be UPDATE t1 SET t1.c1 = 1 FROM t1, t1 b WHERE t1.c2 = b.c2.
• The FROM clause is supported in an UPDATE statement only at the session level. The FROM clause is not supported if the UPDATE statement occurs within a stored procedure.
Examples
The following example updates the record in the faculty table and sets salary as 95000 for ID 103657107.
UPDATE Faculty SET salary = 95000.00 WHERE ID = 103657107
============
The following example shows how to use the DEFAULT keyword.
UPDATE t1 SET c2 = DEFAULT WHERE c2 = 'bcd'
UPDATE t1 SET c1 = DEFAULT, c2 = DEFAULT
============
The following example changes the credit hours for Economics 305 in the course table from 3 to 4.
UPDATE Course SET Credit_Hours = 4 WHERE Name = 'ECO 305'
============
The following example updates the address for a person in the Person table:
UPDATE Person p
SET p.Street = '123 Lamar',
p.zip = '78758',
p.phone = 5123334444
WHERE p.ID = 131542520
============
Subquery Example A
Two tables are created and rows are inserted. The first table, t5, is updated with a column value from the second table, t6, in each row where table t5 has the value 2 for column c1. Because there is more than one row in table t6 containing a value of 3 for column c2, the first UPDATE fails because more than one row is returned by the subquery. This result occurs even though the result value is the same in both cases. As shown in the second UPDATE, using the DISTINCT keyword in the subquery eliminates the duplicate results and allows the statement to succeed.
CREATE TABLE t5 (c1 INT, c2 INT)
CREATE TABLE t6 (c1 INT, c2 INT)
INSERT INTO t5(c1, c2) VALUES (1,3)
INSERT INTO t5(c1, c2) VALUES (2,4)
INSERT INTO t6(c1, c2) VALUES (2,3)
INSERT INTO t6(c1, c2) VALUES (1,2)
INSERT INTO t6(c1, c2) VALUES (3,3)
SELECT * FROM t5
Results:
c1 c2
---------- -----
1 3
2 4
UPDATE t5 SET t5.c1=(SELECT c2 FROM t6 WHERE c2=3) WHERE t5.c1=2 — Note that the query fails
UPDATE t5 SET t5.c1=(SELECT DISTINCT c2 FROM t6 WHERE c2=3) WHERE t5.c1=2 — Note that the query succeeds
SELECT * FROM t5
Results:
c1 c2
---------- -----
1 3
3 4
============
Subquery Example B
Two tables are created and a variety of valid syntax examples are demonstrated. Note the cases where UPDATE fails because the subquery returns more than one row. Also note that UPDATE succeeds and NULL is inserted if the subquery returns no rows (where NULL values are allowed).
CREATE TABLE t1 (c1 INT, c2 INT)
CREATE TABLE t2 (c1 INT, c2 INT)
INSERT INTO t1 VALUES (1, 0)
INSERT INTO t1 VALUES (2, 0)
INSERT INTO t1 VALUES (3, 0)
INSERT INTO t2 VALUES (1, 100)
INSERT INTO t2 VALUES (2, 200)
UPDATE t1 SET t1.c2 = (SELECT SUM(t2.c2) FROM t2)
UPDATE t1 SET t1.c2 = 0
UPDATE t1 SET t1.c2 = (SELECT t2.c2 FROM t2 WHERE t2.c1 = t1.c1)
UPDATE t1 SET t1.c2 = @@IDENTITY
UPDATE t1 SET t1.c2 = @@ROWCOUNT
UPDATE t1 SET t1.c2 = (SELECT @@IDENTITY)
UPDATE t1 SET t1.c2 = (SELECT @@ROWCOUNT)
UPDATE t1 SET t1.c2 = (SELECT t2.c2 FROM t2) -- update fails
INSERT INTO t2 VALUES (1, 150)
INSERT INTO t2 VALUES (2, 250)
UPDATE t1 SET t1.c2 = (SELECT t2.c2 FROM t2 WHERE t2.c1 = t1.c1) -- update fails
UPDATE t1 SET t1.c2 = (SELECT t2.c2 FROM t2 WHERE t2.c1 = 5) — Note that the update succeeds, NULL is inserted for all rows of t1.c2
UPDATE t1 SET t1.c2 = (SELECT SUM(t2.c2) FROM t2 WHERE t2.c1 = t1.c1)
============
The following example creates table t1 and t2 and populates them with data. The UPDATE statement uses a FROM clause to specify another table from which to get the new value.
DROP table t1
CREATE table t1 (c1 integer, c2 integer)
INSERT INTO t1 VALUES (0, 10)
INSERT INTO t1 VALUES (0, 10)
INSERT INTO t1 VALUES (2, 20)
INSERT INTO t1 VALUES (2, 20)
DROP table t2
CREATE table t2 (c1 integer, c2 integer)
INSERT INTO t2 VALUES (2, 20)
INSERT INTO t2 VALUES (2, 20)
INSERT INTO t2 VALUES (3, 30)
INSERT INTO t2 VALUES (3, 30)
UPDATE t1 SET t1.c1 = t2.c1 FROM t2 WHERE t1.c2 = t2.c2
SELECT * FROM t1
See Also
UPDATE (positioned)
The positioned UPDATE statement updates the current row of a rowset associated with a SQL cursor.
Syntax
UPDATE [ table-name ] SET column-name = proc-expr [ , column-name = proc-expr ]...
WHERE CURRENT OF cursor-name
table-name ::= user-defined-name
cursor-name ::= user-defined-name
Remarks
This statement is allowed in stored procedures, triggers, and at the session level.
Note: Even though positioned UPDATE is allowed at the session level, the DECLARE CURSOR statement is not. The method to obtain the cursor name of the active result set depends on the Zen access method your application uses. See the Zen documentation for that access method.
The table-name may be specified in the positioned UPDATE statement only when used at the session level. Table-name cannot be specified with a stored procedure or trigger.
The table-name may be specified in the positioned UPDATE statement only when used at the session level. Table-name cannot be specified with a stored procedure or trigger.
Examples
The following sequence of statements provide the setting for the positioned UPDATE statement. The required statements for a positioned UPDATE are DECLARE CURSOR, OPEN CURSOR, and FETCH FROM cursorname.
The positioned UPDATE statement in this example updates the name of the course HIS 305 to HIS 306.
CREATE PROCEDURE UpdateClass();
BEGIN
DECLARE :CourseName CHAR(7);
DECLARE :OldName CHAR(7);
DECLARE c1 CURSOR FOR SELECT name FROM course WHERE name = :CourseName FOR UPDATE;
SET :CourseName = 'HIS 305';
OPEN c1;
FETCH NEXT FROM c1 INTO :OldName;
UPDATE SET name = 'HIS 306' WHERE CURRENT OF c1;
END;
See Also
USER
Remarks
The USER keyword returns the current user name (such as Master) for each row returned by the SELECT restriction.
Example
The following examples return the user name from the course table.
SELECT USER FROM course
-- returns 145 instances of Master (the table contains 145 rows)
SELECT DISTINCT USER FROM course
-- returns 1 instance of Master
See Also
WHILE
You can use a WHILE statement to control flow. It allows statements to be executed repeatedly as long as the WHILE condition is true. Optionally, you may use the WHILE statement with DO and END WHILE.
Note: You cannot use a mixed syntax for the WHILE statement. You may use either WHILE with DO and END WHILE, or only WHILE. If you are using compound statements with a WHILE condition, you must use BEGIN and END to indicate the beginning and ending of the statement blocks.
Syntax
[ label-name : ] WHILE proc-search-condition [ DO ] [ proc-stmt [; proc-stmt ] ]...
[ END WHILE ][ label-name ]
[ END WHILE ][ label-name ]
Remarks
A WHILE statement can have a beginning label, in which case it is called a labeled WHILE statement.
Examples
The following example increments the variable vInteger by 1 until it reaches a value of 10, when the loop ends.
WHILE (:vInteger < 10) DO
SET :vInteger = :vInteger + 1;
END WHILE
See Also
Grammar Element Definitions
The following is an alphabetical list of element definitions used in the grammar syntax.
alter-options ::= alter-option-list1 | alter-option-list2
alter-option-list1 ::= alter-option |(alter-option [, alter-option ]...)
| ALTER [ COLUMN ] column-definition
| DROP [ COLUMN ] column-name
| DROP CONSTRAINT constraint-name
| DROP PRIMARY KEY
| MODIFY [ COLUMN ] column-definition
alter-option-list2 ::= PSQL_MOVE [ COLUMN ] column-name TO [ [ PSQL_PHYSICAL ] PSQL_POSITION ] new-column-position | RENAME COLUMN column-name TO new-column-name
as-or-semicolon ::= AS | ;
before-or-after ::= BEFORE | AFTER
call-arguments ::= positional-argument [ , positional-argument ]...
col-constraint ::= NOT NULL
| NOT MODIFIABLE
| UNIQUE
| PRIMARY KEY
| REFERENCES table-name [ ( column-name ) ] [ referential-actions ]
collation-name ::= 'string'
column-constraint ::= [ CONSTRAINT constraint-name ] col-constraint
column-definition ::= column-name data-type [ DEFAULT Expression ] [ column-constraint [ column-constraint ]... [CASE | COLLATE collation-name ]
column-name ::= user-defined-name
commit-statement ::= see COMMIT statement
comparison-operator ::= < | > | <= | >= | = | <> | !=
constraint-name ::= user-defined-name
correlation-name ::= user-defined-name
cursor-name ::= user-defined-name
db-name ::= user-defined-name
expression::= expression - expression
| expression + expression
| expression * expression
| expression / expression
| expression & expression
| expression | expression
| expression ^ expression
| ( expression )
| -expression
| +expression
| ~expression
| ?
| literal
| scalar-function
| { fn scalar-function }
| USER
literal ::= 'string' | N'string'
| number
| { d 'date-literal' }
| { t 'time-literal' }
| { ts 'timestamp-literal' }
scalar-function :: = See Scalar Functions
expression-or-subquery ::= expression | ( query-specification )
fetch-orientation ::= NEXT
group-name ::= user-defined-name
index-definition ::= ( index-segment-definition [ , index-segment-definition ]... )
index-name ::= user-defined-name
index-number ::= user-defined-value -- an integer between 0 and 118
index-segment-definition ::= column-name [ ASC | DESC ]
ins-upd-del ::= INSERT | UPDATE | DELETE
insert-values ::= values-clause
| query-specification
join-definition ::= table-reference [ INNER ] JOIN table-reference ON search-condition
| table-reference CROSS JOIN table-reference
| outer-join-definition
label-name ::= user-defined-name
literal ::= 'string' | N'string'
| number
| { d 'date-literal' }
| { t 'time-literal' }
| { ts 'timestamp-literal' }
order-by-expression ::= expression [ CASE | COLLATE collation-name ] [ ASC | DESC ]
outer-join-definition ::= table-reference outer-join-type JOIN table-reference ON search-condition
outer-join-type ::= LEFT [ OUTER ]| RIGHT [ OUTER ] | FULL [ OUTER ]
| SQLSTATE
parameter-type-name ::= parameter-name
| parameter-type parameter-name
| parameter-name parameter-type
parameter-type ::= IN | OUT | INOUT | IN_OUT
parameter-name ::= [ : ] user-defined-name
password ::= user-defined-name | 'string'
positional-argument ::= expression
precision ::= integer
predicate ::= expression [ NOT ] BETWEEN expression AND expression
| expression comparison-operator expression-or-subquery
| expression [ NOT ] IN ( query-specification )
| expression [ NOT ] IN ( value [ , value ]... )
| expression [ NOT ] LIKE value
| expression IS [ NOT ] NULL
| expression comparison-operator ANY ( query-specification )
| expression comparison-operator ALL ( query-specification )
| EXISTS ( query-specification )
proc-expr ::= same as normal expression but does not allow IF expression, or scalar functions
proc-search-condition ::= same as search-condition but does not allow expressions with subqueries
proc-stmt ::= [ label-name : ] BEGIN [ ATOMIC ] [ proc-stmt [ ; proc-stmt ]... ] END [ label-name ]
| CALL procedure-name ( proc-expr [ , proc-expr ]... )
| CLOSE cursor-name
| DECLARE cursor-name CURSOR FOR select-statement [ FOR UPDATE | FOR READ ONLY ]
| DELETE WHERE CURRENT OF cursor-name
| delete-statement
| FETCH [ fetch-orientation [ FROM ] ] cursor-name [ INTO variable-name [ , variable-name ] ]
| IF proc-search-condition THEN proc-stmt [ ; proc-stmt ]... [ ELSE proc-stmt [ ; proc-stmt ]... ] END IF
| IF proc-search-condition proc-stmt [ELSE proc-stmt]
| insert-statement
| LEAVE label-name
| [ label-name : ] LOOP proc-stmt [ ; proc-stmt ]... END LOOP [ label-name ]
| OPEN cursor-name
| PRINT proc-expr [ , 'string' ]
| RETURN [ proc-expr ]
| transaction-statement
| select-statement-with-into
| select-statement
| SET variable-name = proc-expr
| SIGNAL [ ABORT ] sqlstate-value
| START TRANSACTION [tran-name]
| update-statement
| UPDATE SET column-name = proc-expr [ , column-name = proc-expr ]... WHERE CURRENT OF cursor-name
| [ label-name : ] WHILE proc-search-condition DO [ proc-stmt [ ; proc-stmt ] ]... END WHILE [ label-name ]
| [ label-name : ] WHILE proc-search-condition proc-stmt
| alter-table-statement
| create-index-statement
| create-table-statement
| create-view-statement
| drop-index-statement
| drop-table-statement
| drop-view-statement
| grant-statement
| revoke-statement
| set-statement
procedure-name ::= user-defined-name
public-or-user-group-name ::= PUBLIC | user-group-name
query-specification ::= ( query-specification )
FROM table-reference [ , table-reference ]...
[ WHERE search-condition ]
[ HAVING search-condition ] ]
referencing-alias ::= OLD [ AS ] correlation-name [ NEW [ AS ] correlation-name ]
| NEW [ AS ] correlation-name [ OLD [ AS ] correlation-name ]
referential-actions ::= referential-update-action [ referential-delete-action ]
| referential-delete-action [ referential-update-action ]
referential-update-action ::= ON UPDATE RESTRICT
referential-delete-action ::= ON DELETE CASCADE
| ON DELETE RESTRICT
release-statement ::= see RELEASE statement
result ::= user-defined-name data-type
rollback-statement ::= see ROLLBACK WORK statement
savepoint-name ::= user-defined-name
scalar-function ::= see Scalar Function list
scale ::= integer
search-condition ::= search-condition AND search-condition
| search-condition OR search-condition
| NOT search-condition
| ( search-condition )
| predicate
select-item ::= expression [ [ AS ] alias-name ] | table-name.*
select-list ::= * | select-item [ , select-item ]...
sqlstate-value ::= 'string'
table-constraint-definition ::= [ CONSTRAINT constraint-name ] table-constraint
table-constraint ::= UNIQUE (column-name [ , column-name ]... )
| PRIMARY KEY ( column-name [ , column-name ]... )
| FOREIGN KEY ( column-name [ , column-name ] )
REFERENCES table-name
[ ( column-name [ , column-name ]... ) ]
[ referential-actions ]
table-element ::= column-definition
| table-constraint-definition
table-expression ::=
FROM table-reference [ , table-reference ]...
[ WHERE search-condition ]
[ GROUP BY expression [ , expression ]...
[ HAVING search-condition ]
table-name ::= user-defined-name
table-permission ::= ALL
| SELECT [ ( column-name [ , column-name ]... ) ]
| UPDATE [ ( column-name [ , column-name ]... ) ]
| INSERT [ ( column-name [ , column-name ]... ) ]
| DELETE
| ALTER
| REFERENCES
table-reference ::= { OJ outer-join-definition }
| [db-name.]table-name [ [ AS ] alias-name ]
| join-definition
| ( join-definition )
table-subquery ::= query-specification [ [ UNION [ ALL ]
query-specification ]...][ limit-clause ][ ORDER BY order-by-expression [ , order-by-expression ]...]
query-specification ]...][ limit-clause ][ ORDER BY order-by-expression [ , order-by-expression ]...]
limit-clause ::= [ LIMIT [offset,] row_count | row_count OFFSET offset | ALL [OFFSET offset] ]
offset ::= number | ?
row_count ::= number | ?
transaction-statement ::= commit-statement
| rollback-statement
| release-statement
trigger-name ::= user-defined-name
user_and_password ::= user-name [ : ] password
user-group-name ::= user-name | group-name
user-name ::= user-defined-name
value ::= literal | USER | NULL | ?
value-list ::= ( value [ , value ]... )
values-clause ::= DEFAULT VALUES | VALUES ( expression [ , expression ]... )
variable-name ::= user-defined-name
view-name ::= user-defined-name
SQL Statement List
SqlStatementList is defined as:
SqlStatementList
statement ';' | SqlStatementList ';'
statement ::= statement-label ':' statement
| BEGIN ... END block
| CALL statement
| CLOSE CURSOR statement
| COMMIT statement
| DECLARE CURSOR statement
| DECLARE variable statement
| DELETE statement
| FETCH statement
| IF statement
| INSERT statement
| LEAVE statement
| LOOP statement
| OPEN statement
| PRINT statement
| RELEASE SAVEPOINT statement
| RETURN statement
| ROLLBACK statement
| SAVEPOINT statement
| SELECT statement
| SET statement
| SIGNAL statement
| START TRANSACTION statement
| UPDATE statement
| WHILE statement
Predicate
A predicate is defined as:
expression compare-operator expression
| expression [ NOT ] BETWEEN expression AND expression
| expression [ NOT ] LIKE string-literal
| expression IS [ NOT ] NULL
| NOT predicate
| predicate AND predicate
| predicate OR predicate
| '(' predicate ')'compare-operator ::= '=' | '>=' | '>' | '<=' | '<' | '<>' | '!='
| [ NOT ] IN value-list
Expression
An expression is defined as:
number
| string-literal
| column-name
| variable-name
| NULL
| CONVERT '(' expression ',' data-type ')'
| '-' expression
| expression '+' expression
| expression '-' expression
| expression '*' expression
| expression '/' expression
| expression '&' expression
| '~' expression
| expression '|' expression
| expression '^' expression
| function-name '(' [ expression-list ] ')'
| '(' expression')'
| '{' D string-literal '}'
| '{' T string-literal '}'
| '{' TS string-literal '}'
| @:IDENTITY
| @:ROWCOUNT
| @@BIGIDENTITY
| @@IDENTITY
| @@ROWCOUNT
| @@VERSION
An expression list is defined as:
expression-list ::= expression [ , expression ... ]
Global Variables
Zen supports the following global variables:
• @@SPID
Global variables are prefaced with two at signs, @@. All global variables are variables per connection. Each database connection has its own @@IDENTITY, @@BIGIDENTITY, @@ROWCOUNT, and @@SPID values. The value of @@VERSION is information about the version of the engine that executes the statement where it is used.
@@IDENTITY and @@BIGIDENTITY
Either of these variables returns its most recently inserted column value. The value is a signed integer value. The initial value is NULL.
The variable can refer to only a single column. If the target table includes more than one IDENTITY column, the value of this variable refers to the IDENTITY column serving as the table primary key. If no such column exists, then the value of this variable refers to the first IDENTITY column in the table.
If the most recent insert was to a table without an IDENTITY column, then the value of @@IDENTITY is set to NULL.
For BIGIDENTITY values, use @@BIGIDENTITY. For SMALLIDENTITY values, use @@IDENTITY.
Examples
SELECT @@IDENTITY
Returns NULL if no records have been inserted in the current connection, otherwise returns the IDENTITY column value of the most recently inserted row.
SELECT * FROM t1 WHERE @@IDENTITY = 12
Returns the most recently inserted row if it has an IDENTITY column value of 12. Otherwise, returns no rows.
INSERT INTO t1(c2) VALUES (@@IDENTITY)
Inserts the IDENTITY value of the last row inserted into column C2 of the new row.
UPDATE t1 SET t1.c1 = (SELECT @@IDENTITY) WHERE t1.c1 = @@IDENTITY + 10
Updates column C1 with the IDENTITY value of the last row inserted, if the value of C1 is 10 greater than the IDENTITY column value of the last row inserted.
UPDATE t1 SET t1.c1 = (SELECT NULL FROM t2 WHERE t2.c1 = @@IDENTITY)
Updates column C1 with the value NULL if the value of C1 equals the IDENTITY column value of the last row inserted.
The example below creates a stored procedure and calls it. The procedure sets variable V1 equal to the sum of the input value and the IDENTITY column value of the last row updated. The procedure then deletes rows from the table anywhere column C1 equals V1. The procedure then prints a message stating how many rows were deleted.
CREATE PROCEDURE TEST (IN :P1 INTEGER);
BEGIN
DECLARE :V1 INTERGER;
SET :V1 = :P1 + @@IDENTITY;
DELETE FROM t1 WHERE t1.c1 = :V1;
IF (@@ROWCOUNT = 0) THEN
PRINT 'No row deleted';
ELSE
PRINT CONVERT(@@ROWCOUNT, SQL_CHAR) + ' rows deleted';
END IF;
END;
CALL TEST (@@IDENTITY)
@@ROWCOUNT
This variable returns the number of rows that were affected by the most recent operation in the current connection. The value is an unsigned integer. The initial value is zero.
The @@ROWCOUNT variable is valid only when used after an INSERT, UPDATE, or DELETE statement.
Examples
SELECT @@ROWCOUNT
Returns zero if no records were affected by the previous operation in the current connection, otherwise returns the number of rows affected by the previous operation.
CREATE TABLE t1 (c1 INTEGER, c2 INTEGER)
INSERT INTO t1 (c1, c2) VALUES (100,200)
INSERT INTO t1(c1, c2) VALUES (300, @@ROWCOUNT)
SELECT @@ROWCOUNT
Results:
1 (in @@ROWCOUNT variable)
In line four, the @@ROWCOUNT variable has the value of 1 because the previous INSERT operation affected one row.
Also see the example for @@IDENTITY.
@@SESSIONID
This variable returns an eight-byte integer value that identifies the connection to a Zen server engine, reporting engine, or workgroup engine. The integer is a combination of a time value and an incremental counter. This variable can be used to identify uniquely each Zen connection.
@@SESSIONID requires a connection to the database engine to return a value. If the connection to the database engine is lost, the variable cannot return an identifier.
Example
SELECT @@SESSIONID
The example returns an integer identifier such as 26552653137523.
@@SPID
This variable, the server process identifier, returns the identifier integer value of the system thread for the Zen connection.
If the connection to the database engine is lost, the SPID variable cannot return an identifier. Instead, the statement returns an error with a SqlState of 08S01.
Example
SELECT @@SPID
The example returns an integer identifier, such as 402.
@@VERSION
SQL statements that use this variable return a value based on the Zen server engine, reporting engine, or workgroup engine to which the session is connected.
• For a Zen server, the value is the version of the local engine and the bitness, name, and version of the local operating system.
• For Zen Client Reporting Engine, it is the version of the local reporting engine and the bitness, name, and version of the local operating system.
• For Zen Client, it is the version of the engine on the remote Zen server to which the client is connected and the bitness, name, and version of the operating system where the server is running.
• For Zen Workgroup Engine, the value is the version of the local engine and the bitness, name, and version of the local operating system.
Example
SELECT @@version
The example returns text information resembling the following:
Actian Zen - 14.10.020.000 (x86_64) Server Engine - Copyright (C) Actian Corporation 2019 on (64-bit) Windows NT 6.2 7d
Other Characteristics
This topic describes other characteristics of the SQL grammar. It is divided into the following sections:
Temporary Files
When Zen must generate a temporary table in order to process a given query, it creates the file in a location determined in one of the following ways:
• If you have manually added the string key value PervasiveEngineOptions\TempFileDirectory to ODBC.INI, Zen uses the path set for TempFileDirectory. The proper location for both 32- and 64-bit Zen installations on Windows is the registry location HKEY_LOCAL_MACHINE\SOFTWARE\ODBC\ODBC.INI. For Linux, macOS, and Raspbian, the ODBC.INI file is located in /usr/local/actianzen/etc.
• If you have set the temporary file directory property for a Zen engine using ZenCC or bcfg, Zen uses this location. For more information, see Temporary Files in Advanced Operations Guide.
• If you have not used either of the first two options listed here, then Zen checks for the file location using the following sequence on Window platforms:
1. The path specified by the TMP environment variable
2. The path specified by the TEMP environment variable
3. The path specified by the USERPROFILE environment variable
4. The Windows directory
For example, if the TMP environment variable is not defined, Zen uses the path specified in the TEMP environment variable, and so on.
On Linux and macOS distributions, Zen uses the current directory for the server process. No attempt is made to use TMP.
Zen deletes all temporary files used to process a query after the query is finished. If the query is a SELECT statement, then the temporary files exist as long as the result set is active, meaning until the result set is freed by the calling application.
When Are Temporary Files Created?
Zen uses three types of temporary files: in-memory, on-disk, and Btrieve (MicroKernel Engine).
In-Memory Temporary File
In-memory temporary files are used for the following circumstances:
• Forward-only cursor
• Number of bytes in the temporary file is less than 250,000.
• SELECT statements with ORDER BY, GROUP BY, or DISTINCT that do not use an index, that have no BLOB or CLOB in the ORDER BY, GROUP BY, or DISTINCT, and that have no BLOB or CLOB in selection list with UNION.
On-Disk Temporary File
On-disk temporary files are used for the following circumstances:
• Forward-only cursor
• Number of bytes in the temporary file is greater than 250,000.
• SELECT statements with ORDER BY, GROUP BY, or DISTINCT that do not use an index, that have no BLOB or CLOB in the ORDER BY, GROUP BY, or DISTINCT, and that have no BLOB or CLOB in selection list with UNION.
Btrieve Temporary File
Btrieve temporary files are used for the following circumstances:
• Forward-only cursor with BLOB or CLOB in ORDER BY, GROUP BY, or DISTINCT or with BLOB or CLOB in selection list with UNION
• Dynamic or static cursor with UNION queries or SELECT statements with ORDER BY, GROUP BY, or DISTINCT that do not use an index.
Zen does not create a Btrieve temporary file for each base table in a static cursor SELECT query. Instead, each base table is opened by using the MicroKernel to reserve pages in the file as a static representation of the file. Any change made through a static cursor cannot be seen by that cursor.
Working with NULL Values
Zen interprets a NULL as an unknown value. Thus, if you try to compare two NULL values, they will compare as not equal.
An expression that evaluates to WHERE NULL=NULL returns FALSE.
Working with Binary Data
Consider the following scenario: you insert the literal value '1' into a BINARY(4) column named c1, in table t1. Next, you enter the statement, SELECT * FROM t1 WHERE c1='1'.
The engine can retrieve data using the same binary format as was used to input the data. That is, the SELECT example above works properly and returns the value, 0x01000000, even though there is no literal match.
Note: The engine always adds a zero ('0') to the front of odd-digit binary values that are inserted. For example, if you insert the value '010', then the value '0x00100000' is stored in the data file.
Currently, Zen does not support suffix 0x to denote binary constants. Binary constants are a string of hexadecimal numbers enclosed by single quotation marks.
Currently, Zen does not support suffix 0x to denote binary constants. Binary constants are a string of hexadecimal numbers enclosed by single quotation marks.
This behavior is the same as for Microsoft SQL Server.
Creating Indexes
The maximum column size for indexable VARCHAR columns is 254 bytes if the column does not allow Null values and 253 bytes if the column is nullable.
The maximum column size for CHAR columns is 255 bytes if the column does not allow Null values and 254 bytes if the column is nullable.
The maximum column size for indexable NVARCHAR columns is NVARCHAR(126). This limit applies to both nullable and not-null columns. The NVARCHAR size is specified in UCS-2 character units.
The maximum column size for NCHAR columns is NCHAR(127). This limit applies to both nullable and not-null columns. The NCHAR size is specified in UCS-2 character units.
The maximum Btrieve key size is 255. When a column is nullable and indexed a segmented key is created with 1 byte for the null indicator and a maximum 254 bytes from the column indexed. VARCHAR columns differ from CHAR columns in that either length byte (Btrieve lstring) or a zero terminating byte (Btrieve zstring) are reserved, increasing the effective storage by 1 byte. NVARCHAR (Btrieve wzstring) columns differ from NCHAR columns in that a zero terminating character is reserved, increasing the effective storage by 2 bytes.
Comma as Decimal Separator
Many locales use a comma to separate whole numbers from fractional numbers within a floating point numeric field. For example, they would use 1,5 instead of 1.5 to represent the number one-and-one-half.
Zen supports both the period and the comma as decimal separators. Zen accepts input values using the period or the comma, based on the regional settings for the operating system. By default, the database engine displays values using the period.
Note: When the decimal separator is not a period, SQL statements must enclose numbers in quotes.
For output and display only, the session-level command SET DECIMALSEPARATORCOMMA can be used to specify output (for example, SELECT results) that uses the comma as the decimal separator. This command has no effect on data entry or storage.
Client-Server Considerations
Support for the comma as decimal separator is based on the locale setting in the operating system. Both the client operating system and the server operating system have a locale setting. The expected behavior varies according to both settings.
• If either the server or client locale setting uses the comma as decimal separator, then Zen accepts both period-separated values and quoted comma-separated values.
• If neither the server nor the client locale setting uses the comma decimal separator, then Zen does not accept comma-separated values.
Changing the Locale Setting
Decimal separator information can be retrieved or changed only for a machine running a Windows operating system. The decimal setting for Linux and macOS cannot be configured, and it is set to a period. If you have a Linux and macOS server engine and you want to use a comma as decimal separator, you must ensure that all your client computers are set to a locale that uses the decimal separator.
To change the regional settings on a Windows operating system, access the settings from the Control Panel. Stop and restart Zen services after your change to enable the database engine to use the setting.
Examples
Example A – Server locale uses a comma for decimal separator
Client locale uses a comma as decimal separator:
CREATE TABLE t1 (c1 DECIMAL(10,3), c2 DOUBLE)
INSERT INTO t1 VALUES (10.123, 1.232)
INSERT INTO t1 VALUES ('10,123', '1.232')
SELECT * FROM t1 WHERE c1 = 10.123
SELECT * FROM t1 FROM c1 = '10,123'
The above two SELECT statements, if executed from the client, return:
10.123, 1.232
10.123, 1.232
SET DECIMALSEPARATORCOMMA=ON
SELECT * FROM t1 FROM c1 = '10,123'
The above SELECT statement, if executed from the client after setting the decimal separator, returns:
10,123, 1,232
Client locale uses period as decimal separator, and these statements are issued from a new connection (meaning default behavior for SET DECIMALSEPARATORCOMMA):
CREATE TABLE t1 (c1 DECIMAL(10,3), c2 DOUBLE)
INSERT INTO t1 VALUES (10.123, 1.232)
INSERT INTO t1 VALUES ('10,123', '1.232')
SELECT * FROM t1 WHERE c1 = 10.123
SELECT * FROM t1 WHERE c1 = '10,123'
The above two SELECT statements, if executed from the client, return:
10.123, 1.232
10.123, 1.232
Example B – Server locale uses the period for decimal separator
Client locale uses comma as DECIMAL separator:
Same as client using comma in Example A.
Client locale uses period as DECIMAL separator:
CREATE TABLE t1 (c1 DECIMAL(10,3), c2 DOUBLE)
INSERT INTO t1 VALUES (10.123, 1.232)
INSERT INTO t1 VALUES ('10,123', '1,232') -- error in assignment
SELECT * FROM t1 WHERE c1 = 10.123
SELECT * FROM t1 WHERE c1 = '10,123' -- error in assignment
The first SELECT statement above, if executed from the client, returns:
10.123, 1.232
SET DECIMALSEPARATORCOMMA=ON
SELECT * FROM t1 FROM c1 = 10.123
The above SELECT statement, if executed after setting the decimal separator for display, returns:
10,123, 1,232
Last modified date: 10/31/2023