Editing Integration Manager Integrations
This topic describes how to use the Integration Manager for DataConnect Editor to edit and debug an Integration Manager integration that was imported from the Integration Manager for Actian Data Platform, or other Integration Manager installation, into your active DataConnect workspace.
The Integration Manager for DataConnect Editor enables you to edit configuration and integration artifacts (maps, processes, etc.), test and re-deploy them.
Note: Imported configurations cannot be executed from the Editor.
To edit the maps and processes contained within the Integration .djar, the Integration Manager integration must first be imported. If you have not imported an Integration Manager integration, see Importing Integration Manager Integrations into a Workspace.
When an integration is imported into your active workspace, the contents of its package (.djar) file (the .jobconfig, macros, and artifacts) are extracted into the Project Explorer. Editing features are then enabled so that you can then edit and debug any of the following elements: artifacts (such as maps and processes), macros, and configuration file.
IMPORTANT! Once a package (.djar) is imported into your workspace, the Project Explorer elements must not be moved. All elements must remain where they reside when they’re imported. Otherwise, the integration will break when it is re-deployed.
After you finish editing and debugging the integration, you can re-deploy it back to the Actian Data Platform Integration Manager. During re-deployment, a package (.djar) is created, which contains all your edits. You will have to option to overwrite the existing or give it a new name. For more information, see Re-deploying to Integration Manager.
IMPORTANT! To avoid overriding edits made by another user, verify that the integration has not been edited since you imported it.
Prerequisites
• The integration is imported into the Integration Manager for DataConnect workspace. For more information, see Importing Integration Manager Integrations into a Workspace.
• The Project Explorer elements for the integration must be in the same location as when the package (.djar) was imported. (Otherwise, the integration will break when it’s re-deployed.)
• An Integration Manager connection to either a server hosting an Integration Manager installation, or to the Actian Data Platform. For more information, see Defining an Integration Manager Connection.
Note: The Integration Manager instance must be running at the time of import or re-deployment.
• Integration Manager connections are configured in Preferences. For more information, see Setting Integration Manager Preferences.
The following image illustrates the Integration Manager Configuration Editor: 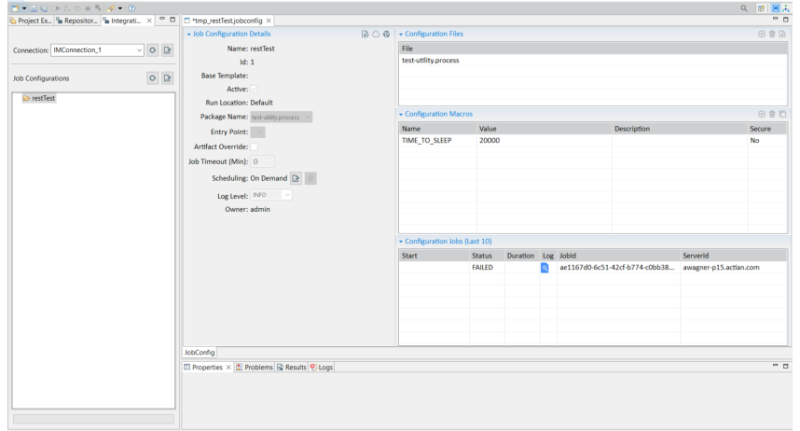
To edit an Integration Manager Integration:
1. Open the Integration Manager Explorer tab (located to the right of the Project Explorer tab).
2. Select the instance you wish to view from the Connections dropdown.
A list of Job Configurations for the instance are displayed.
3. Double-click a package (.djar) to select it.
Job Configuration Details Lists details about the job configuration.
Field | Description |
|---|---|
Name | The name of the job configuration. |
Id | The unique ID for the job configuration. |
Base Template | Template the job configuration is associated with. If the job configuration does not have an association with a template, this field will be empty. |
Active | Indicates whether the job configuration is currently Active or Inactive. You can run the job configuration on the Integration Manager Platform only if it is set to Active (this option is in selected state). |
Run Location | Displays the .djar package that will be run by the job configuration. If multiple packages are available, they will appear in the drop-down (and a different package or configuration can be selected to execute after re-deployment). |
Package Name | Displays the .djar package or packages that were uploaded into the job configuration. If multiple packages are available, they will appear in the drop-down and you can select a different package to view its details. Note: For information about creating a package (.djar) file for a project, see Creating a Package. |
Entry Point | Specifies the entry point where the executed job will begin. The entry point must be a master Run Time Config (.rtc) file in your project. The (.rtc) file can be a master process.rtc or map.rtc file. |
Artifact Override | When this option is selected, the package process steps or map will be overridden by the artifacts added under Files. The artifact must have the same name as in the package. |
Job Timeout (Min) | Jobs run from this job configuration will time out if they do not finish within the time that is set in minutes. If the timeout is set to 0, the timeout will be ignored. |
Scheduling | Click Click Possible values are: • On Demand – Unscheduled; the job configuration must be run manually. • Interval – Select the hours and minutes to set the interval period to run the job configuration. • Simple Cron Expression – This option enables you to run a job on a very simple schedule (for example, a single day of the week, a single day of the month, etc.). If a more complex schedule is required (for example, two days of the week or month), create a cron expression. Select the minute, hour, day, month or day of the week to set the interval period for executing the job configuration: – Minutes. Select the minute of the hour to run the job configuration, ranging from 0-59. – Hours. Select the hour to run the job configuration, ranging from 0-23 in a 24-hour notation. – Days of the month. Select the date of the month to run the job configuration, ranging from 1-31. Select * to execute every day of the month. – Months. Select the month to run the job configuration. The range, from 1-12, represents January to December. Select * to execute every month. – Days of week. Select the day of the week to run the job configuration. The range, from 0-6, represents Sunday to Saturday. Select * to execute every day of the week. • CRON Expression – Specify a run schedule using a Quartz CRON expression. This option is useful if you need to configure a more complex execution schedule for the job configuration. A quick Cron expression tutorial provided by Quartz is here. |
Log Level | Specifies the types of messages that will be included in the job’s log file. Possible settings include: • Inherit From Template • SEVERE – Logs errors that can cause the process execution to terminate. • WARNING – Logs messages about data truncation in a field, field name changes, loss of precision, or other issues • INFO – Logs messages such as “Execution initialization...,” “Execution successful,” whether the process execution was terminated, and so on. • DEBUG – All messages generated as a result of a TraceOn action and some other messages are logged at this level. In this case, the record number, first five fields of each record, and all the events are recorded. |
Owner | Displays the username of the owner (creator) of the job configuration. |
You can perform the following actions:
Actions | Description |
|---|---|
Click to open the Package Import Wizard. You can import the temporary job configuration (and all supporting artifacts within the .djar) into DataConnect for editing and debugging using the guided workflow of this wizard. See Importing Integration Manager Integrations into a Workspace. | |
Click to repackage and deploy/re-deploy a job configuration to Integration Manager. See Deploying to Integration Manager and Re-deploying to Integration Manager. Note: The configuration must be saved in order to deploy/re-deploy. | |
Click to execute the job configuration. The job configuration executes on the Integration Manager server in which it resides. | |
Click to add a file (in the Configuration Files section) and a macro (in the Configuration Macros section). | |
Click to view execution details in the Integration Manager Log tab in the JobConfig panel. | |
Click to edit the schedule of an imported job configuration. See Editing Integration Manager Job Configuration Schedule. | |
Click to delete the schedule of an imported job configuration. This icon is disabled when Scheduling is set to On Demand. See Deleting Integration Manager Job Configuration Schedule. |
Configuration Files: Lists files associated with the select job configuration.
Fields | Description |
|---|---|
File | The artifact file name. |
Click to open the browse dialog, and select an artifact file to add it. |
Configuration Macros: Lists macros associated with the selected job configuration. A new macroset is created for the job configuration that you selected to import. For more information on macros, see Managing Macro Sets and Macros.
Fields | Description |
|---|---|
Name | The macro name. Click the template name to edit it. A text box is displayed. Type a new name and then press enter. |
Value | The macro value. Click the macro value to change it. A text box is displayed. Type a new value and then press enter. |
Description | The macro description. Click the macro description to edit it. A text box is displayed. Type a new description and then press enter. |
Secure | Indicates if the macro is encrypted. |
Click to open the browse dialog, and select an artifact file to add it. |
Last modified date: 01/08/2026