Importing Integration Manager Integrations into a Workspace
This topic describes how to use the Integration Manager for DataConnect to import an integration that resides in the Integration Manager for Actian Data Platform (or other Integration Manager server) into your active DataConnect workspace.
Importing an integration enables you to edit the integration. For more information, see Editing Integration Manager Integrations.
When an integration is imported into your active workspace, the package (.djar) for the integration is extracted into the Project Explorer. This enables you to edit all of the package contents (the .jobconfig, macros, and artifacts such as maps and processes), and also test and debug issues - all on premise. For more information, see Editing Integration Manager Integrations.
IMPORTANT! Do not move integration elements in Project Explorer. All of the integration elements (artifacts, the .jobconfig file, macros, etc.) must remain in the same location as when the package (.djar) was imported. Otherwise, the integration will break when it is re-deployed.
Once you have updated the configuration and package, the entire integration can be repackaged and redeployed to the cloud (Integration Manager for Actian Data Platform). For more information, see Re-deploying to Integration Manager.
Note: For information about creating a package (.djar) file for a project, see Creating a Package.
You have the option of creating a new macroset, containing the configuration macros, within your active macro definition file (the macroset will have the same name as the configuration). This feature makes it easy to manage and separate the macros needed to run your artifacts locally rather than running from Integration Manager. During the redeploy process, you will be provided with an option to merge any new macros you may have added to the macroset into the configuration macros.
Note: If the job configuration already exists in your workspace you will be prompted to specify whether to overwrite the existing project or create a new one with a different name.
You can choose to import using an existing Integration Manager connection that was added using the Setting Integration Manager Preferences dialog, or define a new connection information from the Import Wizard.
Prerequisites
• A package (.djar) file for the project you want to import. For information about creating a package (.djar) file for a project, see Creating a Package.
• An Integration Manager connection to either a server hosting an Integration Manager installation, or to the Actian Data Platform. For more information, see Defining an Integration Manager Connection.
Note: The Integration Manager instance must be running.
• Integration Manager connections are configured in Preferences. For more information, see Setting Integration Manager Preferences.
To import a Configuration into your workspace:
1. In Integration Manager Explorer, select the desired connection.
All available job configurations are listed in the Integration Manager Explorer.
2. From the Job Configurations list, double-click the configuration that you want to import.
3. Click  from the Job Configuration Details pane.
The first page of the Package Import Wizard is displayed and lists the connection information.
4. Specify the connection information and click Next.
The second page of the Wizard is displayed and lists the configuration and package that will be imported.
5. Review the configuration and package (.djar) information and click Next.
6. (Optional) Select Add Configuration macros to current workspace macrodef (recommended).
The final page of the Wizard provides an option to import the configuration macros into your active macro definition file. If selected, the new macro set will have the same name as the imported configuration. These macros can be edited locally (from the Macro Manager) to resolve within your desktop environment. This approach is advantageous as it allows for a copy of the configuration macros to be used while editing, or extending, your artifacts. When you’re ready to repackage and redeploy, you’ll have the option of merging the macros from the macro set back into the configuration macros. This is optional but useful if you’ve expanded or altered your map or process after importing it.
7. Click Finish.
A dialog will appear with a message stating the import is complete. You can view the import log file by clicking View Log. The log file will contain a detailed summary of each file that was imported.
Note: If the job configuration already exists in your workspace then a dialog appears asking, if you want to overwrite the existing project or create a new one with a different name.
8. Click Close.
A new project is created in your current workspace. This project will have the same name as your imported configuration. By default, the .jobconfig file will open in an editor.
The following is a sample image of an imported configuration folder structure:
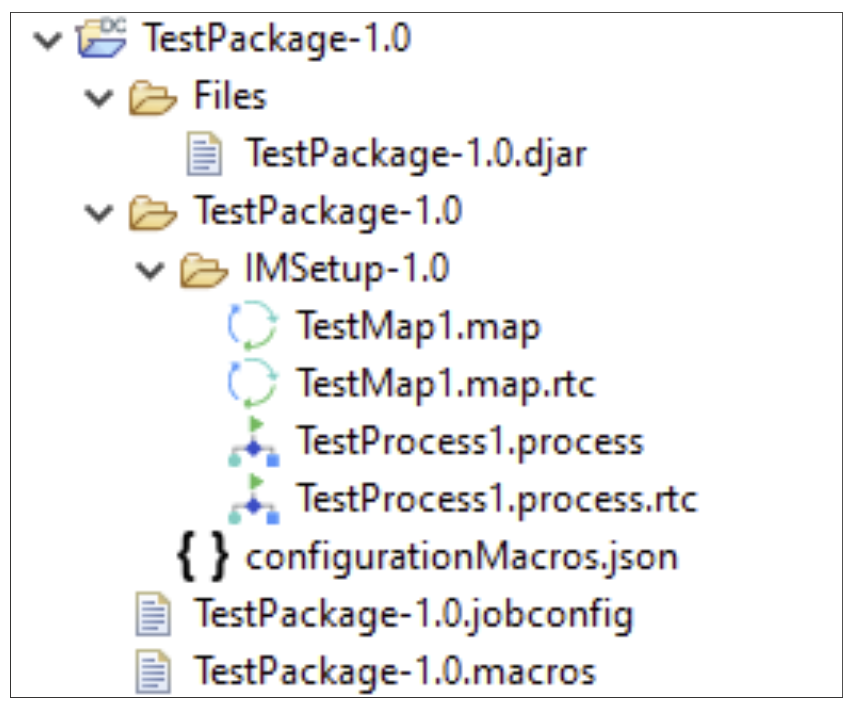
Within this new project you will find:
• A folder titled Files, which contains the .djar files referenced inside your configuration.
• A folder named after the configuration. This folder contains:
– The DataConnect artifacts found inside the .djar files
– The configuration macros
– The .jobconfig file
• In the root of the parent folder, you’ll find the macro definition file that was added when the .djar file was originally created.
Note:
- All the files that were imported can now be opened and edited. The configuration details, files and configuration macros can be edited through the .jobconfig file (see Editing Integration Manager Integrations).
- After editing the configuration and artifacts, you can repackage and re-deploy the configuration to Integration Manager (see Re-deploying to Integration Manager).
Last modified date: 01/08/2026