Workgroup Engine in Depth
The following topics explain how to get the most out of Workgroup Engine.
Networking
Both the server and workgroup products are shipped with the same networking components. So you can upgrade a Workgroup engine to a Zen server engine. The client-side requesters can connect to either type of engine.
The client-side MicroKernel router discovers gateway ownership of files by following a well-established algorithm.
Priority | Procedure |
|---|---|
1 | Try to connect to a database engine on the same computer as the data files. |
2 | Try to open the data files using the local engine (on the client machine). |
3 | Find and connect to the gateway engine that owns the files. |
The first thing the client-side router attempts is to connect to an engine on the same computer as the data. Because of this, it is always more efficient to have an engine running where the data resides.
Because the Zen network services layer uses many methods to find and connect to a remote database engine, there may be a delay on the first attempt to open a file on a file server that does not have a database engine running. If Gateway Durability is turned on, that connection will not be attempted thereafter because the router remembers each machine on which it fails to locate an engine.
If the router cannot connect to an engine on the remote file server, the router then allows the local engine to attempt to open the remote files. The local engine first attempts to create a new locator file and take ownership of the remote directory. If the directory is already owned by another MicroKernel, the local engine returns status code 116 to the router.
Finally, the router attempts to discover the gateway computer. It opens the locator file and reads the name of the gateway engine. Then it sends the request to that engine. Notice that the router never tries to read a locator file unless it has first received status code 116 from a MicroKernel. Accordingly, in order to use the gateway feature, you must have a local workgroup engine installed. If the attempt to open the remote files with the local engine fails because there is no local engine, the router does not try to read the locator file and no gateway engine is found.
Technical Differences Between Server and Workgroup
Zen server and Workgroup engines have a few significant differences.
Platforms
The Zen server engine offers 64- and 32-bit editions for various platforms. The Workgroup engine has only a 32-bit Windows edition. Although the Workgroup engine can run on a 64-bit Windows operating system, it is restricted to an address space of only 4 GB and cannot take advantage of the larger amounts of memory typically installed on such systems. When the Workgroup engine is installed on a 32-bit operating system, it has an address space limit of 2 GB.
User Interface
On Windows, a Zen server engine is always installed to run as a Windows service. The Workgroup engine can be installed as an application or as a service. In a fresh installation, it is installed by default as a service. If you choose instead to install it to run as an application, it uses an icon in the notification area of the taskbar as an interface. See Setting Up a Workgroup Engine in Getting Started with Zen.
Authentication and Btrieve Security Policies
The Zen database engine enforces file permissions in the operating system based on operating system user authentication. The Workgroup engine does not authenticate users on its own. If the Workgroup engine can connect to a system on a network, it can access the data. The more relaxed Workgroup security is intended for small offices where security may be less important than ease of use.
The lack of operating system authentication for the Workgroup engine means that the Mixed security policy for Btrieve is the same as the Classic security policy. This difference in security policy is a behavior difference between the Zen server and Workgroup engines. For more information, see Zen Security.
Gateway Support
The Workgroup engine creates locator files everywhere it opens files, both locally and remotely, allowing the engine to dynamically adjust gateway ownership daily. By default, the Workgroup engine also runs under a user ID, which can be authenticated on other computers and network devices. This makes the Workgroup engine ideal for use in a gateway environment. See Setting Up a Gateway Configuration in Getting Started with Zen.
The Zen server engine does not always create or honor gateway locator files. Because of this, it is not designed or tested for use in a gateway environment. Therefore, we do not support replacing a Workgroup engine with a server engine as a gateway in a workgroup environment.
Asynchronous I/O
The Zen server for Windows makes use of asynchronous I/O. Furthermore, coalescing of database page writes is done only by a Zen server. These features can provide a significant performance advantage for the server engine over the Workgroup engine during heavy I/O usage.
Default Configurations
The default values for some database settings, such as cache size and system cache, differ between a Zen server engine and a Workgroup engine. The default values for Workgroup engine options are set to consume less system resources. See Configuration Reference.
License Model
Zen Enterprise Server and Zen Workgroup use a user count license model. Zen Cloud Server uses a capacity-based license model. See License Models in Zen User’s Guide.
Troubleshooting Workgroup Issues
This section provides a few tips on troubleshooting problems in a Workgroup environment.
Time delay on first connection
If you regularly experience a delay when the first file-open request is issued, see if these techniques help.
If possible, make sure an engine running on the system where the data resides
Connecting to an engine on the same machine as the data is first priority for a client deciding where to send a file-open request. To ensure a Workgroup engine is running as an application, put an engine icon in the startup folder with the command:
zenengnapp.exe
Another option is to install the Workgroup engine as a service. For more information, see Getting Started with Zen. Also, for default locations of Zen files, see Where are the files installed?
If you are running a gateway topology
If you cannot run an engine where the data is, then the time delay during the first connection is a more important issue. Here are a few things you can do.
1. Reduce the supported protocols in the client settings so that protocols that are not used in your network are not attempted.
2. Use Gateway Durability. Gateway Durability is a client configuration setting that allows you to virtually eliminate the delay in making the first connection in a gateway environment. If Gateway Durability is turned on, it forces the client router to write into the registry the names of computers it finds that do not have an engine running. Once a failure to connect happens, instead of remembering this server name only while the router is running in-process, it saves the name in the registry. The next time the application starts up, it does not try to connect to the engine where the data is. It immediately goes to the next step of determining the identity of the current Gateway.
You can turn this setting on in ZenCC. Within ZenCC Zen Explorer, expand Local Client node, then right-click MicroKernel Router. Click Properties then click Access. Click the Gateway Durability option to set it to on (a check mark indicates that the setting is on) then click OK.
Note: This feature is off by default since it fixes the topology. If you add a server engine or a Workgroup engine where the data is, you must turn this setting back to off on each of the clients where you turned it on. Turning the setting off erases the registry of computers without an engine running, so you can turn it back on immediately and a new list will be generated based on the new topology.
Status Code 116
Status 116 is a MicroKernel status code which means that the file is being used by another MicroKernel engine acting as a gateway. If your application receives a status code 116, it means that the MicroKernel router can read the locator file but cannot contact the engine running on the gateway computer.
The first thing you need to do is find out who the gateway is. You can perform this task with the Gateway Locator tool.
Next, use Zen System Analyzer (ZenSA) network tests to try to connect to that computer. ZenSA can provide valuable information to isolate the problem.
One situation when this could occur is when the two computers are separated by a router such that they can both see the file server but they cannot see each other.
Redirecting Locator Files
This feature of gateway engine operation guarantees transaction atomicity for multidirectory databases and also makes it easy to change the name of a gateway engine across multiple data directories.
Recall that the Zen client uses the following approach to access remote data files:
1. First, attempt to connect to a database engine on the same computer as the data files.
2. Second, if no database engine is available on the remote machine, attempt to use a local engine to take ownership of the remote directory and create a locator file. If a gateway locator file already exists, the local engine is not used.
3. Third, try to use the specified gateway engine.
It is important to remember that the gateway configuration only goes into effect when there is no database engine available on the same computer as the data files.
This feature allows a dynamic (floating) gateway engine while at the same time preserving transaction durability for multidirectory databases on the same volume. This benefit is provided by a new type of gateway locator file that points to another gateway locator File. The new type is called a redirecting locator file. By having redirecting locator files in directories A, B, and C that point to the locator file in directory D, you can ensure that the gateway engine specified by the locator file in directory D services data files in the other directories as well.
Regardless of whether the locator file in directory D specifies a permanent gateway or is dynamically created by the first engine to open those files, this architecture ensures that all the specified directories use the same gateway engine. Likewise, if you decide to change the permanently assigned gateway engine for several directories, redirecting locator files allow you to do so by changing only one locator file, rather than all of them. Thus, it is possible to specify that all data files on a given hard drive must use the same gateway engine, with or without designating a permanent gateway.
Redirecting Locator File Requirements
The first line of a redirecting locator file must start with "=>" and be followed by a path specifying another locator file, which must be on the same drive. You can use any combination of slash and backslash in the path name. All slashes are converted to the type of separator used by the local operating system.
If your specified path ends with a slash, the database engine assumes the default locator file name (~PVSW~.LOC) and appends it to the path. If the specified path does not end with a slash, the database engine assumes that the path already contains the file name.
The following table lists the ways a redirecting locator file path can be specified:
Path | Meaning |
|---|---|
=>\path_name | Specifies the path from the root of the drive where the current Locator File is stored. |
=>.\path_name | Specifies the path relative to the current directory. |
=>..\path_name | Specifies the path relative to the parent directory of the current directory. |
You can assign multiple levels of redirection to these locator files. For example, you can have the first locator file pointing to a second locator file, the second locator file pointing to a third locator file, and so on. Each Workgroup engine opens each locator file sequentially, looking for the actual gateway name. It stops searching once it has found the locator file that does not start with "=>". The engine then assumes this locator file specifies the gateway engine.
Creating Redirecting Locator Files
As with any locator file, a redirecting locator file is a plain text file. You can create redirecting locator files by hand or programmatically. A redirecting locator file must be flagged as read-only, or it will be overwritten by the first engine to attempt to access the data files in that directory.
To Create a Redirecting Locator File
1. Open a text editor and create a new text file.
2. Decide where you are going to save the file when you are finished. You will save the file in the same directory as the data files which you want to redirect to another locator file.
For example, if you want to ensure that the data files in C:\data are accessed by the same Gateway engine as other data files, then you will want to keep in mind the folder C:\data.
3. Enter => and the path name of the next locator file. Continuing the example from the previous step, if you want the current data files in C:\data to be owned by the gateway engine specified in the locator file located in C:\moredata, then you would enter the following:
=>..\moredata\ (recommended) or
=>\moredata\ (not recommended)
In the first case, you are specifying a relative path from the current directory. In the second case, you are specifying an absolute path from the root of the current drive. In this particular example, both cases resolve to the same target directory.
Note: It is strongly recommended that you use relative path names (starting with ./ or ../) in your redirecting locator files, and also that you use the same share names on all workstations to access the same data. Following these two recommendations can prevent errors that may occur with network path name resolution over mapped drives.
4. Save the file as ~PVSW~.LOC in the data file directory where you want to configure a Gateway engine.
5. Close the text editor.
6. Flag the text file as read-only.
To mark the file as read-only on Windows, you can use the Properties dialog box (right-click the file icon) in Windows Explorer, or you can use the ATTRIB command in a DOS session or in a program:
attrib +r ~pvsw~.loc
To synchronize many data directories on a permanent Gateway
1. Either by hand or by using the Gateway Locator program, create a read-only (permanent) locator file that does not redirect. It must specify a Workgroup engine to use as the gateway.
For example, your locator file may specify the computer named workgroup1 as the gateway engine, and the file may be located in C:\data\db1.
2. For each of the other data directories that you want to use the gateway engine specified in the previous step, you need to create a Redirecting Locator File in that directory. Each redirecting locator file must point to the file you created in the previous step.
Continuing the example, each redirecting locator file in C:\data\db2 and C:\data\db3 would then contain the following text:
=>..\db1\
This causes any engine reading this file to follow the relative path and search the specified directory C:\data\db1 for another locator file. In this case, the specified directory contains a locator file that names workgroup1 as the gateway computer.
To synchronize many data directories on a dynamic gateway
1. Follow the steps above, only in step 1, ensure that the locator file is writable, not permanently-assigned.
In this case, remember that if no engines are accessing any data files in the redirecting hierarchy, then there will be no locator file in the target directory. This is normal. The dynamic locator file is created each session by the first engine to access the data, and the file is deleted when the last user session ends. It is permissible to have redirecting locator files that point to a data directory that has no locator file in it. In this case, the first engine to open those data files creates the locator file.
Example
Using the example locator files shown in the following figure, the redirecting locator file on the left forces the database engine to go up one directory, then look in the subdirectory newdir for another locator file with the default name (~PVSW~.LOC). This locator file, in turn, specifies that the Workgroup engine on the computer named ntserver1 is the correct gateway engine. As a result, the database engine on ntserver1 is used to access the data files in the directory mydir. 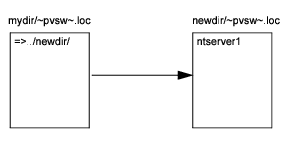
Last modified date: 10/31/2023