Programming with the Java Class Library
The following topics provide instructions and information for programming Java in Zen:
Zen Java Interface Class Structure
This topic describes the classes for the Zen Java interface.
Applying the "factory" pattern, almost all classes (with the exception of Driver, Timestamp, FieldDef and PsqlException) can only be produced through methods of another class (or other classes). In the description of classes, under the label Constructors no constructors are listed when no public constructors are available.
The Zen Java interface has a special class, PsqlException to handle error conditions occurring when methods of the API are invoked. PsqlException extends the java.lang.Exception. Each method of the Zen Java classes throws PsqlException and for brevity, the following clause is left out from the method definitions:
throws PsqlException
Figure 1 shows all classes and their relationship.
Figure 1 Java API Class Structure
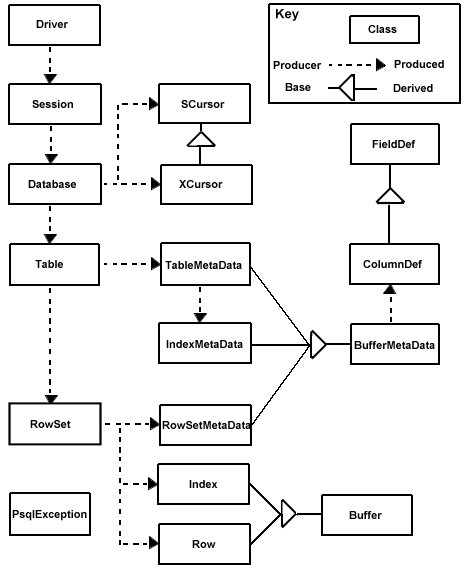
The classes of the Zen Java Interface can be divided into three groups:
General Classes
The following classes belong to General Classes group:
• Driver
• Session
• Database
• Timestamp
• PsqlException
These classes can be used both for tightly coupled and loosely coupled databases.
Rowset Family Classes
The following classes belong to the Rowset Family Classes group:
• Table
• Rowset
• Buffer
• Row
• Index
• DBMetaData
• TableMetaData
• RowSetMetaData
• ColumnDef
• IndexMetaData.
These classes make use of the metadata found in the dictionary of a Zen database and, therefore, can be applied only for tightly coupled databases.
Cursor Family Classes
This is the low-level portion of the Zen Java Interface. If you use this portion of the interface, you must handle position blocks, data buffers, and other elements of programming that are typical of the Btrieve API.
Note: You must use this family of the Java interface if your Btrieve files do not have DDFs. You can use the Zen Control Center utility to create DDF files for your data. See Zen User’s Guide for more information.
The following classes belong to Cursor Family Classes group:
• SCursor
• XCursor
• FieldDef
These classes do not use any meta data, they directly support the "classic" Btrieve operations (for example, through a BTRV method). Therefore, they are applied typically for loosely coupled databases. However, they can also be used to access data files that store tables of a tightly coupled database. (Although, it is more convenient to use the "rowset family" in the latter case.)
Overview of Major Classes and Methods
The following table lists the principal classes and methods in a basic Java application.
Principal Classes and Methods | Used for |
|---|---|
Driver establishSession killAllSessions | • Establishing one or more sessions. • Stopping all Sessions |
Session connectToDatabase startTransaction commitTransaction abortTransaction | • Connecting to Databases • Handling transactions |
Database getTable getTableNames createxCursor | • Obtaining Table names and Tables • Creating an xCursor to perform low-level operations if needed. |
Table getTableMetaData createRowSet | • Creating a RowSet, which is a view into the table data. • Obtaining metadata information about tables. |
TableMetaData getIndexNames | • Obtaining the Indexes from a Table. |
RowSet createRow insertRow deleteRow updateRow getNext getByIndex reset | • Obtaining part of a table • Updating Row information |
RowSetMetaData AddColumns DropColumns AddFirstTerm SetAccessPath SetDirection | • Adding and Dropping Columns • Performing "WHERE" clause functionality • Changing direction of navigation |
Row getString setString getFloat setFloat | • Actual Updating of Data obtained through RowSets. |
You can read about other classes and methods in the Zen Java Class Library javadoc, but these classes are likely to be the ones you will use most often in your application.
The structure of the Java interface classes is flat, without inheritance.
DRIVER
Driver establishes sessions. You can use Driver to instantiate as many Session objects as needed. You can also use the KillallSessions method to stop the application, as it will clean up socket connections, database connections, open files, and system resources.
SESSION
Sessions use the connection to the driver and allow you to connect to databases using URIs and start and end transactions. Each session receives a unique Btrieve client ID. Unless your application specifically needs multiple Btrieve client IDs, you can generally use one Session for the entire application. You can reset the session and the Btrieve client by calling Session.close. For more information about client IDs, see Btrieve Clients in Zen Programmer’s Guide and License Models in Zen User’s Guide.
DATABASE
Objects instantiated using this class are the database itself. Methods in this class allow the developer to, in the case of tightly coupled databases, get the table names, tables and so forth. In the case of the loosely coupled database, the developer can access familiar Btrieve-like APIs including extended operations.
TABLE
An instance of this class represents a table as an object. Using Table objects, you can create row sets and get meta data information about tables.
ROWSET
RowSet is an extremely important class. It is used to access the rows of the associated table. In addition, rows can be inserted, updated, and deleted through methods of this class.
An instance of this class represents a set of rows that is derived from the base table. One other way to look at it: a RowSet is a virtual table (a view) generated from a physically stored table.
Note: This object can be constructed only through the createRowSet method of Table.
A row set could include all rows or a subset of rows of the base table. A number of methods in RowSetMetaData (e.g.addFirstTerm, addAndTerm, and so forth) is available to provide the terms of a restriction criterion that determines which rows from the base table are included into the row set.
A row set could include all columns or any number of selected columns of the base row. When a RowSet object is created by Table.createRowSet, it is initialized according to the value of noColumns specified explicitly or implicitly in the call. If noColumns is specified as true, then no column is included into the row set and the application can selectively include the columns into the row set by calling RowSetMetaData.addColumns. If noColumns is specified a false or it is not included as an argument then the created RowSet includes all columns of the table.
The applications normally do not have to open and close the row sets. The associated data files are opened at the construction time of the RowSet objects and the data files are closed when either the application explicitly calls RowSet.close or as a result of closing a higher-level associated object (Table, Database, etc).
The elements of a row set can be accessed through Row objects. There multiple options are available to retrieve the rows.
For additional information about row sets, see the Zen Java Class Library javadoc.
ROW
An instance of this class represents a row buffer for a row in a RowSet instance. The Class Row enables access to rows and to column values within a row. It can be used to retrieve rows, update, or delete rows and to build rows for insertion.
This class has no methods of its own, but the methods inherited from Buffer can be used to get/set values of columns in the row buffer.
Sequence of Steps for a Java Application
The following sequence of steps are typical of an application or applet. The first two steps are the same for both tightly coupled and for loosely coupled databases:
1. Establish an instance of Session that is used as the execution environment. A Driver object does not have to be instantiated because Driver is a static class. It is also possible for an application/applet to create multiple sessions.
2. Get a Database object for the database by invoking Session.connectToDatabase specifying a URI. See Zen Programmer’s Guide for more information on database URIs. It is also possible to get multiple Database objects in a session, one for each database to be accessed.
For step 3, choose either Case 1: The application is accessing tables of a tightly coupled database. (Btrieve database uses a DDF) or Case 2: The application is accessing data files of a loosely coupled database (or data files that store tables of a tightly coupled database in the "classic" way).
Case 1: The application is accessing tables of a tightly coupled database.
1. Optionally, get the names of tables in the database (if they are not known for the application) by invoking Database.getTableNames.
2. Get a Table object for each table to be worked on by invoking Database.getTable.
3. Optionally, get a TableMetaData object for each table if the application has to get the column names and/or index names from the dictionary.
4. Create at least one RowSet object for each table to be processed in the application. RowSet objects are used to retrieve and modify data. A row set can be created including all or none of columns of the table (see more in step 5).
An application creates more than one RowSet for a table if it wants to process the table in some parallel fashion while maintaining multiple currencies (positioning) when navigating through the table. A RowSet object for a given table can be used for the entire duration of the application. That is, it can be used for retrievals by different indexes, by different conditions, and so forth.
5. For a given row set
a. Get a RowSetMetaData object for the row set.
b. Add needed columns to the definition if the row set was created with no columns included.
c. Change the default characteristics (direction, access path, and so forth) of the row set if necessary.
d. Define a selection criterion (addFirstTerm, addAndTerm, etc) if a row set should include only some selected rows of the base table.
e. Invoke RowSet.getNext method to retrieve Row objects. Optionally, invoke other methods of RowSet (getByIndex, getbyPercent, insertRow, updateRow, and so forth).
f. Invoke methods of Row (getString, setString, getInt, and so forth) to get/set values of columns in a row.
Note: Steps a–d are optional and in some applications may not be needed for some row sets.
Case 2: The application is accessing data files of a loosely coupled database (or data files that store tables of a tightly coupled database in the "classic" way).
1. Create an SCursor or an XCursor object for each data file the application plans to work on. XCursor is needed only if any extended get/step operation will be executed on the file. Optionally, the application can get multiple cursor objects for the same file if it wants to process the file in some parallel fashion maintaining multiple positions at the same time.
2. Execute "classic" Btrieve operations (open, get/step, insert, etc) using SCursor.BTRV.
Note: The BTRV method can be used also on XCursor because XCursor extends SCursor.
3. Optionally, define some FieldDef objects for data fields, use these field objects to set selection criterion (XCursor.addFirstTerm, etc) and define extraction list and use the methods like getNextExtended to execute extended operations.
4. Invoke methods like getDString, setKString, getDInt4, and so forth, to get/set values of fields in the private data and key buffers of SCursor (XCursor) objects.
The topics that follow explain these overview steps in more detail.
First Steps with the Java Class Library
To build your first Java Btrieve application:
Verify your Environment is Correct
Make sure your environment is set up correctly as described in How to Set Up your Environment.
In addition, make sure that "psql.jar" is in your CLASSPATH environment variable. The installation procedure should have performed this step for you. To access the classes in the Zen Java interface class library, you must import the package in your Java source files.
import PSQL.database.*;
Create Your Database and Tables
Currently, the Zen Java interface class library does not support the creation of databases and database tables. Use the Zen Control Center utility to perform these tasks. Once the database Data Dictionary Files (DDFs) and data files have been created, you can use the Java API classes to populate and access the tables.
For more information on the Zen Control Center and creating tables, see Zen User’s Guide.
Connect to the Database
There are two options for connecting to a Zen database. Either connect directly to the engine or connect using the I*net Data Server.
To connect to the database using a URI
1. Get a Session object from the Driver.
Session session = Driver.establishSession();
2. Use the Session object to connect to the database. Specify a URI to connect to the database. At a minimum, this URI should contain btrv:///dbname.
Database db = session.connectToDatabase("btrv:///demodata");
or
Database db = session.connectToDatabase("btrv://user@host/demodata?pwd=password");
See Advanced Operations Guide for more information on database security and URIs.
Obtain the Tables and Create Rowsets
To retrieve a table from the database
Table table = db.getTable("MyTable");
where "MyTable" is the name of the database table. The table name is case sensitive.
You can also get a list of the database’s table names.
String [] names = db.getTableNames();
To access properties of a Table object
Once you have a Table object, you can obtain information about the columns and indexes from its TableMetaData object.
TableMetaData tmd = table.getTableMetaData();
Some examples:
// Get the number of columns.
int num_columns = tmd.getColumnCount();
// Get the data type for column 0
int data_type = tmd.getColumnDef(0).getType());
// Get the length in characters for the column 0
int col_length = tmd.getColumnDef(0).getOffset();
To access rows of a Table object
To access table rows, you need a RowSet object which can only be created by a Table object.
RowSet rowset = table.createRowSet();
You can create multiple RowSet objects from the same table. RowSet objects are used to retrieve a table’s rows, insert new rows, and delete and update existing rows. To iterate through all the table rows, create a RowSet object and call getNext until an PsqlEOFException occurs.
try {
while(true)
Row row = rowset.getNext();
}
catch(PsqlEOFException ex) {
// No more rows
}
To access a RowSet object’s properties
Once you have a RowSet object, you can obtain information about the row set from RowSetMetaData.
RowSetMetaData rsmd = rowset.getRowSetMetaData();
Consult the methods of the RowSetMetaData class in the Zen Java Class Library javadoc for details.
Navigate the Rows in a Row Set
As previously shown, you can iterate through the row set’s rows by repeatedly calling the "getNext" method. You can iterate backwards by changing the "direction" property of the row set’s RowSetMetaData object.
rsmd.setDirection(Const.BTR_BACKWARDS);
After setting this property, the behavior of the "getNext" method becomes "getPrevious."
Note: You can "reset" the currency of the row set at any time to be before the first or after the last row (as shown in the following procedures). This is an efficient way to retrieve the first row or last row without having to iterate through the entire row set.
To retrieve the first row in the row set
1. Set the direction to forwards. This is the default.
rsmd.setDirection(Const.BTR_FORWARDS);
2. Set the row set’s currency to before the 1st row.
rowset.reset();
3. Retrieve the first row.
Row first = rowset.getNext();
To retrieve the last row in a row set
1. Set the direction to backwards.
rsmd.setDirection(Const.BTR_BACKWARDS);
2. Set the row set’s currency to after the last row.
rowset.reset();
3. Retrieve the last row.
Row last = rowset.getNext();
To access a Row object’s column data
Row objects inherit a multitude of accessor/mutator methods from the Buffer class. These methods allow you to set/get column data to/from a Row object’s buffer.
1. For example, to retrieve the data in column 0 as a String, do one of the following.
String str = row.getString(0);
or
String str = row.getString("ColumnName");
where "ColumnName" is the name defined in the data dictionary for column 0. Column names are case sensitive.
2. Now, to set the data for column 0, you use one of the setString methods.
row.setString(0, "MyColumnData");
or
row.setString("ColumnName", "MyColumnData");
3. Consult the methods of the Buffer class in the Zen Java Class Library javadoc for details.
Restrict or Filter the Data
To restrict/filter rows in a row set
To restrict/filter the rows in a row set, you have to use the RowSetMetaData’s "addFirstTerm," "addOrTerm," and "addAndTerm." For example, if the first column of a table contains integer data and you want all the rows where the first column’s value is greater that 25, do the following.
1. Get the row set’s RowSetMetaData.
RowSetMetaData rsmd = rowset.getRowSetMetaData();
2. Get the ColumnDef for first column, column number 0.
ColumnDef cmd = rsmd.getColumnDef(0);
3. Reset the row set’s currency to the beginning.
rowset.reset();
4. Add the first term.
rowset.addFirstTerm(cmd, Const.BTR_GR, "23");
5. Call getNext to get the first row where column 0 is greater than 23.
Row row = rowset.getNext();
You can add additional terms with the RowSetMetaData’s "addOrTerm" and "addAndTerm." These methods allow you to build up more complex filtering conditions similar to a SQL "WHERE" clause.
To select columns from a row set
You can specify a subset of the columns to retrieve, similar to the SQL "select" statement, by using the RowSetMetaData methods, "addColumns" and "dropColumns." By default, a row set will retrieve all the column data unless the row set was created with the "noColumns" parameter set to "true."
RowSet rowset = table.createRowSet(true);
In this case, no columns will be retrieved. Alternatively, after creating the row set, you can drop all or some of the columns.
RowSetMetaData rsmd =rowset.getRowSetMetaData();
rsmd.dropAllColumns();
Now you can add the set of columns you’re interested in to the row set.
rsmd.addColumns("LastName", "FirstName");
You can add columns to the row set by column names or by column numbers. See the various "addColumns" and "dropColumns" methods of the "RowSetMetaData" class in the Zen Java Class Library javadoc for details.
If you access column data in the rows by column number, be aware that the column numbers will be affected by the new ordering produced by "addColumns" and "dropColumns" methods. For example, if "FirstName" was originally column number 3 in the row set, after dropping all the columns and then adding "LastName" and "FirstName," the "FirstName" column number will be 1.
To retrieve a row by index
You can retrieve a row by using a defined index along with a comparison operator. For instance, if an index, "Last_Name" has been created on the "LastName" column for a hypothetical table, you can do the following to find a row with a "LastName" equal to "Smith."
1. Using the row set’s RowSetMetaData object, set the access path to use index "Last_Name."
rsmd.setAccessPath("Last_Name");
2. Create an index object using the index name. You can use the index number instead of the name.
Index index = rowset.createIndex("Last_Name");
3. Set the "LastName" column data for the index.
index.setString("LastName", "Smith");
4. Get the first row with LastName == Smith.
try {
Row row = rowset.getByIndex(Const.BTR_EQ, index);
}
5. Catch any exceptions that occur.
catch(PsqlOperationException ex) {
// If the error code == 4, then no row with LastName
// == Smith exists. This could be considered
// normal operation.
// == Smith exists. This could be considered
// normal operation.
// If the status code is not 4, the operation failed
// for some other reason than "not found."
// for some other reason than "not found."
if (ex.getErrorCode() != 4)
throw(ex);
}
If the index allows duplicate key values, the first row which satisfies the comparison operator will be returned. The returned row becomes the current row, allowing you to retrieve the next logical row, based on the index, with the row set’s "getNext" method.
You can get the list of index names from the table’s TableMetaData object.
String [] index_names = table.getTableMetaData().getIndexNames();
Be aware that an index is not required to have a name. In that case, you should use the index number instead. Index numbers are zero based.
Insert, Update, or Delete Rows
To insert a new row
1. First create a new Row object.
Row row = rowset.createRow();
2. Set the column data for the row.
// Set column 0 data
row.setString(0, "Column0String");
// Set column 1 data
row.setInt(1, 45);
// Update column 2 data
row.setDouble(2, 99.99);
3. Now insert the row.
rowset.insertRow(row);
This newly inserted row becomes the current row of the row set. If you do not want the row set’s currency to be changed by the insertion, you can use the overloaded version of "insertRow" that takes a boolean argument indicating no currency change(NCC).
rowset.insertRow(row, true);
The row set’s current row will be unchanged.
To update a row/record
1. First retrieve the row by calling one of the row set’s retrieval methods, "getNext," "getByIndex," and so forth.
Row row = rowset.getNext();
2. Make the changes to the column data for the row.
// Update column 1
row.setInt(1, 45);
3. Now update the row.
rowset.updateRow(row);
Like "insertRow," the newly updated row becomes the current row of the row set unless "no currency changed" is indicated, as shown following.
rowset.updateRow(row, true);
To delete a row/record
1. First retrieve the row by calling one of the row set’s retrieval methods, "getNext," "getByIndex," and so forth.
Row row = rowset.getNext();
2. Then delete the row.
rowset.deleteRow(row);
The row to be deleted does not have to be the "current" row i.e. the row returned from the last retrieval operation. If it is not the current row, the "deleteRow" method will make the deleted row the "current" row before deleting it. After the deletion, a call to "getNext" will return the row following the deleted row.
Combine Operations into a Transaction
Transactions allow you to combine a series of operations into a single operation that will either be committed or aborted.
To make a set of operations a transaction
You can make a set of operations a transaction by using the transaction methods of the Session class.
Here is an example of a transaction:
1. Start the transaction
try {
session.startTransaction(BTR_CONCURRENT_TRANS);
2. Perform some operations that you want to rollback if a failure occurs.
// insert one or more operations here
3. Attempt to commit the transaction.
session.commitTransaction(); }
catch(PsqlException ex)
4. If an error is detected, abort the transaction.
{ // An error occurred.
session.abortTransaction(); }
Transactions can be "exclusive" or "concurrent." See the Zen Programmer’s Guide for more information about transactions.
Store and Retrieve Binary Large Objects
The setObject and getObject methods can be used to store and retrieve Java objects that implement the java.io.Serializable interface. The setBinaryStream and getBinaryStream methods can be used to store and retrieve binary data using Java InputStreams. If we have a "simple" object Employees with the following interface:
public class Employee implements java.io.Serializable
public int getID(); //Gets the Employee ID
public void setID(int ID); //Sets the Employee ID
public String getName(); //Gets the Employee Name
public void setName(String name); //Sets Employee Name
public String getManagerName(); //Gets the Manager Name
public void setManagerName(); //Sets the Manager Name
...and we have a file that we wish to read at C:\Employees\Java Duke\report.txt, we can instantiate an Employee object, set its state with the mutator methods, and store it into the database in the Employee_Data column as well as storing the file in the Manager_Report column:
// Already performed usual setup
// (Driver.establishSession, and so forth)
// and instantiated an Employee object
// named employeeObject.
employeeObject.setName("Java Duke");
employeeObject.setID(123456789);
employeeObject.setManagerName("Big Boss");
FileInputStream managerReport = null;
try
{
managerReport = new FileInputStream(C:\Employees\Java Duke\report.txt);
}
catch(IOException ioe)
{
//Handle the exception.
}
//Set the column values for the row,
// assuming that a RowSet object
//(rowset) has already been created.
Row employeeRow = rowset.createRow();
//Set the ID column of the database.
employeeRow.setInt("ID", employeeObject.getID());
//Set the Employee object into the row.
try
{
employeeRow.setObject("Employee_Data", employeeObject);
}
catch(PsqlIOException pioe)
{
//Handle the exception.
}
//Set the manager's report into the row.
employeeRow.setBinaryStream("Manager_Report", managerReport);
//Insert the row.
rowset.insertRow(employeeRow);
//Now we can retrieve this row from the database
RowSetMetaData rsmd = rowset.getRowSetMetaData();
ColumnDef cdef = rsmd.getColumnDef("ID");
rsmd.addFirstTerm(cdef, Const.BTR_EQ, "123456789");
Row rowRetrieved = rowset.getNext();
//After the row is retrieved, we can
// perform the getObject and
// getBinaryStream methods on the row in
// order to retrieve the desired data.
try
{
Employee employeeRetrieved =
(Employee)rowRetrieved.getObject("Employee_Data");
}
catch(PsqlException pe) //This method throws both
// PsqlIOException
{ //and PsqlClassNotFoundException
//Handle the exception.
}
InputStream reportRetrieved =
rowRetrieved.getBinaryStream("Manager_Report");
// These objects have now been reconstituted.
// You can invoke the methods that have been
// defined for either the object itself or
// its parents as you normally would.
String managerName = employeeRetrieved.getManagerName();
// You probably wouldn't normally want
// to process the entire file.
// in one chunk, but you could
// if you have the resources.
byte file[] = new byte[reportRetrieved.available()];
reportRetrieved.read(file);
For more information, see Binary Large Object Support.
Java Data Type Issues
This topic contains information that may be of use to the Zen Java programmer.
Binary Large Object Support
Support has been added to the Java Class Library to handle Binary Large Objects or BLOBs. BLOBs represent large (up to 4 GB) binary data, and are represented as LONGVARBINARY data types in the Zen engine. The Java Class Library supports these data types through the following methods, which are found in the PSQL.database.Row class:
public void setObject(int columnNumber, Serializable object),
public void setObject(String columnName, Serializable object),
public Serializable getObject(int columnNumber),
public Serializable getObject(String columnName),
public InputStream getBinaryStream(int columnNumber),
public InputStream getBinaryStream(String columnName),
public void setBinaryStream(int columnNumber, InputStream inStream),
public void setBinaryStream(String columnName, InputStream inStream)
where columnNumber = the zero based sequence number of a column in the row buffer. columnName = the name of a column in the row buffer. object = a serializable Java object to store into the database. inStream = a Java InputStream object used to stream bytes into the database.
The methods above can be split into two categories: those that operate on Serialized Java objects and those that operate on Java InputStream objects. Each of these categories will be discussed further in the following sections. In the following sections, examples will be assuming that a table named Employees has been created with the following schema:
Note: Employee_Data and Manager_Report have the "not null" specification in their definitions because the Zen Java Class Library does not yet support the true null feature found in Pervasive.SQL 2000 and later versions.
table Employees (SS_Num ubigint primary key,
Employee_Data longvarbinary not null,
Manager_Report longvarbinary not null)
Employee_Data longvarbinary not null,
Manager_Report longvarbinary not null)
Data inserted into a "one-byte integer column" with the SQL Interface cannot be retrieved with the Java Interface
The Zen database engine interprets one-byte integers as having possible values from 0 to 255. Java interprets its byte type as signed quantities with possible values from -128 to 127.
Because of this difference in interpretation, your code must perform the procedure described here so that data is not misinterpreted.
To convert single-byte integers between Java’s interpretation and that of the Zen Database engine
int theOneByteInt = 0;
PSQL.database.Row row = _rowset.getNext();
theOneByteInt = row.getByte("OneByte") & 0x00FF;
listCourses.add(theOneByteInt + " ");
Note: All Java data types are signed.
For more information on Java data types and other language information, please see docs.oracle.com/javase/tutorial.
Sample Database Files
You can use the sample database files provided with the SDK to write Java applications. If you damage the database files because of faulty programming, you can restore them from a backup directory installed with the SDK.
To restore the sample database files
1. Before restoring, close any programs that have the database files open, such as the sample application or your development environment.
2. Assuming you installed to the default location of file_path\Zen\SDK, open the following folder:
file_path\zen\sdk\jcl\samples\pvideo\pvideodb\dbbackup
For default locations of Zen files, see Where are the files installed? in Getting Started with Zen.
3. Copy the files located in that directory to the next higher level folder, which in the case of step 1 is:
file_path\zen\sdk\jcl\samples\pvideo\pvideodb\
Additional Java Samples
There are additional samples included with the Java API. One sample demonstrates joining two tables provided in the SDK package. Another is a simple connection to the Demodata database. The final one demonstrates object serialization.
These samples are located in the following directories, (assuming you installed to the default location):
file_path\zen\sdk\jcl\samples\join
file_path\zen\sdk\jcl\samples\helloworld\
file_path\zen\sdk\jcl\samples\serialization
For default locations of Zen files, see Where are the files installed? in Getting Started with Zen. For additional Zen Java information, see the Actian website.
Last modified date: 10/31/2023