SSO Configuration
This document provides step-by-step instructions on how to configure Single Sign-On (SSO) on Actian Data Observability. Follow the steps below to set up SSO seamlessly.
Step 1: Navigate to SSO Settings
- Log in to the Actian Data Observability.
- Go to Administration.
- Click on Single Sign-On (SSO) Settings.
Step 2: Configure SSO Details
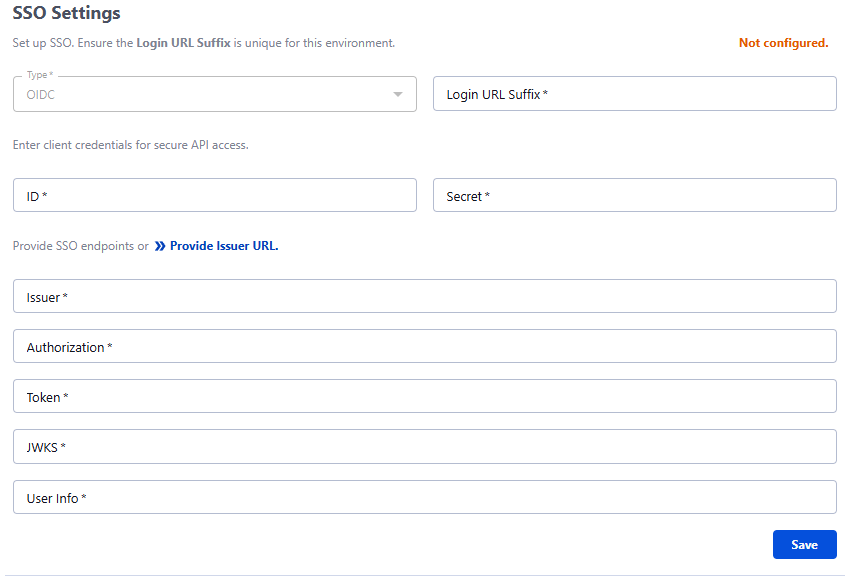
- Enter a unique Login URL Suffix
- For example, if company name is ACME corporation and the environment is stage project instance, then you can use a unique name like acme-stage. And hence the Login URL Suffix will be:
acme-stage, resulting in a login URL similar to:https://data-observability.actian.com/login/acme-stage)
- For example, if company name is ACME corporation and the environment is stage project instance, then you can use a unique name like acme-stage. And hence the Login URL Suffix will be:
- Provide client credentials:
- Client ID: Enter the ID provided by your IdP.
- Client Secret: Enter the secret key provided by your IdP.
- Provide SSO endpoints or click Provide Issuer URL:
- You can enter the below details manually:
- Issuer: Enter the Issuer URL from your IdP.
- Authorization: Enter the Authorization endpoint.
- Token: Enter the Token endpoint.
- JWKS: Enter the JWKS (JSON Web Key Set) URL.
- User Info: Enter the User Info endpoint.
- OR Click on Provide Issuer URL to open a modal dialog.
- Enter the Issuer URL from your IdP and click Retrieve Endpoints.

- Enter the Issuer URL from your IdP and click Retrieve Endpoints.
- You can enter the below details manually:
- Click Save to store the configuration.
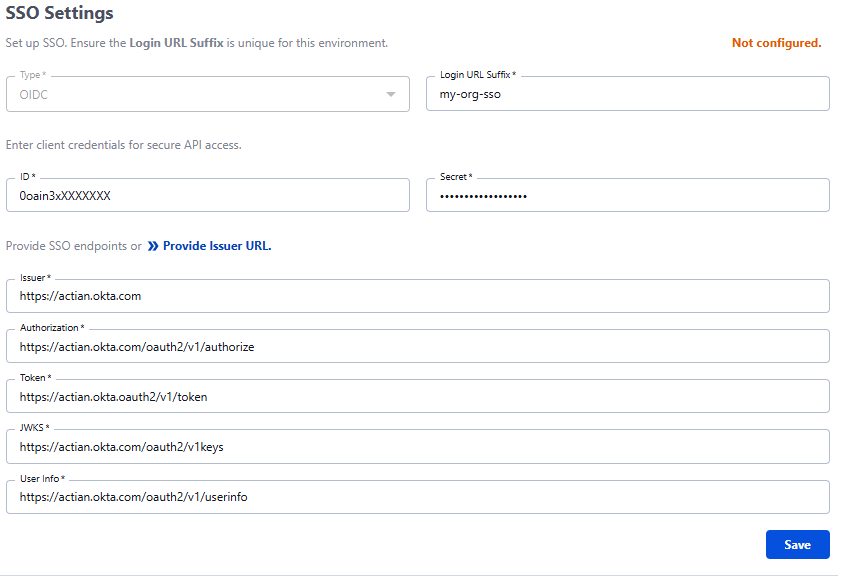
- You can use the toggle button to Enable/Disable the settings after saving. You can also update or delete the setting at anytime.
Step 3: SSO Testing and Verification
- Navigate to the login page
- Example: https://data-observability.actian.com/login/my-org-sso
- Click on Sign in with IDP.
- You will be redirected to Issuer URL. Enter the required details and click Sign In.
If authentication is successful, you should be redirected to the Actian Data Observability dashboard.